ENGLISH CONTENTS VIDEO CASSETTE RECORDER SAFETY FIRST 2 Safety Precautions ...................... 2 INSTALLING YOUR NEW RECORDER 3 HR-J448EE HR-J249EE HR-J248EE HR-J245EE Basic Connections ..................... 3 INITIAL SETTINGS 4 Auto Set Up ............................... 4 Video Channel Set ..................... 5 Select Language ......................... 6 Select Television System ............. 7 Clock Set ................................... 8 On-Screen Displays ...................
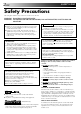
EN SAFETY FIRST Safety Precautions The rating plate and the safety caution are on the rear of the unit. WARNING: DANGEROUS VOLTAGE INSIDE WARNING: TO PREVENT FIRE OR SHOCK HAZARD, DO NOT EXPOSE THIS UNIT TO RAIN OR MOISTURE. CAUTION n When you are not using the recorder for a long period of time, it is recommended that you disconnect the power cord from the mains outlet. n Dangerous voltage inside. Refer internal servicing to qualified service personnel.
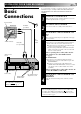
INSTALLING YOUR NEW RECORDER 1 2 Aerial terminal RF Cable (provided) AV-IN terminals AV Cable (not provided) 3 It's essential that your video recorder be properly connected. Follow these steps carefully. THESE STEPS MUST BE COMPLETED BEFORE ANY VIDEO OPERATION CAN BE PERFORMED. Basic Connections Back of TV EN TV Aerial Cable 3 CHECK CONTENTS Make sure the package contains all of the accessories listed in “Specifications” (Z pg. 41).
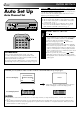
EN INITIAL SETTINGS When the button on the recorder/remote control is pressed for the first time to power on the recorder after you plug the mains power cord into a mains outlet, the Auto Set Up function sets the tuner channels automatically. You can refer to the front display panel and/or the on-screen display to perform this procedure. Auto Set Up Auto Channel Set 2 3 q 5/8 6 Before starting, make sure of the following: ● The TV aerial cable should be connected to the recorder.
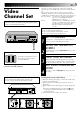
EN Video Channel Set Video Channel (RF Output Channel) is the channel on which your TV receives picture and sound signals from the video recorder through the RF cable. 5 The video recorder is designed to send picture and sound signals via the connected RF cable to your TV on UHF channel 36.
EN INITIAL SETTINGS (cont.) Select Language 1 Turn on the TV and select the VIDEO channel (or AV mode). 1 2 3 3 4 5 6 7 8 9 2 TURN ON THE RECORDER Press . ACCESS MAIN MENU SCREEN Press MENU twice. ACCESS INITIAL SET SCREEN Press PUSH JOG %fi to place the pointer next to "НАЧАЛЬНАЯ УСТАНОВКА (INITIAL SET)", then press OK.
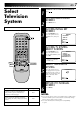
EN Select Television System 1 Turn on the TV and select the VIDEO channel (or AV mode). 2 3 1 2 7 8 9 0 2 ¶ 7 4 1 MENU 4 ¡ ACCESS MAIN MENU SCREEN Press MENU twice. ACCESS INITIAL SET SCREEN Press PUSH JOG %fi to place the pointer next to "INITIAL SET", then press OK. MAIN MENU FUNCTION SET TUNER SET ¢ 3 PUSH JOG 5 Major Countries Austria, Denmark, Finland,Holland, Italy, Norway, Spain, Switzerland, Sweden, Germany, Egypt China, Mongolia, Rumania, Bulgaria, Czech Rep.
EN INITIAL SETTINGS (cont.) Clock Set Turn on the TV and select the VIDEO channel (or AV mode). 1 2 2 3 4 5 6 3 DATE+/– 7 STOP+/– 1 8 9 0 TURN THE RECORDER ON Press . ACCESS MAIN MENU SCREEN Press MENU twice. ACCESS INITIAL SET SCREEN Press PUSH JOG %fi to place the pointer next to "INITIAL SET", then press OK.
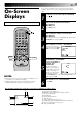
EN You can choose whether or not to have various operational indicators appear on screen, by setting this function "ON" or "OFF". On-Screen Displays 1 Turn on the TV and select the VIDEO channel (or AV mode). 2 1 2 3 4 5 6 7 8 9 3 4 0 2 1 3 ¶ 7 ¡ TURN ON THE RECORDER Press . ACCESS MAIN MENU SCREEN Press MENU twice. ACCESS FUNCTION SET SCREEN Place the pointer next to "FUNCTION SET" by pressing PUSH JOG %fi, then press OK. ACCESS O.S.D. SCREEN Place the pointer next to "O.S.D.
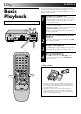
EN PLAYBACK The easiest, most basic operation possible with your video recorder is tape playback. Already-recorded signals on a video tape are read by your video recorder and displayed on your TV just like a TV programme. Basic Playback Turn on the TV and select the VIDEO channel (or AV mode).
EN Take advantage of special functions possible with the recorder’s controls or the remote control. Playback Features FF High-Speed Search 1 PL AY TV PR O G REW 5/8 To resume normal playback, press PLAY. Still Picture/Frame-By-Frame Playback 1 0 2 TV PROG 3 ¶ 7 FF 8 4 PAUSE ¢ 2 Press PAUSE. If there is vertical jitter, use the TV PROG buttons to correct the picture. ACTIVATE FRAME-BY-FRAME PLAYBACK Press PAUSE. OR Press PUSH JOG or .
EN PLAYBACK (cont.) Manual Tracking Your video recorder is equipped with automatic tracking control. During playback, you can override this and adjust the tracking manually by pressing the TV PROG buttons. 1 2 3 4 5 6 7 8 9 REVIEW C. RESET 0 2 PL TV PROG AY 1 3 ¶ 7 8 4 1 3 C.MEMORY ¡ FF 1 PAUSE ¢ STOP REW PUSH JOG 2 3 OVERRIDE AUTOMATIC TRACKING Press the recorder's TV PROG + and – buttons simultaneously to engage manual tracking.
EN Index Search Next Function Memory Your recorder automatically marks index codes at the beginning of each recording. This function gives you quick access to any one of 9 index codes in either direction. £ 2 NOTE: ACTIVATE INDEX SEARCH fi % Press PUSH JOG or (™ or £) on the remote control. “™ 1” or “£ 1” is displayed on screen and search begins in the corresponding direction.
EN RECORDING TV signals being received by the recorder’s built-in tuner can be recorded onto a video tape. You can “capture” a TV programme using your video recorder. Basic Recording U AY LO PL CO PAUSE ● Turn on the TV and select the VIDEO channel (or AV mode). ● Press VCR on the remote control to select the VCR mode.
EN Record One Programme While Watching Another Recording Features DISPLAY 1 2 5/8 6 O RECORD PR TV 3 4 5 6 7 8 9 Once recording is in progress, all you need to do is to set the channel controls on the TV for the station you wish to view. ● The programme selected with the TV’s channel controls appears on the TV screen while the one selected with the recorder's TV PROG buttons is recorded on the tape. Elapsed Recording Time Indication You can check the exact time of a recording. 1 C.
EN RECORDING (cont.) B.E.S.T. Picture System Turn on the TV and select the VIDEO channel (or AV mode). 2 5/8 6 RECORD q 3 The B.E.S.T. (Biconditional Equalised Signal Tracking) system checks the condition of the tape in use during recording and playback, and compensates to provide the highest-possible recording and playback pictures. The default setting for both recording and playback is “ON”. Recording 1 2 3 LOAD A CASSETTE Insert a cassette with the record safety tab intact.
EN 17 PLAY NOTES: 2 6 PAUSE 5/8 RECORD q 3 ● With HR-J448EE: The B.E.S.T. system works for both SP and LP (or EP) modes only after a tape has been inserted and the Record mode is first initiated. It does not work during recording. With HR-J249/248/245EE: The B.E.S.T. system works only after a tape has been inserted and the Record mode is first initiated. It does not work during recording. ● In the case of timer recording, the B.E.S.T. system works before recording is initiated.
EN TIMER RECORDING The SHOW VIEW timer programming system eliminates the need to input channel, date, start and stop time data when setting the timer record function. Simply key in the SHOW VIEW number for the TV program you wish to record (found in most TV listings) and the recorder’s timer is automatically programmed. SHOWVIEW Setup [HR-J249EE only] You have to set "Guide Prog.
EN NUMBER 1 2 3 4 5 6 7 8 9 0 19 ACCESS INITIAL SET SCREEN 4 Press PUSH JOG %fi to place the pointer next to "INITIAL SET", then press OK. 5 Press PUSH JOG %fi to place the pointer next to "SHOWVIEW SET-UP", then press OK. ACCESS SHOWVIEW SETUP SCREEN SHOWVIEW SET-UP GUIDE PROG TV PROG 1 –– 2 ● The screen to the right appears. 1 3 ¶ 7 4 1 : GUIDE PROG SET [5/∞] : CHECK [MENU] : EXIT ¡ 8 ¢ MENU PUSH JOG 3 OK 6 START SETTING Press OK. ● The GUIDE PROG.
EN TIMER RECORDING (cont.) Before performing the following steps: ● Insert a cassette with the safety tab in place. The recorder will come on automatically. ● Turn on the TV and select the VIDEO channel (or AV mode). ● Select the appropriate colour system by pressing the COLOUR SYSTEM button. (Z pg. 28) SHOWVIEW Timer Programming [HR-J249EE 1 only] ACCESS TIMER PROGRAMMING SCREEN Press PROG.
EN 21 NOTES: NUMBER 1 2 3 4 5 6 7 8 9 ● You can programme this recorder to timer-record as many as 8 programmes. If you try to programme the recorder to record a ninth, "PROGRAM FULL" appears on screen. To record the extra programme, you must first cancel any unnecessary programmes (Z pg. 24, "Check And Cancel Programmes"). ● In case of a power failure after programming, the recorder’s memory backup keeps your selections (if the lithium battery is not exhausted).
EN TIMER RECORDING Regular Timer Programming 1 Remember, the clock must be set before you can programme the timer (Z pg. 8). COLOUR SYSTEM Before performing the following steps: ● Insert a cassette with the safety tab in place. The recorder will come on automatically. ● Turn on the TV and select the VIDEO channel (or AV mode). ● Select the appropriate colour system by pressing the COLOUR SYSTEM button.(Z pg.
EN 2 3 4 5 6 7 8 9 8 D AI LY 1 WEEKLY 0 TIMER 9 2 1 3 ¶ 7 RETURN TO NORMAL SCREEN After confirming all information is correct, press OK and the normal screen appears. ● Repeat steps 1–8 for each additional programme. ENGAGE RECORDER’S TIMER MODE Press TIMER. The recorder turns off automatically. ¡ To Timer-Record Weekly Or Daily Serials . . . . . .
EN TIMER RECORDING (cont.) Auto Timer When the Auto Timer is set to "ON" the timer is automatically engaged when the recorder power is turned off and automatically disengaged when the recorder is powered back on. 1 2 3 4 5 6 7 8 9 CANCEL 0 1 TIMER PROG CHECK 2 TV PROG+/– START+/– 3 ¡ D 1 /– P+ O ACCESS FUNCTION SET SCREEN Press PUSH JOG %fi to place the pointer next to "FUNCTION SET", then press OK.
EN 25 Control Two JVC VCRs "1 2 3 4 5 6 7 8 9 R BE BE R 1 M U N " VCR The remote control is capable of controlling two JVC VCRs independently; one set to respond to your remote control's A code control signals and another set to respond to B code control signals. The remote control is preset to send A code signals because your VCR is initially set to respond to A code signals. You can easily modify your VCR to respond to B code signals.
EN EDITING You can use your video recorder as the source player or the recording deck. Edit To Or From Another 1 Video Recorder 2 1 2 3 4 5 6 7 8 9 3 4 0 NUMBER "0" MAKE CONNECTIONS Connect the player’s AUDIO/VIDEO OUT connector to the recorder’s AUDIO/VIDEO IN connector. SET RECORDING DECK’S INPUT MODE Set to AUX. With this video recorder, press NUMBER Key "0" or TV PROG. "AU" will appear instead of a channel number. START SOURCE PLAYER Engage its Play mode.
EN You can use a camcorder as the source player and your video recorder as the recorder. Edit From A Camcorder 1 2 3 4 5 6 7 8 9 1 2 3 0 NUMBER "0" 2 TV PROG 1 3 ¶ 7 ¡ 8 4 1 27 4 ¢ 3 MAKE CONNECTIONS Connect the camcorder’s AUDIO/VIDEO OUT connectors to the recorder’s front panel AUDIO/VIDEO input connectors. For HR-J448EE Owners: ● When a Master Edit Control-equipped JVC camcorder is used, the camcorder is capable of controlling the recorder.
EN INFORMATION ON MULTI-SYSTEM COMPATIBILITY Setting Of The Colour System Select Buttons Use the COLOUR SYSTEM button on the recorder's front panel to select the colour system. Pressing this button changes the mode as illustrated on the left. The On-Screen display will show which mode is selected. Mode COLOUR SYSTEM AUTO Mode Display Description NTSC 3.58 AUTO (Colour Signal) Usually set to this mode.
EN 29 Playback This recorder can play back all 3 types of recorded tape. Recorded tape PAL Your recorder Playback circuit Multi-system receiver PAL MESECAM MESECAM Built-in RFconverter K, I, G NTSC[PAL NTSC PAL (B/G, D/K, I) RF OUT NTSC 3.58 MHz Multi-system monitor Manual switching Manual switching NTSC 4.43 MHz VIDEO OUT AUDIO OUT PAL SECAM NTSC 3.58 NTSC 4.
EN TUNER SET Turn on the TV and select the VIDEO channel (or AV mode). 3 2 3 4 5 6 7 8 9 TV PROG ¶ 7 ¡ 4 SELECT AUTO CH SET MODE Press PUSH JOG% fi to place the pointer next to "AUTO CH SET", then press OK. 8 4 1 MENU 3 ¢ PUSH JOG SELECT TV SYSTEM Press PUSH JOG% fi to place the pointer next to the appropriate TV system, then press OK. ● Auto Channel Set will start.
EN Manual Channel Set Store channels that were not stored during Auto Set Up (Z pg. 4) or Auto Channel Set (Z pg. 30). 1 2 3 ACCESS TUNER SET SCREEN 6 Perform steps 1 – 3 of "Auto Channel Set" on page 30. ACCESS MANUAL CH SET SCREEN Press PUSH JOG %fi to place the pointer next to "MANUAL CH SET", then press OK. SELECT BAND Press PUSH JOG %fi to place the pointer next to the band of your choice, then press OK to initiate Manual Channel Set.
EN TUNER SET (cont.) Delete A Channel Example:To swap CH03 and CH09. Perform steps 1 – 3 of "Auto Channel Set" on page 30. ACCESS CHANNEL LIST Press PUSH JOG %fi to place the pointer next to "CH EDIT", then press OK. SELECT CHANNEL Press PUSH JOG %fi to until the channel you want to delete begins blinking.
EN Fine-Tuning Channels 1 2 3 Perform steps 1 – 3 of "Auto Channel Set" on page 30. ACCESS CHANNEL LIST Press PUSH JOG %fi to place the pointer next to "CH EDIT", then press OK. SELECT CHANNEL TO FINE-TUNE ● The "FRQ" number for that channel starts blinking. 4 5 TV System Selection – When you see the picture but hear no audio ACCESS TUNER SET SCREEN Press PUSH JOG %fi until the channel you want to tune begins blinking, then press OK twice.
EN REMOTE CONTROL Multi-Brand Remote Control R /V C 2 3 4 5 6 7 8 9 2 TV PROG+/– 3 ¶ 7 STOP1 ¡ 8 4 PUSH JOG Refer to the chart below. While holding down TV, enter your TV’s brand code using the NUMBER keys, then press STOP. ● You don’t have to repeat this step until you replace your remote control’s batteries. TRY OPERATING TV Press on the remote to turn the TV off. If it goes off, try other operations.
QUESTIONS AND ANSWERS EN 35 PLAYBACK RECORDING Q. What happens if the end of the tape is reached during playback or search? A. The tape is automatically rewound to the beginning. Q. When I pause and then resume a recording, the end of the recording before the pause is overlapped by the beginning of the continuation of recording. Why does this happen? A. This is normal. It reduces distortion at the pause and resume points.
EN TROUBLESHOOTING Before requesting service for a problem, use this chart and see if you can repair the trouble yourself. Small problems are often easily corrected, and this can save you the trouble of sending your video recorder off for repair. POWER SYMPTOM POSSIBLE CAUSE CORRECTIVE ACTION 1. No power is applied to the recorder. ● The mains power cord is disconnected. Connect the mains power cord. 2. The clock is functioning properly, but the recorder cannot be powered.
EN 37 RECORDING SYMPTOM POSSIBLE CAUSE CORRECTIVE ACTION 1. Recording cannot be started. ● There is no cassette loaded, or the cassette loaded has had its Record Safety tab removed. Insert a cassette, or using adhesive tape, reseal the slot where the tab was removed. 2. TV broadcasts cannot be recorded. ● “AU” has been selected as the input mode. Set to the desired channel. 3. Tape-to-tape editing is not possible. ● The source (another video recorder, camcorder) has not been properly connected.
EN TROUBLESHOOTING (cont.) OTHER PROBLEMS SYMPTOM POSSIBLE CAUSE CORRECTIVE ACTION 1. Whistling or howling is heard from the TV during camcorder recording. ● The camcorder’s microphone is too close to the TV. ● The TV’s volume is too high. Position the camcorder so its microphone is away from the TV. Turn the TV’s volume down. 2. When scanning channels, some of them are skipped over. ● Those channels have been designated to be skipped. If you need the skipped channels, restore them (Z pg. 31).
INDEX EN FRONT VIEW [J448/249/248EE] 39 (J448EE shown) 1 2 3 4 5 2 3 STANDBY/ON DISPLAY VIDEO COLOUR SYSTEM AUDIO q TV PROG AUTO SP/LPP TIMER REVIEW M 5/8 6 SPLPEP 6 78 9 ! 0 @ #$ % ^ [J245EE] 1 2 3 4 5 2 STANDBY/ON VIDEO AUDIO + COUNTER MEMORY TV PROG REVIEW M SPLPEP 6 1 2 3 4 5 6 7 8 8 STANDBY/ON Button Z pg. 4 Cassette Loading Slot Rewind [REW] Button Z pg. 10 PLAY Button Z pg. 10 Fast Forward [FF] Button Z pg. 10 VIDEO/AUDIO Input Connectors Z pg.
EN INDEX (cont.) REAR VIEW 2 1 3 456 PAUSE AUDIO IN ANT. IN OUT 40 32 VIDEO RF OUT 7 1 2 3 4 Mains Power Cord Z pg. 3 Lithium Battery Compartment Z pg. 5 VIDEO/AUDIO Input Connectors Z pg. 26, 27 Remote PAUSE Connector Z pg. 27 (HR-J448EE only) 5 6 7 8 8 VIDEO/AUDIO Output Connectors Z pg. 3, 26 ANT. IN Connector Z pg. 3 RF OUT Connector Z pg. 3 RF Output Channel Adjustment Screw Z pg. 5 DISPLAY PANEL 1 2 3 4 5 6 REVIEW M SPLPEP 7 8 1 B.E.S.T. Picture System Display Z pg.
EN 1 2 3 4 5 6 7 8 VCR 0 ! @ # 2 4 5/ADD TIME 6 7 8/DAILY 9/WEEKLY CANCEL /C.RESET 0/AUX 4 TIMER PROG CHECK 3 EXPRESS PROGRAMMING START 1 STOP REW ¶ REC PROG 1 /MENU 3PLAY 7 STOP 4 TV PROG DATE FF 8 PAUSE TV VOL ¢ i 3 OK C.MEMORY ¡ TV VOL PUSH JOG o 1 2 3 4 5 6 7 8 9 0 ! @ # $ % ^ & * ( ) % q w e r t y u i TV Button Z pg. 34 VCR Button Z pg. 14 NUMBER Keys Z pg. 14 ADD TIME Button Z pg. 20 DAILY Button Z pg. 23 AUX Button Z pg. 26 PROG CHECK Button Z pg.
EN SPECIFICATIONS GENERAL Power requirement Rating : Operating : Power consumption : Temperature Operating : Storage : Operating position : Dimensions (WxHxD) J448/249/248EE : J245EE : Weight : Format : Maximum recording time (SP) : AC 110 – 240 V`, 50/60 Hz AC 90 – 260 V`, 50/60 Hz 18W 5°C to 40°C –20°C to 60°C Horizontal only 400 x 94 x 273 mm 400 x 94 x 276 mm 3.3 kg VHS standard 240 min. with E-240 video cassette (PAL/MESECAM) : 160 min.
MEMO EN 43
EN HR-J448/249/248/245EE VICTOR COMPANY OF JAPAN, LIMITED COPYRIGHT © 1997 VICTOR COMPANY OF JAPAN, LTD.