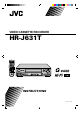
VIDEO CASSETTE RECORDER HR-J631T POWER TV/VIDEO DISPLAY ENTER OSD 1 2 3 4 5 6 DAILY(M-F) WEEKLY 7 8 C.RESET/CH SKIP AUX CANCEL 0 SKIP SEARCH C.MEMORY 9 TIMER OK MENU TV ADD TV VOL. VCR CH REW REW PLAY FF REC STOP PAUSE OK FF 6 MENU POWER q PUSH JOG A B VIDEO (MONO) L–AUDIO–R ∞ CH 5 A. DUB C.MEMORY ITR ST R E C SAP PLAY TIMER VIDEO SP AM M EP PM H M S CANCEL/ C.
Dear Customer, Thank you for purchasing the JVC VHS video cassette recorder. Before use, please read the safety information and precautions contained in the following pages to ensure safe use of your new VCR. CAUTIONS CAUTION RISK OF ELECTRIC SHOCK DO NOT OPEN CAUTION: TO REDUCE THE RISK OF ELECTRIC SHOCK. DO NOT REMOVE COVER (OR BACK). NO USER-SERVICEABLE PARTS INSIDE. REFER SERVICING TO QUALIFIED SERVICE PERSONNEL.
CONTENTS I NSTALLING YOUR NEW VCR 4 Basic Connections .................................. 4 I NITIAL SETTINGS 5 Clock ..................................................... 5 Tuner ..................................................... 6 Set Receivable Channels .................................. 6 Add Or Delete A Channel ................................ 8 G-Code Setup ......................................... 9 S T IMER RECORDING 27 Instant Timer Recording (ITR) ...............
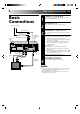
INSTALLING YOUR NEW VCR Basic Connections 1 2 Antenna or Cable Coaxial Cable Flat Feeder Matching Transformer AC Power Cord Back of VCR Video Cable (not supplied) AC Outlet ANTENNAIN (Antenna or Cable input) 3 RF OUT Audio Cable (not supplied) RF Cable (supplied) 75 ohm terminal TV 4 CHECK CONTENTS Make sure the package contains all of the accessories listed in “SPECIFICATIONS” (Z pg. 43). SITUATE VCR Place the VCR on a stable, horizontal surface.
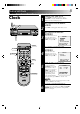
INITIAL SETTINGS 1 M EN U OK POWER Clock 6 q 2 CH5∞ 3 TURN ON THE VCR Press POWER. If watching channel 13, press TV/VIDEO to select the VIDEO mode. VIDEO is displayed on the front display panel. ACCESS ON-SCREEN MENU Press MENU to bring up the Main Menu screen. ACCESS INITIAL SET SCREEN At the Main Menu screen, place the arrow next to “INITIAL SET” by pressing CH5∞, then press OK. MAIN MENU PROGRAM SET FUNCTION SET TUNER SET = INITIAL SET B.E.S.T.
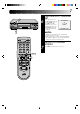
INITIAL SETTINGS (cont.) Set Receivable Channels 1 M EN U OK POWER Tuner 6 2 CH q POWER TV/VIDEO 2 3 4 5 6 7 8 9 Press POWER. If watching on channel 13, press TV/ VIDEO to select the VIDEO mode. VIDEO is displayed on the front display panel. ACCESS MAIN MENU SCREEN Press MENU as many times as necessary . ACCESS TUNER SET SCREEN Place the arrow next to "TUNER SET" by pressing CH5∞, then press OK. ACCESS BAND SCREEN Place the arrow next to "BAND" by pressing CH5∞, then press OK.
M EN U OK 7 6 6 CH q PERFORM AUTO CHANNEL SET Place the arrow next to "AUTO CHANNEL SET" by pressing CH5∞, then press OK. Receivable channels in your area are automatically assigned to the CH5∞ buttons, and non-receivable channels are skipped. AUTO CHANNEL SET CH (TV) 2 ADD SCANNING ... PRESS (MENU) TO END NOTES: ● At the end of Auto Channel Set, “SCAN COMPLETED” appears on screen. ● If the scan was unsuccessful, “SCAN COMPLETED– NO SIGNAL” appears on screen.
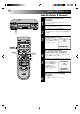
INITIAL SETTINGS (cont.) M EN U OK Add Or Delete A Channel 6 q 1 CH 2 3 2 3 4 5 6 7 8 9 O 0 CH.SKIP D MENU AD Access by performing steps 2 and 3 of the Tuner procedure on page 6. ● To add a channel, go to step 2. ● To delete a channel, skip to step 4. ACCESS AFC SCREEN Place the arrow next to "AFC" by pressing CH5∞, then press OK. MAKE SELECTION Place the arrow next to "SPCL" by pressing CH5∞, then press MENU to return to the Tuner Set screen.
Depending on the TV or cable stations that you receive and the channel numbers that they are received on in your area, you may have to make certain changes in your VCR’s “Guide Channel Set” menu to get proper results. Please read the following information carefully to find out which tasks you need to perform. MENU POWER G-Code Setup The G-Code timer programming system eliminates the need to input channel, date, start and stop time data when setting the timer record function.
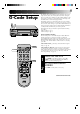
OK INITIAL SETTINGS (cont.) 6 3 ACCESS INITIAL SET SCREEN Press CH5∞ to place the arrow next to “INITIAL SET”, then press OK. q MAIN MENU PROGRAM SET FUNCTION SET TUNER SET =INITIAL SET B.E.S.T. PICTURE SYSTEM CH PRESS (5,∞), THEN (OK) PRESS (MENU) TO END 4 3 4 5 6 7 8 9 Press CH5∞ to place the arrow next to “G-CODE SET-UP”, then press OK.
M EN U OK 11 6 7 CH q 2 3 4 5 6 7 8 9 Press CH5∞ or the appropriate NUMBER keys to input the number of the channel on which the Guide Channel’s broadcasts are received. Then press OK. ● If there is more than one mismatch, repeat steps 6 and 7 for each instance. RETURN TO G-CODE SETUP SCREEN Press MENU. CHECK INPUT DATA Press CH5∞ to place the arrow next to “GUIDE CHANNEL MAP”, then press OK. ● The Guide Channel and VCR channel numbers you input appear on the screen in ascending order.
SIMPLE PLAYBACK AND RECORDING Simple Playback 1 SHUTTLE 2 PLAY ST O P/ EJ EC T q 3 4 2 3 4 5 6 7 8 9 Make sure the window side is up, the rear label side is facing you and the arrow on the front of the cassette is pointing towards the VCR. Don’t apply too much pressure when inserting. ● The VCR’s power comes on automatically. ● The counter is automatically reset to "0H 00M 00S". ● If the cassette's record safety tab has been removed, playback begins automatically.
Simple Recording 1 PAUSE 2 6 q PLAY ST O P/ CH EJ EC T REC 3 4 P /E SP ENTER NUMBER 1 2 3 4 5 6 7 8 9 Make sure the record safety tab is intact. If not, cover the hole with adhesive tape before inserting the cassette. SELECT RECORDING CHANNEL Press CH5∞. Or press the appropriate NUMBER keys, then press ENTER. (The channel changes after a few seconds whether you press ENTER or not.) SET TAPE SPEED Press SP/EP to set the recording speed.
PLAYBACK AND RECORDING FEATURES Take advantage of special functions possible with the recorder’s controls or the remote control. Playback NOTE: Refer to the SHUTTLE ring illustration below as you read the following procedures. v e rs e Re low s Slow motio n y CH search PLAY JO G q sea 6 Pl a ard Forw rch Reverse la e rs y Re p ve SHUTTLE PAUSE Still Still Picture/Frame-ByFrame Playback 1 1 2 3 4 5 6 7 8 9 2 0 PAUSE DURING PLAYBACK Press PAUSE.
SHUTTLE Variable-Speed Search/ Reverse Play 6 1 During playback or still, turn the SHUTTLE ring to the right for forward variable-speed search, or to the left for reverse variable-speed search (refer to the illustration on page 14). OR PLAY q ACTIVATE VARIABLE-SPEED SEARCH During playback, press PUSH JOG ™ or £. ● To increase the speed in the forward direction, press £. ● To decrease the speed in the forward direction, press ™.
PLAYBACK AND RECORDING FEATURES (cont.) Manual Tracking Once playback begins, the VCR’s automatic tracking function is engaged. If noise appears in the picture, you can override this and make the adjustment manually. 6 q CH 1 2 1 2 3 4 5 6 7 8 9 3 0 CH ENGAGE MANUAL TRACKING MODE During playback, press the CH5∞ buttons on the VCR's front panel simultaneously to cancel the automatic tracking mode and enable manual tracking adjust.
Your VCR can record two soundtracks simultaneously (Normal and Hi-Fi) and play back the selected one, or both together. Or, when viewing a pre-recorded tape that contains both a main and a sub audio track, you can choose to listen to either one by selecting either "L" or "R" in step 4. M EN U OK Select The Soundtrack 6 q CH 1 2 2 3 4 5 6 7 8 9 3 O K 1 0 ACCESS MAIN MENU SCREEN Press MENU during playback or when VCR is in stop mode. ● If the G-CODE screen appears press MENU again.
PLAYBACK AND RECORDING FEATURES (cont.) This function, switchable between ON and OFF, determines whether or not operational indicators will appear on screen. M EN U OK Superimpose 6 q CH 1 2 OSD 2 3 4 5 6 7 8 9 3 Press MENU as many times as necessary. ACCESS FUNCTION SET SCREEN Place the arrow next to "FUNCTION SET" by pressing CH5∞, then press OK. ACCESS SUPERIMPOSE SCREEN Place the arrow next to "SUPERIMPOSE" by pressing CH5∞, then press OK.
Skip Search 1 6 Press SKIP SEARCH 1 to 4 times during playback. Each press initiates a 30-second period of fast- motion playback. Normal playback resumes automatically. NOTE: To return to normal playback during a Skip Search, press PLAY. PLAY ST O P q SKIP OVER UNWANTED SECTIONS Repeat Playback VIDEO PLAY SP H M S 1 2 3 4 5 6 7 8 9 1 2 START REPEAT Press and hold PLAY (until "PLAY" blinks on the front display panel) during playback, then release.
PLAYBACK AND RECORDING FEATURES (cont.) Instant ReView At the press of a button, you can power up your VCR, rewind the tape and begin viewing the most recent timer-recorded program. 1 6 STOP DISPLAY C. C. M RE SE EM T O RY q REVIEW ACTIVATE INSTANT REVIEW After ensuring that the VCR is off and the Timer mode is disengaged, press REVIEW. ● The power comes on and the VCR searches for the index code indicating the start of the last timer-recorded program, then begins playback automatically.
SHUTTLE MENU 6 q Tape Position Indicator The Tape position indicator appears on screen when, from the stop mode, you press FF, REW or perform an Index Search or Instant ReView. The position of " " in relation to "B" (Beginning) or "E" (End) shows you where you are on the tape. B + + COUNT + E 0:33:27 PLAY NOTE: SUPERIMPOSE must be set to ON, or the indicator will not appear (Z pg. 18). Next-Function Memory POWER RY O EM M C.
PLAYBACK AND RECORDING FEATURES (cont.) Preparation 1 M EN U OK POWER B.E.S.T. Picture System Your VCR is equipped with the B.E.S.T. (Biconditional Equalized Signal Tracking) feature, which checks the condition of the tape in use during recording and playback, and compensates to provide the highest-possible recording and playback pictures. *The default setting for both recording and playback is "ON". 6 q CH 2 POWER 3 TURN ON THE VCR Press POWER.
PAUSE Recording Perform steps 1 – 3 on page 13 ("Simple Recording") before continuing. 6 1 q PLAY REC START RECORDING Press and hold REC and press PLAY on the remote control, or press REC on the VCR's front panel. ● The VCR takes about 7 seconds to assess the quality of the tape in use, then recording begins with the picture level optimized. NOTES: 1 2 3 4 5 6 7 8 9 0 AY PL REC PAUSE DURING B.E.S.T. START END + + + B.E.S.T.PICTURE SYSTEM B.E.S.T. COMPLETE ● B.E.S.T.
PLAYBACK AND RECORDING FEATURES (cont.) Playback The VCR assesses the quality of the tape once you initiate playback. Before beginning, perform steps 1 and 2 on page 12. 6 q PLAY 1 START PLAYBACK Press PLAY. ● The VCR adjusts the playback picture quality based on the quality of the tape in use. NOTES: 1 2 3 4 5 6 7 8 9 PLAY 0 B.E.S.T.
Record One Program While Watching Another Recording 1 6 q 2 OSD TV/VIDEO C.RESET 1 2 3 4 5 6 7 8 9 ENGAGE TV MODE During recording... ● If using the RF connection (Z pg. 4), press TV/VIDEO. The VCR's VIDEO indicator goes out and the TV broadcast being recorded disappears. ● If using the AV connection (Z pg. 4), change the TV's input mode from AV to TV. SELECT CHANNEL FOR VIEWING Use the TV’s channel selector to set the channel you want to watch.
PLAYBACK AND RECORDING FEATURES (cont.) M EN U OK Stereo And SAP (Second Audio Program) 6 q Your VCR’s built-in MTS decoder enables reception of Multichannel TV Sound broadcasts. ● The ST indicator on the front display panel lights during stereo broadcast reception, and SAP lights during SAP program reception. ● Both indicators light when a stereo program is accompanied by SAP audio. CH To Record Stereo Programs . . . . . . simply follow the basic recording procedure.
TIMER RECORDING Instant Timer Recording (ITR) 6 REC This easy method lets you record for from 30 minutes to 6 hours (selectable in 30-min. increments), and shuts the VCR off after recording is finished. 1 2 3 q START RECORDING Press REC. ENGAGE ITR MODE Press REC again. ITR blinks and 0:30 appears on the front display panel. SET RECORDING DURATION If you want to record for more than 30 minutes, press REC to extend the time. Each press extends recording time by 30 minutes.
TIMER RECORDING (cont.) G-Code Timer 1 Programming 2 O K Before G-Code Timer programming, see "G-Code Setup" on page 9. 6 q SP /E P 3 TV/VIDEO NUMBER 1 2 3 4 5 6 7 8 9 NUMBER "9" 0 "8 " CANCEL 4 N U M BE R MENU TV/VCR LOAD A CASSETTE Make sure the record safety tab is present. ● The VCR’s power comes on automatically. ● If you’re watching on channel 13, press TV/VIDEO to select the VIDEO mode. VIDEO is displayed on the front display panel.
M EN U OK 29 6 q 6 CH 7 8 NUMBER 1 2 3 4 5 6 7 8 9 K O 0 CHECK/CORRECT INPUT DATA If the data is correct as it is, go to step 7. If not, press OK or PUSH JOG ™£ until the item you want to change begins to blink. Then press the appropriate NUMBER keys or CH5∞ to obtain the desired setting. RETURN TO NORMAL SCREEN Press MENU as many times as necessary. ● Press just once to access the Auto Timer screen (Z pg. 34). ENGAGE TIMER MODE Press TIMER. The VCR turns off automatically.
TIMER RECORDING (cont.) You can directly program the VCR’s timer to record up to 8 shows, as far as a year in advance. Remember, the clock must be set before you can program the timer (Z pg. 5). M EN U OK On-Screen Timer 1 Programming 6 CH q 2 3 LOAD A CASSETTE Make sure the record safety tab is intact. If not, cover the hole with adhesive tape, then load. ● The VCR comes on, and the counter is reset, automatically. ● If watching channel 13, press TV/VIDEO to select the VIDEO mode.
6 M EN U OK 31 6 q CH 7 8 MAKE CORRECTIONS To change any of the settings, press OK or PUSH JOG ™ £ until the item you want to change begins blinking. Then set as in step 5. RETURN TO NORMAL SCREEN Press MENU as many times as necessary. ● Press just once to access the Auto Timer screen (Z pg. 34). ENGAGE TIMER MODE Press TIMER. The VCR turns off automatically.
TIMER RECORDING (cont.) M EN U OK 6 q 1 2 CH POWER 1 2 3 4 5 6 7 8 9 TIMER 0 CANCEL MENU 4 DISENGAGE TIMER Press TIMER, then press POWER. ACCESS MAIN MENU SCREEN Press MENU as many times as necessary. ACCESS PROGRAM SET SCREEN Press CH5∞ to place the arrow next to "PROGRAM SET", then press OK. CHECK PROGRAM INFORMATION Press CH5∞ to check the programs in succession. To Cancel A Program . . . K CH 3 O POWER Check And Cancel Programs 5 6 7 CANCEL A PROGRAM Press CANCEL.
If, when recording in SP mode, there is not enough tape to record the entire program, the VCR automatically switches to EP mode to allow complete recording. This feature is especially handy when recording a program of more than 2 hours in length. M EN U OK Auto SP/EP Timer 6 q For Example . . .
TIMER RECORDING (cont.) When the Auto Timer is set to ON the timer is automatically engaged when the VCR's power is turned off and automatically disengaged when the VCR is powered back on. M EN U OK Auto Timer 6 q CH 1 2 1 2 3 4 5 6 7 8 9 K O 0 3 TIMER ACCESS MAIN MENU SCREEN Press MENU as many times as necessary. ACCESS FUNCTION SET SCREEN Place the arrow next to "FUNCTION SET" by pressing CH5∞, then press OK.
SPECIAL FEATURES TV Multi-Brand Remote Control POWER ENTER TV/VIDEO NUMBER 1 2 3 4 5 6 7 8 9 The VCR's remote control can control several functions on JVC remote control TVs and on the brands of remote control TVs listed below. Some TV brands have more than one code. If the TV will not function with one code, try entering another. 1 CH 0 TV/VCR STOP VOL.
EDITING Edit From A Camcorder Recorder You can use a camcorder as the player and your VCR as the recorder. 1 Your VCR 6 q 2 To rear panel PAUSE connector AUDIO IN Mini-plug cable (not supplied) (JVC camcorder only) 3 VIDEO IN VIDEO OUT Camcorder 4 AUDIO OUT EDIT 5 6 7 Player 2 3 4 5 6 7 8 9 O K 1 NUMBER "0" 0 MENU CH MAKE CONNECTIONS Connect an AV cable (not supplied) between the camcorder’s VIDEO OUT and AUDIO OUT connectors and your VCR’s VIDEO IN and AUDIO IN connectors.
MENU RETURN TO NORMAL SCREEN 8 START PLAYER 9 START RECORDER 10 Press MENU as many times as necessary. 6 q Set the camcorder to its play mode. Set your VCR to its record mode. ● If you are using a Master Edit Control-equipped JVC camcorder, it can put the recorder automatically into Record mode. (Refer to camcorder's instruction manual.
EDITING (cont.) You can use your VCR as the player or the recorder. Edit To Or From Another 1 VCR Player Your VCR VIDEO OUT 2 3 AUDIO OUT MAKE CONNECTIONS Connect an AV cable (not supplied) between the player’s VIDEO OUT and AUDIO OUT connectors and the recorder’s VIDEO IN and AUDIO IN connectors. ● When using your VCR as the recorder and a monaural VCR as the player, connect the player’s AUDIO OUT connector to the AUDIO IN L connector on the recorder.
Audio Dubbing Audio dubbing replaces the normal audio sound of a previously recorded tape with a new soundtrack. Use your VCR as the recorder. PAUSE Normal audio track Video/Hi-Fi audio track B U D A. 6 Audio-dubbed tape PLAY STOP q Audio component (CD player etc.) NOTES: Pre-recorded tape ● When monitoring the sound during Audio Dubbing, the normal soundtrack is automatically selected.
TROUBLESHOOTING Before requesting service for a problem, use this chart and see if you can repair the trouble yourself. Small problems are often easily corrected, and this can save you the trouble of sending your VCR off for repair. POWER SYMPTOM POSSIBLE CAUSE CORRECTIVE ACTION 1. The power won’t come on. ● The power cord is disconnected. Connect the power cord. 2. The clock works, but the VCR’s power won’t come on. ● The TIMER mode is engaged with Auto Timer set to "OFF" (Z pg. 34).
3. Tape-to-tape editing won’t work. ● The VCRs or the camcorder and the VCR have been incorrectly connected. ● The power to one or more of the units has not been turned on. ● The recorder’s input mode has been set incorrectly. Refer to the directions and the illustration under “Edit To Or From Another VCR” (Z pg. 38) or “Edit From A Camcorder” (Z pg. 36) and properly connect the units. Make sure the power to all units is on.
QUESTIONS AND ANSWERS PLAYBACK RECORDING Q. What happens if the end of the tape is reached during playback or search? A. The tape is automatically rewound to the beginning. Q. When I pause and then resume a recording, the end of the recording before the pause is overlapped by the new recording. Why does this happen? A. This is normal. It reduces distortion at the pause and resume points. ○ ○ ○ ○ ○ ○ ○ ○ ○ ○ ○ ○ ○ ○ ○ ○ ○ ○ ○ ○ ○ ○ ○ ○ ○ ○ ○ ○ Q.
SPECIFICATIONS GENERAL Power requirement Power consumption Temperature Operating Storage Operating position Dimensions (W x H x D) : AC 120 V` , 60 Hz : 21 W : 5°C to 40°C (41°F to 104°F) : –20°C to 60°C (–4°F to140°F) : Horizontal only : 400 x 94 x 291 mm (15-3/4" x 3-3/4" x 11-1/2") : 3.7 kg (8.2 lbs) : VHS NTSC standard Weight Format Maximum recording time SP : 210 min. with ST-210 video cassette EP : 630 min.
INDEX FRONT VIEW 1 2 3 5 6 78 4 REW FF 6 MENU OK POWER q VIDEO (MONO) L–AUDIO–R ∞ CH 5 A. DUB C.MEMORY ITR ST R E C SAP PLAY TIMER AM M EP PM VIDEO SP 9 0! @ # $ H M S PAUSE % 1 Power ON/OFF Button (Z pg. 5) 2 OK Button (Z pg. 5) 3 Menu Button (Z pg. 5) 4 Cassette Loading Slot 5 Record [REC] Button (Z pg. 13) 6 Pause Button (Z pg. 13) 7 SHUTTLE Ring (Z pg. 14) 8 JOG Dial (Z pg. 14) 9 Video Input Connector (Z pg. 36) 0 Mono Audio Input Connector (Z pg.
FRONT DISPLAY PANEL 4 3 1 2 ITR TIMER ST R E C SAP PLAY AM M EP PM VIDEO SP H 5 6 78 M 9 1 Instant Timer Recording Indicator (Z pg. 27) 2 Timer Mode Indicator (Z pg. 29) 3 Recording Mode Indicator (Z pg. 13) 4 Video Mode Indicator (Z pg. 5) 5 “Cassette Loaded” Mark 6 Counter Memory Mark (Z pg. 20) 7 Tape Speed Indicators (Z pg. 13) 8 AM/PM Indicators (Z pg. 5) 0 S # PAUSE ! @ 9 Clock Display (Z pg. 5) 0 Channel Display [“AU” for AUX mode] (Z pg. 36) Counter Display (Z pg.
HR-J631T VICTOR COMPANY OF JAPAN, LIMITED COPYRIGHT © 1996 VICTOR COMPANY OF JAPAN, LTD.