DVD PLAYER Hi-Fi VIDEO CASSETTE RECORDER USER’S GUIDE For model: HR-XV1EK DIGITAL VIDEO LPT0716-001A 2A77501B E Cover 1 5/30/02, 9:21 PM
Safety Precautions SAFETY FIRST The rating plate and the safety caution are on the rear of the unit. WARNING: DANGEROUS VOLTAGE INSIDE WARNING: TO PREVENT FIRE OR SHOCK HAZARD, DO NOT EXPOSE THIS UNIT TO RAIN OR MOISTURE. IMPORTANT Please read the various precautions on page 2 and 3 before installing or operating the recorder.
Safety Precautions When the equipment is installed in a cabinet or a shelf, make sure that it has sufficient space on all sides to allow for ventilation (10 cm or more on both sides, on top and at the rear.) When discarding batteries, environmental problems must be considered and the local rules or laws governing the disposal of these batteries must be followed strictly. Failure to heed the following precautions may result in damage to the recorder, remote control or video cassette. 1.
Features Video Cassette Recorder • High Quality (HQ) Images • On-Screen Displays (OSD) • Nicam Hi-Fi Stereo Audio Recording and Playback • Auto TV Station Tuning and Auto Clock Set • 80 Memory for presets • Auto Time Setting • 30 Minute Back-Up in case of Power failure • 6 rotary Head (4 Video Head and 2 Hi-Fi Audio Head) • Long play • Programme Delivery Control System • Timer Recording of up to 8 Programme per Month • VIDEO Plus+® rapid timer programming • Instant Timer Recording (ITR) • Video index Search
Contents Before using your unit Disc playback operation Safety Precautions ........................................... 2 Features ........................................................... 4 Contents ........................................................... 5 Parts and functions .......................................... 6 Display ............................................................. 7 Remote control ................................................. 8 Connections and Installation ..............
Parts and functions Front VCR/DVD mode selector button PLAY button Cassette Loading Slot OPEN/CLOSE button STOP button Disc tray EJECT button Display window Remote sensor Standby/On button PR +/– buttons AUDIO (L/R)/ VIDEO IN jacks DVD indicator REW (Rewind) button VCR indicator REC button FF (Fast Forward) button Rear AC power cord SCART PRISE PERITEL RF IN jack RF OUT jack DVD OPTICAL DIGITAL AUDIO OUT jack DVD COAXIAL DIGITAL AUDIO OUT jack DVD AUDIO (L/R) OUT jacks DVD S-VIDEO OUT jack
Display Display window 1 2 3 4 10 5 9 No. 1 8 7 Display 6 Description VCR mode of TV/VCR switch VCR 2 Playback (lights) / Auto resume (flashes) 3 Still picture 4 DVD DVD disc is inserted. 5 CD CD is inserted.
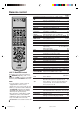
Remote control JVC TV Remote Control This Remote can control some functions ( , NUMBER (0-9), TV ∏ , TV @ +/–, TV PR +/– and OK) of a remote controllable JVC TV by slide TV/VCR/DVD switch to TV. NOTE: • It’s not possible to operate a unit not equipped with a remote sensor. • This Remote can control a JVC TV only. • When you operate the VCR or DVD, the TV/VCR/DVD switch must be slided to VCR/DVD again. Otherwise the DVD/ VCR may not operate properly.
Remote control How to install the batteries Use micro batteries type AA. 1 Open the battery compartment cover in the direction of the arrow. two "AA" batteries (not 2 Install supplied), paying attention to the 3 Replace the compartment cover. polarity diagram in the battery compartment. Battery precautions The precautions below should be followed when using batteries in this device: 1. Use only the size and type of batteries specified. 2.
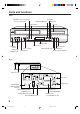
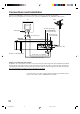
Connections and Installation Connect your DVD/VCR to your home's aerial and to your TV-set as shown in the illustration. When you have finished these connections you connect your DVD/VCR to the 230-240 V / 50 Hz mains.
Playback connection The exact arrangement you use to interconnect various video and audio components to the DVD/VCR is dependent on the model and features of each component. Check the Owner's Manual provided with each component for the location of SCART socket.
Playback connection Connect to a Stereo Amplifier with Audio Output If your DVD/VCR is connected to a stereo amplifier, the video soundtrack can output through the loudspeakers of the stereo system.
Tuning the TV Stations and Setting the Time and Date Automatically Plug your DVD/VCR into the mains supply and it will start to automatically tune itself in and set the correct date and time. After setting itself up, you must set the TV to the video channel. Preparation • Make sure that your DVD/VCR is connected properly to the TV. • If a satellite receiver is connected with the coaxial lead, make sure it’s switched ON and set to SKY ONE.
On-screen Language Selection Turn on your TV and select the VCR channel which you have already tuned on your TV. The TV will switch to AV (VCR mode) automatically by the Scart lead connection. The on-screen menu can display any of three languages; English, German and French. Preparation • Press the button to turn on the DVD/VCR. • Make sure TV/VCR/DVD switch has been slided to VCR/DVD. Then press VCR to select the VCR mode. (The VCR indicator will light) Press SET UP MENU.
Setting the Time and Date Manually You must set the date and time manually for timer recordings if Automatic tuning process did not set them correctly. Preparation • Turn on the TV, and select the VCR channel on TV. • Make sure TV/VCR/DVD switch has been slided to VCR/ DVD. Then press VCR to select the VCR mode. (The VCR indicator will light) Example: Setting the clock to 11:30, 26 Oct. 2002. Press SET UP MENU. Press ▲ or ▼ to select the SYS1 TEM SETUP. Then press OK.
Tuning the TV Stations Manually This VCR has one built-in tuner to receive broadcasts. Before you record a TV broadcast, you must set and preset all channels. This VCR can preset up to 80 channels. Preparation • Turn on the TV, and select the VCR channel on TV. • Make sure TV/VCR/DVD switch has been slided to VCR/ DVD. Then press VCR to select the VCR mode. (The VCR indicator will light) Example: Preset the BBC 2 on programme position 2. SET UP MENU.
Setting the VIDEO Plus +® Channel Number (Guide CH) The TV stations must be stored according to the tuning guide given on page 13, otherwise the VIDEO Plus+ feature will not work. If for any reason you did not select channels BBC1, BBC2, ITV, CH4, CH5 and Satellite in channel positions 1 through to 6 respectively, you must set each VIDEO Plus+ channel number (GUIDE CH) manually. Preparation • Turn on the TV, and select the VCR channel on TV. • Press the button to turn on the VCR.
Loading and Unloading a Cassette Tape Use only video cassette tapes marked and . • Cassettes marked “VHS” (or “S-VHS”) can be used with this video cassette recorder. However, S-VHS recording is not possible with this model. • This model is equipped with SQPB (S-VHS QUASI PLAYBACK) that makes it possible to play back S-VHS recordings with regular VHS resolution. • HQ VHS is compatible with existing VHS equipment. • SQPB playback can be seen only at PAL SP mode.
Cassette tape playback Preparation: • Turn ON the TV and select the VCR channel on TV. • Make sure TV/VCR/DVD switch has been slided to VCR/DVD. Then press VCR to select the VCR mode. (The VCR indicator will light) a prerecorded tape 1 Load (When loading a cassette tape without the erase prevention tab, playback will start automatically). start playback 2 To Press . Playback will start. If the cassette has not loaded yet, will blink for 4 seconds. VCR To stop playback Press 3.
Special playback/Playback sharpness/Skip Search Special playback Playback sharpness Picture Search Adjust the sharpness of playback picture during playback. During slow motion, still picture and picture search, sharpness-adjusting is impossible. Reverse picture search function Press x 1 or x 2 during the playback. Forward picture search function x 1 or x 2 during the playback. Press To return to playback: Press . 1 Start the playback of video tape. SET UP MENU. 2 Press or to select Press VCR SETUP.
Repeat Playback If the Repeat function is switched on, the playback will continue until it reaches the tape-end and then rewind to the beginning of the tape. This process will repeat until the unit is turned off. To set the Repeat function Preparation • Turn on the TV and select the VCR channel on TV. • Press VCR to select the VCR mode. SET UP MENU. 1 Press Press ▲ or ▼ to select the AUTO REPEAT.
Counter Display ZERO RETURN function This function makes tape-rewinding stop at the counter 00:00:00 position automatically. Preparation: • Turn ON the TV and select the VCR channel on TV. • Make sure TV/VCR/DVD switch has been slided to VCR/DVD. Then press VCR to select the VCR mode. (The VCR indicator will light) OSD. 1 Press The counter display shows the tape running time during playback or recording. The Recorder will indicate REC during recording for itself.
Video Index Search System Whenever a recording is begun an invisible index mark is recorded on the tape.These index marks are all identical, and each mark means: "Here starts a new recording". Every DVD/VCR equipped with the Video Index Search System (VISS) can locate these marks at the beginning of any recording. Example: Indexing of TV commercials. playback and wait until the 1 Start end of the TV commercial is reached, then press 3. once.
Recording a TV Programme Preparation: • Turn ON the TV and select the VCR channel on TV. • Make sure TV/VCR/DVD switch has been slided to VCR/DVD. Then press VCR to select the VCR mode. (The VCR indicator will light) a blank cassette tape with the 1 Load erase prevention tab intact. (The DVD/VCR will automatically turn on.) VCR the program(e.g.29) you want to record with PR +/– or 2 Select number keys. 1~9 : e.g. 5 = press “5” 10~80 : e.g. 29 = press “2” and “9”.
Recording a TV Programme Recording with a SCART Lead: You can record a programme using the TV receiver of the DVD/VCR and at the same time watch another programme on the TV set using its receiver. As the DVD/VCR automatically switches the TV set the following points should be observed: TV/VCR until "VCR" appears on the display. Select 1 Press the program on the DVD/VCR you want to record. This program can be watched on the screen and recorded by the DVD/VCR. VCR “VCR” indicator goes on.
Instant Timer Recording (ITR) The instant timer recording feature provides a simple and convenient way to make a timed recording. Preparation: • Turn ON the TV and select the VCR channel on TV. • Make sure TV/VCR/DVD switch has been slided to VCR/DVD. Then press VCR to select the VCR mode. (The VCR indicator will light) a blank cassette tape with the 1 Load erase prevention tab intact. (The DVD/VCR will automatically turn on.) VCR the program (e.g.
VIDEO Plus+® Recording Look up the PlusCode Number in an appropriate TV programme magazine. Select the desired TV programme for recording and refer to the PlusCode Number next to it. VIDEO Plus+ and PlusCode are registered trademarks of Gemstar Development Corporation. The VIDEO Plus+ system is manufactured under license from Gemstar Development Corporation. Preparation • Turn on the TV and select the VCR channel on TV. • Make sure TV/VCR/DVD switch has been slided to VCR/ DVD.
VIDEO Plus+ Recording If you have selected Daily or Weekly in step 3, then you can select a recording date again. The date must blink. If it does not blink, then press ▲ or ▼ repeatedly until the DATE blinks. Then press or repeatedly until the desired date appears. The following date options are available: SUN-SAT: all dates from Sunday to Saturday, or MON-SAT: only from Monday to Saturday, or MON-FRI: only from Monday to Friday. WKL-MON: each Monday, WKL-TUE: each Tuesday WKL-SUN: each Sunday, etc.
Timer Recording Manually The built-in timer allows unattended recording of up to 8 programmes within 1 month. Preparation • Turn on the TV and select the VCR channel on TV. • Make sure TV/VCR/DVD switch has been slided to VCR/ DVD. Then press VCR to select the VCR mode. (The VCR indicator will light) • Load a video cassette with the erase prevention tab intact. Make sure that the time and date are correct. Example: Timer recording for the 23rd, Friday, on channel 3, 19:30 to 21:30 and LP mode.
Timer Recording Manually OK to accept them. 5 Press To enter other programmes, 19:30 21:30 23 FRI : : : : : : : : : : : : : : repeat steps 2 to 4, or press SET UP MENU repeatedly until the TV picture appears. 3 LP SELECT : / OK : MENU EXIT Note: • In case of a timer recording from the Scart socket, proceed as follows: When "CH" is blinking in picture/step 4, press or repeatedly until "AV" appears.
Timer Recording Manually Confirmation/Cancellation of the Timer Recording If the Timer has been activated, now press • to deacti1 vate the timer. The clock symbol will disappear. Then press VCR to change to VCR mode. To confirm a Timer programme. 2 Press PROG. twice. All the timer programmes will appear. 28 FRI 30 SUN 30 SUN 19:30 21:00 12:15 13:00 19:00 22:00 : : : : : : : : : : 3 LP 1 SP 3 LP SELECT : / OK CLEAR : CANCEL EXIT : MENU 3 To cancel a Timer programme.
NICAM Stereo Recording and Playback This DVD/VCR is capable of recording sound in Hi-Fi system. The recording will be performed automatically. NICAM STEREO broadcasts are recorded in its original sound system regardless of the setting. If you wish to record NICAM programmes, select NICAM "AUTO" as follows. Preparation: • Turn ON the TV and select the VCR channel on TV. • Make sure TV/VCR/DVD switch has been slided to VCR/DVD. Then press VCR to select the VCR mode.
NICAM Stereo Recording and Playback Playback Use A.MONITOR to select under stereo/mono or bilingual playback. See the table below for more information. On-screen indications Stereo playback (for 4 sec.
Audio Mixing You can listen to both sound tracks (HiFi and MONO), by setting AUDIO MIXING mode. Preparation: • Turn ON the TV and select the VCR channel on TV. • Make sure TV/VCR/DVD switch has been slided to VCR/DVD. Then press VCR to select the VCR mode. (The VCR indicator will light) SET UP MENU. 1 Press or to select Press TIMER REC SET AUTO REPEAT VCR SETUP CHANNEL SETUP SYSTEM SETUP VCR SETUP. Then press OK. [OFF] SELECT : ENTER : OK EXIT : MENU or 2 Press AUDIO MIX.
Duplicating a Video Tape When you try to connect with a cable, make sure the power of both units have been turned off. Connect the recording unit with the TV. Therefore you can just watch what the recording unit is recording. 1 Load a blank cassette tape with the erase prevention tab intact into the recording DVD/VCR. Load the previously recorded cassette tape into the playback VCR or a video camera. VCR 2 3 4 While holding 2, press 5 Press 4 of both units simultaneously to start the Duplicating.
Disc This unit applies to DVD discs from Region 2 only. The loaded Disc (DVD, Video-CD, Audio-CD and MP3-CD) will be recognized automatically. The suitable Disc-formats are: DVD, CD-R and CD-RW. Some CD-R/RW discs may be incompatible. This DVD/VCR uses the PAL color system. The NTSC-DVDs can be playback on PAL 60Hz. Do not play DVD-ROM, DVD-Audio, CDV, CD-G or Photo CD to prevent accidental erasure of prerecorded material. Some DVDs is played back with a Copy guard system.
Setting setup language The setup language can be selected. Preparation: • Turn ON the TV and set to the video input mode. • Make sure TV/VCR/DVD switch has been slided to VCR/DVD. • When using an amplifier, switch on the amplifier. DVD to select the DVD 1 Press mode. (The DVD indicator will light.) “No Disc” will appear on the screen. (If a DVD disc has already loaded, the playback will start automatically.) SET UP MENU in the stop 2 Press mode. The SETUP MENU of DVD will appear on the screen.
Playback procedure Preparation: • Turn ON the TV and set to the video input mode. • Make sure TV/VCR/DVD switch has been slided to VCR/DVD. Then press DVD to select the DVD mode. (The DVD indicator will light) OPEN/CLOSE. 1 Press The disc tray will open. a disc onto the tray. 2 Place Hold the disc, position it with the printed label side up, align it with the guides, and place it in its proper position. Press or OPEN/CLOSE. 3 The disc tray closes automatically.
Special playback Note: There may be a slight delay between pressing the button and the function activation. Fast Forward Playback Press during normal playback. Each press of will increase the speed of the search x2 ( ), x8 ), x30 ( ), x100 ( ). (in case of Audio-CD: x4 ( ) and x8 ( ( ) are available) • To resume normal playback, press . Review Playback Press during normal playback. Each press of will increase the speed of the search x2 ( ), x8 ( ), x30 ( ), x100 ( ).
DVD Picture Signal Selection/Zooming You can select the output signal of DVD playback picture to the TV screen as an VIDEO signal or a RGB signal. Preparation: • Turn ON the TV and set to the video input mode. • Make sure TV/VCR/DVD switch has been slided to VCR/DVD. Then press DVD to select the DVD mode. (The DVD indicator will light) SET UP MENU in the 1 Press stop mode. Press or to select “Picture”, then press or to select “Video Out Select”.
Repeat playback Preparation: • Turn ON the TV and set to the video input mode. • Make sure TV/VCR/DVD switch has been slided to VCR/DVD. Then press DVD to select the DVD mode. (The DVD indicator will light) REPEAT PLAYBACK Press PLAY MODE repeatedly to select “Chapter Repeat”, 1 “Title Repeat” or “All Repeat”. (In case of CD, select “Track Repeat” or “ All Repeat” ) DVD CD Chapter Repeat Track Repeat playback repeat playback will start automatically.
Memory playback/Random playback Preparation: • Turn ON the TV and set to the video input mode. • Make sure TV/VCR/DVD switch has been slided to VCR/DVD. Then press DVD to select the DVD mode. (The DVD indicator will light) Memory playback You can arrange the order of titles, chapter or tracks on the disc. 1 Press MEMORY.
MP3 Playback This player can play back the MP3-data which has been recorded on CD-R or CDRW. To produce the MP3-data, you need a Windows-PC with CD-ROM drive and a MP3encoding Software (not supplied). The Apple-HFS-System can not be played. MP3 CD Information Limitations on MP3 CD playback • MP3 CD is the disc that is standardized by ISO9660, its file name must include 3-digits extension letters, “mp3”. • The directory and file names of the MP3 CD must correspond to the ISO standardized files.
Changing soundtrack language / Changing Subtitles language Preparation: • Turn ON the TV and set to the video input mode. • Make sure TV/VCR/DVD switch has been slided to VCR/DVD. Then press DVD to select the DVD mode. (The DVD indicator will light) Changing soundtrack language You can select the language when you play a multilingual disc. A.MONITOR during play1 Press back. The current soundtrack language is displayed. ENG1 ENG2 FRE1 2CH 5.1CH 2CH Audio:FRE1 : Select 2CH : Return 2CH A.
Changing angles / Title selection / DVD menu Preparation: • Turn ON the TV and set to the video input mode. • Make sure TV/VCR/DVD switch has been slided to VCR/DVD. Then press DVD to select the DVD mode. (The DVD indicator will light) Changing Angles When playing back a disc recorded with multi-angle facility, you can change the angle that you are viewing the scene from. ANGLE during playback. 1 Press The current angle will appear. 1 2 3 Angle :1 : Select Press ANGLE or 2 selected.
Parental control Some discs are specified not suitable for children. Such discs can be prevented from play back with the unit. Preparation: • Turn ON the TV and set to the video input mode. • Make sure TV/VCR/DVD switch has been slided to VCR/DVD. Then press DVD to select the DVD mode. (The DVD indicator will light) Parental control setting SET UP MENU in the stop 1 Press mode. Press tion”.
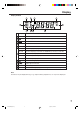
Parental control Country/Area AUSTRALIA BELGIUM CANADA CHINA CHINA HONG KONG DENMARK FINLAND FRANCE GERMANY INDONESIA ITALY JAPAN MALAYSIA Code AU BE CA CN HK DK FI FR DE ID IT JP MY Country/Area NETHERLANDS NORWAY PHILIPPINES RUSSIAN FEDERATION SINGAPORE SPAIN SWEDEN SWITZERLAND TAIWAN THAILAND UNITED KINGDOM UNITED STATES / to select the paren6 Press tal lock level, then press OK (Enter).
Setting menu language You can select the language of the disc menu messages of DVDs. Preparation: • Turn ON the TV and set to the video input mode. • Make sure TV/VCR/DVD switch has been slided to VCR/DVD. Then press DVD to select the DVD mode. (The DVD indicator will light) SET UP MENU in the stop 1 Press mode. Press guage”. or to select “Lan- AB C Picture TV Shape 4:3LB Video Out Select Video : Select or to select “Disc 2 Press Menu Language”.
Setting audio soundtrack language The same audio soundtrack language can always be selected by your unit even if you replace the disc or turn the power off. Preparation: • Turn ON the TV and set to the video input mode. • Make sure TV/VCR/DVD switch has been slided to VCR/DVD. Then press DVD to select the DVD mode. (The DVD indicator will light) SET UP MENU in the stop 1 Press mode. or Press “Language”. to select AB C Picture TV Shape 4:3LB Video Out Select Video : Select Press or 2 Language”.
Setting subtitle language The same subtitle language can always be selected even if you replace the disc or turn the power off. Preparation: • Turn ON the TV and set to the video input mode. • Make sure TV/VCR/DVD switch has been slided to VCR/DVD. Then press DVD to select the DVD mode. (The DVD indicator will light) SET UP MENU in the stop 1 Press mode. or Press “Language”. to select AB C Picture TV Shape 4:3LB Video Out Select Video : Select or 2 Press Language”.
Setting the aspect ratio of TV screen / Setting on Screen display You can select the aspect ratio for your TV. Preparation: • Turn ON the TV and set to the video input mode. • Make sure TV/VCR/DVD switch has been slided to VCR/DVD. Then press DVD to select the DVD mode. (The DVD indicator will light) Setting the aspect ratio of TV screen SET UP MENU in the stop 1 Press mode. or to select Press “Picture”, then press or to select “TV shape”.
Setting Audio Preparation: • Turn ON the TV and set to the video input mode. • Make sure TV/VCR/DVD switch has been slided to VCR/DVD. Then press DVD to select the DVD mode. (The DVD indicator will light) Audio Out Select Select the output sound format corresponding to your system connection. For details of sound recording systems, see on page 55. Press SET UP MENU in the stop mode. 1 Press or to select “Audio”. 2 Press or to select “Audio Out Select”, then press OK (Enter).
Setting Operation Preparation: • Turn ON the TV and set to the video input mode. • Make sure TV/VCR/DVD switch has been slided to VCR/DVD. Then press DVD to select the DVD mode. (The DVD indicator will light) PBC SET UP 1 Press MENU in the stop mode. or to Press select “Operation”. Pause/Still Select the resolution of still pictures. SET UP MENU 1 Press in the stop mode. to Press or select “Operation”.
Selecting the sound enhancement (E.A.M.)/Setting Background/ Setting Screen Saver Preparation: • Turn ON the TV and set to the video input mode. • Make sure TV/VCR/DVD switch has been slided to VCR/DVD. Then press DVD to select the DVD mode. (The DVD indicator will light) Selecting the sound enhancement (E.A.M.*) You can easily switch a preferred audio enhancement. Setting Background Select the background color or background picture. SET UP MENU 1 Press in the stop mode. or to sePress lect “Display”.
Setting initial setup/output sound conversion table You can install the initial system setting. Preparation: • Turn ON the TV and set to the video input mode. • Make sure TV/VCR/DVD switch has been slided to VCR/DVD. Then press DVD to select the DVD mode. (The DVD indicator will light) Setting initial setup SET UP MENU in the stop 1 Press mode. Press or Setup”.
Status display of Disc You can view information on the operation status and access and settings. 1 With each press of OSD, the status of the disc will appear on the screen and change as follows. Symbol mark of the feature you selected is displayed. DVD T 2C 3 T 2C 3 0:08:16 -0:21:28 Audio/ Video CD ZOOM EAM T 1 -03:38 EAM EPM EAM EAM PCM PCM 2CH 2CH ZOOM X C C 1 OFF OFF 0:08:16 T 1 00:30 EAM ZOOM X 1 T 2C 3 mark is only for Video CD. BIT RATE T 1 T 2C3 9.
Table of languages Enter the appropriate code for the initial settings"Menu", "Audio" and/or "Subtitle" (see pages 48~50).
Problems and troubleshooting Use the following check list for troubleshooting when you have problems with your unit. Consult your local dealer or service outlet if problems persist. Be sure all connections are properly made when using with other units. SYMPTOMS POSSIBLE SOLUTIONS PAGE DVD/VCR DVD/VCR does not operate. • Make sure the power cord is plugged in. • Try another AC outlet. • Power is off, check fuse or circuit breaker. • Unplug unit, then plug it back in.
Problems and troubleshooting / Video head cleaning SYMPTOMS POSSIBLE SOLUTIONS PAGE No 4:3 (16:9) picture • The setup does not match your TV. 51 No on-screen display • Select Display On. 51 No surround sound • The setup does not match your stereo system. 12 The unit or remote operation key is not functioning. • Turn off the unit and unplug the AC power cord for several minutes, then replug it. 14 • Check the Parental control setting. 46 Playback does not start when the title is selected.
Specifications GENERAL Power supply: Power consumption: AC 230-240V 50Hz Operation: 22W Stand by: 5W Weight: 4.5 kg Dimensions: Width : 430 mm Height : 99 mm Depth : 310.