DVD PLAYER & VIDEO CASSETTE RECORDER HR-XVC40B HR-XVC41S INSTRUCTIONS LVT1948-002A [C]
CAUTION RISK OF ELECTRIC SHOCK DO NOT OPEN ATTENTION RISQUE D’ELECTROCUTION NE PAS OUVRIR CAUTION: TO REDUCE THE RISK OF ELECTRIC SHOCK DO NOT REMOVE COVER (OR BACK) NO USER-SERVICEABLE PARTS INSIDE REFER SERVICING TO QUALIFIED SERVICE PERSONNEL.
IMPORTANT SAFETY INSTRUCTIONS CAUTION: PLEASE READ AND OBSERVE ALL WARNINGS AND INSTRUCTIONS IN THIS OWNER’S MANUAL. AND THOSE MARKED ON THE PRODUCT. RETAIN THIS BOOKLET FOR FUTURE REFERENCE. This product has been designed and manufactured to assure personal safety. Improper use can result in electric shock or fire hazard. The safeguards incorporated in this product will protect you if you observe the following procedures for installation, use, and servicing.
Contents Introduction . . . . . . . . . . . . . . . . . . . . .5-9 Operations - VCR . . . . . . . . . . . . . .20-25 Moisture Condensation . . . . . . . . . . . . . . . . . .5 Symbol Used in this Manual . . . . . . . . . . . . .5 VCR Tape Playback . . . . . . . . . . . . . . . . .20-21 Basic Instructions . . . . . . . . . . . . . . . . . . . . .20 Auto Tracking . . . . . . . . . . . . . . . . . . . . . . . .20 Manual Tracking . . . . . . . . . . . . . . . . . . . . . .20 Search . . . . . . . . . . . . .
To ensure proper use of this product, please read this owner’s manual carefully and retain it for future reference. This manual provides information on the operation and maintenance of your unit. Should the unit require service, contact an authorized service location. About the Introduction Introduction Symbol Display “ ” may appear on your TV display during operation and indicates that the function is not permitted by this unit or the disc.
Types of Playable Discs DVD (8 cm / 12 cm disc) Video CD (VCD) (8 cm / 12 cm disc) Audio CD (8 cm / 12 cm disc) Regional Code This unit has a regional code printed on the rear of the unit. This unit can play only DVD discs labeled as the same as the rear of the unit or “ALL”. ALL 1 12 1 2 3 4 Notes on Regional Codes In addition, this unit plays DVD±R/RW and CD-R/RW that contains audio titles, MP3, WMA, DivX and/or JPEG files.
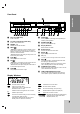
Introduction Front Panel CH a Disc Tray (DVD deck) h Insert a disc here. b Cassette Compartment (VCR deck) Insert a video cassette here. c d Display Windows Refer to below for details. k Remote Sensor Point the unit Remote Control here. l Z) EJECT (Z Ejects the tape in the VCR deck. m CH (-/+) To scan up or down through memorized channels. n z) REC (z To record normally or to activate One-touch Timer Recordping by repeated presses.
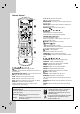
Remote Control DISC MENU : Accesses menu on a DVD disc. b / B / v / V : Selects menu options. CH (-/+) : Selects VCR channels. SETUP MENU : Accesses or removes DVD Setup menu and VCR menu. a ENTER (OK) : Confirms menu selections. Displays functions on the TV screen. O) : Removes the setup menu. RETURN (O b X (PAUSE) : Pause playback or recording temporarily. Press repeatedly for frame-by-frame playback. ./> (SKIP) (DVD only): b Go to next the chapter or track.
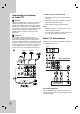
Introduction Rear Panel Caution Do not touch the inner pins of the jacks on the rear panel. Electrostatic discharge may cause permanent damage to the unit. a a b c de g h f i ANT.IN f Connect the VHF/UHF/CATV antenna to this terminal. b VCR IN LINE 1 (VIDEO/AUDIO (Left/Right)) Connect the audio/video output of an external source (Audio system, TV/Monitor, VCR, Camcorder). c d AC Power Cord Plug into the power source. g RF. OUT Connect to a TV with RF coaxial inputs.
Connecting an Antenna or Cable TV To view or record a CATV channel 1 Tune the TV to the DVD+VCR output channel (CH 3 or 4). a Antenna: Disconnect the antenna from the rear of the TV and identify the antenna cable. If it is a round 75 ohm coaxial cable connect it directly to the jack marked ANT.IN on your DVD+VCR. If your antenna cable is flat connect it to a 300-ohm to 75-ohm antenna adaptor (not supplied) and slip the adaptor over the ANT.IN jack. Don’t attempt to screw it into to the DVD+VCR.
How to set the DVD+VCR’s RF output channel Optional TV Connections 1. When the DVD+VCR is turned off, press and hold CH (+/-) on the front panel for more than five seconds. “RF03” or “RF04” appears in the display window. These connections support only DVD playback. The tuner and VCR still output through the RF.OUT (R) or DVD/VCR OUT (A, V) jacks. 2. Press CH (+/-) to change the RF output channel (RF03 or RF04). Tune the TV to this channel. S-Video connection 3. Turn off the DVD+VCR.
Connection to an Amplifier Rear of DVD+VCR You can only listen to DVD playback using COAXIAL (X) and AUDIO OUT (A2) connections. The VCR will still be heard through the DVD/VCR AUDIO OUT (A1) jack. Connecting to an amplifier equipped with two channel analog stereo or Dolby Pro Logic II/Pro Logic Connect the Left and Right AUDIO OUT (or DVD/VCR AUDIO OUT) jacks on the unit to the audio left and right in jacks on your amplifier, receiver, or stereo system using the audio cables (A1, A2) supplied.
By using the VCR Setup menu, you can make various adjustments to items such as clock setting, and timer recordings. Your DVD+VCR allows remote control adjustment of several features. General Operation 1. Press VCR on the remote control. 2. Press SETUP MENU and the MAIN menu will appear. • AUTO CLOCK SET The Auto Clock Set feature is set to ON at the factory. In the ON setting, the DVD+VCR looks for a channel carrying XDS (Extended Data Services) information.
TUNING SETUP This DVD+VCR is equipped with a frequency synthesized tuner capable of receiving up to 181 channels. These include VHF channels 2-13, UHF channels 14-69 and CATV channels 1-125. Auto Channel Programming FUNCTION OSD The on-screen display can be turned on or off. AUDIO MODE 1. Choose the SOURCE SELECT option, then use b / B to select TUNER. Use b / B to switch among TUNER, LINE1, and LINE2. 2. Choose the AUTO CHANNEL SET option, then use b / B to find channels.
You can display various information about the disc loaded on-screen. 1. Press DISPLAY to show various playback information. The items displayed differ depending on the disc type or playing status. 1/3 1 / 12 0:20:09 ABC 1 ENG 1/1 3D SUR 2. You can select an item by pressing v / V and change or select the setting by pressing b / B. Title (Track) – Current title (or track). number/total number of titles (or tracks). Chapter – Current chapter number/total number of chapters. Time – Elapsed playing time.
LANGUAGE Progressive Scan Progressive Scan Video provides the highest quality pictures with less flickering. If you are using the Component Video jacks for connection to a TV or monitor that is compatible with a progressive scan signal, set Progressive Scan to On. To turn on progressive scan: Menu Language Select a language for the VCR and DVD’s setup menu and information display. Disc Audio / Subtitle / Menu Select the language you prefer for the audio track (disc audio), subtitles, and the disc menu.
AUDIO LOCK (Parental Control) Each DVD disc has a variety of audio output options. Set this unit’s AUDIO options according to the type of audio system you use. Rating Bitstream: Select “Bitstream” if you connect the DVD+VCR’s DIGITAL AUDIO OUT jack to an amplifier or other equipment with a Dolby Digital, DTS or MPEG decoder. PCM (for Dolby Digital / MPEG): Select when connected to a two-channel digital stereo amplifier.
4. Press ENTER (OK) to confirm your rating selection, then press SETUP MENU to exit the menu. 5. Press Z (OPEN/CLOSE) to activate parental control. Password (Security Code) You can enter or change password. 1. Select “Password” on the LOCK menu then press B. 2. Follow step 2 as shown previous page (Rating). To change the password, select the “Change”, press ENTER (OK) and input the new 4-digit code then press ENTER (OK). Input it again to verify. 3. Press SETUP MENU to exit the menu.
Remote Control Function Remote Control A/B/C Code Switching Preparation The remote control is capable of controlling three JVC video units independently. Each of the units can respond to one of three codes (A, B or C). The remote control is preset to send C code signals because your unit is initially set to respond to C code signals. You can easily modify your unit to respond to A or B code signals. 1/ I B ENTER x 1-3 • Keep pressing ENTER (OK) down during step 1. 1.
Operation This chapter describes how to operate the VCR and DVD. VCR Tape Playback Press the VCR button to select the device to be operated. Basic Instructions 1. Turn on the TV. 2. Tune the TV to the DVD+VCR output channel (CH 3 or 4) or if a direct VIDEO/AUDIO connection is made between the DVD+VCR and the TV, set the TV’s source selector to VIDEO. 3. Insert a pre-recorded video cassette. The indicator lights and the DVD+VCR powers on automatically. 4.
This feature is useful for skipping commercials or short program segments. The other options are (LEFT) POSITION, which results in the left channel sound (L) being heard from both speakers or (RIGHT) POSITION, which results in the right channel sound (R) being heard from both speakers. 1. Press in playback mode. The unit performs a fast forward picture search through 30 seconds of recording. 3. Insert a cassette and press N (PLAY). 2. Press again to extend the search time by an addition 30 seconds.
VCR Tape Recording Basic Instructions 1. Turn on the DVD+VCR and TV. 2. Tune the TV to the DVD+VCR output channel (CH 3 or 4) or if a direct VIDEO/AUDIO connection is made between the DVD+VCR and the TV, set the TV’s source selector to VIDEO. 3. Insert a video cassette with the safety tab intact. 4. Select the desired channel using CH (+/-). 5. If you are recording from another source via audio/video input jacks (at the rear or front panel), select LINE1 or LINE2 using AUX. 6.
CHANNEL: Select a TV channel, LINE1 or LINE2. If you have CABLE TV and use a cable box (converter) you must set the channel to match the cable box output channel (usually CH 3 or 4). Change channels on the cable box instead of with the DVD+VCR. If you use a cable converter, you can program multiple recordings only on the converter box output channel. This is because the converter determines what channel you view through your DVD+VCR.
Basic Recording (One-Touch Recording) Instant Timer Recording You can record from an external component, such as a camcorder or VCR, connected to any of the unit’s external inputs. With this feature you can record for a preset length without using the program timer. 1. Make sure that the component you want to record from is connected properly to the unit. See page 11. 2. Press AUX repeatedly to select the external input to record from. • LINE1 (L1): Audio/Video Input mounted on back panel.
Each press of the ENTER (OK) changes the TV screen in the following sequence. You can copy the contents of a DVD to a VHS tape. STOP CH 4 SP 1. Insert the disc you wish to copy into the DVD deck and close the disc tray. STEREO JAN 1, MON 2:15 PM 2. Insert a blank VHS video tape into the VCR deck. 2:15 PM 3. Find the place on the DVD from which you want to start dubbing using the PLAY, FF, REW and PAUSE functions. For best results, pause playback at the point from which you want to record.
Additional VCR Information S-VHS Quasi Playback (SQPB) • • This DVD+VCR can play back S-VHS recorded tapes, however, it cannot make recordings using S-VHS format tapes. • SQPB is an abbreviation for S-VHS Quasi Playback. • During manual recording, timer recording, Instant Timer Recording, playback, or fast forward modes, the DVD+VCR automatically starts rewinding the tape at the end of the tape. The cassette stops at the beginning of the tape and is ejected.
Operations - DVD Playback Setup Turn the TV on and select the video input source connected to this unit. Audio System: Turn the Audio System on and select the input source connected to this unit. 1. Press Z (OPEN/CLOSE) to open the disc tray. 2. Load your chosen disc in the tray with the playback side down. 3. Press Z (OPEN/CLOSE) to close the tray. READING appears on the display window, and playback starts automatically. If playback does not start, press N (PLAY).
Buttons Operations Discs RANDOM During playback or in stop mode, press RANDOM for random playback. ACD TITLE If the current DVD title has a menu, the title menu appears on the screen. Otherwise, the disc menu may appears. DVD DISC MENU The disc menu appears on the screen. DVD ANGLE During playback of DVD disc contains scenes recorded different camera angles, press ANGLE repeatedly to select a desired angle.
Playing an Audio CD or MP3/WMA file This unit can play Audio CDs or MP3/WMA files recorded media. MP3/ WMA/ Audio CD Once you insert an MP3/WMA files recorded media or Audio CD, a menu appears on the TV screen. Press v / V to select a track/file then press PLAY or ENTER (OK) and playback starts. You can use variable playback functions. Refer to page 27-28. Programmed Playback The program function enables you to store your favorite tracks from any disc in the player memory. A program can contain 30 tracks.
V iewing a JPEG Disc Using this DVD+VCR you can view discs with JPEG files. 1. Insert a disc and close the tray. The PHOTO menu appears on the TV screen. Slide Show Use v V b B to highlight the press ENTER (OK). (Slide Show) then Still Picture 1. Press X (PAUSE) during slide show. The player will now go into PAUSE mode. 2. To return to the slide show, press N (PLAY) or press X (PAUSE) a gain. Moving to another File Press > or .
Playing a DivX Movie file Using this DVD+VCR, you can play DivX file. 1. Insert a DivX file recorded media. The MOVIE menu appears on the TV screen. DivX disc compatibility with this player is limited as follows: • Available resolution size of the DivX file is under 720x576 (W x H) pixel. • The file name of the DivX subtitle is available by 56 characters. • If there is impossible code to express in the DivX file, it may be displayed as “ _ ” mark on the display.
Playing a DVD VR format Disc This unit will play DVD-R/RW discs recorded using the DVD-Video format that have been finalized using a DVD-recorder. • This unit will play DVD-RW discs recorded using the Video Recording (VR) format. 1. Insert a disc and close the tray, It start playing automatically. 2. The DVD-VR menu appears on the TV screen when you press DISC MENU buttons while playing. Maintenance and Service Refer to the information in this chapter before contacting a service technician.
Reference Language Codes Language Abkhazian Afar Afrikaans Albanian Ameharic Arabic Armenian Assamese Aymara Azerbaijani Bashkir Basque Bengali; Bangla Bhutani Bihari Breton Bulgarian Burmese Byelorussian Cambodian Catalan Chinese Corsican Croatian Czech Danish Dutch English Esperanto Estonian Faroese Code 6566 6565 6570 8381 6577 6582 7289 6583 6588 6590 6665 6985 6678 6890 6672 6682 6671 7789 6669 7577 6765 9072 6779 7282 6783 6865 7876 6978 6979 6984 7079 Language Fiji Finnish French Frisian Galician
Troubleshooting Check the following guide for the possible cause of a problem before contacting service. Symptom Correction No power. The power cord is disconnected. Plug the power cord into the wall outlet securely. The power is on, but the DVD+VCR does not work. DVD or VCR button is not switched properly. Refer to page 6. No disc is inserted. No tape is inserted. Insert a disc or tape. (Check that the disc or tape indicator in the display window is lit.) No picture.
Cause Correction An unplayable disc is inserted. Insert a playable disc. (Check the disc type and Regional code.) The disc is placed upside down. Place the disc with the playback side down. The disc is not placed within the guide. Place the disc on the disc tray correctly inside the guide. The disc is dirty. Clean the disc. The Rating level is set. Cancel the Rating function or change the rating level. Video tape cannot be inserted. Is the cassette compartment empty? Eject the tape in.
Specifications General Power requirements Power consumption Dimensions (approx.) Weight (approx.) Operating temperature Operating humidity Signal system 120V, 60 Hz 16 W 16.9" X 3.1" X 10.4" (430 X 78.5 X 265 mm) (w x h x d) 9.26 lbs (4.2 kg) 5˚C to 40˚C (41˚F to 104˚F) 5 % to 90 % NTSC Inputs ANTENNA IN VHS VIDEO IN(LINE1, 2) VHS AUDIO IN(LINE1, 2) 75 ohms (VHF/UHF/CATV) 1 V (p-p) 75 ohms, sync negative, RCA jack x 2 -6.
HR-XVC40B / HR-XVC41S 0608SKMLGEEGL EN