ENGLISH DEUTSCH JLIP CAPTURE PACK CASTELLANO NEDERLANDS FRANÇAIS JLIP CAPTURE-PACK ENSEMBLE JLIP CAPTURE JLIP CAPTURE PAKKET PAQUETE JLIP CAPTURE PACCHETTO JLIP CAPTURE JLIP CAPTURE PACK JLIP-SIEPPAUSPAKKAUS JLIP CAPTURE PACK JLIP BILDEOVERFØRINGSPAKKE ITALIANO HS-V4KITE BEFORE OPERATION NORSK SVENSKA SUOMI DANSK VOR DER INBETRIEBNAHME AVANT DE COMMENCER VOOR GEBRUIK ANTES LA OPERACION PRIMA DI INIZIARE FØR BRUGEN ENNEN KÄYTTÖÄ INNAN DU SÄTTER IGÅNG FØR BRUK INSTRUCTIONS BEDIENUNGSANLEITUNG / MO
CAUTIONS IMPORTANT (For owners in U.K.) Connection to the mains supply in the United Kingdom. DO NOT cut off the mains plug from this equipment. If the plug fitted is not suitable for the power points in your home or the cable is too short to reach a power point, then obtain an appropriate safety approved extension lead or consult your dealer. BE SURE to replace the fuse only with an identical approved type, as originally fitted, and to replace the fuse cover.
Some Do’s And Don’ts On The Safe Use Of Equipment This equipment has been designed and manufactured to meet international safety standards but, like any electrical equipment, care must be taken if you are to obtain the best results and safety is to be assured. DO read the operating instructions before you attempt to use the equipment.
2 JVC SOFTWARE LICENCE AGREEMENT EN IMPORTANT TO CUSTOMERS: MAKE SURE TO READ THIS CAREFULLY BEFORE OPENING THE SEALED SOFTWARE PACKETS Thank you for purchasing our product. In order to start using the software programme enclosed, you are required to accept the terms and conditions of the agreement as provided below. Software Licence Agreement This is a legal agreement between you (either an individual or an entity) and Victor Company of Japan, Limited (JVC).
EN 5. LIMITED WARRANTY JVC warrants that any media in which the Programme is embodied (e.g. floppy discs, CDROM, etc.) are free from any defects in materials and workmanship for a period of thirty (30) days from the date of your purchase and that any hardware accompanying the Programme is also free from defects to the extent provided in the attached Warranty Form.
4 CONTENTS EN MAJOR FEATURES 5–6 GETTING STARTED 7 Provided Accessories ............................................................. 7 Connectable Devices .............................................................. 7 Operating Environment ........................................................... 7 INSTALLATION 8–9 JLIP Video Capture ................................................................ 8 JLIP Video Producer ..............................................................
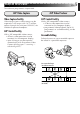
MAJOR FEATURES EN 5 Two software programmes are provided. JLIP Video Capture JLIP Video Producer Video Capture Facility JLIP Control Facility Video images from a video camera can be captured as still images with 16.77 million colours through the serial port (RS-232C) of a WindowsT-operated computer. With a JLIP-compatible video camera, • all basic video operations can be executed on the computer display; • programmed video playback (up to 99 programmes) or assemble editing can be performed.
6 MAJOR FEATURES (cont.) EN Advanced Applications Create title indexes for your video collection Title index images can be captured from your favorite recordings using the Interval Capture mode. Print the captured index images on your PC printer using the computer’s Print Screen facility, then attach them to your cassettes. Business presentations Images captured from video can be incorporated into business documents to spice up your presentations.
GETTING STARTED EN 7 Provided Accessories CD-ROM including: •JLIP Video Capture •JLIP Video Producer •Presto! Mr. Photo Gold • Mr.
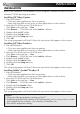
8 EN INSTALLATION INSTALLATION Refer to the Windows ® 95/98 manual or your computer’s manual for details on basic Windows® 95/98 operating procedures. Installing JLIP Video Capture 1. Start up Windows®. • Close any other applications that are running. Make sure that there are no icons of other applications on the task bar. 2. Insert the CD-ROM into the CD-ROM drive. Click Start on the task bar — Run. 3. Click Browse — CD-ROM icon in the Look in: column. 4. Double-click the JVC folder. 5.
EN 9 INSTALLATION Refer to the Windows® 95/98 manual or your computer’s manual for details on basic Windows® 95/98 operating procedures. Installing NewSoft Presto! Mr. Photo/PhotoAlbum/ImageFolio 1. Start up Windows ®. • Close any other applications that are running. Make sure that there are no icons of other applications on the task bar. 2. Insert the CD-ROM into the CD-ROM drive. Click Start on the task bar — Settings — Control Panel. 3. Double-click Add/Remove Programs.
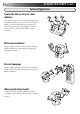
10 CONNECTIONS EN n To assure safety, make sure all units are turned off before making any connections. n We recommend that you use the AC Power Adapter/Charger. n When connecting a cable with a core filter attached, be sure to plug the connector equipped with the core filter into the video camera. n Do not make any connections to the video camera’s DV OUT connector.
EN 11 WHEN CONNECTED TO A VCR NOT EQUIPPED WITH A JLIP JACK When using a VCR not equipped with a JLIP jack, set your VCR brand using the remote control unit, then perform editing using the remote control. When JLIP Video Capture is used: PC connection cable (provided) To COM port (RS-232C) Use the plug which has three yellow rings around the pin.
12 EN MEMO
EN 13 Mr. Photo Gold: Presto! Mr. Photo Presto! PhotoAlbum Presto! ImageFolio For Windows * Please consult your nearest NewSoft service centre for technical support. (see next page) Copyright © 1997-1998, NewSoft Technology Corp. All Rights Reserved.
14 Technical Support EN NewSoft international service centre: U.S.A: 4113 Clipper Court, Fremont, CA 94538, USA Tel: (1) 510-445-8600 Fax: (1) 510-445-8601 Technical Support Hot Line: (1) 510-445-8616 E-mail: tech@newsoftinc.com http://www.newsoftinc.com Taiwan: 9F, No. 68, Sec. 3, Nan-king E. Rd., Taipei, Taiwan, R.O.C. Tel: (886) 2-2517-0750 Fax: (886) 2-2517-0760 Technical Support Hot Line: (886) 2-2517-0952 E-mail: support@newsoft.com.tw http://www.newsoft.com.
Presto! Mr. Photo 15 EN Mr. Photo stores and catalogues all of your valuable photos. You can sort photos and film “rolls” by date and title, or search by keyword, date, and other image properties. Then drag-and-drop photos to the Application Bar to create photo masterpieces using ready-made templates or design electronic photo albums. Click the Slide Show icon to view selected photos in a “roll” of film, or drag-and-drop a photo to the E-mail icon to send it to family and friends.
16 Presto! PhotoAlbum EN Presto! PhotoAlbum helps you create electronic photo albums that keep your memories alive forever. Just drag-and-drop photos, frames, clip art, textures, and special effects. You can also personalize your albums with voice-overs and sound effects, then produce album slide shows to post to the Internet or send completed albums by e-mail. Features ● ● ● ● ● ● ● ● ● Scan or import your photos from digital cameras and scanners. Auto colour correction for input photos.
Presto! ImageFolio 17 EN ImageFolio is a comprehensive multimedia image processing programme running under MS Windows 95 or Windows NT. It enables you to process in detail on your computer screen scanned images such as photographs, graphics and drawings, as well as images captured from video devices such as a VCR, a laser disc, a digital camera, a video capture box, etc. You can create new images by using the powerful tools included in the software.
18 Presto! ImageFolio (cont.) EN Generating object shadows in selectable light directions with one touch. ● ● Elegant templates provided for easy applications of daily-life photo usage. ● Image fine-tuning functions to adjust brightness, contrast, hue, saturation, tone distribution (equalization) and so on. ● Multiple filters to produce special effects such as smooth, sharpen, edge detection, emboss and mosaic.
Installing Mr. Photo, PhotoAlbum and ImageFolio EN 19 Follow the steps below to install Mr. Photo, PhotoAlbum and ImageFolio. 1. Insert the programme CD into your CD-ROM drive. 2. Press the Start button and choose Run. 3. Type [drive]:\NewSoft\setup.exe and choose OK. The installation programme will automatically detect the language being used in the version of Windows you are running. 4. Follow the instructions on your screen as they appear.
20 EN TECHNICAL SUPPORT FOR REGISTERED USERS JVC Support for: U.K. & IRELAND JVC (U.K.) Limited JVC IRELAND 14 Priestley Way, London (Branch of JVC(U.K.)Limited) NW2 7BA, United Kingdom JVC HOUSE Carriglea Industrial Estate Tel : (0181) 450-3282 Naas Road, Dublin 12, Republic of Ireland Fax : (0181) 452-2534 Tel : (01)-460-2288 Fax : (01) -456-7522 FRANCE JVC FRANCE S.A. DIVISION VIDEO 102, boulevard Heloise, 95104 Argenteuil CEDEX, France Tel : 01.39.96.33.33 Fax : 01.39.47.73.
EN NewSoft Support for: North America (U.S.A) Technical Support Hotline: Please e-mail: tech@newsoftinc.com or call (510) 445-8616 www.newsoftinc.com Europe UK The Software Centre, East Way, East Mill Industrial Estate, Ivybridge, Devon, PL21 9PE, UK Tel: (44) 1752-201148 Fax: (44) 1752-894833 21 France Info Trade Centre d’activités de l’Ourcq 45, rue Delizy 93692 Pantin, France Tel: (33) 1-4810-7563 Fax: (33) 1-4810-7555 Asia/Pacific (Taiwan, R.O.C.) 9F, NO68, Sec. 3, Nankig E. Rd., Taipei, Taiwan, R.O.
HS-V4KITE VICTOR COMPANY OF JAPAN, LIMITED COPYRIGHT© 1999 VICTOR COMPANY OF JAPAN, LTD.