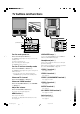
REAR PROJECTION TELEVISION HV-53PRO Contents Safety precautions . . . . . . . . . . . . 2 Cautions on screen treatment . . . 3 Setting up your TV . . . . . . . . . . . . 4 TV buttons and functions . . . . . . . 7 Remote control buttons and functions . . . 8 Using the TV's menu. . . . . . . . . . . 16 Basic operation . . . . . . . . . . . . . 16 PICTURE SETTING menu . . . . 17 PICTURE FEATURES menu . . . 18 SOUND SETTING menu . . . . . . 20 FEATURES menu . . . . . . . . . . . 21 INSTALL menu . . . . . . .
Thank you for buying this JVC colour television. To make sure you understand how to use your new TV, please read this manual thoroughly before you begin. Safety precautions WARNING: TO PREVENT FIRE OR SHOCK HAZARD, DO NOT EXPOSE THIS APPLIANCE TO RAIN OR MOISTURE. CAUTION: TO ENSURE PERSONAL SAFETY, OBSERVE THE FOLLOWING RULES REGARDING THE USE OF THIS TV. 1 Operate only from the power source indicated on the rear of the TV. 2 Avoid damaging the power cord and mains plug.
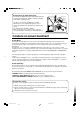
To prevent the TV from falling over: Plastic loop Use the two small plastic loops on the back of the TV set, and connect them to a wall or column using two secure wires or strong cords. Wire or strong cord • The wire or strong cord, and wall ring (or similar attachment), are not supplied with this TV set. Use commonly available items, but make sure that they are strong. • The thread or wire should be straight.
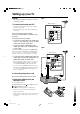
Setting up your TV CAUTION Fig.A •Turn off all the epuipment including the TV before connecting anything. Back of the TV 1 Connecting the aerial and VCR •Aerial cable is not supplied. Use a good quality 75-ohm coaxial cable. •Read the manual that came with the VCR before connecting. R VIDEO-1 VIDEO-2 CR •If the VCR's audio output is in mono, connect the VCR's AUDIO OUT (audio output) jack and the TV's AUDIO L/MONO jack with an audio cable.
Setting up your TV 4 Making the initial settings When the TV is first turned on, it enters the initial setting mode, and the JVC logo is displayed. 1 Press the main power button on the TV The TV is turned on, and the JVC logo appears. •If the power lamp on the TV lights red and does not change to green, your TV is in the standby mode. Press the POWER button on the remote control to turn the TV on. •If the JVC logo does not appear, your TV has already been turned before.
Setting up your TV •The AUTO PROGRAM function does not store a TV channel to the programme number 0 (AV). 5 If you do not need to use the EDIT/ MANUAL function, press the MENU/OK button to close the EDIT menu. 5 Adjusting CRT colour convergence This TV has three color projection tubes : one for red, one for green and one for blue. When mixed together in the proper proportion, the output of these three colour tubes can produce any colour.
TV buttons and functions R AUDIO L/MONO VIDEO S OVER VIDEO-1 (Behind the cover) VIDEO-2 CR MENU CHANNEL VOLUME YV/VIDEO OK R CB Y/VIDEO AUDIO L/MONO VIDEO-3/ COMPONENT EXIT S-VIDEO V L/MONO R OUTPUT R L AUDIO AV COMPU LINK IN(VIDEO4) VIDEO Turn the main power on SPATIALIZER lamp 3 Press the main power button 1 . If you set the SPATIALIZER function to MONO or LIVE,the SPATIALIZER lamp lights. The POWER lamp 2 lights red and your TV is in the standby mode.
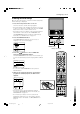
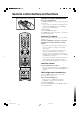
Remote control buttons and functions Turn the TV on from standby mode Press the POWER button. The POWER lamp lights red to green and your TV will be turned on. •You can turn on the TV from the standby mode by pressing the TV/VIDEO button, the CHANNEL -/+ buttons or the number buttons. POWER TV/VIDEO ZOOM SPATIALIZER BASS PICTURE MODE 1 2 3 4 5 6 7 8 9 Press the CHANNEL-/+ buttons or enter the programme number (PR) with the number buttons.
Remote control buttons and functions MUTING button Press the MUTING button to turn off the volume. Pressing the MUTING button again resumes the previous volume level. •When the TV’s MUTING function is on, is displayed on the screen. However, to prevent screen burn-in, the mark automatically dims if no TV operation has been performed for a period of about one minute. •The LIVE mode works properly only with stereo sound. •The LIVE mode does not work correctly with headphones.
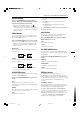
Remote control buttons and functions To cancel register a TV channel as the "Return Channel" : while viewing any TV channel, press the RETURN+ button and hold for more than 3 seconds continuously. "RETURN PLUS CANCELED!" is displayed and the registration is cancelled. •When you turn off the TV, the registration for the "Return Channel" is cancelled. DISPLAY button You can display the PR LIST, programme number or VIDEO terminal number on the screen. Press the DISPLAY button.
Remote control buttons and functions COLOUR SYSTEM button BROADCASTING SYSTEMS The colour system is chosen automatically. However, if the picture is not clear or no colour appears, choose the colour system manually. For sound sysytem colour system in your country or rigion, refer to the table below. Press the COLOUR SYSTEM button to choose the appropriate colour system. AUTO : This function detects a colour system from the input signal.
Remote control buttons and functions FREEZE button You can view the Main picture's frozen image as the SUB-picture. Press the FREEZE button. Using the MULTI function You can display multi-pictures that enable you to easily find a program you want to view. 1 Press the MULTI button. Still pictures MAIN Press the MULTI button changes the display as follow: 5-pictures multi mode To cancel the FREEZE function : Press the FREEZE button again.
Remote control buttons and functions Using the PIP function You can view two pictures (MAIN and SUB) at the same time. Press the PIP button. Press the PIP button changes the display as follows: 5 SUB MAIN 1 While the SUB-picture is displayed, press the MENU/OK button to display the MENU (main manu). 2 Press the / and / buttons to choose PICTURE FEATURES, and then press the MENU/OK button.
Remote control buttons and functions Viewing a teletext programme 1 Choose a TV channel with a teletext broadcast. 2 Press the TV/TEXT button. Press the TV/TEXT button changes the mode as follows: HOLD button You can hold a teletext page on the screen for as long as you want, even while several other teletext pages are being received. Press the HOLD button. The (hold) are displayed at the top left of the screen. To cancel the Hold function: Press the HOLD button again.
Remote control buttons and functions SUBPAGE button Some teletext pages include sub-pages that are automatically displayed. You can hold any sub-page, or veiw it at any time. 1 Press the SUBPAGE button to operate the Sub-page function. Sub-page numbers are displayed at the left of the screen. Colour* Yellow White Blue or Red Meaning of sub-page number Currently being displayed. Can be displayed. Cannot be displayed and it is not sent. * : Background color of the sub-page number.
Using the TV's menu This TV has a number of functions you can operate using menus. To fully utilize all your TV's functions, you need to understand the basic menu operating techniques fully. Basic operation 1 Press the MENU/OK button to display the MENU (main menu).
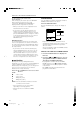
Using the TV's menu PICTURE SETTING menu PICTURE SETTING PICTURE MODE CONTRAST BRIGHT SHARP COLOUR TINT WHITE BALANCE OK :OK TV :EXIT DISP :BACK STANDARD MID RESET PICTURE MODE You can choose one of three PICTURE MODEs to adjust the picture settings automatically. BRIGHT: Heightens contrast and sharpness. STANDARD: Standardizes picture adjustment. SOFT: Softens contrast and sharpness. •You can also operate the PICTURE MODE function with the PICTURE MODE button on the remote control.
Using the TV's menu PICTURE FEATURES menu DigiPure PICTURE FEATURES DIGITAL VNR AUTO DigiPure AUTO PULL DOWN AUTO COLOUR SYSTEM ZOOM DIGITAL CONVERGENCE OK :OK TV :EXIT DISP :BACK MIN: The Digipure function uses the latest in digital technology to give you a natural looking picture. The Digipure function includes the following two functions. Digipure function: DIGITAL VNR The DIGITAL VNR function cuts down the amount of noise in the original picture.
Using the TV's menu COLOUR SYSTEM The colour system is chosen automatically. However, if the picture is not clear or no colour appears, choose the colour system manually. 1 Choose COLOUR SYSTEM, then press the MENU/OK button. COLOUR SYSTEM :OK TV :EXIT DISP :BACK The picture expands and the chosen ZOOM mode is displayed in about 5 seconds. •You can choose a ZOOM mode from REGULAR or ZOOM modes. For details, see "ZOOM button" on page 9.
Using the TV's menu SOUND SETTING menu BALANCE SOUND SETTING STEREO/ BASS TREBLE BALANCE AI VOLUME BBE SPATIALIZER SUPER BASS HEADPHONE OK :OK TV :EXIT DISP :BACK MONO ON ON LIVE ON SPATIALIZER You can adjust the volume balance between the left and right speakers. : turn the left speaker's volume level up. : turn the right speaker's volume level up.
Using the TV's menu FEATURES menu TV SPEAKER: CHILD LOCK FEATURES When this function is on, the TV’s speaker does not shut off the sound even if headphones are connected. SLEEP TIMER CHILD LOCK CHANNEL GUARD AUTO SHUTOFF VIDEO-3 SETTING OUTPUT: You can choose the sound from the MAIN-picture(MAIN) or the SUB-picture(SUB) when using the headphones. •The TV’s speaker does not out put the sound from the SUBpicture. •The sound of the SUB-picture is mono only.
Using the TV's menu 3 Press the MENU/OK button. CHANNEL GUARD PR AV 01 02 03 04 05 06 07 08 09 CH / CC ID CH CH CH CH CH CH CC CC CC OK :OK TV :EXIT DISP :BACK 21 22 23 24 25 26 01 02 03 GUARD 4 Press the / buttons to choose a TV channel. •The TV shows the TV programme which the chosen TV channel is now broadcasting. 5 Press the blue button to set this function to the TV channel. (CHANNEL GUARD) appears and the TV channel is locked. To cancel this function: Press the blue button again.
Using the TV's menu INSTALL menu •To cancel the AUTO PROGRAM function, press the DISPLAY button. INSTALL LANGUAGE AUTO PROGRAM EDIT/MANUAL TELETEXT LANGUAGE OK :OK TV :EXIT DISP :BACK 2 After the TV channels have been stored in the programme number list, the EDIT menu appears. LANGUAGE 1 Choose LANGUAGE, then press the MENU/OK button. OK :OK TV :EXIT DISP :BACK The menu disappers.
Using the TV's menu EDIT/MANUAL FUNCTIONS MOVE 1 Press the / buttons to choose a TV channel. 2 Press the button to start the MOVE function. DELETE 1 Press the / buttons to choose a TV channel. 2 Press the yellow button to delete the TV channel. The TV channel is deleted from the programme numbers list. EDIT PR AV 01 02 03 04 05 06 07 08 09 ID CH/CC CH CH CH CH CH CH CH CC CC OK :OK TV :EXIT DISP :BACK 21 22 23 24 25 26 CC 01 02 03 STORE 3 Press the / buttons to choose a new programe number.
Using the TV's menu CH/CC number 4 Press the Number buttons to enter the remaining CH/CC number. The TV shifts to registration mode. When the registration is completed, the picture of the TV channel appears on the screen. •The CH/CC number is a number indicating the broadcast frequency to the TV. If the TV cannot detect the TV channel corresponding to the broadcast frequency indicated by the CH/CC number, a picture in the no-signal state appears.
Using the TV's menu TELETEXT LANGUAGE 3 Press the MENU/OK button to complete the setting. There are 4 types of teletext language groups. Set the teletext language group that corresponds to the language of the teletext program that you want to watch. 1 Choose TELETEXT LANGUAGE, then press the MENU/OK button. The menu disappears. •Languages that are not included in the teletext language group that you select, the sub-titles of the teletext program will not be displayed properly.
Additional preparation Connecting the external devices Connect the devices to the TV, paying attention to the following connection diagram. Before connecting anything: •Read the manuals provided with the devices. Depending on the devices, the connection method may differ from the figure. In addition, the device settings may be changed depending on the connection method to secure proper operation. (Behind the cover) •Turn off all the devices including the TV.
Additional preparation Connecting methods 1 Connect the TV's VIDEO jack and the device's VIDEO OUT (video output) jack with a video cable. If connecting a device to the TV with an S-VIDEO cabel: Connect the VCR's S-VIDEO OUT (S-VIDEO output) connector and the TV's S-VIDEO connector with an S-VIDEO cable, instead of connecting with a video cable. Note that the connection with a video cable will be ignored in case you conect a VCR to the TV with both video cable and S-VIDEO cable.
Additional preparation Connecting AV COMPU LINK Supported Devices AV COMPU LINK remote control system is a system in which related devices are automatically controlled when you operate one device. If you apply this system to the TV, you can have the TV automatically perform the required operations by operating one external device. You don't have to use the TV's remoto control to turn on the TV or change the VIDEO modes.
Troubleshooting If a problem arises while you are using the TV, please read this "Troubleshooting" well before you request having the TV repaired. You may be able to fix it easily by yourself. For example, if the AC plug is disconnected from the AC outlet, or the TV aerial has problems, you may think there is a problem with the TV itself. Important: •This Troubleshooting guide only covers problems whose cause are not easy to determine.
Troubleshooting Operation disabled •Have the batteries of the remote control become exhausted? Follow the description "Putting the Batteries into the Remote Control" on page 4 and replace them with new batteries to try solve the problem.
HV-53PRO Specifications Broadcasting systems B, G, I, D, K, K1, M Colour systems PAL, SECAM, NTSC3.58/4.43MHz Channels and frequencies VHF low channel (VL) =46.25 to 168.25 MHz VHF high channel (VH) =175.25 to 463.25 MHz UHF channel(U) =471.25 to 863.25 MHz Receives cable channels in mid band (X to Z+2, S1 to S10), super band (S11 to S20) and hyper band (S21 to S41).