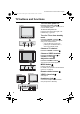
Cover_Eng.fm Page 1 Thursday, November 13, 2003 2:36 PM COLOUR TELEVISION Contents Setting up your TV. . . . . . . . . . . . . . . . . . 3 TV buttons and functions. . . . . . . . . . . . . 6 Remote control buttons and functions. . . 8 HV-Z34L1 HV-Z29V1 Using the TV’s menu . . . . . . . . . . . . . . . 19 PICTURE menu . . . . . . . . . . . . . . . . . 20 FEATURES menu . . . . . . . . . . . . . . 21 SOUND menu . . . . . . . . . . . . . . . . . . . 24 FEATURES menu . . . . . . . . . . . . . . . .
HVZ34L1_Z29V1.book Page 2 Friday, November 7, 2003 9:30 AM Thank you for buying this JVC colour television. To make sure you understand how to use your new TV, please read this manual thoroughly before you begin. WARNING: TO PREVENT FIRE OR SHOCK HAZARD, DO NOT EXPOSE THIS APPLIANCE TO RAIN OR MOISTURE. CAUTION: TO ENSURE PERSONAL SAFETY, OBSERVE THE FOLLOWING RULES REGARDING THE USE OF THIS TV. 1 Operate only from the power source indicated on the rear of the TV.
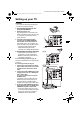
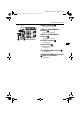
HV-Z34L1/29V1/ LCT1457-001A / English HVZ34L1_Z29V1.book Page 3 Friday, November 7, 2003 9:30 AM Setting up your TV CAUTION • Turn off all the equipment including the TV before connecting anything. 1 Connecting the woofer unit (only for HV-Z29V1) 1 Fitting the woofer unit Align the projection on the base of the woofer unit with the hole in the top of the TV, and insert the connector into the woofer terminal.
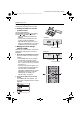
HV-Z34L1/29V1/ LCT1457-001A / English HVZ34L1_Z29V1.book Page 4 Friday, November 7, 2003 9:30 AM Setting up your TV 3 Connecting the power cord Connect the mains plug to the AC outlet. 4 Putting the batteries into the remote control Use two AA/R6 batteries. Insert the batteries from the - end, making sure the + and - polarities are correct. • Follow the warnings printed on the batteries. • If the remote control does not work properly, replace the batteries.
HV-Z34L1/29V1/ LCT1457-001A / English HVZ34L1_Z29V1.book Page 5 Friday, November 7, 2003 9:30 AM Setting up your TV 3 Press the 6 buttons to choose ENGLISH. Then press the OK button on the remote contol. The TELETEXT LANGUAGE menu appears. Set the teletext language group that corresponds to the language of the teletext program that you want to watch. For details, see “TELETEXT LANGUAGE” on page 34. 5 After the TV channels have been stored in the programme numbers (PR) list, the EDIT menu appears.
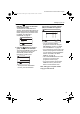
HV-Z34L1/29V1/ LCT1457-001A / English HVZ34L1_Z29V1.book Page 6 Friday, November 7, 2003 9:30 AM TV buttons and functions Turn the main power on Press the main power button 1. The POWER lamp 2 lights red and your TV is in the standby mode. HV-Z34L1 To turn the main power off: Press the main power button again. The POWER lamp 2 goes off. Turn the TV on from standby mode Press the CHANNEL-/+ buttons 5. The POWER lamp 2 lights red to green and your TV will be turned on.
HV-Z34L1/29V1/ LCT1457-001A / English HVZ34L1_Z29V1.book Page 7 Friday, November 7, 2003 9:30 AM TV buttons and functions VIDEO-1 terminal 0 Back of the TV • See pages 3 and 36. 0 ! ~ - = VIDEO-2 (COMPONENT) terminal • See pages 33 and 36. VIDEO-3 (COMPONENT) terminal = • See pages 33 and 36. # @ OUTPUT terminal ~ • See page 37. Aerial socket ! Connect the aerial cable. • See page 3. AV COMPU LINK terminal @ • See page 38. BASS SPEAKER OUT terminal # (only for HV-Z29V1) • See page 3.
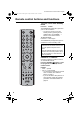
HV-Z34L1/29V1/ LCT1457-001A / English HVZ34L1_Z29V1.book Page 8 Friday, November 7, 2003 9:30 AM Remote control buttons and functions 2 3 4 5 6 7 8 9 PIP 1 TV DVD Turn the TV on from standby mode RETURN+ 0 FAVORITE CHANNEL TV/VIDEO SUB-P MENU OK DISPLAY SUB-P VOLUME SOUND CINEMA MODE SURROUND BASS ZOOM F. T/L ? TOP MENU STROBE 8 To turn the TV off: Press the # button again. The POWER lamp changes from green to red and the TV enters standby mode.
HV-Z34L1/29V1/ LCT1457-001A / English HVZ34L1_Z29V1.book Page 9 Friday, November 7, 2003 9:30 AM Remote control buttons and functions Adjust the volume Press the VOLUME-/+ buttons. Watch images from an external device ZOOM: You can zoom up the Wide picture (16:9 aspect ratio) to fill the TV screen. Choose a VIDEO terminal to which the external device has been connected. Press the TV/VIDEO button. • You can choose a VIDEO terminal with the CHANNELp buttons or from the PR LIST.
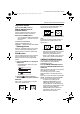
HV-Z34L1/29V1/ LCT1457-001A / English HVZ34L1_Z29V1.book Page 10 Friday, November 7, 2003 9:30 AM Remote control buttons and functions MONO: Select the MONO mode, when you listen to the mono sound. You can enjoy the sound for a wider audience similar to stereo sound. OFF: The CINEMA SURROUND function switches off. SOUND MODE button You can select the SOUND MODE of you liking from 4 types of sound modes to fully enjoy the sound of your TV. Press the SOUND MODE button to select one of sound modes.
HV-Z34L1/29V1/ LCT1457-001A / English HVZ34L1_Z29V1.book Page 11 Friday, November 7, 2003 9:30 AM Remote control buttons and functions RETURN function The TV temporarily memorises the TV channel that was chosen right before the current TV channel as the “Last Channel”. By pressing the RETURN+ button, you can alternately view the current TV channel and the “Last Channel”.
HV-Z34L1/29V1/ LCT1457-001A / English HVZ34L1_Z29V1.book Page 12 Friday, November 7, 2003 9:30 AM Remote control buttons and functions • If the chosen channel is already registered as the favorite channel, when a colour button is pressed, the registered colour button icon appears on the top right of the screen. • You cannot register in the Text mode, or while multiple screens, such as PIP (picture in picture) are displayed.
HV-Z34L1/29V1/ LCT1457-001A / English HVZ34L1_Z29V1.book Page 13 Friday, November 7, 2003 9:30 AM Remote control buttons and functions PIP (picture in picture) mode Press . Each time it is pressed the mode changes as shown below. Normal screen PIP mode Sub Main To return to the normal screen: Press the or again, or press the BACK button. • The and buttons do not work in the Text mode. • Twin and PIP functions do not work for a picture of 1125i signal.
HV-Z34L1/29V1/ LCT1457-001A / English HVZ34L1_Z29V1.book Page 14 Friday, November 7, 2003 9:30 AM Remote control buttons and functions Changing the sub picture position (in PIP mode only) You can position the sub picture to one of corners of the main picture. Press the (Position) button. Each time you press the button, the sub picture moves clockwise (lower right → lower left → upper left → upper right).
HV-Z34L1/29V1/ LCT1457-001A / English HVZ34L1_Z29V1.book Page 15 Friday, November 7, 2003 9:30 AM Remote control buttons and functions Freeze function 1 Set the PIP/TV/DVD switch to the PIP position. 2 Press the (Freeze) button. Still picture is captured and displayed on the right side of the screen. On the left, the moving picture is displayed. While watching a picture, you can capture a still picture you want. The captured still picture and the moving picture are displayed at a time.
HV-Z34L1/29V1/ LCT1457-001A / English HVZ34L1_Z29V1.book Page 16 Friday, November 7, 2003 9:30 AM Remote control buttons and functions Operating a JVC brand DVD player You can operate a JVC brand DVD player. Pressing the button having the same appearance as the original remote control button of a device makes the function work in the same way as the original remote control. F. T/L 1 Choose a TV channel with a teletext broadcast. 2 Set the PIP/TV/DVD switch to the TV position.
HV-Z34L1/29V1/ LCT1457-001A / English HVZ34L1_Z29V1.book Page 17 Friday, November 7, 2003 9:30 AM Remote control buttons and functions (Hold) button You can hold a teletext page on the screen for as long as you want, even while several other teletext pages are being received. Press the (Hold) button. The (hold) are displayed at the top left of the screen. To cancel the Hold function: Press the (Hold) button again. (Reveal) button Some teletext pages include hidden text (such as answers to a quiz).
HV-Z34L1/29V1/ LCT1457-001A / English HVZ34L1_Z29V1.book Page 18 Friday, November 7, 2003 9:30 AM Remote control buttons and functions Using the List mode You can store the numbers of your favorite teletext pages in memory and call them up quickly using the colour buttons. To store the page numbers: 1 Press the F.T/L button to engage the List mode. The stored page numbers are displayed at the bottom of the screen. 2 Press a colour button to choose a position.
HV-Z34L1/29V1/ LCT1457-001A / English HVZ34L1_Z29V1.book Page 19 Friday, November 7, 2003 9:30 AM Using the TV’s menu This TV has a number of functions you can operate using menus. To fully utilize all your TV’s functions, you need to understand the basic menu operating techniques fully. Buttons used to operate the menus 7 8 Types of menu PICTURE menu Choose to set the screen settings.
HV-Z34L1/29V1/ LCT1457-001A / English HVZ34L1_Z29V1.book Page 20 Friday, November 7, 2003 9:30 AM Using the TV’s menu Operation with the buttons on the TV You can also operate the menus using the buttons on the front panel of the TV.
HV-Z34L1/29V1/ LCT1457-001A / English HVZ34L1_Z29V1.book Page 21 Friday, November 7, 2003 9:30 AM Using the TV’s menu TINT You can adjust the picture tint. 2 : reddish 3 : greenish • You can change the TINT setting (picture tint) only when the colour system is NTSC 3.58 or NTSC 4.43. To return to the default settings in each PICTURE MODE: Press the blue button. This will return the picture settings in the currently chosen PICTURE MODE to the default settings, and stores them in the PICTURE MODE again.
HV-Z34L1/29V1/ LCT1457-001A / English HVZ34L1_Z29V1.book Page 22 Friday, November 7, 2003 9:30 AM Using the TV’s menu MAX: The level of the DIGITAL VNR effect is set to the maximum. If you set the DIGITAL VNR function to AUTO(HIGH) but still notice some noise, change the setting from AUTO(HIGH) to MAX. • The MAX setting is not suitable for high-quality pictures which contain very little noise.
HV-Z34L1/29V1/ LCT1457-001A / English HVZ34L1_Z29V1.book Page 23 Friday, November 7, 2003 9:30 AM Using the TV’s menu Colour DigiPure Makes the colour outline stand out and increases the sharpness giving a clearer picture. ON: Colour DigiPure works. Normally use with this function turned on. OFF: Colour DigiPure doesn’t work. This gives a less clear picture than when this function is turned on. COLOUR SYSTEM The colour system is chosen automatically.
HV-Z34L1/29V1/ LCT1457-001A / English HVZ34L1_Z29V1.book Page 24 Friday, November 7, 2003 9:30 AM Using the TV’s menu ZOOM You can change the screen size according to the picture aspect ratio. Choose the optimum one from three ZOOM modes. 1 Choose ZOOM, then press the OK or 3 button. SOUND menu SOUND STEREO/ SOUND MODE BALANCE HEADPHONE VOLUME CINEMA SURROUND SUPER BASS BBE DIGITAL MONO MONO LOW ON >> ZOOM OSD-3-EN REGULAR ZOOM 16:9 OK D0017-EN 2 Press the 6 buttons to choose a ZOOM mode.
HV-Z34L1/29V1/ LCT1457-001A / English HVZ34L1_Z29V1.book Page 25 Friday, November 7, 2003 9:30 AM Using the TV’s menu SOUND MODE HEADPHONE VOLUME Register your preferred pattern in the SOUND MODE USER. 1 Choose SOUND MODE, then press the OK or 3 button. The “SOUND MODE“ menu appears. Adjust the volume of the sub-picture sound which is heard through the headphones when set to Twin mode, PIP mode or 5 pictures multi.
HV-Z34L1/29V1/ LCT1457-001A / English HVZ34L1_Z29V1.book Page 26 Friday, November 7, 2003 9:30 AM Using the TV’s menu FEATURES menu CHANNEL GUARD FEATURES SLEEP TIMER CHANNEL GUARD APPEARANCE BLUE BACK CHILD LOCK AUTO SHUTOFF FAVORITE SETTING TYPE A ON OFF ON When there is a TV channel you do not want your children to watch, you can lock out the channel. Even when a child chooses a programme number for a locked out channel the screen will change to blue and display n so the channel cannot be viewed.
HV-Z34L1/29V1/ LCT1457-001A / English HVZ34L1_Z29V1.book Page 27 Friday, November 7, 2003 9:30 AM Using the TV’s menu To cancel this function: Press the blue button again. n (CHANNEL GUARD) disappears and the lock is released. 6 Press the OK button to complete the setting. The menu disappears. To view a locked TV channel: 1 Choose a programme number in which a TV channel locked with the number buttons or PR LIST. The screen changes to blue and the n (CHANNEL GUARD) appears.
HV-Z34L1/29V1/ LCT1457-001A / English HVZ34L1_Z29V1.book Page 28 Friday, November 7, 2003 9:30 AM Using the TV’s menu FAVORITE SETTING You can set a dedicated picture effect for the favorite channels registered to the colour buttons (Red, Green, Yellow and Blue). For favorite channel registration, see “Favorite channel registration” on page 11. 1 Choose FAVORITE SETTING, then press the OK or 3 button.
HV-Z34L1/29V1/ LCT1457-001A / English HVZ34L1_Z29V1.book Page 29 Friday, November 7, 2003 9:30 AM Using the TV’s menu 3 Press the 6 button to choose VIDEO, then press the 5 button to choose one of video inputs, VIDEO-1 to -4. 4 Set the picture effect. Press the 6 button to choose an item listed in the following table and press the 5 button to choose one of options. • As explained in the table, if PICTURE EFFECT is set to OFF, the dedicated picture effect for the video inputs is not used.
HV-Z34L1/29V1/ LCT1457-001A / English HVZ34L1_Z29V1.book Page 30 Friday, November 7, 2003 9:30 AM Using the TV’s menu • You can proceed to edit the programme numbers list using the EDIT/MANUAL function. For details, see “EDIT/MANUAL” on page 30 • If a TV channel you want to view is not stored in the programme numbers list, you can register it using the MANUAL function. For details, see “EDIT/MANUAL” on page 30. • The AUTO PROGRAM function does not store a TV channel to the programme number 0 (AV).
HV-Z34L1/29V1/ LCT1457-001A / English HVZ34L1_Z29V1.book Page 31 Friday, November 7, 2003 9:30 AM Using the TV’s menu FUNCTIONS To cancel the ID function: Press the BACK button. MOVE 1 Press the 6 buttons to choose a TV channel. 4 Press the OK button to register a channel name to a TV channel. 2 Press the 3 button to start the MOVE function. DELETE 1 Press the 6 buttons to choose a TV channel.
HV-Z34L1/29V1/ LCT1457-001A / English HVZ34L1_Z29V1.book Page 32 Friday, November 7, 2003 9:30 AM Using the TV’s menu 3 Press the 3 button to choose the system (sound system) for a TV channel you want to register. • For the sound systems in each country or region, refer to the table below: Area Asia, Middle East Europe Oceania Africa Country or Region Bahrain, Kuwait, Oman, Qatar, United Arab Emirates, Yemen, etc. Indonesia, Malaysia, Singapore, Thailand, India, etc. China, Vietnam, etc.
HV-Z34L1/29V1/ LCT1457-001A / English HVZ34L1_Z29V1.book Page 33 Friday, November 7, 2003 9:30 AM Using the TV’s menu • The CH/CC number is a number indicating the broadcast frequency to the TV. If the TV cannot detect the TV channel corresponding to the broadcast frequency indicated by the CH/CC number, a picture in the nosignal state appears. LANGUAGE You can choose the language you want to use for the on-screen display from the language list in a menu. 1 Choose LANGUAGE, then press the OK button.
HV-Z34L1/29V1/ LCT1457-001A / English HVZ34L1_Z29V1.book Page 34 Friday, November 7, 2003 9:30 AM Using the TV’s menu TELETEXT LANGUAGE There are four types of teletext language groups. Set the teletext language group that corresponds to the language of the teletext program that you want to watch. 1 Choose TELETEXT LANGUAGE, then press the OK or 3 button. > TELETEXT LANGUAGE GROUP-1 GROUP-2 GROUP-3 GROUP-4 OK OSD-10-EN 2 Press the 6 buttons to choose a group.
HV-Z34L1/29V1/ LCT1457-001A / English HVZ34L1_Z29V1.book Page 35 Friday, November 7, 2003 9:30 AM Using the TV’s menu CH/CC number When you want to use the INSERT function on page 32, find the CH/CC number corresponding to the Channel number of the TV channel from this table. US: The US channel numbers are the channel numbers used in the United States, Philippines, etc. CCIR: The CCIR channel numbers are the channel numbers used in the Middle East, Southeast Asia, etc.
HV-Z34L1/29V1/ LCT1457-001A / English HVZ34L1_Z29V1.book Page 36 Friday, November 7, 2003 9:30 AM Additional preparation Connecting the external devices Connect the devices to the TV, paying attention to the following connection diagram. Before connecting anything: • Read the manuals provided with the devices. Depending on the devices, the connection method may differ from the figure. In addition, the device settings may be changed depending on the connection method to secure proper operation.
HV-Z34L1/29V1/ LCT1457-001A / English HVZ34L1_Z29V1.book Page 37 Friday, November 7, 2003 9:30 AM Additional preparation Connecting methods 1 Connect the TV’s VIDEO jack and the device’s VIDEO OUT (video output) jack with a video cable. If connecting a device to the TV with an S-VIDEO cable: Connect the VCR’s S-VIDEO OUT (SVIDEO output) connector and the TV’s S connector with an S-VIDEO cable, instead of connecting with a video cable.
HV-Z34L1/29V1/ LCT1457-001A / English HVZ34L1_Z29V1.book Page 38 Friday, November 7, 2003 9:30 AM Additional preparation Connecting Headphones Connect the headphones with a stereo mini jack (of 3.5 mm in diameter) to the Headphone jack at the TV front panel. Connecting AV COMPU LINK Supported Devices AV COMPU LINK remote control system is a system in which related devices are automatically controlled when you operate one device.
HV-Z34L1/29V1/ LCT1457-001A / English HVZ34L1_Z29V1.book Page 39 Friday, November 7, 2003 9:30 AM Additional preparation 3 Change the device’s setting according to the VIDEO terminal it is connected to. If a VCR is connected to the VIDEO-1 terminal: Set the VCR’s remote control code to A code. If a DVD player is connected to the VIDEO-1 terminal: Set the DVD player’s AV COMPULINK MODE to DVD2. If a VCR is connected to the VIDEO-2 (COMPONENT) terminal: Set the VCR’s remote control code to B code.
HV-Z34L1/29V1/ LCT1457-001A / English HVZ34L1_Z29V1.book Page 40 Friday, November 7, 2003 9:30 AM Troubleshooting If a problem arises while you are using the TV, please read this “Troubleshooting” well before you request having the TV repaired. You may be able to fix it easily by yourself. For example, if the AC plug is disconnected from the AC outlet, or the TV aerial has problems, you may think there is a problem with the TV itself.
HV-Z34L1/29V1/ LCT1457-001A / English HVZ34L1_Z29V1.book Page 41 Friday, November 7, 2003 9:30 AM Troubleshooting • Has COLOUR or BRIGHT been controlled properly? Follow the description “Adjusting the picture” on page 20 to try to adjust them properly. • Videotaping teletext is not recommended because it may not record correctly. • When a white and bright still image (such as a white dress) is displayed on the screen, the white part may look as if it were coloured.
HV-Z34L1/29V1/ LCT1457-001A / English HVZ34L1_Z29V1.book Page 42 Friday, November 7, 2003 9:30 AM Troubleshooting Other concerns • When the AUTO SHUTOFF function operates, the TV is automatically turned off. If the TV is turned off suddenly, try to press the # button to turn on the TV once again. At this time, if the TV resumes a normal state, there is no problem.
HV-Z34L1/29V1/ LCT1457-001A / English Body_Eng.fm Page 43 Thursday, November 13, 2003 2:36 PM Specifications Broadcasting systems B, G, I, D, K, K1, M Colour systems PAL, SECAM, NTSC3.58/4.43MHz Channels and frequencies VHF low channel (VL) =46.25 to 168.25 MHz VHF high channel (VH) =175.25 to 463.25 MHz UHF channel (U) =471.25 to 863.25 MHz • Receives cable channels in mid band (X to Z+2, S1 to S10), super band (S11 to S20) and hyper band (S21 to S41).
Body_Eng.