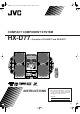
00-00_Cover[J]_f.fm Page 1 Monday, January 16, 2006 8:17 PM COMPACT COMPONENT SYSTEM HX-D77 SP-HXD77 —Consists of CA-HXD77 and SP-HXD77 CA-HXD77 SP-HXD77 INSTRUCTIONS For Customer Use: Enter below the Model No. and Serial No. which are located either on the rear, bottom or side of the cabinet. Retain this information for future reference. Model No. Serial No.
00-00_Safty[J]_f.fm Page 1 Monday, February 13, 2006 3:27 PM Warnings, Cautions and Others Mises en garde, précautions et indications diverses CAUTION RISK OF ELECTRIC SHOCK DO NOT OPEN CAUTION: TO REDUCE THE RISK OF ELECTRIC SHOCK, DO NOT REMOVE COVER (OR BACK). NO USER SERVICEABLE PARTS INSIDE. REFER SERVICING TO QUALIFIED SERVICE PERSONNEL.
00-00_Safty[J]_f.fm Page 2 Monday, February 13, 2006 3:27 PM IMPORTANT FOR LASER PRODUCTS 24 kg / 53 lbs. CAUTION! To avoid personal injury or accidentally dropping the unit, have two persons unpack, carry, and install the unit. ATTENTION! Pour éviter toute blessure personnelle ou chute accidentelle del’appareil, faites déballer, transporter et installer l’appareil par deux personnes. 1 CLASS 1 LASER PRODUCT 2 CAUTION: Do not open the top cover.
HX-D7[J]_f.book Page 1 Monday, February 13, 2006 3:31 PM Introduction Precautions Installation • Install in a place which is level, dry and neither too hot nor too cold—between 5°C (41°F) and 35°C (95°F). • Install the System in a location with adequate ventilation to prevent internal heat buildup in the System. DO NOT install the System in a location near heat sources, or in a place subject to direct sunlight, excessive dust or vibration. • Leave sufficient distance between the System and the TV.
HX-D7[J]_f.book Page 2 Monday, February 13, 2006 3:31 PM Contents Before Operating the System....................... 3 Advanced Disc Operations ........................ 23 Playable Disc Types .................................................... 3 Programming the Playing Order—Program Play...... 23 Playing at Random—Random Play........................... 24 Playing Repeatedly—Repeat Play ............................ 25 Prohibiting Disc Ejection—Child Lock .................... 25 Getting Started.........
HX-D7[J]_f.book Page 3 Monday, February 13, 2006 3:31 PM Before Operating the System Playable Disc Types INFO This unit has been designed to play back the following discs: Disc Type Mark (Logo) Note on Region Code DVD players and DVDs have their own Region Code numbers. This unit can play back only DVDs whose Region Code numbers include “1.” EX.
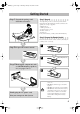
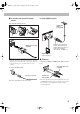
HX-D77[J]_f.book Page 4 Thursday, February 23, 2006 5:09 PM Getting Started Step 1:Unpack the package and check the accessories. Step 1: Unpack After unpacking, check to be sure that you have all the following items. The number in parentheses indicates the quantity of each piece supplied. • FM antenna (1) • AM loop antenna (1) • Composite video cord (1) • Remote control (1) • Batteries (2) If any item is missing, consult your dealer immediately.
HX-D7[J]_f.book Page 5 Monday, February 13, 2006 3:31 PM Step 3: Hook Up If you need more detailed information, see page 6 and 7. Do not connect the AC power cord until all other connections have been made. Illustrations of the input/output terminals below are typical examples. When you connect other components, refer also to their manuals since the terminal names actually printed on the rear may vary. ~ From the AM/FM antenna See page 6. Ÿ From the input of TV/monitor See page 6.
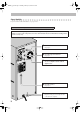
HX-D77[J]_f.book Page 6 Thursday, February 23, 2006 5:09 PM ~ To assemble and connect the AM loop For better FM/AM reception antenna To assemble the AM loop antenna Outdoor FM antenna (not supplied) To connect the AM loop antenna cords Disconnect the supplied FM antenna, and connect to an outdoor FM antenna using a 75 Ω wire with coaxial type connector (IEC or DIN45325). AM loop antenna cord (supplied) AM loop antenna Keep it connected.
HX-D7[J]_f.book Page 7 Monday, February 13, 2006 3:31 PM To select the color system Remote ONLY You can select the video output to match it to the color system of your TV. • The color system can be changed only while DVD/CD is selected as the source and playback is stopped. 1 Press NTSC/PAL. 2 Select NTSC or PAL. NTSC PAL NTSC: For an NTSC TV. PAL: For a PAL TV. • When using a multi-color system TV, either position will work.
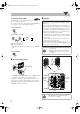
HX-D7[J]_f.book Page 8 Monday, February 13, 2006 3:31 PM Display Indication The indications on the display tell you a lot of things while you are operating the System. Before operating the System, be familiar with when and how the indicator illuminates on the display. 1 2 3 p q we rt 4 5 y u i 6 7 o ; 8 9 a See also page 9. 1 BEEP ON indicator • Lights when key-touch tone is activated.
HX-D7[J]_f.
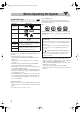
HX-D7[J]_f.book Page 10 Monday, February 13, 2006 3:31 PM Daily Operations—Playback In this manual, the operation using the remote control is mainly explained; however, you can use the buttons and controls on the main unit if they have the same (or similar) name and marks. ¥ Turn on the power. The standby lamp on the main unit turns off. • Without pressing , the System also turns on by pressing one of the source select buttons in the next step. ø Select the source.
HX-D7[J]_f.book Page 11 Monday, February 13, 2006 3:31 PM Remote ONLY To preset stations To save the power consumption while on standby—Eco mode Main Unit ONLY While on standby... You can preset 30 FM and 15 AM stations. 1 Tune in to a station you want to preset, then enter into ECO the presetting mode. Canceled The display illumination (including the display demonstration) disappears. (While holding...
HX-D7[J]_f.book Page 12 Monday, February 13, 2006 3:31 PM Playing Back a Disc INFO Before operating a disc, be familiar how a disc is recorded. • DVD Video/DVD-VR comprises of “Titles” which includes “Chapters,” MP3/WMA comprise of “Groups” which includes “Tracks,” and CD/SVCD/VCD comprise of only “Tracks.” For MP3/WMA/JPEG playback, see also page 30.
HX-D7[J]_f.book Page 13 Monday, February 13, 2006 3:31 PM Remote ONLY To select a title/group While playing a disc... Skips to the next title/group. Skips to the previous title/group. (While holding...) To play back by using the disc menu Remote ONLY You can operate the disc play—DVD and SVCD/VCD with Playback Control (PBC)—using the disc menu shown on the TV screen. • When an SVCD or VCD with PBC is detected, “PBC” appears on the display instead of the playing time.
HX-D7[J]_f.book Page 14 Monday, February 13, 2006 3:31 PM To move to the next or previous page of the current menu: Moves to the next page. Moves to the previous page. How to install the USB drivers The following procedure is described using the English version of WindowsR XP. If your PC is running on a different version of Windows, the screens shown on your PC’s monitor will differ from the ones used in the following procedure.
HX-D7[J]_f.book Page 15 Monday, February 13, 2006 3:31 PM 6 Check if the drivers are correctly installed. Open the Control Panel on your PC: Select [Start] = [Settings] = [Control Panel] 2 Click [System] = [Hardware] = [Device Manager] = [Sound, video and game controllers] and [Universal Serial Bus controllers] • The following window appears, and you can check whether the drivers are installed.
HX-D7[J]_f.book Page 16 Monday, February 13, 2006 3:31 PM Daily Operations—Sound and Other Adjustments Adjusting the Volume Remote Control INFO The volume level can be adjusted in 32 steps (VOL MIN, VOL 1 – VOL 30, VOL MAX).
HX-D7[J]_f.book Page 17 Monday, February 13, 2006 3:50 PM Making the Center Channel Sound Clear Selecting 3D Phonic Mode —Clear Voice While playing a disc (except JPEG)... • 3D Phonic does not take effect while GAME/AUX is selected as the source. Remote ONLY When a multi-channel disc with center-channel signal is loaded on the current tray, you can increase the output level for the center channel sound.
HX-D7[J]_f.book Page 18 Monday, February 13, 2006 3:31 PM Changing the Picture Tone Remote ONLY INFO While showing a playback picture on the TV, you can select the preset picture tone, or adjust it and store your own preference. To adjust the picture tone 1 Select “USER1” or “USER2.” • Follow steps 1 and 2 explained above. 2 Select a parameter you want to adjust. To select a preset picture tone 1 Activate VFP.
HX-D7[J]_f.book Page 19 Monday, February 13, 2006 3:31 PM 2 Adjust the hour. Turning On or Off the Key-Touch Tone Remote control: Main unit: 3 sec. (While holding...) 3 Adjust the minute. (While holding...) BEEP OFF BEEP ON (While holding...) • When the key-touch tone is activated, the BEEP ON indicator lights up. Now the built-in clock starts working. To check the current time during play Changing the Display Brightness 2 sec. Remote ONLY You can dim the display window.
HX-D7[J]_f.book Page 20 Monday, February 13, 2006 3:31 PM Unique DVD/VCD Operations Selecting the Sound Track Remote Control Number buttons PAGE PLAY MODE REPEAT 5/∞, ENTER 7 4 /¢ AUDIO SHIFT DISC PLAY 3 8 INFO For DVD Video: While playing back a chapter containing multiple audio tracks, you can select the one to listen to. For DVD-VR/SVCD/VCD: When playing back a track, you can select the audio channel to play. • You can also select the audio track using the on-screen bar (see pages 26 and 27).
HX-D7[J]_f.book Page 21 Monday, February 13, 2006 3:31 PM Remote ONLY Selecting the Subtitle Language For DVD Video: While playing back a chapter (of DVD Video) containing subtitles in different languages, you can select the subtitle language to display on the TV screen. For DVD-VR: While playing, you can turn the subtitle on or off. For SVCD: While playing, you can select the subtitles even if no subtitles are recorded on the disc.
HX-D7[J]_f.book Page 22 Monday, February 13, 2006 3:31 PM Special Picture Playback INFO Zoom 1 While playing... Still picture playback To resume normal playback: To start still picture playback: Remote ONLY ZOOM 1 ZOOM OFF While playing... 2 ZOOM 2 ZOOM 3 ZOOM 6 ZOOM 4 ZOOM 5 • As the number increases, magnification also increases. Move the zoomed-in position. Frame-by-frame playback 1 While playing... Still picture playback starts.
HX-D7[J]_f.book Page 23 Monday, February 13, 2006 3:31 PM Advanced Disc Operations Programming the Playing Order Remote Control —Program Play Remote ONLY INFO You can arrange the playing order of the tracks (up to 99) before you start playback. • Program play cannot be used for DVD-VR disc. Number buttons 1 Before starting playback, activate Program Play.
HX-D7[J]_f.book Page 24 Monday, February 13, 2006 3:31 PM To skip a track: To pause: To stop: Playing at Random Remote ONLY —Random Play INFO You can play the contents of all tracks at random. • Random play cannot used for DVD-VR disc. To release, press DISC PLAY 3. 1 Before playback... PROGRAM To check the programmed contents RANDOM Canceled Remote ONLY Before or after playback... RANDOM indicator in the reverse order in the programmed order To modify the program 2 Start playback.
HX-D7[J]_f.book Page 25 Monday, February 13, 2006 3:31 PM Remote ONLY Playing Repeatedly—Repeat Play You can repeat playback. • You can also select the repeat mode using the on-screen bar (see page 27). • For JPEG and DVD-VR discs, see page 32. • For DVD Video: While playing... CHAP TITLE OFF ALL On the TV screen Before starting playback... Indication Display window REPEAT 1 Repeats the current CHAP, chapter/track. TRACK, REPEAT TRACK, (REPEAT) STEP REPEAT Repeats the current TITLE, title/group.
HX-D7[J]_f.book Page 26 Monday, February 13, 2006 3:31 PM On-Screen Disc Operations On-screen bars Remote control See also page 27. DVD Video 1 Number buttons 2 DISC 1 TITLE 2 CHAP 3 TOTAL 1:01:58 DVD-VIDEO 8.5 Mbps TIME OFF 3 CHAP. 1/3 1/3 1/1 4 DVD-VR REPEAT 1 2 DISC 1 PG DVD-VR TIME 3/2/5/∞, ENTER 7 DISC PLAY 3 ON SCREEN 8 ¡ ZOOM CHAP.
HX-D7[J]_f.book Page 27 Monday, February 13, 2006 3:31 PM About the On-screen Bar Operations Using the You can check the information on disc (except for MP3/WMA/JPEG disc) and use some functions through the on-screen bar. On-screen Bar On-screen bar Ex.: While playing a DVD Video 1 2 DVD-VIDEO 8.5 Mbps TIME OFF 3 DISC 1 TITLE 2 CHAP 3 TOTAL 1:01:58 CHAP. 1/3 1/3 1 Display the on-screen bar with the pull-down menu.
HX-D7[J]_f.book Page 28 Monday, February 13, 2006 3:31 PM Changing the time information Repeat Play You can change the time information in the on-screen bar and the display window on the main unit. 1 Display the on-screen bar with the pull-down menu. • See also page 25. 1 While playing a disc (without PBC for SVCD/VCD), display the on-screen bar with the pull-down menu. 2 Select . 3 Display the pop-up window. DVD-VIDEO 8.5 Mbps TIME OFF DISC 1 TITLE 2 CHAP 3 TOTAL 1:01:58 CHAP.
HX-D7[J]_f.book Page 29 Monday, February 13, 2006 3:31 PM A-B Repeat Time Search • A-B repeat is not available for MP3/WMA and some DVDs. You can move to a particular point by specifying the elapsed playing time from the beginning. 1 While playing, display the on-screen bar with the pull-down menu. 2 Select . 3 Display the pop-up windows. 1 While playing (without PBC for SVCD/VCD), display the on-screen bar with the pull-down menu.
HX-D7[J]_f.book Page 30 Monday, February 13, 2006 3:31 PM Chapter/Track Search You can search for the chapter (DVD Video/DVD-VR) number to play. 1 While playing, display the on-screen bar with the pull-down menu. 2 Select CHAP. or TRACK . 3 Display the pop-up window. DVD-VIDEO 8.5 Mbps TIME TIME OFF TOTAL 1:25:58 1:01:58 CHAP233 TOTAL DISCTITLE 1 TITLE 14 2CHAP 1/3 1/3 CHAP.
HX-D7[J]_f.book Page 31 Monday, February 13, 2006 3:31 PM Control screen for DVD-R/-RW in DVD-VR format The control screen is superimposed on the TV screen when you call up Original Program (PG) or Play List (PL). To move the highlight bar between group list and track list Moves the bar to the track list. To select playback type To select the Program List: To select the Play List: Moves the bar to the group list. • While playing an MP3/WMA disc, selecting list starts playback.
HX-D7[J]_f.book Page 32 Monday, February 13, 2006 3:31 PM To repeat slide-show for JPEG To zoom in the still picture Before starting playback... 1 During playback is paused... GROUP DISC OFF ALL On the TV screen ZOOM OFF ZOOM 2 ZOOM 3 ZOOM 6 ZOOM 4 ZOOM 5 • As the number increases, magnification also increases. Indication Display window ZOOM 1 Meanings TV screen REPEAT GROUP Repeats the current group. REPEAT 1 DISC DISC Repeats the current disc. REPEAT ALL ALL Repeats all discs.
HX-D7[J]_f.book Page 33 Monday, February 13, 2006 3:31 PM Timer Operations Setting the Timer Remote control AUDIO CLOCK/TIMER SET CANCEL Remote ONLY INFO Using Daily Timer, you can wake up with your favorite song. • To correct a misentry during the process, press CANCEL (while holding SHIFT). You can return to the previous step. 1 Select the timer setting mode for Daily Timer—“TIMER ON.” DAILY TIMER (ON) Canceled (While holding...) SHIFT 2 Set the hour then minute for on-time. (While holding...
HX-D7[J]_f.book Page 34 Monday, February 13, 2006 3:31 PM 5 Select the playback source—“TUNER FM,” “TUNER AM,” “CD,” “AUX,” or “USB.” To turn off Daily Timer Since Daily Timer is activated at the same time everyday, you may need to cancel it on some particular days. DAILY Canceled (While holding...) TIMER (ON) Clock setting Ex.: When “TUNER FM” is selected. 6 • When you select “TUNER FM” or “TUNER AM,” repeat the procedure to select a preset station. Select the volume level. (While holding...
HX-D7[J]_f.book Page 35 Monday, February 13, 2006 3:31 PM Set up Menu Operations Operating Procedure Remote control Remote ONLY You can use the Set up Menus only when a disc is selected as the source and its playback is not yet started. Ex.: Selecting “STILL PICTURE” for “FILE TYPE”: 1 Show the set up menu. LANGUAGE MENU LANGUAGE ENGLISH AUDIO LANGUAGE ENGLISH SUBTITLE OFF ON SCREEN LANGUAGE ENGLISH SELECT ENTER USE TO SELECT. USE ENTER TO CONFIRM TO EXIT, PRESS [SET UP] .
HX-D7[J]_f.book Page 36 Monday, February 13, 2006 3:31 PM 7 Repeat steps 3 to 4 to set other items on the same Set up Menu. Repeat steps 2 to 4 to set other items on another Set up Menu. 7 PICTURE Set up Menu You can select the desired options concerning a picture or monitor screen. To remove the Set up Menu PICTURE MONITOR TYPE AUTO SCREEN SAVER ON FILE TYPE AUDIO ENTER 7 LANGUAGE Set up Menu USE TO SELECT. USE ENTER TO CONFIRM TO EXIT, PRESS [ SET UP ] .
HX-D7[J]_f.book Page 37 Monday, February 13, 2006 3:31 PM 7 AUDIO Set up Menu PICTURE SOURCE You can obtain optimal picture quality by selecting an appropriate option—picture source type (either video source or film source). You can adjust the sound settings of the System. AUDIO Select one of the following: AUTO: Normally select this.
HX-D7[J]_f.book Page 38 Monday, February 13, 2006 3:31 PM D. RANGE COMPRESSION You can compress the dynamic range (the difference between the loudest sound and the softest sound) to enjoy a powerful sound even at a low volume level when listening to Dolby Digital software. This is useful at night. • The effectiveness varies depends on a software. Select one of the following: AUTO: To enjoy powerful sounds with full dynamic range. ON: Best for watching a movie at a low volume level.
HX-D7[J]_f.book Page 39 Monday, February 13, 2006 3:31 PM Operating the TV Operating TV Remote control Remote ONLY You can operate the JVC’s TV using this remote control. To turn on or off the TV: TV To select the input mode (either TV or VIDEO): TV VOL + / – TV VIDEO TV CH + / – (While holding...) To adjust TV volume: SHIFT (While holding...) To select the TV channel: (While holding...
HX-D7[J]_f.book Page 40 Monday, February 13, 2006 3:31 PM Additional Information Learning More about This System Before Operating the System (see page 3) Playable Disc Types: • About audio format – Linear PCM: Uncompressed digital audio, the same format used for CDs and most studio masters. – Dolby Digital: Compressed digital audio, developed by Dolby Laboratories, which enables multi-channel encode to create the realistic surround sound.
HX-D7[J]_f.book Page 41 Monday, February 13, 2006 3:31 PM Unique DVD/VCD Operations (see pages 20 to 22) Selecting the Sound Track: On some DVD videos, you cannot change audio languages while playing back. Special Picture Playback: • During slow-motion playback, no sound will be reproduced. • While zoomed in, the picture may look coarse. • You cannot use frame-by-frame playback for DVD-VR. Advanced Disc Operations (see pages 23 to 25) Programming the Playing Order—Program Play: • While programming steps..
HX-D7[J]_f.book Page 42 Monday, February 13, 2006 3:31 PM Maintenance To get the best performance of the System, keep your discs clean. Handling discs • Remove the disc from its case by holding it at the edge while pressing the center hole lightly. • Do not touch the shiny surface of the disc, or bend the disc. • Put the disc back in its case after use to prevent warping. • Be careful not to scratch the surface of the disc when placing it back in its case.
HX-D7[J]_f.book Page 43 Thursday, February 16, 2006 3:41 PM USB Operations: Timer operations: Unable to play back through the USB connection. ] USB connection and setting is incorrect (see page 14). The sound through the USB connection stops. ] Noise and static electricity may stop the sound through the USB connection. In this case, do the following operations: • Disconnect and connect the USB cable again • Restart the music software on your PC • Turn off and on the system Daily Timer does not work.
HX-D7[J]_f.
HX-D7[J]_f.book Page 45 Monday, February 13, 2006 3:31 PM Parts Index Refer to the pages to see how to use the buttons and controls.
HX-D77[J]_f.book Page 46 Thursday, February 23, 2006 5:09 PM General Specifications Power requirement: Power consumption: Amplifier section—CA-HXD77 Output Power: SUBWOOFERS: 180 W per channel, min. RMS, driven into 3 Ω at 63 Hz with no more than 10% total harmonic distortion. MAIN SPEAKERS: 90 W per channel, min. RMS, driven into 6 Ω at 1 kHz with no more than 10% total harmonic distortion.
00-00_Wrranty[J]_f.
00-00_Wrranty[J]_f.
00-00_Cover[J]_f.
Français English 00-00_Cover[C]_f.
00-00_Safty[J]_f.fm Page 1 Monday, February 13, 2006 3:27 PM Warnings, Cautions and Others Mises en garde, précautions et indications diverses CAUTION RISK OF ELECTRIC SHOCK DO NOT OPEN CAUTION: TO REDUCE THE RISK OF ELECTRIC SHOCK, DO NOT REMOVE COVER (OR BACK). NO USER SERVICEABLE PARTS INSIDE. REFER SERVICING TO QUALIFIED SERVICE PERSONNEL.
00-00_Safty[J]_f.fm Page 2 Monday, February 13, 2006 3:27 PM IMPORTANT FOR LASER PRODUCTS 24 kg / 53 lbs. CAUTION! To avoid personal injury or accidentally dropping the unit, have two persons unpack, carry, and install the unit. ATTENTION! Pour éviter toute blessure personnelle ou chute accidentelle del’appareil, faites déballer, transporter et installer l’appareil par deux personnes. 1 CLASS 1 LASER PRODUCT 2 CAUTION: Do not open the top cover.
English HX-D7[J]_f.book Page 1 Thursday, February 16, 2006 4:06 PM Introduction Precautions Installation • Install in a place which is level, dry and neither too hot nor too cold—between 5°C (41°F) and 35°C (95°F). • Install the System in a location with adequate ventilation to prevent internal heat buildup in the System. DO NOT install the System in a location near heat sources, or in a place subject to direct sunlight, excessive dust or vibration.
HX-D7[J]_f.book Page 2 Thursday, February 16, 2006 4:06 PM Before Operating the System....................... 3 Advanced Disc Operations ........................ 23 Playable Disc Types .................................................... 3 Programming the Playing Order—Program Play...... 23 Playing at Random—Random Play........................... 24 Playing Repeatedly—Repeat Play ............................ 25 Prohibiting Disc Ejection—Child Lock .................... 25 Getting Started................
English HX-D7[J]_f.book Page 3 Thursday, February 16, 2006 4:06 PM Before Operating the System Playable Disc Types INFO This unit has been designed to play back the following discs: Disc Type Mark (Logo) Note on Region Code DVD players and DVDs have their own Region Code numbers. This unit can play back only DVDs whose Region Code numbers include “1.” EX.
EN_HX-D77[C]_f.book Page 4 Thursday, February 23, 2006 5:14 PM Step 1:Unpack the package and check the accessories. English Getting Started Step 1: Unpack After unpacking, check to be sure that you have all the following items. The number in parentheses indicates the quantity of each piece supplied. • FM antenna (1) • AM loop antenna (1) • Composite video cord (1) • Remote control (1) • Batteries (2) If any item is missing, consult your dealer immediately.
English HX-D7[J]_f.book Page 5 Thursday, February 16, 2006 4:06 PM Step 3: Hook Up If you need more detailed information, see page 6 and 7. Do not connect the AC power cord until all other connections have been made. Illustrations of the input/output terminals below are typical examples. When you connect other components, refer also to their manuals since the terminal names actually printed on the rear may vary. ~ From the AM/FM antenna See page 6. Ÿ From the input of TV/monitor See page 6.
~ To assemble and connect the AM loop English EN_HX-D77[C]_f.book Page 6 Thursday, February 23, 2006 5:14 PM For better FM/AM reception antenna To assemble the AM loop antenna Outdoor FM antenna (not supplied) To connect the AM loop antenna cords Disconnect the supplied FM antenna, and connect to an outdoor FM antenna using a 75 Ω wire with coaxial type connector (IEC or DIN45325). AM loop antenna cord (supplied) AM loop antenna Keep it connected.
English HX-D7[J]_f.book Page 7 Thursday, February 16, 2006 4:06 PM To select the color system Remote ONLY You can select the video output to match it to the color system of your TV. • The color system can be changed only while DVD/CD is selected as the source and playback is stopped. 1 Press NTSC/PAL. 2 Select NTSC or PAL. NTSC PAL NTSC: For an NTSC TV. PAL: For a PAL TV. • When using a multi-color system TV, either position will work.
HX-D7[J]_f.book Page 8 Thursday, February 16, 2006 4:06 PM English Display Indication The indications on the display tell you a lot of things while you are operating the System. Before operating the System, be familiar with when and how the indicator illuminates on the display. 1 2 3 p q we rt 4 5 y u i 6 7 o ; 8 9 a See also page 9. 1 BEEP ON indicator • Lights when key-touch tone is activated.
English HX-D7[J]_f.
HX-D7[J]_f.book Page 10 Thursday, February 16, 2006 4:06 PM In this manual, the operation using the remote control is mainly explained; however, you can use the buttons and controls on the main unit if they have the same (or similar) name and marks. English Daily Operations—Playback ¥ Turn on the power. The standby lamp on the main unit turns off. • Without pressing , the System also turns on by pressing one of the source select buttons in the next step. ø Select the source.
English HX-D7[J]_f.book Page 11 Thursday, February 16, 2006 4:06 PM Remote ONLY To preset stations To save the power consumption while on standby—Eco mode Main Unit ONLY While on standby... You can preset 30 FM and 15 AM stations. 1 Tune in to a station you want to preset, then enter into ECO the presetting mode. Canceled The display illumination (including the display demonstration) disappears. (While holding...
Playing Back a Disc INFO Before operating a disc, be familiar how a disc is recorded. • DVD Video/DVD-VR comprises of “Titles” which includes “Chapters,” MP3/WMA comprise of “Groups” which includes “Tracks,” and CD/SVCD/VCD comprise of only “Tracks.” For MP3/WMA/JPEG playback, see also page 30. While playing DVD/SVCD/VCD: This System can store the stop point, and when you start playback again by pressing DISC PLAY 3, it starts from the position where you have stopped—Resume Play.
English HX-D7[J]_f.book Page 13 Thursday, February 16, 2006 4:06 PM Remote ONLY To select a title/group While playing a disc... Skips to the next title/group. Skips to the previous title/group. (While holding...) To play back by using the disc menu Remote ONLY You can operate the disc play—DVD and SVCD/VCD with Playback Control (PBC)—using the disc menu shown on the TV screen. • When an SVCD or VCD with PBC is detected, “PBC” appears on the display instead of the playing time.
To move to the next or previous page of the current menu: Moves to the next page. Moves to the previous page. English HX-D7[J]_f.book Page 14 Thursday, February 16, 2006 4:06 PM How to install the USB drivers The following procedure is described using the English version of WindowsR XP. If your PC is running on a different version of Windows, the screens shown on your PC’s monitor will differ from the ones used in the following procedure.
English HX-D7[J]_f.book Page 15 Thursday, February 16, 2006 4:06 PM 6 Check if the drivers are correctly installed. Open the Control Panel on your PC: Select [Start] = [Settings] = [Control Panel] 2 Click [System] = [Hardware] = [Device Manager] = [Sound, video and game controllers] and [Universal Serial Bus controllers] • The following window appears, and you can check whether the drivers are installed.
HX-D7[J]_f.book Page 16 Thursday, February 16, 2006 4:06 PM Adjusting the Volume Remote Control English Daily Operations—Sound and Other Adjustments INFO The volume level can be adjusted in 32 steps (VOL MIN, VOL 1 – VOL 30, VOL MAX).
English HX-D7[J]_f.book Page 17 Thursday, February 16, 2006 4:06 PM Making the Center Channel Sound Clear Selecting 3D Phonic Mode —Clear Voice While playing a disc (except JPEG)... • 3D Phonic does not take effect while GAME/AUX is selected as the source. Remote ONLY When a multi-channel disc with center-channel signal is loaded on the current tray, you can increase the output level for the center channel sound.
Changing the Picture Tone Remote ONLY INFO While showing a playback picture on the TV, you can select the preset picture tone, or adjust it and store your own preference. English HX-D7[J]_f.book Page 18 Thursday, February 16, 2006 4:06 PM To adjust the picture tone 1 Select “USER1” or “USER2.” • Follow steps 1 and 2 explained above. 2 Select a parameter you want to adjust. To select a preset picture tone 1 Activate VFP.
English HX-D7[J]_f.book Page 19 Thursday, February 16, 2006 4:06 PM 2 Adjust the hour. Turning On or Off the Key-Touch Tone Remote control: Main unit: 3 sec. (While holding...) 3 Adjust the minute. (While holding...) BEEP OFF BEEP ON (While holding...) • When the key-touch tone is activated, the BEEP ON indicator lights up. Now the built-in clock starts working. To check the current time during play Changing the Display Brightness 2 sec. Remote ONLY You can dim the display window.
HX-D7[J]_f.book Page 20 Thursday, February 16, 2006 4:06 PM Selecting the Sound Track Remote Control Number buttons PAGE PLAY MODE REPEAT 5/∞, ENTER 7 4 /¢ AUDIO SHIFT DISC PLAY 3 8 Remote ONLY INFO For DVD Video: While playing back a chapter containing multiple audio tracks, you can select the one to listen to. For DVD-VR/SVCD/VCD: When playing back a track, you can select the audio channel to play. • You can also select the audio track using the on-screen bar (see pages 26 and 27).
English HX-D7[J]_f.book Page 21 Thursday, February 16, 2006 4:06 PM Remote ONLY Selecting the Subtitle Language For DVD Video: While playing back a chapter (of DVD Video) containing subtitles in different languages, you can select the subtitle language to display on the TV screen. For DVD-VR: While playing, you can turn the subtitle on or off. For SVCD: While playing, you can select the subtitles even if no subtitles are recorded on the disc.
Special Picture Playback INFO Zoom Remote ONLY 1 While playing... Still picture playback To resume normal playback: To start still picture playback: English HX-D7[J]_f.book Page 22 Thursday, February 16, 2006 4:06 PM ZOOM 1 ZOOM OFF While playing... 2 ZOOM 2 ZOOM 3 ZOOM 6 ZOOM 4 ZOOM 5 • As the number increases, magnification also increases. Move the zoomed-in position. Frame-by-frame playback 1 While playing... Still picture playback starts.
HX-D7[J]_f.book Page 23 Thursday, February 16, 2006 4:06 PM English Advanced Disc Operations Programming the Playing Order Remote Control —Program Play Remote ONLY INFO You can arrange the playing order of the tracks (up to 99) before you start playback. • Program play cannot be used for DVD-VR disc. Number buttons 1 Before starting playback, activate Program Play.
To skip a track: To pause: To stop: English HX-D7[J]_f.book Page 24 Thursday, February 16, 2006 4:06 PM Playing at Random Remote ONLY —Random Play INFO You can play the contents of all tracks at random. • Random play cannot used for DVD-VR disc. To release, press DISC PLAY 3. 1 Before playback... PROGRAM To check the programmed contents RANDOM Canceled Remote ONLY Before or after playback...
English HX-D7[J]_f.book Page 25 Thursday, February 16, 2006 4:06 PM Remote ONLY Playing Repeatedly—Repeat Play You can repeat playback. • You can also select the repeat mode using the on-screen bar (see page 27). • For JPEG and DVD-VR discs, see page 32. • For DVD Video: While playing... CHAP TITLE OFF ALL On the TV screen Before starting playback... Indication Display window REPEAT 1 Repeats the current CHAP, chapter/track.
HX-D7[J]_f.book Page 26 Thursday, February 16, 2006 4:06 PM English On-Screen Disc Operations On-screen bars Remote control See also page 27. DVD Video 1 Number buttons 2 DISC 1 TITLE 2 CHAP 3 TOTAL 1:01:58 DVD-VIDEO 8.5 Mbps TIME OFF 3 CHAP. 1/3 1/3 1/1 4 DVD-VR REPEAT 1 2 DISC 1 PG DVD-VR TIME 3/2/5/∞, ENTER 7 DISC PLAY 3 ON SCREEN 8 ¡ ZOOM CHAP.
English HX-D7[J]_f.book Page 27 Thursday, February 16, 2006 4:06 PM About the On-screen Bar Operations Using the You can check the information on disc (except for MP3/WMA/JPEG disc) and use some functions through the on-screen bar. On-screen Bar On-screen bar Ex.: While playing a DVD Video 1 2 DVD-VIDEO 8.5 Mbps TIME OFF 3 DISC 1 TITLE 2 CHAP 3 TOTAL 1:01:58 CHAP. 1/3 1/3 1 Display the on-screen bar with the pull-down menu.
English HX-D7[J]_f.book Page 28 Thursday, February 16, 2006 4:06 PM Changing the time information Repeat Play You can change the time information in the on-screen bar and the display window on the main unit. 1 Display the on-screen bar with the pull-down menu. • See also page 25. 1 While playing a disc (without PBC for SVCD/VCD), display the on-screen bar with the pull-down menu. 2 Select . 3 Display the pop-up window. DVD-VIDEO 8.5 Mbps TIME OFF DISC 1 TITLE 2 CHAP 3 TOTAL 1:01:58 CHAP.
English HX-D7[J]_f.book Page 29 Thursday, February 16, 2006 4:06 PM A-B Repeat Time Search • A-B repeat is not available for MP3/WMA and some DVDs. You can move to a particular point by specifying the elapsed playing time from the beginning. 1 While playing, display the on-screen bar with the pull-down menu. 2 Select . 3 Display the pop-up windows. 1 While playing (without PBC for SVCD/VCD), display the on-screen bar with the pull-down menu.
Chapter/Track Search You can search for the chapter (DVD Video/DVD-VR) number to play. 1 While playing, display the on-screen bar with the pull-down menu. 2 Select CHAP. or TRACK . 3 Display the pop-up window. DVD-VIDEO 8.5 Mbps TIME TIME OFF TOTAL 1:25:58 1:01:58 CHAP233 TOTAL DISCTITLE 1 TITLE 14 2CHAP 1/3 1/3 CHAP. CHAPTER 1/1/3 3 1/3 1/1 Operations on the control Remote ONLY Screen INFO You can search for and play the desired items through the control screen.
English HX-D7[J]_f.book Page 31 Thursday, February 16, 2006 4:06 PM Control screen for DVD-R/-RW in DVD-VR format The control screen is superimposed on the TV screen when you call up Original Program (PG) or Play List (PL). To move the highlight bar between group list and track list Moves the bar to the track list. To select playback type To select the Program List: To select the Play List: Moves the bar to the group list. • While playing an MP3/WMA disc, selecting list starts playback.
To repeat slide-show for JPEG To zoom in the still picture Before starting playback... 1 During playback is paused... GROUP DISC OFF ALL On the TV screen ZOOM 1 ZOOM OFF ZOOM 2 ZOOM 3 ZOOM 6 ZOOM 4 ZOOM 5 • As the number increases, magnification also increases. Indication Display window English HX-D7[J]_f.book Page 32 Thursday, February 16, 2006 4:06 PM Meanings TV screen REPEAT GROUP Repeats the current group. REPEAT 1 DISC DISC Repeats the current disc.
HX-D7[J]_f.book Page 33 Thursday, February 16, 2006 4:06 PM English Timer Operations Setting the Timer Remote control AUDIO CLOCK/TIMER SET CANCEL Remote ONLY INFO Using Daily Timer, you can wake up with your favorite song. • To correct a misentry during the process, press CANCEL (while holding SHIFT). You can return to the previous step. 1 Select the timer setting mode for Daily Timer—“TIMER ON.” DAILY TIMER (ON) Canceled (While holding...) SHIFT 2 Set the hour then minute for on-time.
5 Select the playback source—“TUNER FM,” “TUNER AM,” “CD,” “AUX,” or “USB.” English HX-D7[J]_f.book Page 34 Thursday, February 16, 2006 4:06 PM To turn off Daily Timer Since Daily Timer is activated at the same time everyday, you may need to cancel it on some particular days. DAILY Canceled (While holding...) TIMER (ON) Clock setting Ex.: When “TUNER FM” is selected. 6 • When you select “TUNER FM” or “TUNER AM,” repeat the procedure to select a preset station. Select the volume level.
HX-D7[J]_f.book Page 35 Thursday, February 16, 2006 4:06 PM English Set up Menu Operations Operating Procedure Remote control Remote ONLY You can use the Set up Menus only when a disc is selected as the source and its playback is not yet started. Ex.: Selecting “STILL PICTURE” for “FILE TYPE”: 1 Show the set up menu. LANGUAGE MENU LANGUAGE ENGLISH AUDIO LANGUAGE ENGLISH SUBTITLE OFF ON SCREEN LANGUAGE ENGLISH SELECT ENTER USE TO SELECT. USE ENTER TO CONFIRM TO EXIT, PRESS [SET UP] .
7 Repeat steps 3 to 4 to set other items on the same Set up Menu. Repeat steps 2 to 4 to set other items on another Set up Menu. 7 PICTURE Set up Menu You can select the desired options concerning a picture or monitor screen. To remove the Set up Menu PICTURE MONITOR TYPE AUTO SCREEN SAVER ON FILE TYPE AUDIO ENTER 7 LANGUAGE Set up Menu USE TO SELECT. USE ENTER TO CONFIRM TO EXIT, PRESS [ SET UP ] . INFO You can select the initial languages for disc playback.
English HX-D7[J]_f.book Page 37 Thursday, February 16, 2006 4:06 PM 7 AUDIO Set up Menu PICTURE SOURCE You can obtain optimal picture quality by selecting an appropriate option—picture source type (either video source or film source). You can adjust the sound settings of the System. AUDIO Select one of the following: AUTO: Normally select this.
English HX-D7[J]_f.book Page 38 Thursday, February 16, 2006 4:06 PM D. RANGE COMPRESSION You can compress the dynamic range (the difference between the loudest sound and the softest sound) to enjoy a powerful sound even at a low volume level when listening to Dolby Digital software. This is useful at night. • The effectiveness varies depends on a software. Select one of the following: AUTO: To enjoy powerful sounds with full dynamic range. ON: Best for watching a movie at a low volume level.
HX-D7[J]_f.book Page 39 Thursday, February 16, 2006 4:06 PM English Operating the TV Operating TV Remote control Remote ONLY You can operate the JVC’s TV using this remote control. To turn on or off the TV: TV To select the input mode (either TV or VIDEO): TV VOL + / – TV VIDEO TV CH + / – (While holding...) To adjust TV volume: SHIFT (While holding...) To select the TV channel: (While holding...
Additional Information Learning More about This System Before Operating the System (see page 3) Playable Disc Types: • About audio format – Linear PCM: Uncompressed digital audio, the same format used for CDs and most studio masters. – Dolby Digital: Compressed digital audio, developed by Dolby Laboratories, which enables multi-channel encode to create the realistic surround sound. – DTS (Digital Theater Systems): Compressed digital audio, developed by Digital Theater Systems, Inc.
English HX-D7[J]_f.book Page 41 Thursday, February 16, 2006 4:06 PM Unique DVD/VCD Operations (see pages 20 to 22) Selecting the Sound Track: On some DVD videos, you cannot change audio languages while playing back. Special Picture Playback: • During slow-motion playback, no sound will be reproduced. • While zoomed in, the picture may look coarse. • You cannot use frame-by-frame playback for DVD-VR.
Maintenance To get the best performance of the System, keep your discs clean. Handling discs • Remove the disc from its case by holding it at the edge while pressing the center hole lightly. • Do not touch the shiny surface of the disc, or bend the disc. • Put the disc back in its case after use to prevent warping. • Be careful not to scratch the surface of the disc when placing it back in its case. • Avoid exposure to direct sunlight, extreme temperature, and moisture.
English HX-D7[J]_f.book Page 43 Thursday, February 16, 2006 4:06 PM USB Operations: Timer operations: Unable to play back through the USB connection. ] USB connection and setting is incorrect (see page 14). The sound through the USB connection stops. ] Noise and static electricity may stop the sound through the USB connection.
English HX-D7[J]_f.
English HX-D7[J]_f.book Page 45 Thursday, February 16, 2006 4:06 PM Parts Index Refer to the pages to see how to use the buttons and controls.
General Specifications Power requirement: Power consumption: Amplifier section—CA-HXD77 Output Power: SUBWOOFERS: 180 W per channel, min. RMS, driven into 3 Ω at 63 Hz with no more than 10% total harmonic distortion. MAIN SPEAKERS: 90 W per channel, min. RMS, driven into 6 Ω at 1 kHz with no more than 10% total harmonic distortion. Video input sensitivity/impedance GAME/AUX(composite video): off—Normal mode) 1 W (on standby; with power saving on—Eco mode) Dimensions (approx.
00-00_Cover[C]_f.