User Manual BlackCrystal™ 3500 Series LED TV JLE42BC3500 42” Class Before operating your LED TV, please read this manual thoroughly.
We Are Here To Help! Before Returning the Product Call Our Customer Service at 1-855-868 1928 We can help you with ! Damaged Package ! Missing Parts ! Technical Support
Contents Congratulations on purchasing your new JVC TV. To get the most out of your JVC LED TV, read these instructions before making any adjustments, and retain them for future reference. For assistance, call the JVC Customer Support and Service Center 1-855-868-1928 or visit our website http://go.jvc.com/HDTVSupport/ We recommend that you register your JVC LED TV either at our wesite http://go.jvc.com/HDTVSupport/ or fill out and mail the Product Registration Card on the back of the manual.
CAUTION RISK OF ELECTRIC SHOCK DO NOT OPEN CAUTION: TO REDUCE THE RISK OF ELECTRIC SHOCK, DO NOT REMOVE COVER (OR BACK). NO USERSERVICEABLE PARTS INSIDE. REFER SERVICING TO QUALIFIED SERVICE PERSONNEL. The lightning flash with arrowhead symbol, within an equilateral triangle is intended to alert the user to the presence of uninsulated dangerous voltage within the product’s enclosure that may be of sufficient magnitude to constitute a risk of electric shock.
Important Safety Instructions 9) 10) 11) 12) 13) 14) 15) 16) 17) 18) 19) 20) 21) Read these instructions. Keep these instructions. Heed all warnings. Follow all instructions. Do not use this apparatus near water. Clean only with dry cloth. Do not block any ventilation openings. Install in accordance with manufacturer’s instructions. Do not install near any heat sources such as radiators, heat registers, stoves, or other apparatus (including amplifiers) that produce heat.
Important Safety Instructions 22) When you connect the product to other equipment, turn off the power and unplug all of the equipment from the wall outlet. Failure to do so may cause an electric shock and serious personal injury. Read the owner’s manual of the other equipment carefully and follow the instructions when making any connections. 23) Sudden high volume sound may cause hearing or speaker damage.
Important Safety Instructions ENGLISH CONDENSATION Moisture will form in the operating section of the unit if the unit is brought from cool surroundings into a warm room or if the temperature of the room rises suddenly. When this happens, unit’s performance will be impaired. To prevent this, let the unit stand in its new surroundings for about an hour before switching it on, or make sure that the room temperature rises gradually.
Important Safety Instructions Television Antenna Connection Protection External Television Antenna Grounding If an outside antenna/satellite dish or cable system is to be connected to the TV, make sure that the antenna or cable system is electrically grounded to provide some protection against voltage surges and static charges.
Important Safety Instructions ENGLISH DTV Transition Advisory As of June 12, 2009, all U.S. television stations have switched to digital broadcasting. As a result, owners of analog television sets must connect a digital-to-analog converter box to the television set or subscribe to cable or satellite TV to receive over-the-air TV.
Contents Contents Contents ......................................................1 Important Safety Instructions....................3 Television Antenna Connection Protection ... 6 External Television Antenna Grounding .... 6 DTV Transition Advisory ........................................ 7 Contents ......................................................8 Attaching the Stand..................................10 LE42BC3500 (42”) .............................................10 Removing the Stand ..............
Contents ENGLISH Closed Caption .......................................................32 Channel Menu ........................................................32 Select Antenna / Cable ..................................32 Scan Channels ...................................................32 Add Channel ......................................................33 Delete Channel .................................................33 Sleep Timer ..............................................................
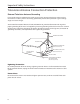
Attaching the Stand LE42BC3500 (42”) 1 Align the metal neck of the stand to the slot at the back of the TV and insert the neck into the slot. 2 Align the bottom four screw holes with the neck and stand, and secure with the provided four screws and screwdriver. 3 Insert the neck cover into the slot and attach it firmly until it locks into place. 10 Removing the Stand When the TV needs to be transported, remove the stand and pack the TV back in the carton.
Package Contents Remote Control LED TV ENGLISH Check if the following items are included in your package. Batteries SLEEP MEDIA I MENU NP IN FO UT W N OK ID E RE TU R A U D IO VOL CH MUTE Quick Start Guide Quick GuideStart 1 2 4 5 7 8 9 _ 0 ENT 3 6 HDMI PC TV VIDEO COMP MUSIC User Manual r's Use Power Cord l nua Ma Remote Control Batteries 1 Push the tab, then lift to open the cover. 2 Insert the batteries, making sure the [+] and [-] polarities are correct.
Parts and Functions Front Views Power indicator t Power ON: White Remote control sensor Rear View VESA mounting holes HDMI SIDE port USB port AC INPUT HDMI Port POWER button Component IN / Composite IN (See page 15) PC IN (See page 17) PC Audio / Music IN (See page 17) MENU button Channel Up / Down button DTV / TV / Antenna(See page 14) Optical Audio OUT(See page 16) Stereo Audio OUT(See page 16) 12 Volume Up / Down button INPUT button
Parts and Functions 1 12 2 13 SLEEP 3 14 MEDIA 15 MENU 4 I IN FO UT NP 16 17 OK 18 5 W N 1 IR Transmitter: Sends remote control signal to the TV. 2 SLEEP button: Select a sleep mode timer (Off, 30 minutes, 60 minutes, 90 minutes, 120 minutes, 180 minutes). 3 Playback controls: The buttons are used for Photo, Music, Video, and HDMI CEC function. 4 INPUT button: Change the input source. 5 WIDE button: Change the display mode (Normal, Wide, Zoom Panoramic).
Making Connections Connecting Antenna / Cable Connect the 75 ohm coaxial cable directly to the DTV/TV Cable/Antenna jack of the TV. DTV / TV CABLE / ANTENNA 75 ohm coaxial cable Connecting HD Devices You can connect different devices to the TV using HDMI, DVI, Composite, or Component connections. Check the type of connection available on your device. HDMI HDMI connection transmits both digital video and audio signals from an HDMI device to the TV.
Making Connections Audio cable TV Y/N Y Pb/Cb ENGLISH Component Pr/Cr L AUDIO R Audio IN Audio OUT DVD Player / Cable Box / Satellite R AUDIO COMPONENT L Pr/Cr Pb/Cb Y Video IN Video OUT Component cable Note: The component and audio cable are not included with the TV. Composite TV VCR / Camcorder / Game Console VIDEO VIDEO Y/V L AUDIO R Audio OUT Audio IN R AUDIO L VIDEO Video IN Video OUT Video cable Note: t The video and audio cable are not included with the TV.
Making Connections Connecting External Speakers / Soundbar / AV Receivers Digital Connection Connect the SPDIF/Optical audio cable to the Audio OUT optical port of the TV and the optical port of the soundbar, AV receiver, or audio system. Digital Audio System TV AUDIO OUT Audio OUT Audio IN OPTICAL OPTICAL Optical audio cable Note: t The optical audio cable is not included with the TV.
Making Connections 1 2 3 ENGLISH Connecting Computers and Laptops Connect one end of a VGA cable to the PC port of the TV. Connect the other end of the VGA cable to the RGB port of the computer or laptop. For audio, connect a 3.5mm audio cable to the PC audio port of the TV and audio out port of the computer or laptop.
Basic Operations Setup Wizard TV Mode The Setup Wizard will assist you with setting up your TV for the first time. Please follow the instruction carefully. Mode Selection Mode: Home Mode Note: If you would like to setup over-the-air or cable programming, make sure the antenna or cable TV system is connected. See page 15 for setup. Change 1 When you turn on the TV for the first time, the Setup Wizard screen will appear. 2 Press or to select the menu language, then press OK.
Basic Operations Auto Scan 1 2 Select the Signal Type of your TV input and start auto scan. Cable Signal Type: Press RETURN. Press or to select “OK”, then press OK to confirm. Start Scan Do you wish to exit Retail Mode? Move OK Select Change RETURN Previous Setup INFO Exit OK Cancel Basic TV Operation Changing Channel Press the number buttons to directly select channels. 7 Note: After pressing the number buttons, there will be a few seconds delay before the TV changes channel.
Basic Operations To Select Digital Channels Press the first 3 digits, then press _ , followed by the remaining number. Example, to select channel 15-1, press 1, 5, _ , 1, then press ENT. To Select by Channel List All channels found from channel scan are listed on the Channel List screen. You can select channels from this screen. 1 2 Press ENT to display the Channel List screen. 3 Press RETURN to close the Channel List screen. Press or to select a channel number, then press ENT.
Basic Operations Aspect Ratio options in PC mode. ENGLISH Multimedia Mode 5IF 57 BMMPXT ZPV UP QMBZ TMJEF TIPXT PG QIPUPT GSPN B 64# NFNPSZ TUJDL Normal When watching a 4:3 content, the TV displays a standard picture with black side bars. When viewing a 16:9 content, it displays the full picture, pixel to pixel. Stretch When watching a 4:3 content, the picture is stretched hozontally to fill the width of the screen.
Basic Operations 6 The displayed screen varies depending on the media type you selected. Press , , or to select a file or function, then press OK. Multimedia: Photo PATH:/MMP/Photo/ Photo File Name: P1130130 Resolution: 768x1024 Size: 113KB .. P1130130 P1130131 P1130132 P1130133 P1130134 P1130136 P1130137 1 2 Start Slideshow Sort: Newest First View: Thumbnails Setting 3 Browse Music 4 P1130135 Page 1 of 7 5 1 Start Slideshow button: Play slide show.
Basic Operations ENGLISH Kensington Lock Security Deterrent Kensington Lock The JVC 3001 Series provides you with security deterrent slot hole that are compatible to Kensington Locks. This helps securely affix the TV physically to other objects. The appearance and locking method differs depending on the manufacturer. Refer to the manual provided with the Kensington Lock for information on installation. The location of the security deterrent slot differs depending on the TV model.
Basic Operations Wall Mount Installing Wall Mount The wall mount kit allows you to mount the TV on the wall. For detailed information on installing the wall mount, see the instructions provided with the wall mount kit. Note: The wall mount kit is not included with the product. For product protection and safety reasons, JVC strongly recommends contacting a technician or professional for assistance installing the wall mount and setting up the TV.
Adjusting the Menu Settings Input ENGLISH Quick Menu Operation TV TV Picture Video Component Audio Main Menu HDMI-1 HDMI SIDE Setup Options or submenu PC Music Closed Caption Wide Channel Remote Control TV Panel 1 Display the menu. Press MENU. 2 Select a menu option. or to select a 1. Press menu or option. 2. Press OK or to enter a menu or confirm an option. 1. Press CH or CH to select a menu or option. 2. Press INPUT to enter a menu or confirm an option.
Adjusting the Menu Settings Input Menu Select the input source signal. !" TV: To watch analog or digital TV channels. TV TV !" Video: To use VCRs, camcorders, or game consoles connected via composite connection. Video Component !" Component: To use VCRs, camcorders, or game consoles connected via component connection. HDMI-1 HDMI SIDE PC !" HDMI 1(ARC): To use devices connected via HDMI connection, or AV receiver support HDMI ARC (audio return channel).
Adjusting the Menu Settings ENGLISH Tint Adjust the picture hue. (-50 ~ 50) Sharpness Adjust the sharpness of the edges of elements in the picture. Size & Position Auto Adjust Horiz. Position / Vertical Positon Horizontal Size / Vertical Size Automatically adjust the picture size and position. Adjust the horizontal / vertical position of the picture. Adjust the horizontal / vertical size of the picture.
Adjusting the Menu Settings Audio Menu XinemaSound™ 3D Expansive & immersive, multi-dimensional surround sound experience. Note: t When XinemaSound™ 3D is on, Equalizer Settings menu is not available. XinemaSound™ 3D Off XinemaSound™ Leveler Off Bass 8 Treble 7 Balance 2 Lip Sync TV Speakers Audio Only Digital Audio Out XinemaSound™ Leveler Delivering smooth, steady volume levels from the quietest sound to the loudest volume with exceptional audio clarity.
Adjusting the Menu Settings Name Input The Name Input feature of the TV allows you to add a label name on an input source. ENGLISH Setup Menu Name Input CEC Settings Menu Language To label an input source , perform the following steps: 1 2 3 4 5 6 Time & Local Settings English Parental Control Press MENU. Power Indicator Press or to select “Setup”, then press or OK. Press or to select “Name Input”, then press or OK. Press or to select “Input Source”, then press or OK.
Adjusting the Menu Settings Time & Local Settings Time Zone Daylight Saving Select a location to apply the time zone. Enable or disable daylight saving time. Parental Control The Parental Control feature allows you to control and restrict TV programs by Channel Lock , TV Rating, or Movie Rating. Access Parental Control Menu The Parental Control menu requires you to enter the password to access its submenu. 1 2 3 4 Press MENU. Press or to select “Setup”, then press or OK.
Adjusting the Menu Settings ENGLISH t “USA-Movie”: Set by USA movie rating standards. t “CAN-English”: Set by Canadian English movie rating standards. t “CAN-French”: Set by Canadian French movie rating standards. t “Block Unrated Shows”: Select “On” to block unrated shows. 2 3 Press or , then press OK to select the rating. Press to return to the previous screen or press RETURN to close the menu screen.
Adjusting the Menu Settings Closed Caption Closed Caption decodes and displays closed caption data of television programs as subtitle. This feature displays text on the screen or it translates and displays text in another language. 1 2 3 Press MENU. Press to select “Closed Caption”, then press or OK. or n or to select “Analog Closed Caption” or Press “Digital Closed Caption, then press or OK.
Adjusting the Menu Settings 1 2 3 4 ENGLISH Partial Scan Channels You can partially scan for network signal within a specified range of channels. Press MENU. Press or to select “Partial Channel Scan”, then press or OK. Press or to select “Scan Mode”, then press or OK. or to select an option, then press OK.
Appendix Supported Input Source for PIP/POP Main\PIP TV Composite Component RGB HDMI 1 HDMI SIDE Music TV ! ! ! ! ; ; ! ! ! ! ! ; ; ! ! ! ! ! ; ; ! ! ! ! ! ; ; ! ; ; ; ; ! ! ! ; ; ; ; ! ! ! ! ! ! ! ! ! ! Composite Component RGB HDMI 1 HDMI SIDE Music ;"- Supported ! - Not supported Supported Resolution Model Name JLE42BC3500 720 x 400 @ 70Hz 640 x 480 @ 60, 75Hz Supported PC Timing (VGA & HDMI) 800 x 600 @ 60, 75Hz 1024 x 768 @ 60, 75Hz 1280 x 1024 @ 75Hz 1920 x 1080 @ 60Hz 34 Support
Troubleshooting Problem No power. ENGLISH If your TV fails to work properly, check the following guidelines for possible causes and solutions. Consult your local dealer or service outlet if problems persist. Solution t Make sure the power cord is plugged in. t The power is off, press the Power button to turn on the TV. t Try another outlet. Poor sound or no sound. t Unplug the unit for an hour, then plug it back in. t Press the VOL button on the remote control or the VOL + button on the TV.
!"#$%&$'(%)*+ Model No. JLE42BC3500 42” Black Crystal 3500 Series LED TV Panel Type LED Panel Size 42” Class 42.
ON PARTS AND LABOR This Limited Warranty covers units that are purchased as new and in the United States Only. This Product is manufactured, distributed, and warranted by AmTRAN Video Corporation (hereinafter known as “Warrantor”) under brand license by JVC KENWOOD Corporation. The Warrantor provides a warranty to the original purchaser of a new Product against defects in materials and workmanship for a period of one (1) year of non-commercial usage and ninety (90) days of commercial use.
Limitations and Exclusions The Warrantor’s one-year limited warranty only covers defects in materials and workmanship.
Important Open Source Software Notice Your JVC device contains free software which is based on the license granted under the GNU General Public License and Lesser General Public License (hereinafter “GPL/LPGL”) that are subject to the GPL2.0/ LGPL2.1. You may use, modify, or distribute only if you agree to all of the terms and conditions of the GPL/LGPL.
Product Registration !"#$%#&'(&)(*&%#)'&+,('-.*%&(,&(*/#,& .(,,#%+()'#).#&*(&*/0%&$'',#%%1& & & !8;>A& ?%@!%A9BCA& & & & 3#D/#-%,-./0"'1"/(#$%E32F<@2@3GHIJKE;LK,!K;3=% 20,%*&3$4#5& 8$%*&3$4#5& ;'',#%%& ;+*1&=& >0*?& <*$*#5& @0+&>('#5& !/()#&3-4:#,5& AB9$0"&;'',#%%5& & & & & & & & & & & & & & & & & & & 6$*#&(7&!-,./$%#5& 9('#"&3-4:#,5& <#,0$"&3-4:#,5& !-,./$%#&!,0.
We Are Here To Help! Before Returning the Product Call Our Customer Service at 1-855-868 1928 We can help you with ! Damaged Package ! Missing Parts ! Technical Support 192513014750