INSTRUCTIONS (BASIC) . HD MEMORY CARD CAMERA RECORDER JY-HM360AG TIME CODE This manual provides a brief explanation on operating this camera recorder. For detailed operation methods and camera settings, please refer to the following Mobile User Guide. . The specifications and appearance of this product are subject to changes for further improvement without prior notice. Please check the latest version of the INSTRUCTIONS from the following Mobile User Guide.
Safety Precautions CAUTION: The mains plug shall remain readily operable. Remove the mains plug immediately if the camera functions abnormally. WARNING: The battery pack, the camera with battery installed, and the remote control with battery installed should not be exposed to excessive heat such as direct sunlight, fire or the like. WARNING: TO PREVENT FIRE OR SHOCK HAZARD, DO NOT EXPOSE THIS UNIT TO RAIN OR MOISTURE.
CAUTIONS: Battery Pack (sold separately) The battery pack is a lithium-ion battery. Before using the battery pack, be sure to read the following cautions: Introduction To prevent shock, do not open the cabinet. No user serviceable parts inside. Refer servicing to qualified personnel. When you are not using the AC adapter for a long period of time, it is recommended that you disconnect the power cord from AC outlet. Terminals To avoid hazards ... do not burn. ... do not short-circuit the terminals.
Contents Introduction Content of this manual Symbols used Caution : Describes precautions concerning the operation of this product. Memo : Describes reference information, such as functions and usage restrictions of this product. Adjusting the Grip Belt ....................................... 9 Opening/Closing the Lens Cover ....................... 9 Attaching/Detaching the Hood ........................... 9 Using a Battery Pack (sold separately) ............ 10 Configuring the Initial Settings ..........
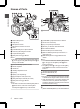
Names of Parts A BC D E dc b a Z F G Introduction FIX VAR REC T W HOLD INPUT2 L M OFF K REC ER POW CODE ON L S FOCU MENU/THUM B AE N LEVE OFF AUTO MOD MANU E SLOT A/B 1/64 ∞ PUSH AUTO SHU CEL CAN BAL WHT GAIN OFF TTER FULL K/4 ZEBRA/5 MARKER /6 AV IRIS L M H B A ET PRES IN OUT HDMI AE LOC TC AUTO Bottom ON AUTO PUSH DEVIC E B 1/16 1/4 AUX POWE /CHGR S ASSIS TIME ER ND FILT W BATT.
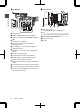
Side Control Panel SD Slot UTS R Q P A FOCUS ASSIST/1 AUTO O ON OFF OFF D A AE LEVEL Introduction MANU A LOCK N MODE CANCEL WHT BAL GAIN SHUTTER IRIS FULL AUTO AE LOCK/4 ZEBRA/5 MARKER/6 ON PUSH AUTO L M H F .
LCD Monitor Lens Section A Introduction B MENU/THUMB N ML K CH1 C D CH2 INT INPUT1 INPUT2 INPUT1 INPUT2 LINE MIC MIC +48V LCD BRIGHT J MONITOR CH1 BOTH CH2 PEAKING DISPLAY STATUS A AUTO MANUAL CANCEL CH1 CH2 E FG H I .
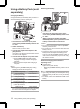
Adjusting the Grip Belt Open the pad and adjust the position of the grip belt accordingly. Attaching/Detaching the Hood Attaching the Hood INPUT2 INPUT1 Align the markings on the camera recorder and hood; turn the hood in the direction of the arrow until it is locked. Preparations BATT.RELE ASE A AUX POW ER /CHG REC DEVIC E AV B HDMI REMO TE DC . Caution : 0 If the grip is loose, the camera recorder may fall off resulting in injuries or malfunction.
Using a Battery Pack (sold separately) Removing the Battery 2 Charging the Battery Charge the battery immediately after purchase or when the battery power is running low. 2 Preparations 4 1 POWER /CHG POWER ON OFF MODE . 3 1 POWER ON OFF MODE 4 . 1 Hold down the lock button (blue) at the center of the [POWER ON/OFF] switch to set to “OFF”. 2 Attach the battery. Slide it in until you hear a click. 3 Connect the supplied AC adapter to the [DC] terminal.
Configuring the Initial Settings When the power is first turned on, the Initial Setting screen for performing the initial settings in the camera recorder appears. Set the date/time of the built-in clock in the [Initial Setting] screen. All operations are disabled until initial settings are complete. MENU/THUMB Precautions for Batteries CANCEL 0 Store the battery in a cool and dry place when not in use. Do not expose the battery to high temperatures (such as in a car under direct sunlight).
2 Ensure that the lens cover is closed, and press the Set button (R). 0 Self-diagnosis starts. 0 A progress bar appears, and “Complete Diagnosis” appears when the diagnosis is complete. Preparations . Memo : 0 It takes about 6 minutes to complete the diagnosis. During the diagnosis, do not operate or turn off the camera recorder. 3 Press the Set button (R) after confirming the exit screen. The [Initial Setting] screen appears. UTC+05:30 .
Usable Cards Use a Class 6/10 SD card. Memo : 0 Depending on the recording format, SD card with Class 4 or higher performance can also be used. 0 To use an SDHC card, set [4GB File Spanning(SDXC)] to “On”. Estimated Recordable Time of SD Cards The estimated recordable time is only a guide. Differences may occur depending on the SD card in use and the battery condition.
Formatting (Initializing) SD Cards Preparations When the following cards are inserted, [!FORMAT] appears at the remaining media display area. Format the card using the camera recorder menu. 0 Unformatted SD cards 0 SD cards formatted under different specifications Caution : 0 Be sure to format the SD card on this camera recorder. SD cards formatted on a PC and other peripheral equipment cannot be used on this camera recorder.
Clips Recorded to SD Cards Folders in the SD Card Example: In the case of QuickTime/MP4 Images recorded are sorted into the respective folders according to the menu settings below. * Select which folder to record to from the menu.
Basic Shooting Procedures Shooting 1 Configure the video and audio input settings. 0 Set the [FULL AUTO ON/OFF] switch to “ON” to enter Full Auto mode. This mode adjusts the Iris, Gain, Shutter and White Balance automatically. 0 The audio recording level is also set to Auto, and audio from the built-in microphone is recorded in the Full Auto mode. 0 The a icon appears at the lower center area of the LCD in the Full Auto mode. Preparations 2 4 4 00: 00: 00.
Memo : 0 [Clip Review] is assigned to [C.REVIEW/7] button in factory default. 0 [Clip Review] can also be assigned to other user buttons. 2 Press the [MENU/THUMB] button. The Scene Select setting menu appears. Cursor (Orange Frame) Check Mark Using Scene Select Use the [SCENE SELECT] switch to change camera settings easily and promptly according to specific scenarios. Set the [SCENE SELECT] switch to “A” or “B” to enter the Scene Select mode.
List of Shooting Modes (Icon) Icon Detailed Settings for Shooting Mode Description Select for indoor shooting. . Indoor (*1) Select for outdoor shooting. . Outdoor (*1) . (Reset) Shooting . Hi Contrast . Bright (*2) . Dark (*2) . . Vivid Sharp . (Adjust) Returns all current setting values for the [SCENE SELECT] switch (“A” or “B”) to default. Select to add contrast and differentiate brightness and darkness.
Miscellaneous Functions for Shooting and Recording Methods This camera recorder is equipped with various functions for shooting. The functions described here are the typical functions of the camera recorder. Miscellaneous Functions for Shooting 0 Assignment of user buttons: 0 0 0 0 A Recording using both slots A and B 0 Continuous recording (Series Rec): Enables seamless long hour continuous recordings over the slots.
Playing Recorded Clips Use the operation buttons on the side control panel of the camera recorder to play back. MENU/THUMB CANCEL AE LEVEL A B C . Playback A IW Button 0 Plays back/pauses the clip pointed by the cursor. 0 You can press the cross-shaped button (HI) to perform frame-by-frame forward playback during pause mode. B S/T Button Skips in the reverse or forward direction. O/N Button During Playback: Fast forwards in the reverse or forward direction.
Connecting External Monitor 0 To output live or playback video images and INPUT2 Audio (Lch) Video GND Audio (Rch) Setting the Aspect 0 For setting the mode to convert images with a 16:9 aspect ratio to display on a 4:3 aspect ratio screen. 0 Set using [A/V Set] B [Video Set] B [SD Aspect]. 0 The available modes include “Side Cut”, “Letter” (blackened at the top and bottom), and “Squeeze” (full size, compressed at the left and right).
Loading Clips to the PC 0 You can load clips to a PC by connecting the camera recorder to the PC via the USB port. Doing so enables clips stored in the SD card to be managed and edited on the PC. 0 Files on the SD card can be managed/edited on the connected PC in this mode only for USB mass storage class devices that are recognized by the said PC as a peripheral drive. Memo : 0 Files cannot be written to the SD card. 1 Connect the camera recorder to the PC using a USB cable.
Menu Screen Hierarchical Chart Main Menu... TC/UB... TC Generator TC Preset Camera Function... Bars OIS Flicker Correction Shutter AE Level AE Speed AGC Limit Smooth Trans GAIN L GAIN M GAIN H AE LEVEL SW Dynamic Zoom Handle Zoom Speed UB Mode Drop Frame LCD/VF... Shooting Assist... Marker Settings... Display Settings... LCD + VF VF Bright VF Contrast LCD Contrast LCD Backlight LCD Mirror A/V Set... Video Set... Audio Set... Camera Process... Detail Master Black Black Toe White Clip Gamma White Balance.
Basic Operations in Menu Screen 0 Press the [MENU/THUMB] button on the side 0 0 0 0 0 control panel of the camera recorder or on the LCD monitor to display the menu screen on the LCD monitor and viewfinder. Various settings for shooting and playback can be configured on the menu screen. There are two types of menu screens - [Main Menu] and [Favorites Menu].
Display Screen B Voltage/Battery Power Displays the current status of the power supply in use. Memo : 0 Displayed in the Display 0 and Display 1 screens during warnings only. Display Screen in Camera Mode Display 0 screen This screen displays the event. It is also used to display warnings only. c ※1 b YX a 282min 100min 50min ※2 A 5 . 6f t 0 AE+6 0dB F1. 6 F1.6 1/ 100 P 13000K P 13000K G .
D Resolution Displays the video image resolution. Memo : 0 This item is not displayed when [Main Menu] B [LCD/VF] B [Display Settings] B [Record Format] is set to “Off”. E Frame Rate/Bit Rate Displays the frame rate and bit rate in pairs. Memo : 0 This item is not displayed when [Main Menu] B [LCD/VF] B [Display Settings] B [Record Format] is set to “Off”. F Audio Level Meter 0 Displays the audio levels of CH1 and CH2. 0 a appears on the screen when in the Auto mode. 4030 20 .
M Iris F-Number Displays F-number of the lens iris. N Gain 0 Displays the gain value when in the Manual Gain mode. 0 “LUX30” is displayed when in the low-light shooting mode. Memo : 0 Displayed in the Display 0 screen only when there is a change. R Zebra pattern During zebra pattern display, (zebra icon) is displayed on the display screen in Camera mode. S Focus Assist 0 “FOCUS” is displayed when auto focus is activated. Memo : 0 Displayed in the Display 0 screen only when there is a change.
Memo : 0 You can specify the display method (Number/ Bar) in [LCD/VF] B [Display Settings] B “Zoom”. This item will not be displayed when “Off” is selected. 0 Displayed in the Display 0 screen only when there is a change. V Time Code (I)/User’s Bit (J) Display 0 Displays the time code (hour: minute: second: frame) or user’s bit data recorded in the SD card being played back. 0 Example of time code display: 00:00:00:00 . ※ * Colon (:) denotes non-drop frames and dot (.) denotes drop frames.
Display Screen in Media Mode Media Display 0 Screen This screen displays the media status or event. It is also used to display warnings only. O A ※ NM L K 1000/2000 282min C Resolution Displays the video image resolution. D Frame Rate/Bit Rate Displays the frame rate and bit rate in pairs. E Operation Guide Displays a guide for the current operation buttons. F Audio Level Meter Displays the audio levels of CH1 and CH2. +5 G .
J Time Code (I)/User’s Bit (J) Display 0 Displays the time code (hour: minute: second: frame) or user’s bit data recorded in the SD card being played back. 0 Example of time code display: 00:00:00:00 ※ . * Colon (:) denotes non-drop frames and dot (.) denotes drop frames. 0 Example of user’s bit display: . F F E E DD 20 Memo : 0 You can specify whether to display the time code, user’s bit, or turn off the display in [TC/UB] of [Main Menu] B [LCD/VF] B [Display Settings].
Troubleshooting Symptom Power does not turn on. Unable to start recording. Action 0 Is the AC adapter properly connected? 0 Is the battery charged? 0 Is the power turned on immediately after it is turned off? 0 0 0 Camera image is not output on the LCD monitor and viewfinder screen. Playback does not start after selecting a clip thumbnail and pressing the Set button (R). Images on the LCD monitor and viewfinder screen appear dark or blurred.
Precautions for Proper Use Storage and Usage Locations Others o Allowable ambient temperature and humidity Be sure to use this unit within the allowable temperature range of 0 °C to 40 °C and a relative humidity of 30 % to 80 %. Using this unit at a temperature or humidity outside the allowable ranges could result not only in malfunction but also serious impact on the CMOS elements as small white spots may be generated. Please exercise care during use.
SDHC/SDXC Cards o SDHC/SDXC card is referred to as SD card in this manual. o This camera recorder saves the recorded images and audio sound on the SD card (sold separately) in the card slot. o If the SD card contains files recorded by devices other than this camera recorder or files that are saved from a PC, the recordable time may be shorter or data may not be properly recorded. In addition, the remaining space on the card may not increase even when files are deleted using a PC.
License Notices Others o MPEG LA AVC THIS PRODUCT IS LICENSED UNDER THE AVC PATENT PORTFOLIO LICENSE FOR THE PERSONAL USE OF A CONSUMER OR OTHER USES IN WHICH IT DOES NOT RECEIVE REMUNERATION TO (i) ENCODE VIDEO IN COMPLIANCE WITH THE AVC STANDARD (“AVC VIDEO”) AND/OR (ii) DECODE AVC VIDEO THAT WAS ENCODED BY A CONSUMER ENGAGED IN A PERSONAL ACTIVITY AND/OR WAS OBTAINED FROM A VIDEO PROVIDER LICENSED TO PROVIDE AVC VIDEO. NO LICENSE IS GRANTED OR SHALL BE IMPLIED FOR ANY OTHER USE.
Content of this manual 0 All rights reserved by JVC KENWOOD 0 0 0 0 0 0 0 0 0 0 0 Others 0 Corporation. Unauthorized duplication or reprinting of this manual, in whole or in part, is strictly prohibited. Illustrated designs, specifications and other contents of this manual are subject to change for improvement without prior notice. AVCHD Progressive and the AVCHD Progressive logo are trademarks of Panasonic Corporation and Sony Corporation. XDCAM EX is a trademark of Sony Corporation.
Specifications General Item Power Power consumption Mass Lens Description DC 12 V Approx. 6 W (When recording in the factory default settings using the viewfinder.) Approx. 1.7 kg (When battery is not installed) 0 °C to 40 °C Allowable operating temperature Allowable 30 %RH to 80 %RH operating humidity Allowable -20 °C to 50 °C storage temperature Dimensions (W 177.5 mm × 197 mm × 416 mm × H × D) Others Terminal Section Item Description [HDMI] output V1.
Video/Audio * The specifications and appearance of this product are subject to changes for further improvement without prior notice. Others Item Description Recording time Approx. 25 minutes (8 GB SD card, 35 Mbps, VBR mode) HD mode (MOV/MP4: MPEG-2) Video QuickTime File Format (For recording file Final Cut Pro)/MP4 File Format format Video HQ mode MPEG-2 Long GOP VBR, 35 Mbps (Max) MP@HL, 1920x1080/59.94i, 50i 1440x1080/59.94i, 50i 1280x720/59.
Software License Agreement Others The software embedded in the Product (hereinafter the “Licensed Software”) provided by JVC KENWOOD Corporation (hereinafter the “Licensor”) is copyrighted to or sublicensable by the Licensor, and this Agreement provides for the terms and conditions which Users shall follow in order to use the Licensed Software. The User shall use the Licensed Software by agreeing with the terms of this Software License Agreement.
(1) when the User violated any provision of this Agreement; or (2) when a petition has been filed against the User for an attachment, provisional attachment, provisional disposition or any other compulsory execution. Article 9 Destruction of the Licensed Software If this Agreement is terminated pursuant to the provision of Article 8, the User shall destroy the Licensed Software, any related documents and copies thereof within two (2) weeks from such date of termination.
© 2016 JVC KENWOOD Corporation JY-HM360AG HD MEMORY CARD CAMERA RECORDER .