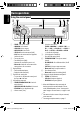
KD-ABT22 RECEPTOR CON CD KD-ABT22 ESPAÑOL RÉCEPTEUR CD KD-ABT22 FRANÇAIS ENGLISH CD RECEIVER For canceling the display demonstration, see page 5. Para cancelar la demostración en pantalla, consulte la página 5. Pour annuler la démonstration des affichages, référez-vous à la page 5. For installation and connections, refer to the separate manual. Para la instalación y las conexiones, refiérase al manual separado. Pour l’installation et les raccordements, se référer au manuel séparé.
ENGLISH Thank you for purchasing a JVC product. Please read all instructions carefully before operation, to ensure your complete understanding and to obtain the best possible performance from the unit. INFORMATION (For U.S.A.) This equipment has been tested and found to comply with the limits for a Class B digital device, pursuant to Part 15 of the FCC Rules. These limits are designed to provide reasonable protection against harmful interference in a residential installation.
CONTENTS INTRODUCTIONS Preparation .................................................. 5 ENGLISH How to reset your unit OPERATIONS Basic operations ........................................... 6 • Your preset adjustments will also be erased (except the registered Bluetooth device, see pages 13 and 14). How to forcibly eject a disc • Using the control panel............................... • Using the remote controller (RM-RK50)...... 6 7 Listening to the radio ...................................
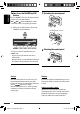
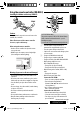
ENGLISH How to use the M MODE and SEL buttons Detaching the control panel If you use M MODE or SEL (select), the display and some controls (such as the number buttons, 4 /¢ buttons, 5/∞ buttons, and the control dial) enter the corresponding control mode. Ex.: When you press number button 1 after pressing M MODE, to operate the FM tuner. Avoid touching the connectors. Attaching the control panel To use these controls for original functions, press M MODE again.
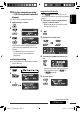
ENGLISH Preparation Cancel the display demonstration and set the clock • See also pages 31 and 32. 1 2 Turn on the power. 3 Cancel the display demonstrations Enter the PSM settings. Select “Demo,” then “Off.” Set the clock Select “Clock Hr” (hour), then adjust the hour. Select “Clock Min” (minute), then adjust the minute. Select “24H/12H,” then “24Hours” or “12Hours.” 4 Finish the procedure.
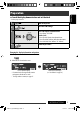
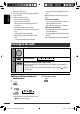
ENGLISH Basic operations Using the control panel 1 • TUNER: Select preset station. • • • • • 2 3 4 5 6 7 8 HD RADIO: Select channel. SIRIUS/XM: Select category. CD/USB/CD-CH: Select folder. USB-iPod: Enter the main menu [Hold]. iPod: Enter the main menu/Pause playback/ Confirm selection. • Turn on the power. • Turn off the power [Hold]. • Attenuate the sound (if the power is on). • Bluetooth: Switch the conversation media during a phone call conversation. Display window • Enter/exit Bluetooth menu.
Using the remote controller (RM-RK50) Caution: Battery shall not be exposed to excessive heat such as sunshine, fire, or the like. If the effectiveness of the remote controller decreases, replace the battery. Before using the remote controller: • Aim the remote controller directly at the remote sensor on the unit. • DO NOT expose the remote sensor to bright light (direct sunlight or artificial lighting).
ENGLISH 3 4 5 6 – Changes the channels rapidly if pressed and held. • While listening to an iPod (in menu selecting mode): Connected to KS-PD100: – Selects an item if pressed briefly. (Then, press D ∞ to confirm the selection.) – Skips 10 items at a time if pressed and held. Connected to the USB cable: – By holding F 3, you can start play back the selected item directly. – By holding R 2, you can go back to the main display. • Reverse skip/forward skip for Bluetooth audio. Adjusts the volume level.
You can preset up to six stations for each band. 1 While listening to a station... Using the Preset Station list • When is shown on the display, you can move back to the previous screen by pressing number button 3. 1 Follow steps 1 and 2 of “Using the number buttons” on the left column. • By holding 5 / ∞, the Preset Station List will also appear (go to step 4).
ENGLISH Listening to the preset station on the Preset Station List 1 Display the Preset Station List, then select the preset station you want to listen to. 2 Change to the selected station. Disc operations All tracks will be played repeatedly until you change the source or eject the disc. To stop play and eject the disc Prohibiting disc ejection To cancel the prohibition, repeat the same procedure. • Press SOURCE to listen to another playback source.
4 Select an item. Skip 10 tracks MP3/WMA/AAC: Within the same folder Repeat Track: Repeat current track Repeat Folder: MP3/WMA/AAC: Repeat current folder Random Folder: MP3/WMA/AAC: Randomly play all tracks of current folder, then tracks of next folders Random Disc: Randomly play all tracks • You can also cancel the playback mode by selecting ). “Off” or press number button 4 ( Ex.: When “File” is selected in step 3 ENGLISH After pressing M MODE, press the following buttons to...
ENGLISH Listening to the USB device You can connect a USB mass storage class device such as a USB memory, Digital Audio Player *1, portable HDD, etc. to the unit. • You can also connect an Apple iPod to the USB cable from the rear of the unit. For details of the operations, see pages 24 – 26. This unit can play MP3/WMA/WMA-DRM10 *1/AAC *2/WAV tracks stored in a USB device. *1 You can connect both MTP (Media Transfer Protocol) devices and USB mass storage class devices. See also page 40.
Connecting a Bluetooth device for the first time Pairing and PIN code Bluetooth is a short-range wireless radio communication technology for the mobile device such as mobile phones, portable PCs, and other devices. The Bluetooth devices can be connected without cables and communicate with each other. • Refer to the list (included in the box) to see the countries where you may use the Bluetooth® function. Bluetooth profile This unit supports the following Bluetooth profiles; HFP (Hands-Free Profile) 1.
4 ENGLISH Enter a PIN (Personal Identification Number) code to the unit. • You can enter any number you like (1-digit to 16-digit number). [Initial: 0000] • To enter a PIN code less than 4-digit, firstly delete the initial PIN code (0000) by pressing ). number button 5 ( * Some devices have their own PIN code. Enter the specified PIN code to the unit. 1 Move to the next (or previous) number position. 2 Select a number.
3 Select the method to make a call. ENGLISH You can set the unit to connect the Bluetooth device automatically when the unit is turned on. (See “Auto Cnnct” on page 36.) Disconnecting a device Perform steps 1 and 2 on page 13, then... Select “Discn Phone” or “Discn Audio.” • Dialed *: Shows the list of the phone numbers you have dialed. Go to the following step. • Received *: Shows the list of the received calls. Go to the following step.
When a call comes in.... How to enter phone number ENGLISH The source is automatically changed to “Bluetooth.” Select a number. • Phone number appears (if acquired). When “Auto Answer” is activated.... The unit answers the incoming calls automatically, see page 36. • When “Auto Answer” is deactivated, press any button (except /control dial) to answer the incoming call. • You can adjust the microphone volume level (see page 36).
How to copy phone book 1 2 Select “Settings.” 3 Select “PhoneBook.” 4 Enter the PIN code both for this unit and Bluetooth phone. • See step 4 of page 14. Presetting the phone number You can preset up to six phone numbers. • When is shown on the display, you can move back to the previous screen by pressing number button 3. 1 Display the phone number you want to preset by using one of the “Call” items. 2 Select a phone number.
ENGLISH Using the Bluetooth audio player • Operations and display indications differ depending on their availability on the connected audio player. Select “BT-AUDIO.” If playback does not start automatically, operate the Bluetooth audio player to start playback. [Press] Reverse skip/forward skip [Hold] Reverse search/forward search Select group/folder Start/pause playback • Refer also to pages 14 and 15 for connecting/ disconnecting/deleting a registered device.
Before operating, connect HD Radio tuner box, KT-HD300 (separately purchased) to the CD changer jack on the rear of the unit. What is HD Radio Technology? ENGLISH Listening to the HD Radio ™ Broadcast HD Radio Technology can deliver high-quality digital sound—AM digital will have FM-like quality (in stereo) and FM digital will have CD-like quality—with static-free and clear reception. Furthermore, stations can offer text and data, such as artist names and song titles.
ENGLISH 2 [Lights up] When holding the digital reception [Flashes] When holding the analog reception • If no sound can be heard from the selected setting, change the setting to “Analog” or “Digital.” • The setting automatically changes to “Auto” if you tuned in to or change to another station, or if you turned off the power. • This setting cannot take effect for the conventional FM/AM stations. • If the radio station forces the reception mode to digital or analog, the DIGI or ANA indicator lights up.
Random Folder: MP3: Randomly play all tracks of the current folder, then tracks of the next folder Random Disc: Randomly play all tracks of current disc Random All: Randomly play all tracks of the discs in the magazine Skip 10 tracks MP3: Within the same folder Repeat Track: Repeat current track Repeat Folder: MP3: Repeat all tracks of current folder Repeat Disc: Repeat all tracks of the current disc ENGLISH After pressing M MODE, press the following buttons to...
ENGLISH Activate your XM subscription after connection • Only Channel 0, 1, and 247 are available before activation. 1 3 Check your XM Satellite radio ID labelled on the casing of the XMDirect ™ Universal Tuner Box, or tune in to “Channel 0” (see page 23). 4 Contact XM Satellite radio on the internet at to activate your subscription, or you can call 1-800-XM-RADIO (1-800-967-2346). Once completed, the unit tunes in to one of the available channels (Channel 4 or higher).
Checking the XM Satellite radio ID 3 Select “LIST.” 4 Select “Preset.” 5 Select a preset number you want to store into. 6 Store the channel. The display alternately shows “RADIO ID” and the 8-digit (alphanumeric) ID number. ENGLISH While selecting “XM1,” “XM2,” or “XM3,” select “Channel 0.” To cancel the ID number display, select any channel other than “Channel 0.
ENGLISH Selecting a category/channel on the list To select a channel 1 Follow steps 2 to 4 of “Storing channels in memory” on page 23. • In step 4, select “Channel.” • When is shown on the display, you can move back to the previous screen by pressing number button 3. • When / is shown on the display, you can move to the other lists by pressing number button 5 or 6 repeatedly. 2 Select a channel. Ex.: When listening to the SIRIUS Satellite radio.
• Avoid using the iPod if it might hinder your safety while driving. • Make sure all important data has been backed up to avoid losing the data. 1 Connect an iPod to the USB cable or through KS-PD100. — 2 3 Playback starts automatically from where it had been paused previously. • If an iPod has been connected, press SOURCE to select “USB-iPod” or “iPod” as the playback source. ENGLISH Caution: Select a track. — Adjust the volume and sound as you want. (See pages 28 – 30.
ENGLISH Selecting a track from the menu No. Operation 1 Enter the main menu. 2 Select the desired menu. 3 For iPod connected through KS-PD100 For iPod connected to the USB cable Playlists Ô Artists Ô Albums Ô Songs Ô Genres Ô Composers Playlists Ô Artists Ô Albums Ô Songs Ô Podcasts Ô Genres Ô Composers Ô Audiobooks • By holding 4 /¢ , you can fast skip during song search in the main menu. • By holding ¢ , you can start play back the selected item directly.
ENGLISH Listening to the other external components You can connect an external component to: • CD changer jack on the rear of this unit using the following adapters: – Line Input Adapter, KS-U57 – AUX Input Adapter, KS-U58 Preparation: Make sure “Ext In” is selected for the external input setting, see page 33. • AUX (auxiliary) input jack on the control panel. 1 Select “EXT IN” or “AUX IN.” 2 3 — 4 — Turn on the connected component and start playing the source. Adjust the volume.
ENGLISH Selecting a preset sound mode You can select a preset sound mode suitable to the music genre (iEQ: intelligent equalizer). 1 Enter sound mode setting. 2 Select “EQ.” 3 Select “On.” 4 Select a preset sound mode. • If “Bypass” is selected, you can listen to the original sound mode recorded. lights up on the display. Preset value setting for each sound mode Preset value Sound mode Band 1 (100 Hz) Band 2 (320 Hz) Band 3 (1 kHz) Band 4 (3.
3 Turn the control dial to adjust the Adjusting the sound 4 Press number button 1 ( ) to move to another setting level. 4 /¢ : select the quality of LPF. [–12dB/oct or –24dB/oct] Control dial: Turn the control dial to select the subwoofer phase. [0deg (normal) or 180deg (reverse)] * If “Off” is selected in step 2, you can only adjust the subwoofer phase. C Hi Pass (Hi Pass Filter) Turn the control dial to select the cutoff frequency to the front/rear speakers. Set this to match the LPF setting.
ENGLISH Storing your own sound modes 5 Adjust the sound elements of the selected frequency range. 1 Press 4 /¢ to select the frequency band, then press 5 / ∞ to enhanced level for the selected frequency band. [–6 to +6] 2 Press number button 5 ( ), then turn the control dial to select the frequency. 3 Press number button 5 ( ), then turn the control dial to select the quality slope (Q). 6 Repeat steps 3 and 4 to adjust the other frequency bands. 7 Store the adjustments.
You can change PSM (Preferred Setting Mode) items listed in the table below and on pages 32 – 34. 1 Enter the PSM settings. 2 Select a PSM category. ENGLISH General settings — PSM 4 Adjust the selected PSM item. 5 Repeat steps 2 – 4 to adjust other PSM items if necessary. 6 Finish the procedure. To display the rest 3 Select a PSM item. By pressing either one of the buttons repeatedly, you can also move to the item of the other categories.
ENGLISH Category Indication CLOCK Clock Hr Hour adjustment Item ( : Initial) Setting, [reference page] 1 – 12AM/ 1 – 12PM (0 – 23) : Initial: 1 (1:00AM), [5]. Clock Min 00 – 59 Minute adjustment : Initial: 00 (1:00AM), [5]. 24H/12H Time display mode • 12Hours • 24Hours : See also page 5 for setting. Clock Adj *2 Clock adjustment • Auto : The built-in clock is automatically adjusted using the clock data provided via the satellite radio channel. : Cancels.
TUNER Item Setting, [reference page] ( : Initial) : Positive pattern will be selected during the day time *7; while negative pattern will be used during the night time *7. • Positive : Positive pattern of the display. • Negative : Negative pattern of the display. LCD Type Display type • Auto Tag Tag display • On • Off : Shows the tag while playing MP3/WMA/AAC/WAV tracks. : Cancels.
COLOR ENGLISH Category Indication Item ( : Initial) Setting, [reference page] Color Sel Color selection Initial: All Source; Color: Pale : Select your favorite display color for each source (or for all sources), [34, 35]. Color Set Color setting — Red Green Blue : Create your own colors, and select them for the display color, [35]. Day Color : User color during the day time *11. NightColor : User color during the night time *11.
3 Select a source. Creating your own color—User Color All Source *1 Ô CD Ô Changer *3 (or Ext In *2) Ô USB *3 Ô FM Ô AM Ô Sirius *3/XM *3 Ô iPod *3 Ô Aux In Ô BT Audio Ô (back to the beginning) ENGLISH You can create your own colors—“Day Color” or “NightColor.” 1 Follow steps 1 to 3 on page 31. • In step 2, select “COLOR.” • In step 3, select “Color Set.” 2 Select “Day Color” or “NightColor.” 3 Select a primary color. 4 Adjust the level (00 to 11) of the selected primary color.
ENGLISH Bluetooth settings You can change the settings listed below and on the right column according to your preference. is shown on the display, you can • When move back to the previous screen by pressing number button 3. 1 2 Select “Settings.” 3 Select a setting item.
3 Assign a title. 1 Press number button 4 ( to select a character set. ) repeatedly ENGLISH Version Hardware and software versions of the Bluetooth module. Phone Device *2 Name of the connected Bluetooth phone. Audio Device *2 Name of the connected Bluetooth audio player. *1 If the connected Bluetooth phone does not support text message notification (via Bluetooth), the unit will not receive any notification upon the arrival of a text message.
ENGLISH More about this unit Basic operations Disc/USB operations Turning on the power Caution for DualDisc playback • By pressing SOURCE on the unit, you can also turn on the power. If the source is ready, playback also starts. • The Non-DVD side of a “DualDisc” does not comply with the “Compact Disc Digital Audio” standard. Therefore, the use of Non-DVD side of a DualDisc on this product may not be recommended.
Playing an MP3/WMA/AAC disc • This unit can play back MP3/WMA/AAC files with the extension code <.mp3>, <.wma>, or <.m4a> (regardless of the letter case—upper/lower). • This unit can show the names of albums, artists (performer), and Tag (Version 1.0, 1.1, 2.2, 2.3, or 2.4) for MP3 files and show WMA/AAC Tag. • This unit can display only one-byte characters. No other characters can be correctly displayed.
ENGLISH Playing MP3/WMA/AAC/WAV tracks from a USB device • Connecting a USB device automatically changes the source to “USB.” • While playing from a USB device, the playback order may differ from the one from other players. • This unit may be unable to play back some USB devices or some files due to their characteristics or recording conditions. • Depending on the shape of the USB devices and connection ports, some USB devices may not be attached properly or the connection might be loose.
Icons for phone types Satellite radio These icons indicate the type of connected phone/ audio devices : Cellular phone : Phone only : Household phone : Phone/Audio : Office : Audio only : General : Other than above : Unknown Warning messages for Bluetooth operations • Connection Error: The device is registered but the connection has failed. Use “Connect” to connect the device again. (See page 14.) • Error Try the operation again.
ENGLISH • While connecting an iPod with Video: – No video shows on the iPod’s display or the external monitor (only the audio part is available). – It is not possible to browse video files on the “Video“ menu. (If you connect the iPod during the playback or pausing of a video file, resuming playback will not work.) • iPod shuffle and iPhone cannot be used with this unit. • You can control the iPod from this unit when “JVC” or “ ” appears on the iPod display after connection.
ENGLISH Troubleshooting Disc playback FM/AM General What appears to be trouble is not always serious. Check the following points before calling a service center. Symptoms Remedies/Causes • Sound cannot be heard from the speakers. • Adjust the volume to the optimum level. • Check the cords and connections. • The unit does not work at all. Reset the unit (see page 3). • “Connect Error” appears on the display. Remove the control panel, wipe the connector, then attach it again (see page 4).
MP3/WMA/AAC playback ENGLISH Symptoms Remedies/Causes • Disc cannot be played back. • Use a disc with MP3/WMA/AAC tracks recorded in a format compliant with ISO 9660 Level 1, Level 2, Romeo, or Joliet. • Add the extension code <.mp3>, <.wma>, or <.m4a> to the file names. • Noise is generated. Skip to another track or change the disc. (Do not add the extension code <.mp3>, <.wma>, or <.m4a> to non-MP3/WMA/AAC tracks.) • A longer readout time is required (“Reading” keeps flashing on the display).
USB device Remedies/Causes • Noise is generated. • The track played back is not a playable file format (MP3/WMA/AAC/WAV). Skip to another file. • Do not add the extension code <.mp3>, <.wma>, <.m4a>, or <.wav> to non-MP3/WMA/AAC/WAV tracks. • Tracks cannot play back as you have intended them to play. Playback order may differs from the one played back using other players. • “Reading” keeps flashing on the display. • Readout time varies depending on the USB device.
HD Radio reception Bluetooth ® ENGLISH Symptoms Remedies/Causes • The unit cannot be detected by the Bluetooth device. • Search from the Bluetooth device again. • Reset the unit. When “Open...“ appears on the display, search from the Bluetooth device again. • The unit does not make pairing with the Bluetooth device. Enter the same PIN code for both the unit and target device. • Phone sound quality is poor. • Reduce the distance between the unit and the Bluetooth cellular phone.
Remedies/Causes • “No Disc” appears on the display. Insert a disc into the magazine. • “No Magazine” appears on the display. Insert the magazine. • “Reset 08” appears on the display. Connect this unit and the CD changer correctly and press the reset button of the CD changer. • “Reset 01” – “Reset 07” appears on the display. Press the reset button of the CD changer. • The CD changer does not work at all. Reset the unit (see page 3).
Satellite radio ENGLISH Symptoms Remedies/Causes • “LOADING” appears on the display while listening to the XM Satellite radio. The unit is loading the channel information and audio. Text information are temporarily unavailable. • “Reset 08” appears on the display. The unit is loading the channel information and audio. Text information are temporarily unavailable. • Satellite radio does not work at all. Reconnect this unit and the satellite radio correctly, then reset the unit.
How to clean the connectors Frequent detachment will deteriorate the connectors. To minimize this possibility, periodically wipe the connectors with a cotton swab or cloth moistened with alcohol, being careful not to damage the connectors. Connectors Moisture condensation Moisture may condense on the lens inside the unit in the following cases: • After starting the heater in the car. • If it becomes very humid inside the car. Should this occur, the unit may malfunction.
ENGLISH Specifications AUDIO AMPLIFIER SECTION Power Output: 20 W RMS × 4 Channels at 4 Ω and ≤ 1% THD+N Signal-to-Noise Ratio: 80 dBA (reference: 1 W into 4 Ω) Load Impedance: 4 Ω (4 Ω to 8 Ω allowance) Equalizer Control Range: Frequency: Band 1: 68 Hz, 100 Hz, 150 Hz Band 2: 210 Hz, 320 Hz, 460 Hz Band 3: 680 Hz, 1 kHz, 1.5 kHz Band 4: 2.1 kHz, 3.2 kHz, 4.6 kHz Band 5: 6.8 kHz, 10 kHz, 15 kHz Level: ±12 dB Q (Q-slope): Q0.7 to Q2.0 Frequency Response: 40 Hz to 20 000 Hz Line-Out Level/Impedance: 5.
Number of Channels: Frequency Response: Dynamic Range: Signal-to-Noise Ratio: Wow and Flutter: MP3 Decoding Format: (MPEG1/2 Audio Layer 3) WMA (Windows Media® Audio) Decoding Format: AAC (Advanced Audio Coding) Decoding Format: GENERAL BLUETOOTH USB SECTION USB Standards: Data Transfer Rate: Compact disc player Non-contact optical pickup (semiconductor laser) 2 channels (stereo) 5 Hz to 20 000 Hz 96 dB 98 dB Less than measurable limit Max. Bit Rate: 320 kbps Max. Bit Rate: 192 kbps Max.
Muchas gracias por la compra de un producto JVC. Como primer paso, por favor lea detenidamente este manual para comprender a fondo todas las instrucciones y obtener un máximo disfrute de esta unidad. ESPAÑOL IMPORTANTE (EE.UU.) Este equipo se ha sometido a todo tipo de pruebas y cumple con las normas establecidas para dispositivos de Clase B, de conformidad con la Parte 15 de las reglas de la FCC (Comisión Federal de Comunicaciones).
Cómo reposicionar su unidad CONTENIDO OPERACIONES Operaciones básicas ..................................... 6 • Sus ajustes preestablecidos también serán borrados (excepto el dispositivo Bluetooth registrado, consulte las páginas 13 y 14). Cómo expulsar el disco por la fuerza • Uso del panel de control ............................. • Uso del control remoto (RM-RK50) ............. 6 7 Para escuchar la radio .................................. Operaciones de los discos .............................
ESPAÑOL Cómo usar los botones M MODE y SEL Desmontaje del panel de control Si utiliza M MODE (modo) o SEL (seleccionar), la pantalla y algunos controles (como por ejemplo, botones numéricos, botones 4 /¢ , botones 5/∞, y el control giratorio) acceden al modo de control correspondiente. Ej.: Cuando usted pulsa el botón numérico 1 después de pulsar M MODE, para operar el sintonizador de FM. Evite tocar los conectores.
Preparativos Cancele la demostración en pantalla y ponga el reloj en hora 1 2 Encienda la unidad. 3 Cancele las demostraciones en pantalla. ESPAÑOL • Consulte también las páginas 31 y 32. Introduzca los ajustes PSM. Seleccione “Demo” y, a continuación, “Off”. Ponga el reloj en hora Seleccione “Clock Hr” (hora) y, seguidamente ajuste la hora. Seleccione “Clock Min” (minutos) y, seguidamente ajuste los minutos. Seleccione “24H/12H” y, a continuación, “24Hours” o “12Hours”.
Operaciones básicas ESPAÑOL Uso del panel de control 1 • TUNER: Selecciona la emisora preajustada. • • • • • 2 3 4 5 6 7 8 6 HD RADIO: Seleccionar un capítulo. SIRIUS/XM: Seleccione una categoría. CD/USB/CD-CH: Seleccionar la carpeta. USB-iPod: Ingrese al menú principal [Sostener]. iPod: Ingresa al menú principal / pausa la reproducción / confirma la selección • Encienda la unidad. • Apaga el sistema [Sostener]. • Atenúa el sonido (si el sistema está encendido).
Uso del control remoto (RM-RK50) ESPAÑOL Instalación de la pila botón de litio (CR2025) Precaución: No deje las pilas expuestas a altas temperaturas, como, por ejemplo, a la luz del sol, al fuego u otras condiciones similares. Si disminuye la efectividad de acción del control remoto, cambie la pila. Antes de utilizar el control remoto: • Apunte el control remoto directamente hacia el sensor remoto del receptor.
3 Ajusta el nivel de volumen. 4 Selección del modo de sonido (iEQ: ecualizador – Cambia rápidamente los canales si lo pulsa y mantiene pulsado. • Mientras escucha en un iPod (en el modo de selección de menú): Conectado al KS-PD100: – Selecciona una opción si lo pulsa brevemente. (Seguidamente, pulse D ∞ para confirmar la selección). – Salta 10 opciones simultáneamente si lo pulsa y mantiene pulsado. Conectado al cable USB: – Si sostiene F 3, se iniciará directamente la reproducción del tema seleccionado.
Se pueden preajustar hasta seis emisoras para cada banda. 1 Uso de la lista de emisoras preajustadas • Cuando aparezca en la pantalla, podrá volver a la pantalla anterior pulsando el botón numérico 3. 1 Mientras escucha una emisora... Siga los pasos 1 y 2 de “Uso de los botones numéricos” descritos en la columna izquierda. • Si mantiene pulsado 5 / ∞, aparecerá la lista de emisoras preajustadas (vaya al paso 4).
Para escuchar la emisora preajustada de la Lista de Emisoras Preajustadas Visualice la lista de emisoras preajustadas y, a continuación, seleccione la emisora que desea escuchar. 2 Cambie a la emisora seleccionada. ESPAÑOL 1 Operaciones de los discos Todas las pistas se reproducen repetidamente hasta que usted cambie la fuente o extraiga el disco. Para detener la reproducción y expulsar el disco Prohibición de la expulsión del disco Para cancelar la prohibición, repita el mismo procedimiento.
Tras pulsar M MODE , pulse los siguientes botones para... 4 Seleccione una opción. Saltar 10 pistas MP3/WMA/AAC: Dentro de la misma carpeta Random Folder: MP3/WMA/AAC: Repetir aleatoriamente todas las pistas de la carpeta actual y luego las pistas de las siguientes carpetas Random Disc: Reproducir aleatoriamente todas las pistas • El modo de reproducción también se puede cancelar seleccionando “Off” o pulsando el botón numérico 4 ( ).
ESPAÑOL Escuchando el dispositivo USB Puede conectar a la unidad un dispositivo de clase de almacenamiento masivo USB tal como una memoria USB, un reproductor de audio digital*1, un HDD (disco duro) portátil, etc. • También puede conectar un Apple iPod al cable USB desde la parte trasera de la unidad. Para obtener detalles de las operaciones, consulte las páginas 24 – 26. La unidad puede reproducir pistas MP3/WMA/WMA-DRM10 *1/AAC *2/WAV almacenadas en un dispositivo USB.
Uso de dispositivos Bluetooth ® Conexión de un dispositivo Bluetooth por primera vez Perfil de Bluetooth Esta unidad es compatible con los perfiles Bluetooth siguientes; HFP (Perfil manos libres) 1.5 OPP (Perfil de carga de objetos) 1.1 A2DP (Perfil Avanzado de Distribución de Audio) 1.2 AVRCP (Perfil de Control Remoto de Audio/Video) 1.
4 ESPAÑOL Ingrese un código PIN (Número de identificación personal) en la unidad. • Puede introducir cualquier número que desee (número de 1 a 16 dígitos). [Inicial: 0000] • Para ingresar un código PIN de menos de 4 dígitos, primero borre el código PIN (0000) inicial ). pulsando el botón numérico 5 ( * Algunos dispositivos tienen su propio código PIN: Introduzca el código PIN específico en la unidad. 1 Muévase a la posición del número siguiente (o anterior). 2 Selecciona un número.
Puede configurar la unidad para que se conecte automáticamente el dispositivo Bluetooth al encender la unidad. (Véase “Auto Cnnct” en la página 36). 3 Seleccione el método para hacer la llamada. Efectúe los pasos 1 y 2 de la página 13 y luego... Seleccione “Discn Phone” o “Discn Audio”. • Dialed *: Muestra la lista de los números telefónicos a los que ha llamado. Vaya al paso siguiente. • Received *: Muestra la lista de las llamadas recibidas. Vaya al paso siguiente.
Cuando entra una llamada... Cómo ingresar un número telefónico La fuente será cambiada automáticamente a “Bluetooth”. Seleccionar un número. ESPAÑOL • Aparece el número telefónico (si se ha obtenido). Cuando “Auto Answer” está activado.... La unidad contesta automáticamente las llamadas entrantes, consulte la página 36. • Si “Auto Answer” está desactivado, pulse cualquier botón (excepto /control giratorio) para contestar la llamada entrante.
Cómo copiar la guía telefónica 1 2 Memorización del números telefónico Puede memorizar hasta seis números telefónicos. • Cuando aparezca en la pantalla, podrá volver a la pantalla anterior pulsando el botón numérico 3. 1 Visualice el número telefónico que desea preajustar utilizando una de las opciones de “Call”. 2 Seleccione un número telefónico. También puede ingresar un número telefónico nuevo (véase también “Cómo ingresar un número telefónico” en la página 16) para guardarlo.
Uso del reproductor de audio Bluetooth • Las operaciones y las indicaciones en pantalla difieren según el reproductor de audio conectado. Seleccione “BT-AUDIO”. ESPAÑOL Si la reproducción no comienza automáticamente, opere el reproductor de audio Bluetooth para comenzar la reproducción.
Para escuchar una transmisión de HD Radio™ Antes de hacer funcionar, conecte el sintonizador HD Radio, KT-HD300 (de venta por separado) al jack del cambiador de CD en la parte posterior de la unidad. La tecnología HD Radio puede brindar sonido digital de alta calidad—las emisiones digital AM tendrán calidad similar a las FM (en estéreo) y las digital FM poseerán calidad similar a la de un CD—con una recepción clara y libre de estática.
2 ESPAÑOL [Se enciende] Cuando sostiene la recepción digital [Parpadea] Cuando sostiene la recepción analógica Auto: [Inicial] Cambia entre audio digital y analógico automáticamente • Si no puede escucharse ningún sonido en el ajuste seleccionado, cámbielo a “Analog” o “Digital”. • El ajuste cambia automáticamente a “Auto” si sintonizó o cambió a otra emisora, o si apagó la unidad. • Este ajuste no posee ningún efecto en las emisoras FM/AM convencionales.
Random Folder: MP3: Reproduce aleatoriamente todas las pistas de la carpeta actual y luego las pistas de la siguiente carpeta Random Disc: Reproduce aleatoriamente todas las pistas del disco actual Random All: Reproduce en forma aleatoria todas las pistas de los discos en el cargador Saltar 10 pistas MP3: Dentro de la misma carpeta Repeat Track: Repetir la pista actual Repeat Folder: MP3: Repite todas las pistas de la carpeta actual Repeat Disc: Repite todas las pistas del disco actual • El modo de reprod
Active la suscripción de XM después de la conexión 3 Consulte el número de identificación de la 1 radio satelital XM que aparece en la etiqueta de la carcasa del Sintonizador universal XMDirect™ o sintonice el “Channel 0” (consulte la página 23). 2 4 Para activar su suscripción, visite el sitio web ESPAÑOL • Antes de la activación sólo están disponibles los canales 0, 1 y 247. El Sintonizador universal XMDirect™ comienza a actualizar todos los canales XM. El “Channel 1” se sintoniza automáticamente.
Para consultar el número de identificación de la radio satelital XM 3 Seleccione “LIST”. 4 Seleccione “Preset”. 5 Seleccione el número de preajuste en que desea almacenar. 6 Almacene el canal. ESPAÑOL Mientras selecciona “XM1”, “XM2” o “XM3”, seleccione “Channel 0”. La pantalla muestra alternativamente “RADIO ID” y el número de identificación de 8 caracteres alfanuméricos. Para cancelar la visualización del número de identificación seleccione un canal diferente al “Channel 0”.
ESPAÑOL Seleccionando una categoría/canal en la lista Para seleccionar un canal 1 Siga los pasos 2 a 4 de “Cómo almacenar canales en la memoria” en la página 23. • En el paso 4, seleccione “Channel”. • Cuando aparezca en la pantalla, podrá volver a la pantalla anterior pulsando el botón numérico 3. • Cuando aparece / en la pantalla, podrá desplazarse a otras listas pulsando repetidamente el botón numérico 5 o 6. 2 Seleccione un canal. Ej.: Para escuchar la radio por satélite SIRIUS.
Precaución: • Evite utilizar el iPod si esto puede poner en peligro su seguridad cuando conduce. • Para evitar el borrado accidental, asegúrese de sacar copia de respaldo de todos los datos importantes. 1 La reproducción se inicia automáticamente desde el punto de detención anterior. • Si se ha conectado un iPod, pulse SOURCE para seleccionar “USB-iPod” o “iPod” como fuente de reproducción. — 2 3 Seleccione una pista. Ajuste el volumen y el sonido según se desee. (Consulte las páginas 28 a 30.
ESPAÑOL Seleccionar una pista en el menú Nº. Funcionamiento 1 Ingrese al menú principal. 2 Seleccione el menú deseado. 3 Para un iPod conectado a través del KS-PD100 Para un iPod conectado al cable USB Playlists Ô Artists Ô Albums Ô Songs Ô Genres Ô Composers Playlists Ô Artists Ô Albums Ô Songs Ô Podcasts Ô Genres Ô Composers Ô Audiobooks • Si sostiene 4 /¢ , se efectúa el salto rápido durante la búsqueda de canciones en el menú principal.
Podrá conectar un componente externo a: • Jack del cambiador de CD de la parte trasera de esta unidad utilizando los siguientes adaptadores: – Adaptador de entrada de línea, KS-U57 – Adaptador de entrada AUX, KS-U58 Preparativos: Asegúrese de que se ha seleccionado “Ext In” para el ajuste de entrada externa, consulte la página 33. • Jack de entrada AUX (auxiliar) en el panel de control. 1 2 Seleccione “EXT IN” o “AUX IN”.
Selección de un modo de sonido preajustado ESPAÑOL Podrá seleccionar un modo de sonido preajustado adecuado al género musical (iEQ: ecualizador inteligente). 1 Ingrese al ajuste del modo de sonido. 2 Seleccione “EQ”. 3 Seleccione “On”. 4 Seleccione un modo de sonido preajustado. • Si selecciona “Bypass”, podrá escuchar el modo de sonido original grabado. se enciende en la pantalla.
3 Gire el control giratorio para ajustar el Cómo ajustar el sonido nivel de salida del subwoofer. [0 a 8] Usted puede ajustar las características de sonido según sus preferencias. • Cuando aparezca en la pantalla, podrá volver a la pantalla anterior pulsando el botón numérico 3 o 6. ) para desplazarse a otro nivel de ajuste. 4 /¢ : seleccione la calidad de LPF. [–12dB/oct o –24dB/oct] Disco de control: Haga girar el control giratorio para seleccionar la fase del subwoofer.
ESPAÑOL Cómo almacenar sus propios modos de sonido 5 Ajuste los elementos de sonido de la gama de frecuencias seleccionada. 1 Presione 4 /¢ para seleccionar la banda de frecuencia y, a continuación, presione 5 / ∞ y ajuste el nivel mejorado para la banda de frecuencia seleccionada. [–6 a +6] 2 Pulse el botón numérico 5 ( ) y, a continuación, gire el control giratorio para seleccionar la frecuencia.
Podrá cambiar las opciones de PSM (Modo de ajustes preferidos) listadas en la tabla de abajo y en las páginas 32 a 34. 1 Introduzca los ajustes PSM. 2 Seleccione una categoría de PSM. 4 Ajuste el ítem PSM seleccionado. 5 Repita los pasos 2 a 4 para ajustar las otras opciones de PSM, si fuera necesario. 6 Finalice el procedimiento. ESPAÑOL Configuraciones generales—PSM Para visualizar el resto 3 Seleccione una opción de PSM.
CLOCK ESPAÑOL Categoría Indicación Opción Ajuste, [página de referencia] ( : Inicial) Clock Hr Ajuste de la hora 1 – 12AM/ 1 – 12PM (0 – 23) : Inicial: 1 (1:00AM), [5]. Clock Min Ajuste de los minutos 00 – 59 : Inicial: 00 (1:00AM), [5]. 24H/12H Modo de visualización de la hora • 12Hours : Para el ajuste, consulte también la página 5.
TUNER Opción ( : Inicial) LCD Type Tipo de pantalla • Auto Tag Visualización de etiqueta • On : Se seleccionarán patrones positivos durante las horas del día*7; mientras que se seleccionarán patrones negativos durante la noche *7. • Positive : Patrón positivo de la pantalla. • Negative : Patrón negativo de la pantalla. • Off : Se visualiza la etiqueta mientras se reproducen pistas MP3/ WMA/AAC/WAV. : Se cancela.
ESPAÑOL COLOR Categoría Indicación Opción ( : Inicial) Ajuste, [página de referencia] Color Sel Selección del color Inicial: All : Seleccione su color de visualización favorito para cada fuente Source; (o para todas las fuentes), [34, 35]. Color: Pálido Color Set Ajuste de color — Red Green Blue : Cree sus propios colores, y selecciónelos para el color de visualización, [35]. Day Color : Color de usuario durant elas horas del día*11. NightColor : Color de usuario durante las horas de la noche *11.
3 Seleccione una fuente. Creando sus propios colores—User Color Podrá crear sus propios colores—“Day Color” (color de día) o “NightColor” (color de noche). 1 Siga los pasos 1 a 3 de la página 31. • En el paso 2, seleccione “COLOR”. • En el paso 3, seleccione “Color Set”. 2 Seleccione “Day Color” o “NightColor”. 3 Seleccione un color primario. 4 Ajuste el nivel (00 – 11) del color primario seleccionado. 5 Repita los pasos 3 y 4 para ajustar los otros colores primarios. 6 Salga del ajuste.
ESPAÑOL Ajustes Bluetooth Los ajustes listados debajo y en la columna derecha se pueden cambiar según sus preferencias. en la pantalla, podrá • Cuando aparezca volver a la pantalla anterior pulsando el botón numérico 3. 1 2 Seleccione “Settings”. Menú de ajustes ( : Inicial) Auto Cnnct (conectar) Al encender la unidad, la conexión se establece automáticamente con... Off: Ningún dispositivo Bluetooth. Last: El dispositivo Bluetooth conectado en último término.
Version Versiones de hardware y software del módulo Bluetooth. 3 Asigne un título. 1 Pulse repetidamente el botón numérico 4 ) para seleccionar un conjunto de ( caracteres. Audio Device *2 Nombre del reproductor de audio Bluetooth conectado. 2 Gire el control giratorio para seleccionar un *1 Si el teléfono Bluetooth conectado no es compatible con la notificación de mensajes de texto (a través de Bluetooth), la unidad no recibirá ninguna notificación cuando llegue un mensaje de texto.
Más sobre este receptor ESPAÑOL Operaciones básicas Operaciones de disco/USB Conexión de la alimentación Precaución sobre la reproducción de DualDisc • También es posible conectar la alimentación pulsando SOURCE en el receptor. Si está preparada la fuente, también se iniciará la reproducción. • El lado no DVD de un “DualDisc” no es compatible con la norma “Compact Disc Digital Audio”. Por consiguiente, no se recomienda usar el lado no DVD de un DualDisc en este producto.
Reproducción de discos MP3/WMA/AAC • Este receptor puede reproducir solamente archivos MP3/WMA/AAC con el código de extensión <.mp3>, <.wma> o <.m4a> (sin distinción de caja— mayúsculas/minúsculas). • Esta unidad puede mostrar los nombres de los álbumes, artistas (ejecutantes), y etiqueta (Versión 1,0, 1,1, 2,2, 2,3, ó 2,4) para archivos MP3 y mostrar la etiqueta WMA/AAC. • Esta unidad puede manejar solamente caracteres de un byte. Otros caracteres no serán visualizados correctamente.
ESPAÑOL Reproducción de pistas MP3/WMA/AAC/WAV desde un dispositivo USB • La conexión de un dispositivo USB hace que la fuente cambie automáticamente a “USB”. • Cuando se reproduzcan las pistas de un dispositivo USB, el orden de reproducción puede diferir del orden de otros reproductores. • Puede suceder que esta unidad no pueda reproducir algunos dispositivos USB o algunos archivos debido a sus características o a las condiciones de grabación.
Estos iconos indican el tipo de entradas de números telefónicos de Phonebook (Guía telefónica) Estos iconos indican el tipo de teléfono/dispositivos de audio conectados : Teléfono celular : Sólo Teléfono : Teléfono del hogar : Teléfono/audio : Oficina : Sólo audio : General : Excepto lo de arriba : Desconocido Mensajes de advertencia para las operaciones Bluetooth • Connection Error: El dispositivo está registrado pero ha fallado la conexión. Utilice “Connect” para volver a conectar el dispositivo.
ESPAÑOL • Mientras se encuentre conectado un iPod con Vídeo: – No aparecerá vídeo en la pantalla del iPod ni en el monitor externo (sólo se activará la parte de audio). – No se pueden buscar archivos de vídeo en el menú “Video“. (Si conecta el iPod durante la reproducción o la pausa de un archivo de vídeo, no se podrá reanudar la reproducción). • iPod shuffle y iPhone no se pueden utilizar con esta unidad.
Localización de averías Reproducción del disco FM/AM Síntomas Soluciones/Causas • No se puede escuchar el sonido a través de los altavoces. • Ajuste el volumen al nivel óptimo. • Inspeccione los cables y las conexiones. • El receptor no funciona en absoluto. Reinicialice el receptor (consulte la página 3). • Aparece “Connect Error” en la pantalla. Retire el panel de control, limpie el conector, y vuélvalo a instalar (consulte la página 4 ). • El preajuste automático SSM no funciona.
Reproducción de MP3/WMA/AAC ESPAÑOL Síntomas Soluciones/Causas • No se puede reproducir el disco. • Utilice un disco con pistas MP3/WMA/AAC grabadas en un formato compatible con ISO 9660 Nivel 1, Nivel 2, Romeo o Joliet. • Añada el código de extensión <.mp3>, <.wma> o <.m4a> a los nombres de archivos. • Se generan ruidos. Salte a otra pista o cambie el disco. (No añada el código de extensión <.mp3>, <.wma> o <.m4a> a pistas que no sean MP3/WMA/AAC).
Dispositivo USB Soluciones/Causas • Se generan ruidos. • La pista reproducida no es de un formato de archivo reproducible (MP3/WMA/AAC/WAV). Salte a otro archivo. • No añada el código de extensión <.mp3>, <.wma>, <.m4a>> o <.wav> a pistas que no sean MP3/WMA/ AAC/WAV. • Las pistas no se reproducen de la manera intentada por usted. El orden de reproducción puede ser diferente del orden empleado con otros reproductores. • “Reading” permanece parpadeando en la pantalla.
Síntomas Soluciones/Causas Recepción de HD Radio Bluetooth ® ESPAÑOL • Esta unidad no puede detectarse mediante • Vuelva a efectuar la búsqueda desde el dispositivo el dispositivo Bluetooth. Bluetooth. • Reinicialice la unidad. Cuando aparezca “Open...” en la pantalla, vuelva a efectuar la búsqueda desde el dispositivo Bluetooth. • La unidad no puede realizar apareamiento con el dispositivo Bluetooth. Ingrese el mismo código PIN para la unidad y el dispositivo objetivo.
Soluciones/Causas • Aparece “No Disc” en la pantalla. Inserte el disco en el cargador. • Aparece “No Magazine” en la pantalla. Inserte el cargador. • Aparece “Reset 08” en la pantalla. Conecte correctamente este receptor y el cambiador de CD y pulse el botón de reinicialización del cambiador de CD. • Aparece “Reset 01” – “Reset 07” en la pantalla. Pulse el botón de reinicialización del cambiador de CD. • El cambiador de CD no funciona en absoluto. Reinicialice el receptor (consulte la página 3).
Radio satelital Soluciones/Causas • La señal “LOADING” aparece en la pantalla mientras escucha la radio satelital XM. El receptor está cargando la información del canal y el audio. La información de texto no está disponible temporalmente. • Aparece “Reset 08” en la pantalla. El receptor está cargando la información del canal y el audio. La información de texto no está disponible temporalmente. • La radio satelital no funciona.
Mantenimiento Conectores Condensación de humedad Podría condensarse humedad en el lente del interior de la unidad, en los siguientes casos: • Después de encender el calefactor del automóvil. • Si hay mucha humedad en el habitáculo. Si se produce condensación, la unidad podría no funcionar correctamente. En este caso, saque el disco y deje el receptor encendido durante algunas horas hasta que se evapore la humedad. Para mantener los discos limpios Un disco sucio podría no reproducirse correctamente.
Especificaciones SECCIÓN DEL AMPLIFICADOR DE AUDIO ESPAÑOL Salida de potencia: 20 W RMS × 4 canales a 4 Ω y ≤ 1% THD+N Relación señal a ruido: 80 dBA (referencia: 1 W en 4 Ω) Impedancia de carga: 4 Ω (tolerancia de 4 Ω a 8 Ω) Gama de control del Frequency: Band 1: 68 Hz, 100 Hz, 150 Hz ecualizador: Band 2: 210 Hz, 320 Hz, 460 Hz Band 3: 680 Hz, 1 kHz, 1,5 kHz Band 4: 2,1 kHz, 3,2 kHz, 4,6 kHz Band 5: 6,8 kHz, 10 kHz, 15 kHz Nivel: ±12 dB Q (curva Q): Q0,7 a Q2,0 Respuesta de frecuencias: 40 Hz a 20 000
Reproductor de discos compactos Captor óptico sin contacto (láser semiconductor) Número de canales: 2 canales (estereofónicos) Respuesta de frecuencias: 5 Hz a 20 000 Hz Gama dinámica: 96 dB Relación señal a ruido: 98 dB Lloro y trémolo: Inferior al límite medible Formato de decodificación MP3: (MPEG1/2 Audio Layer 3) Máx. velocidad de bits: 320 kbps Formato de decodificación WMA (Windows Media® Audio): Máx. velocidad de bits: 192 kbps Formato de Decodificación AAC (Codificación Audio Máx.
FRANÇAIS Merci pour avoir acheté un produit JVC. Veuillez lire attentivement toutes les instructions avant d’utiliser l’appareil afin de bien comprendre son fonctionnement et d’obtenir les meilleures performances possibles. Précautions: Tout changement ou modification non approuvé par JVC peut annuler l’autorité de l’utilisateur d’utiliser l’appareil. IMPORTANT POUR PRODUITS LASER 1. PRODUIT LASER CLASSE 1 2. ATTENTION: N’ouvrez pas le couvercle supérieur.
Comment réinitialiser votre appareil TABLE DES MATIERES INTRODUCTIONS Préparation .................................................. 5 FONCTIONNEMENT Opérations de base ...................................... 6 Comment forcer l’éjection d’un disque • Utilisation du panneau de commande ......... • Utilisation de la télécommande (RM-RK50) .................................................. 6 7 Écoute de la radio......................................... Opérations des disques ...............................
Comment utiliser les touches M MODE et SEL Retrait du panneau de commande Si vous utilisez M MODE ou SEL (sélection), l’affichage et certaines commandes (telles que les touches numériques, les touches 4 /¢ , les touches 5/∞ et la molette de commande) entrent dans le mode de commande correspondant. Évitez de toucher les connecteurs. FRANÇAIS Ex.: Quand vous appuyez sur la touche numérique 1 après avoir appuyez sur M MODE, pour commander le tuner FM.
Préparation Annulez la démonstration des affichages et réglez l’horloge • Voir aussi pages 31 et 32. 1 2 Mise sous tension de l’appareil. 3 Annulez de la démonstration des affichages Accédez aux réglages PSM. Choisissez “Clock Hr” (heures), puis ajustez les heures. Choisissez “Clock Min” (minutes), puis ajustez les minutes. Choisissez “24H/12H”, puis “24Hours” ou “12Hours”. 4 FRANÇAIS Choisissez “Demo”, puis “Off”. Réglez l’horloge Terminez la procédure.
Opérations de base FRANÇAIS Utilisation du panneau de commande 1 • TUNER: Sélection d’une station préréglée. • • • • 2 3 4 5 6 7 8 HD RADIO: Sélection du canal. SIRIUS/XM: Sélection de la catégorie. CD/USB/CD-CH: Sélection d’un dossier. USB-iPod: Entrez dans le menu principal [Maintenez pressée]. • iPod: Accès au menu principal/Pause de la lecture/Confirmation de votre choix. • Mise sous tension de l’appareil. • Mise hors tension de l’appareil [Maintenez pressée].
Utilisation de la télécommande (RM-RK50) Attention: La pile ne doit pas être exposée à une chaleur excessive telle que la lumière du soleil, un feu ou quelque chose de similaire. Si la télécommande perd de son efficacité, remplacez la pile. Avant d’utiliser la télécommande: • Dirigez la télécommande directement sur le capteur de télécommande de autoradio. • N’EXPOSEZ PAS le capteur de télécommande à une forte lumière (lumière directe du soleil ou éclairage artificiel).
3 Ajuste le niveau de volume. 4 Choisit les modes sonores préréglés (iEQ: égaliseur – Change les canaux rapidement si les touches sont maintenues pressées. • Lors de l’écoute d’un iPod (en mode de sélection de menu): Connecté au KS-PD100: – Appuyez brièvement sur la touche pour choisir un élément. (Puis, appuyez sur D ∞ pour valider le choix). – Maintenez pressée la touche pour sauter 10 éléments en même temps.
Préréglage automatique des stations FM—SSM (Mémorisation automatique séquentielle des stations puissantes) Vous pouvez prérégler six stations maximum pour chaque bande. • Quand apparaît sur l’affichage, vous pouvez retourner à l’écran précédent en appuyant sur la touche numérique 3. 1 Pendant l’écoute d’une station... 2 Suivez les étapes 1 et 2 de “Utilisation des touches numériques” sur la colonne de gauche.
FRANÇAIS Écoute d’une station préréglée de la liste des stations préréglées 1 Affichez la liste des stations préréglée, puis choisissez la station préréglée que vous souhaitez écouter. 2 Passez à la station choisie. Opérations des disques Toutes les plages sont reproduites répétitivement jusqu’à ce que vous changiez la source ou éjectiez le disque. Interdiction de l’éjection du disque Pour annuler l’interdiction, répétez la même procédure.
Après avoir appuyé sur M MODE, appuyez sur les touches suivantes pour... 4 Choisissez un élément. Sauter 10 plages MP3/WMA/AAC: À l’intérieur du même dossier Ex.: Quand “File” est choisi à l’étape 3 Repeat Track: Répéter la plage actuelle Repeat Folder: MP3/WMA/AAC: Répéter le dossier actuel • Vous pouvez aussi annuler le mode de lecture en choisissant “Off” ou en appuyant sur la touche ).
Écoute du périphérique USB FRANÇAIS Vous pouvez connecter un périphérique USB à mémoire de grande capacité tel qu’une mémoire USB, un lecteur audio numérique*1, un disque dur portable, etc. à cet appareil. • Vous pouvez aussi connecter un iPod Apple au câble USB à partir de l’arrière de l’appareil. Pour en savoir plus, référez-vous aux pages 24 – 26. Cet appareil peut reproduite les plages MP3/WMA/WMA-DRM10 *1/AAC *2/WAV stockées sur un périphérique USB.
Utilisation d’appareil Bluetooth® Connexion d’un périphérique Bluetooth pour la première fois Quand vous connecter un périphérique Bluetooth à l’appareil pour la première fois, faites les pairage entre l’appareil et le périphérique. Le pairage permet aux périphériques Bluetooth de communiquer entre eux. Pour réaliser le pairage, vous pouvez avoir besoin d’entrer le code PIN (numéro d’identification personnel) du périphérique Bluetooth que vous souhaitez connecter.
4 FRANÇAIS Entrez un code PIN (numéro d’identification personnel) dans l’appareil. • Vous pouvez entrer n’importe quel nombre (entre 1 et 16 chiffres). [Réglage initial: 0000] • Pour entrer un code PIN de moins de 4 chiffres, effacez d’abord le code PIN initial (0000) en appuyant sur la touche numérique 5 ( ). * Certains périphériques ont leur propre code PIN. Entrez le code PIN spécifié sur l’appareil. 1 Déplacez-vous à la position du chiffre suivant (ou précédent).
3 Déconnexion d’un périphérique Choisissez la méthode pour faire un appel. • Dialed *: Affiche la liste des numéros de téléphone que vous avez composés. Passez à l’étape suivante. • Received *: Affiche la liste des appels reçus. Passez à l’étape suivante. • Phonebook: Affiche le nom/numéro de téléphone du répertoire téléphonique de l’appareil. Passez à l’étape suivante. Pour faire une copie de la mémoire du répertoire téléphonique, référez-vous à la page 17.
Quand un appel arrive.... Comment entrer un numéro de téléphone La source change automatiquement sur “Bluetooth”. Choisissez un nombre. FRANÇAIS • Le numéro de téléphone apparaît (s’il a été obtenu). Quand “Auto Answer” est en service.... L’appareil répond automatiquement aux appels entrant, voir page 36. • Quand “Auto Answer” (réponse automatique) est hors service, appuyez sur n’importe quelle touche (sauf /molette de commande) pour répondre à un appel entrant.
Comment copier le répertoire téléphonique 1 2 Préréglage d’un numéro de téléphone Vous pouvez prérégler un maximum de six numéros de téléphone. • Quand apparaît sur l’affichage, vous pouvez retourner à l’écran précédent en appuyant sur la touche numérique 3. 1 Affichez le numéro de téléphone que vous souhaitez prérégler en utilisant une des options “Call”. 2 Choisissez un numéro de téléphone.
Utilisation d’un lecteur audio Bluetooth • Les opérations et les indications de l’affichage diffèrent en fonction de leur disponibilité sur le lecteur audio connecté. Choisissez “BT-AUDIO”. Si la lecture ne démarre pas automatiquement, utilisez le lecture audio Bluetooth pour démarrer la lecture. FRANÇAIS [Appuyez sur la touche] Saut vers l’arrière/saut vers l’avant [Maintenez pressée] Recherche vers l’arrière/recherche vers l’avant Choisissez un groupe/dossier. Démarre/met en pause la lecture.
Écoute d’une émission HD Radio™ Avant de commencer, connectez le tuner HD Radio , KT-HD300 (vendu séparément) à la prise du changeur de CD à l’arrière de l’appareil. La technologie HD Radio permet de diffuser un son numérique de grande qualité—la bande AM numérique a une qualité équivalente à la bande FM (en stéréo) et la bande FM numérique a une qualité équivalente aux CD—sans bruits statiques et avec une réception claire.
2 [S’allume] Lors du maintient de la réception numérique [Clignote] Lors du maintient de la réception analogique FRANÇAIS Auto: [Réglage initial] Commute automatiquement entre les signaux numériques et analogiques Digital: Accord des signaux numériques uniquement Analog: Accord des signaux analogiques uniquement • Si aucune son ne peut être entendu avec le réglage actuellement choisi, changez le réglage sur “Analog” ou “Digital”.
Sauter 10 plages MP3: À l’intérieur du même dossier Repeat Track: Répéter la plage actuelle Repeat Folder: MP3: Répétition de toutes les plages du dossier actuel Repeat Disc: Répétition de toutes les plages du disque actuel Random Folder: MP3: Lecture aléatoire de toutes les plages du dossier actuel, puis de toutes les plages du dossier suivant Random Disc: Lecture aléatoirement de toutes les plages du disque actuel Random All: Reproduit aléatoirement toutes les plages des disques dans le magasin.
Activez votre suscription XM après la connexion 3 Vérifiez le numéro d’identification de votre radio satellite XM sur le boîte du tuner universelle XMDirect™ ou accordez le “Channel 0” (voir page 23). • Seuls les canaux 0, 1 et 247 sont disponibles avant l’activation. 1 4 Contactez la radio satellite XM sur Internet à FRANÇAIS 2 Le tuner universel XMDirect™ démarre la mise à jour de tous les canaux XM. “Channel 1” est accordé automatiquement. 1 Choisissez “SIRIUS” ou “XM”.
Vérification du numéro d’identification de la radio satellite XM 3 Choisissez “LIST”. 4 Choisissez “Preset”. 5 Choisissez le numéro de préréglage sur lequel vous souhaitez mémoriser le programme. 6 Mémorisez le canal. Lors de la sélection de “XM1”, “XM2” ou “XM3”, choissiez le “Channel 0”. Pour annuler l’affichage du numéro d’identification, choisissez un autre canal que le “Channel 0”.
Sélection d’une catégorie/canal sur la liste Pour choisir un canal 1 Suivez les étapes 2 à 4 de “Mémorisation des canaux” à la page 23. • À l’étape 4, choisissez “Channel”. • Quand apparaît sur l’affichage, vous pouvez retourner à l’écran précédent en appuyant sur la touche numérique 3. • Quand / apparaît sur l’affichage, vous pouvez passer sur d’autres listes en appuyant répétitivement sur la touche numérique 5 ou 6. 2 Choisissez un canal. Ex.: Lors de l’écoute de la radio satellite SIRIUS.
Attention: • Éviter d’utiliser iPod s’il peut gêner une conduite en toute sécurité. • Assurez-vous que toutes les données importantes ont été sauvegardées pour éviter toute perte de données. 1 Connectez un iPod au câble USB ou via le KS-PD100. — 2 Choisissez une plage. — Ajustez le volume et le son comme vous le souhaitez. (Voir les pages 28 à 30). FRANÇAIS 3 La lecture démarre automatiquement à partir de l’endroit où elle a été interrompue la dernière fois.
FRANÇAIS Sélection d’une plage à partir du menu Nº Opérations 1 Entrez dans le menu principal. 2 Choisissez le menu souhaité. 3 Dans le cas d’un iPod connecté via le KS-PD100. Dans le cas d’un iPod connecté au câble USB Playlists Ô Artists Ô Albums Ô Songs Ô Genres Ô Composers Playlists Ô Artists Ô Albums Ô Songs Ô Podcasts Ô Genres Ô Composers Ô Audiobooks Validez le choix.
Écoute d’un autre appareil extérieur Vous pouvez connecter un appareil extérieur à: • la prise de changeur de CD à l’arrière de cet appareil en utilisant les adaptateurs suivants: – Adaptateur d’entrée de ligne, KS-U57 – Adaptateur d’entrée auxiliaire, KS-U58 Préparation: Assurez-vous que “Ext In” est choisi pour le réglage de l’entrée extérieure, voir page 33. • Prise d’entrée AUX (auxiliaire) sur le panneau de commande. 1 — 3 4 FRANÇAIS 2 Choisissez “EXT IN” ou “AUX IN”.
Sélection d’un mode sonore préréglé FRANÇAIS Vous pouvez sélectionner un mode sonore préréglé adapté à votre genre de musique (iEQ: égaliseur intelligent). 1 Entrez en mode de réglage du son. 2 Choisissez “EQ”. 3 Choisissez “On”. 4 Choisissez un mode sonore préréglé. • Si “Bypass” est choisi, vous pouvez écouter le mode sonore original enregistré. s’allume sur l’affichage.
ajuster le niveau de sortie du caisson de grave. [0 à 8] 4 Appuyez sur la touche numérique 1 ( ) pour passer à un autre niveau de réglage. 4 /¢ : choisissez la qualitee pour LPF. [–12dB/oct ou –24dB/oct] Molette de commande: Tournez la molette de commande pour choisir la phase du caisson de grave. [0deg (normal) ou 180deg (inversé)] * Si “Off” est choisi à l’étape 2, vous pouvez uniquement ajuster la phase du caisson de grave.
Mémorisation de vos propres modes sonores 5 Ajustez les éléments du son de la plage de fréquences choisie. 1 Appuyez sur 4 /¢ pour choisir la bande de fréquence, puis appuyez sur 5 / ∞ pour accentuer le niveau de la bande de fréquence choisie. [–6 à +6] 2 Appuyez sur la touche numérique 5 ( ), puis tournez la molette de commande pour choisir la fréquence. 3 Appuyez sur la touche numérique 5 ( ), puis tournez la molette de commande pour choisir la pente de qualité (Q).
Réglages généraux—PSM 1 Accédez aux réglages PSM. 2 Choisissez une catégorie PSM. 4 Ajustez le réglage PSM choisi. 5 Répétez les étapes 2 à 4 pour ajuster les autres options PSM si nécessaire. 6 Terminez la procédure. FRANÇAIS Vous pouvez changer les options PSM (mode des réglages préférés) du tableau ci-dessous et des pages 32 à 34. Pour afficher le reste 3 Choisissez une option PSM.
CLOCK FRANÇAIS Catégorie Indication Élément Réglage, [page de référence] ( : Réglage initial) Clock Hr Ajustement des heures 1 – 12AM/ : Réglage initial: 1 (1:00AM), [5]. 1 – 12PM (0 – 23) Clock Min Ajustement des minutes 00 – 59 • 12Hours 24H/12H Mode d’affichage de • 24Hours l’heure : Référez-vous aussi à la page 5 pour le réglage. Clock Adj *2 Ajustement de l’horloge : L’horloge intégrée est ajustée automatiquement en utilisant les données d’horloge fournies par le cana de la radio satellite.
Élément Réglage, [page de référence] ( : Réglage initial) LCD Type • Auto Type d’affichage • Positive • Negative : Un affichage positif est choisi pendant la journée*7; alors qu’un affichage négatif est utilisée pendant la nuit *7. : L’affichage positif est utilisé. : L’affichage négatif est utilisé. Tag Affichage des balises • On : Affiche les balises lors de la lecture d’une plage MP3/ WMA/AAC/WAV. : Annulation.
FRANÇAIS COLOR Catégorie Indication Élément Réglage, [page de référence] ( : Réglage initial) Color Sel Sélection de la couleur Réglage initial: Toutes les sources; Couleur: Pale : Choisissez votre couleur d’affichage préférée pour chaque source (ou pour toutes les sources), [34, 35]. Color Set Réglage de la couleur — : Créez vos propres couleurs et choisissez les pour la couleur de l’affichage, [35]. : Couleur de l’utilisateur utilisée pendant la journée*11.
Choisissez une source. All Source *1 Ô CD Ô Changer *3 (ou Ext In *2) Ô USB *3 Ô FM Ô AM Ô Sirius *3/XM *3 Ô iPod *3 Ô Aux In Ô BT Audio Ô (retour au début) *1 Si vous choisissez “All Source”, vous pouvez utiliser la même couleur pour toutes les sources. *2 Dépend du réglage “Ext Input”, voir page 33. *3 Est affiché uniquement quand l’appareil source est connectée. 4 Choisissez une couleur.
Réglages Bluetooth Vous pouvez changer les réglages ci-dessous et de la colonne de droite en fonctions de vos préférences. apparaît sur l’affichage, vous pouvez • Quand retourner à l’écran précédent en appuyant sur la touche numérique 3. FRANÇAIS 1 2 Choisissez “Settings”. 3 Choisissez une option de réglage. Auto Cnnct Ô Auto Answer Ô MSG Notice *1 Ô MIC Ô PhoneBook Ô Initialize Ô Name Ô Address Ô Version Ô Phone Device *2 Ô Audio Device *2 Ô (retour au début) 4 Changez le réglage souhaité.
Version Versions du matériel et du logiciel des modules Bluetooth. 3 Affectez un titre. 1 Appuyez répétitivement sur la touche ) pour choisir un jeu de numérique 4 ( caractères. Phone Device *2 Nom du téléphone Bluetooth connecté. Audio Device *2 Nom du lecteur audio Bluetooth connecté. Affectation d’un titre Vous pouvez affecter un titre à 30 fréquences de station (FM et AM) et 10 caractères* (maximum) pour chaque titre.
Pour en savoir plus à propos de cet autoradio Opérations de base Mise sous tension de l’appareil • En appuyant sur SOURCE sur l’autoradio, vous pouvez aussi mettre l’appareil sous tension. Si la source est prête, la lecture démarre aussi. FRANÇAIS Mise hors tension de l’appareil • Si vous mettez l’appareil hors tension pendant l’écoute d’une plage, la lecture reprendra à partir du point où elle a été interrompue la prochaine fois que vous mettez l’appareil sous tension.
Lecture d’un disque MP3/WMA/AAC • Cet autoradio peut reproduire les fichiers MP3/WMA/ AAC portant le code d’extension <.mp3>, <.wma> ou <.m4a> (quel que soit la casse des lettres— majuscules/minuscules). • Cet appareil peut afficher le nom de l’album, l’artiste (interprète) et les balises (version 1.0, 1.1, 2.2, 2.3 ou 2.4) pour les fichiers MP3 et afficher les balises WMA/ AAC. • Cet autoradio peut afficher uniquement les caractères d’un octet.
FRANÇAIS Lecture des plages MP3/WMA/AAC/WAV à partir d’un périphérique USB • Connecter un périphérique USB automatiquement change la source sur “USB”. • Lors de la lecture à partir d’un périphérique USB, l’ordre de lecture peut différer de celui d’autres lecteurs. • Cet appareil peut ne pas être capable de reproduire certains périphériques USB ou certains fichiers à causes de leurs caractéristiques ou des conditions d’enregistrement.
Ces icônes indiquent le type de téléphone des numéros du répertoire téléphonique : Téléphone cellulaire : Téléphone domestique Ces icônes indiquent le type de téléphone/ périphérique audio connecté : Téléphone uniquement : Bureau : Téléphone/audio : Audio uniquement : Généralités : Autre que cidessus : Inconnu Messages d’avertissement pour les opérations Bluetooth • Connection Error: Le périphérique est enregistré mais la connexion a échouée.
FRANÇAIS • Lors de la connexion d’un iPod avec vidéo: – Aucune séquence vidéo n’apparaît sur l’affichage de iPod ou du moniteur extérieur (seule la partie audio est disponible). – Il n’est pas possible de parcourir les fichiers vidéo sur le menu “Vidéo“. (Si vous connectez iPod pendant la lecture ou un pause d’un fichier vidéo, vous ne pouvez pas reprendre la lecture.) • iPod shuffle et iPhone ne peuvent pas être utilisés avec cet appareil.
Guide de dépannage Symptôme Remèdes/Causes • Aucun son n’est entendu des enceintes. • Ajustez le volume sur le niveau optimum. • Vérifiez les cordons et les connexions. • Cet autoradio ne fonctionne pas du tout. Réinitialisez l’autoradio (voir page 3). • “Connect Error” apparaît sur l’affichage. Retirez le panneau de commande, frottez les connecteurs, puis attachez-le de nouveau (voir page 4). • Le préréglage automatique SSM ne fonctionne pas. Mémorises les stations manuellement.
Lecture MP3/WMA/AAC FRANÇAIS Symptôme Remèdes/Causes • Le disque ne peut pas être reproduit. • Utilisez un disque avec des plages MP3/WMA/AAC enregistrées dans un format compatible avec ISO 9660 Niveau 1, Niveau 2, Romeo ou Joliet. • Ajoutez le code d’extension <.mp3>, <.wma> ou <.m4a> aux noms de fichier. • Du bruit est produit. Sautez à une autre plage ou changez le disque. (N’ajoutez pas le code d’extension <.mp3>, <.wma> ou <.m4a> à des plages non MP3/WMA/AAC).
Périphérique USB Remèdes/Causes • Du bruit est produit. • La page reproduite n’est pas dans un format compatible (MP3/WMA/AAC/WAV). Passez à un autre fichier. • N’ajoutez pas le code d’extension <.mp3>, <.wma>, <.m4a> ou <.wav> à des plages non MP3/WMA/ AAC/WAV. • Les plages ne sont pas reproduites comme vous le souhaitiez. L’ordre de lecture peut différer de celui utilisé par d’autres lecteurs. • “Reading” continue de clignoter sur l’affichage.
Bluetooth ® Réception HD Radio FRANÇAIS Symptôme Remèdes/Causes • L’appareil ne peut pas être détecté par le périphérique Bluetooth. • Faites de nouveau une recherche à partir du périphérique Bluetooth. • Réinitialisez l’appareil. Quand “Open...” apparaît sur l’affichage, recherchez de nouveau un périphérique Bluetooth. • L’appareil ne réalise pas le pairage avec le périphérique Bluetooth. Entrez le même code PIN pour cet appareil et le périphérique cible.
Remèdes/Causes • “No Disc” apparaît sur l’affichage. Insérez des disques dans le magasin. • “No Magazine” apparaît sur l’affichage. Insérez le magasin. • “Reset 08” apparaît sur l’affichage. Connectez cet autoradio et le changeur de CD correctement et appuyez sur le bouton de réinitialisation du changeur de CD. • “Reset 01” – “Reset 07” apparaît sur l’affichage. Appuyez sur le touche de réinitialisation du changeur de CD. • Le changeur de CD ne fonctionne pas du tout.
Radio satellite Symptôme Remèdes/Causes • “LOADING” apparaît sur l’affichage lors de l’écoute de la radio satellite XM. L’appareil est en train de changer les informations du canal et audio. Le texte d’information est temporairement indisponible. • “Reset 08” apparaît sur l’affichage. L’appareil est en train de changer les informations du canal et audio. Le texte d’information est temporairement indisponible. iPod FRANÇAIS • La radio satellite ne fonctionne pas du tout.
Entretien Pour garder les disques propres Si le disque est sale, sa lecture risque d’être déformée. Si un disque est sale, essuyez-le avec un chiffon doux, en ligne droite du centre vers les bords. • N’utilisez pas de solvant (par exemple, un nettoyant conventionnel pour disque vinyle, un vaporisateur, un diluant, du benzène, etc.) pour nettoyer les disques.
Spécifications Puissance de sortie: SECTION DE L’AMPLIFICATEUR AUDIO FRANÇAIS Rapport signal sur bruit: Impédance de charge: Plage de commande de l’égaliseur: Fréquence: Niveau: Q (pente Q): Réponse en fréquence: Niveau de sortie de ligne/Impédance: Niveau de sortie du caisson de grave/Impédance: Impédance de sortie: Autre prise: Plage de fréquences: SECTION DU TUNER 20 W RMS × 4 canaux à 4 Ω et avec ≤ 1% THD+N 80 dBA (référence: 1 W pour 4 Ω) Tuner FM: Tuner AM: 4 Ω (4 Ω à 8 Ω admissible) Band 1
Nombre de canaux: Réponse en fréquence: Plage dynamique: Rapport signal sur bruit: Pleurage et scintillement: Format de décodage MP3: (MPEG1/2 Audio Layer 3) Format de décodage WMA (Windows Media® Audio): Format de décodage AAC (Advanced Audio Coding): GÉNÉRALITÉS BLUETOOTH SECTION USB Standards USB: Vitesse de transfert de données: Lecteur de disque compact Capteur optique sans contact (laser semiconducteur) 2 canaux (stéréo) 5 Hz à 20 000 Hz 96 dB 98 dB Inférieur à la limite mesurable Débit binaire m
Having TROUBLE with operation? Please reset your unit Refer to page of How to reset your unit Still having trouble?? USA ONLY Call 1-800-252-5722 http://www.jvc.com We can help you! EN, SP, FR © 2008 Victor Company of Japan, Limited Rear_KD-ABT22[J]3.
Instructions CD RECEIVER KD-ABT22