ENGLISH CD RECEIVER ESPAÑOL RECEPTOR CON CD RÉCEPTEUR CD FRANÇAIS KD-AHD59/KD-HDR50 For canceling the display demonstration, see page 7. Para cancelar la demostración en pantalla, consulte la página 7. Pour annuler la démonstration des affichages, référez-vous à la page 7. For installation and connections, refer to the separate manual. Para la instalación y las conexiones, refiérase al manual separado. Pour l’installation et les raccordements, se référer au manuel séparé.
ENGLISH Thank you for purchasing a JVC product. Please read all instructions carefully before operation, to ensure your complete understanding and to obtain the best possible performance from the unit. INFORMATION (For U.S.A.) This equipment has been tested and found to comply with the limits for a Class B digital device, pursuant to Part 15 of the FCC Rules. These limits are designed to provide reasonable protection against harmful interference in a residential installation.
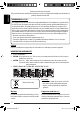
CONTENTS Detaching/attaching control panel .............. 3 How to reset your unit ................................. 3 How to forcibly eject a disc........................... 3 ENGLISH Detaching/attaching control panel OPERATIONS Basic operations ........................................... 4 Detaching... • Using the control panel............................... • Using the remote controller (RM-RK50)...... • Changing the display information .............. 4 5 7 Preparation ............................
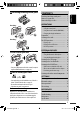
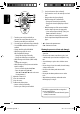
ENGLISH Basic operations Using the control panel 1 2 3 4 5 *1 p qw e 6 r 1 • FM/AM: – Select HD Radio™ multicast channel. – Search for HD Radio stations only [Hold]. • SIRIUS/XM: Select category. • CD/USB/CD-CH: Select folder. • IPOD: Enter the main menu/Pause playback/ Confirm selection. • BT PHONE/BT AUDIO: Enter/go back to previous Bluetooth menu. 2 • Turn on the power. • Attenuate the sound (if the power is on). • Turn off the power [Hold]. 3 • Select the source.
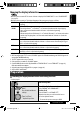
1 2 3 456 7 89p q ENGLISH Display window w 1 Status of Bluetooth device (Device number, [P: 1 – 5]; signal strength, [ : 0 – 3]*; battery reminder, [ : 0 – 3]*) 2 Tr (track) indicator 3 Source display / Preset number / Disc number / Track number / Folder number / Setting and list operation information 4 (USB) indicator 5 (iPod/iPhone) indicator 6 HD (HD Radio™ broadcast) indicator 7 Playback mode / item indicators—RND (random), (disc), (folder), RPT (repeat) e r 8 9 p q HOLD (reception hold) indi
ENGLISH 1 • Turns the power on if pressed briefly or attenuates the sound when the power is on. • Turns the power off if pressed and held. 2 • Selects the preset radio station if pressed briefly. • Selects HD Radio multicast channel if pressed and held. • Changes the folder of the MP3/WMA. • While playing an MP3 disc on an MP3-compatible CD changer: – Changes the disc if pressed briefly. – Changes the folder if pressed and held.
• When the power is turned off: The current clock time is displayed if “CLOCK DISP” is set to “CLOCK OFF” (see page 28).
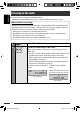
ENGLISH Listening to the radio You can tune in to both conventional and HD Radio broadcasts. • If you want to search for HD Radio stations only, see “Searching for HD Radio stations only” on page 9. What is HD Radio™ broadcasting? HD Radio stations can deliver high-quality digital sound—AM digital will have FM-like sound quality (in stereo) and FM digital will have CD-like sound quality—with static-free and clear reception.
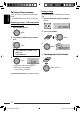
HD1 WXYZ-FM Channel number Select your desired channel. 4 Select “MONO ON.” ENGLISH When receiving HD Radio multicast channels... [Turn] = [Press] Reception improves, but stereo effect will be lost. • The ST indicator goes off. To restore the stereo effect, repeat the same procedure to select “MONO OFF.” Changing HD Radio reception mode • “LINKING” appears while linking to a multicast channel.
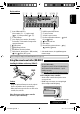
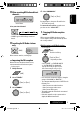
ENGLISH Storing stations in memory You can preset up to 18 stations for FM and 6 stations for AM. • The HD Radio multicast channels can also be preset. Manual presetting Ex.: Storing FM station of 92.50 MHz into preset number “P04.” 1 Tune in to the station or channel you want to preset. Automatic presetting —SSM (Strong-station Sequential Memory) 92.50MHz 1 While listening to a radio... 2 Select a preset number. [Hold] [Turn] 2 Select the preset number range you want to store.
Some HD Radio broadcasts provide PSD (Program Service Data) for a song. You can tag the song and store its PSD (maximum 60 songs) while listening the song— iTunes Tagging. • For details how to purchase the tagged songs, see page 24. While listening to the song (with the TAG indicator lit on the display)... TAG SAVED The TAG indicator start flashing, then the PSD of the song is stored into the memory. • When pressing TAG within 10 seconds before or after the PSD changes, the tags for two songs are stored.
ENGLISH Disc/USB operations Playing a disc 1 Turn on the power. 2 Insert a disc. All tracks will be played repeatedly until you change the source or eject the disc. Stop playing and ejecting the disc • “NO DISC” appears. Press SRC to listen to another playback source. Prohibiting disc ejection [Hold] To cancel the prohibition, repeat the same procedure. Playing a file on USB device This unit can play MP3/WMA files stored on a USB mass storage class device.
Caution: Avoid using the USB device if it might hinder your safety driving. Do not pull out and attach the USB device repeatedly while “READING” is flashing on the display. Do not start the car engine if a USB device is connected. Stop playback before disconnecting a USB device. Make sure all important data has been backed up to avoid losing the data. Do not leave a USB device in the car, expose to direct sunlight, or high temperature to avoid deformation or cause damages to the device.
ENGLISH Using the Bluetooth ® devices For Bluetooth operations, it is required to connect the Bluetooth adapter (KS-BTA200) (not supplied) to the CD changer jack on the rear of this unit. • Refer also to the instructions supplied with the Bluetooth adapter and the Bluetooth device. • Refer to the list (included in the box) to check the countries where you may use the Bluetooth ® function.
connect. On the device to be connected, enter the same PIN code you have just entered for this unit. “CONNECTED” appears on the display. Now connection is established and you can use the device through the unit. The device remains registered even after you disconnect the device. Use “CONNECT“ (or activate “AUTO CNNCT”) to connect the same device from next time on. (See the following and page 27.) Connecting a device 1 Select “BT PHONE” or “BT AUDIO.” 2 Select “NEW DEVICE.
ENGLISH Using the Bluetooth cellular phone 1 2 3 Select “BT PHONE.” Enter the Bluetooth menu. — Make a call or setting using the Bluetooth setting menu. (See the following and page 27.) When a call comes in... The source is automatically changed to “BT PHONE.” • The display will flash in blue (see “RING COLOR” on page 30.) When “AUTO ANSWER” is activated... The unit answers the incoming calls automatically, see page 27.
Using the Bluetooth audio player Select “BT AUDIO.” If playback does not start, operate the Bluetooth audio player to start playback. 2 Select a number. [Turn] 3 Move to the next (or previous) number position. 4 Repeat steps 2 and 3 until you finish entering the phone number. 5 ENGLISH Direct dialing: 1 Select “NUMBER.” Reverse skip/forward skip Pause/start playback* Enter the Bluetooth menu (see page 27) * Operation may be different according to the connected Bluetooth audio player.
ENGLISH Listening to the CD changer It is recommended to use a JVC MP3-compatible CD changer (not supplied) with your unit. You can connect a CD changer to the CD changer jack on the rear of the unit. • You can only play conventional CDs (including CD Text) and MP3 discs. Preparation: Make sure “CH/IPOD” is selected in the “SELECT SRC” = “EXT IN” setting, see page 31. 1 2 3 Select “CD-CH.” Enter the list mode. Select a disc, folder, then the track. [Turn] = [Press] • Repeat this procedure.
Before operating, connect either one of the following (not supplied) to the CD changer jack on the rear of this unit. • JVC SIRIUS Satellite Radio System, SC-C1 and KS-SRA100, PnP, SC-VDOC1 and KS-SRA100, for listening to the SIRIUS Satellite Radio. • XM Satellite Radio System, JVC Smart Digital Adapter–XMDJVC100, CNP2000UC and CNPJVC1 for listening to the XM Satellite Radio.
ENGLISH 1 2 Select “SIRIUS” or “XM.” 3 Select a channel to listen. Select a category. SIRIUS: If you select “ALL,” you can tune in to all the channels of all categories. • Holding the button changes the channels rapidly. • While searching, invalid and unsubscribed channels are skipped. XM: If you do not select a channel within 15 seconds, category selected in step 2 is canceled. You can select all channels of all categories now (including noncategorized channels).
You can connect the iPod/iPhone using the following cable or adapter: Cable/adapter To operate USB 2.0 cable (accessory of the iPod/iPhone) See “When connected with the USB cable” below. Interface Adapter for iPod—KS-PD100 (not supplied)* See “When connected with the interface adapter” on page 22. ENGLISH Listening to the iPod/iPhone * You cannot connect the iPhone.
ENGLISH Selecting the playback modes 1 REPEAT ONE RPT [Hold] The playback mode menu is called up. 2 ALL RPT Functions the same as “Repeat One” of the iPod/iPhone. Functions the same as “Repeat All” of the iPod/iPhone. RANDOM [Turn] = [Press] REPEAT Ô RANDOM 3 [Turn] = [Press] SONG RND Functions the same as “Shuffle Songs” of the iPod/iPhone. • When “Repeat” is set to “Off” for the iPod/iPhone, connecting the iPod/iPhone changes the setting to “ALL RPT.
Selecting the playback modes 1 [Hold] The playback mode menu is called up. 2 This mode will be canceled if no operations are done for about 5 seconds. 2 Select the desired menu. ENGLISH Selecting a track from the menu 1 Enter the main menu. [Turn] = [Press] REPEAT Ô RANDOM 3 [Turn] = [Press] PLAYLISTS Ô ARTISTS Ô ALBUMS Ô SONGS Ô GENRES Ô COMPOSERS Ô (back to the beginning) • Pressing and holding the button skips 10 items at a time. 3 Confirm the selection.
ENGLISH Purchasing your favorite songs You can easily purchase the songs you have tagged while listening to HD Radio programs (see page 11) — iTunes Tagging. For purchasing the tagged songs, you need to perform the following operations: 1 Transfer the PSDs of the tagged songs to the iPod/ iPhone. (See “Transferring the tagged PSD to your iPod/iPhone.”) 2 Transfer the PSDs of the tagged songs to iTunes, then purchase the songs at iTunes Store. (See “Purchasing songs at iTunes Store.
You can connect an external component to: • EXT INPUT: CD changer jack on the rear of this unit using the following adapters (not supplied): – KS-U57: For connecting the component with pin jacks – KS-U58: For connecting the component with stereo mini jack Preparation: Make sure “EXT INPUT” is selected in the “SELECT SRC” = “EXT IN” setting, see page 31. • AUX IN: Input jack on the control panel. Preparation: Make sure “AUX ON” is selected in the “SELECT SRC” = “AUX IN” setting, see page 31.
ENGLISH Selecting a preset sound mode You can select a preset sound mode suitable to the music genre. Selecting from Menu. (See also page 28.) or [Hold] The menu is called up. [Turn] = [Press] • Repeat this procedure. Select “EQ” = “USER/ROCK/CLASSIC/POPS/ HIP HOP/JAZZ/FLAT.
You can change the settings listed on the right column according to your preference. 1 Select “BT PHONE” or “BT AUDIO.” 2 Enter the Bluetooth menu. 3 Select “SETTINGS.” 4 Select a setting item. *1 Appears only when a Bluetooth phone is connected. *2 Appears only when a Bluetooth phone is connected and it is compatible with text message. Setting menu ( : Initial) AUTO CNNCT (connect) When the unit is turned on, the connection is established automatically with... OFF: No Bluetooth device.
ENGLISH Menu operations 1 Call up the menu. [Hold] 2 Select the desired item. [Turn] = [Press] 3 Repeat step 2 if necessary. • To return to the previous menu, press BACK. • To exit from the menu, press DISP or MENU. Initial: Underlined EQ CLOCK DEMO Category Menu items DEMO Display demonstration CLOCK DISP *1 Clock display Selectable settings, [reference page] • DEMO ON: Display demonstration will be activated automatically if no operation is done for about 20 seconds, [7]. • DEMO OFF: Cancels.
SCROLL*4 Scroll TAG DISPLAY Tag display AREA Tuner channel interval TUNER MONO Monaural mode *3 *4 *5 *6 SID *5 SIRIUS ID BLEND HOLD *6 HD Radio reception mode IF BAND Intermediate frequency band Selectable settings, [reference page] • DIMMER AUTO: Dims the display when you turn on the headlights.*3 • DIMMER OFF: Cancels. • DIMMER ON: Dims the display and button illumination. • SCROLL ONCE: Scrolls the displayed information once. • SCROLL AUTO: Repeats scrolling (at 5-second intervals).
COLOR MENU COLOR AUDIO RING COLOR ENGLISH Category Menu items Selectable settings, [reference page] COLOR 01 — COLOR 29, USER MENU COLOR Menu color Select one of the preset or user color for display and button (except EQ/ /0) illumination. (See also page 32 for USER color setting.) • OFF: Cancels. • ON: Changes the display and button (except EQ/ /0) illumination during menu, list search and playback mode operations. RING COLOR *7 • OFF: Cancels.
IPOD SWITCH TAG ALL CLR SELECT SRC SUB.W LEVEL Subwoofer level BEEP Keypress tone AMP GAIN *10 Amplifier gain control AM *11 AM station EXT IN *12, *13 External input AUX IN *14 Auxiliary input TAG ALL CLR Tag all clear IPOD SWITCH *15 iPod/iPhone control Selectable setting, [reference page] SUB.W 00 — SUB.W 08: • BEEP OFF: • BEEP ON: • LOW POWER: Adjust the subwoofer output level. [Initial: SUB.W 04] Deactivates the keypress tone. Activates the keypress tone.
ENGLISH Color settings Selecting the color for the display and buttons 4 [Turn] = [Press] • See also page 30. [Hold] Menu is called up. 5 Select a primary color. [Turn] = [Press] [Turn] = [Press] • Repeat this procedure. Select “COLOR” = “COLOR 01” – “COLOR 29”/“USER” 6 Adjust the level (00 to 31) of the selected primary color. Creating your own color —USER Color You can create your own colors—“DAY COLOR” or “NIGHT COLOR.” • DAY COLOR: color for the display and buttons.
Basic operations Disc operations Turning on the power Caution for DualDisc playback • By pressing SRC button on the unit, you can also turn on the power. If the source is ready, playback also starts. • The Non-DVD side of a “DualDisc” does not comply with the “Compact Disc Digital Audio” standard. Therefore, the use of Non-DVD side of a DualDisc on this product may not be recommended.
ENGLISH • CD-RWs may require a longer readout time since the reflectance of CD-RWs is lower than that of regular CDs. • Do not use the following CD-Rs or CD-RWs: – Discs with stickers, labels, or a protective seal stuck to the surface. – Discs on which labels can be directly printed by an ink jet printer. Using these discs under high temperature or high humidity may cause malfunctions or damage to the unit.
Bluetooth operations General • While driving, do not perform complicated operation such as dialing the numbers, using phone book, etc. When you perform these operations, stop your car in a safe place. • Some Bluetooth devices may not be connected to this unit depending on the Bluetooth version of the device. • This unit may not work for some Bluetooth devices. • Connecting condition may vary depending on the circumstances around you. • When the unit is turned off, the device is disconnected.
ENGLISH • You can enjoy iTunes Tagging with the following types of iPod/iPhone: – iPod classic, software version 1.0 or later – iPod nano (3rd Generation), software version 1.0 or later – iPod nano (4th Generation), software version 1.0 or later – iPod Touch, software version 2.1 or later – iPhone/iPhone 3G, software version 2.1 or later • If the iPod/iPhone does not play correctly, please update your iPod/iPhone software to the latest version.
ENGLISH Troubleshooting Symptoms Remedies/Causes • Sound cannot be heard from the speakers. • Adjust the volume to the optimum level. • Check the cords and connections. • The unit does not work at all. Reset the unit (see page 3). • “AUX IN” cannot be selected. Check the “SELECT SRC” = “AUX IN” setting (see page 31). • Nothing appears on the display. Check the “USER” color setting (see page 32). • SSM automatic presetting does not work. Store stations manually.
MP3/WMA playback Disc playback ENGLISH Symptoms Remedies/Causes • Disc cannot be played back. Insert the disc correctly. • CD-R/CD-RW cannot be played back. • Tracks on the CD-R/CD-RW cannot be skipped. • Insert a finalized CD-R/CD-RW. • Finalize the CD-R/CD-RW with the component which you used for recording. • Disc can neither be played back nor ejected. • Unlock the disc (see page 12). • Eject the disc forcibly (see page 3). • Disc sound is sometimes interrupted.
USB playback Remedies/Causes • Noise is generated. • The track played back is not a playable file format. Skip to another file. • Do not add the extension code <.mp3> or <.wma> to non-MP3 or WMA tracks. • “READING” keeps flashing on the display. • • • • • “NO FILE” appears on the display. Check whether the selected folder, the connected USB device, or the iPod/iPhone contains a playable file. • Tracks/folders are not played back in the order you have intended them to play.
CD changer Bluetooth *2 ENGLISH Symptoms Remedies/Causes • Bluetooth device does not detect the unit. The unit can be connected with one Bluetooth cellular phone and one Bluetooth audio device at a time. While connecting a device, this unit cannot be detected from another device. Disconnect the currently connected device and search again. • The unit does not detect the Bluetooth device. • Check the Bluetooth setting of the device. • Search from the Bluetooth device.
Satellite Radio Remedies/Causes • “CALL 1-888-539-SIRIUS TO SUBSCRIBE” scrolls on the display while listening to the SIRIUS Satellite Radio. Starts subscribing to SIRIUS Satellite Radio (see page 19). • No sound can be heard. “UPDATING” or “UPDATE XXX%” appears on the display. The unit is updating the channel information and it takes a few minutes to complete. • “NO SIGNAL” or “ACQUIRING” appears on the display. Move to an area where signals are stronger.
iPod/iPhone ENGLISH Symptoms Remedies/Causes • The iPod/iPhone does not turn on or does not work. • • • • • • The sound is distorted. Deactivate the equalizer either on this unit or the iPod/iPhone. • “NO IPOD” appears on the display. • Check the connecting cable and its connection. • Charge the battery of the iPod/iPhone. • Playback stops. The headphones are disconnected during playback. Restart the playback operation (see pages 21 to 23). Check the connecting cable and its connection.
How to clean the connectors Frequent detachment will deteriorate the connectors. To minimize this possibility, periodically wipe the connectors with a cotton swab or cloth moistened with alcohol, being careful not to damage the connectors. Connectors Moisture condensation Moisture may condense on the lens inside the unit in the following cases: • After starting the heater in the car. • If it becomes very humid inside the car. Should this occur, the unit may malfunction.
ENGLISH Specifications AUDIO AMPLIFIER SECTION Power Output: Signal-to-Noise Ratio: Load Impedance: Equalizer Control Range: 20 W RMS × 4 Channels at 4 Ω and ≤ 1% THD+N 80 dBA (reference: 1 W into 4 Ω) Frequencies: Level: Frequency Response: Line-Out Level/Impedance: Subwoofer-Out Level/Impedance: KD-AHD59: KD-HDR50: KD-AHD59: KD-HDR50: Output Impedance: Other Terminal: 4 Ω (4 Ω to 8 Ω allowance) 60 Hz, 150 Hz, 400 Hz, 1 kHz, 2.4 kHz, 6 kHz, 15 kHz ±10 dB 40 Hz to 20 000 Hz 5.
CD PLAYER SECTION Number of Channels: Frequency Response: Dynamic Range: Signal-to-Noise Ratio: Wow and Flutter: MP3 Decoding Format: (MPEG1/2 Audio Layer 3) WMA (Windows Media® Audio) Decoding Format: Compact disc player Non-contact optical pickup (semiconductor laser) 2 channels (stereo) 5 Hz to 20 000 Hz 96 dB 98 dB Less than measurable limit Max. Bit Rate: 320 kbps Max. Bit Rate: 192 kbps ENGLISH Type: Signal Detection System: USB SECTION USB Standards: Data Transfer Rate: USB 2.
Muchas gracias por la compra de un producto JVC. Como primer paso, por favor lea detenidamente este manual para comprender a fondo todas las instrucciones y obtener un máximo disfrute de esta unidad. ESPAÑOL IMPORTANTE (EE.UU.) Este equipo se ha sometido a todo tipo de pruebas y cumple con las normas establecidas para dispositivos de Clase B, de conformidad con la Parte 15 de las reglas de la FCC (Comisión Federal de Comunicaciones).
Desmontando... CONTENIDO Desmontaje/montaje del panel de control ... 3 Cómo reposicionar su unidad ....................... 3 Cómo expulsar el disco por la fuerza ............ 3 OPERACIONES Operaciones básicas ..................................... 4 • Uso del panel de control ............................. • Uso del control remoto (RM-RK50) ............. • Cambio de la información en pantalla ........ 4 5 7 ESPAÑOL Desmontaje/montaje del panel de control Preparativos .....................................
Operaciones básicas Uso del panel de control 3 4 5* 1 6 7 8 9 ESPAÑOL 1 2 p q w e r 1 • FM/AM: – Selecciona el canal de multidifusión HD Radio™. – Busca solamente las emisoras HD Radio [Sostener]. • SIRIUS/XM: Seleccione una categoría. • CD/USB/CD-CH: Seleccionar la carpeta. • IPOD: Ingresa al menú principal/Pausa la reproducción/Confirma la selección. • BT PHONE/BT AUDIO: Ingresa/vuelve al menú Bluetooth anterior. 2 • Enciende la unidad. • Atenúa el sonido (si el sistema está encendido).
3 456 w 1 Estado del dispositivo Bluetooth (Número de dispositivo, [P: 1 – 5]; intensidad de la señal, [ : 0 – 3]*; recordatorio de batería, [ : 0 – 3]*) 2 Indicador Tr (pista) 3 Visualización de fuente/Número de preajuste/ Número de disco/Número de pista/Número de carpeta/Información sobre ajustes y operaciones de lista 4 Indicador (USB) 5 Indicador (iPod/iPhone) 6 Indicador HD (transmisión HD Radio™) 7 Indicadores del modo de reproducción/ítem— RND (aleatoria), (disco), (carpeta), RPT (repetición) e 7
ESPAÑOL 1 • La unidad se enciende al pulsarlo brevemente o el sonido se atenúa cuando está encendida. • La unidad se apaga si lo pulsa y mantiene pulsado. 2 • Selecciona la radioemisora preajustada si lo pulsa brevemente. • Selecciona los canales de multidifusión HD Radio si lo pulsa y mantiene pulsado. • Cambia la carpeta de MP3/WMA. • Mientras se reproduce un disco MP3-en un cambiador de CD compatible con MP3: – Cambia el disco si lo pulsa brevemente. – Cambia la carpeta si lo pulsa y mantiene pulsado.
• Al apagar la unidad: La hora actual del reloj se visualiza si “CLOCK DISP” está ajustado a “CLOCK OFF” (consulte la página 28).
Para escuchar la radio Puede sintonizar tanto transmisiones convencionales como transmisiones HD Radio. • Si desea buscar sólo emisoras HD Radio, consulte “Para buscar emisoras HD Radio solamente” en la página 9.
HD1 WXYZ-FM Número de canal Seleccione el canal que desea. • Aparece “LINKING” mientras se enlaza con un canal multicast. Para buscar emisoras HD Radio solamente [Sostener] 4 Seleccione “MONO ON”. [Gire] = [Pulse] Se consigue mejorar la recepción, pero se pierde el efecto estereofónico. • El indicador ST se apaga. Para restablecer el efecto estereofónico, repita el procedimiento para seleccionar “MONO OFF”.
Cómo almacenar emisoras en la memoria ESPAÑOL Es posible preajustar hasta 18 emisoras para FM y 6 emisoras para AM. • Los canales de multidifusión HD Radio también pueden preajustarse. Preajuste automático—SSM (Memoria secuencial de las emisoras más fuertes) Preajuste manual Ej.: Almacenando la emisora FM de 92,50 MHz en el número de preajuste “P04”. 1 Sintonice la emisora que desea preajustar. 92.50MHz 2 Seleccione un número de preajuste. 1 Mientras escucha la radio...
Algunas transmisiones HD Radio ofrecen PSD (Datos de servicios de programa) para una canción. Puede marcar la canción y almacenarla en su PSD (máximo 60 canciones) mientras la escucha—iTunes Tagging. • Si desea información sobre cómo comprar las canciones marcadas, consulte la página 24. Mientras escucha la canción (con el indicador TAG encendido en la pantalla)...
Operaciones de disco/USB ESPAÑOL Para reproducir un disco 1 Encienda la unidad. 2 Inserte un disco. Todas las pistas se reproducen repetidamente hasta que usted cambie la fuente o extraiga el disco. Detención de la reproducción y expulsión del disco • Aparece “NO DISC”. Pulse SRC para escuchar otra fuente de reproducción. Prohibición de la expulsión del disco [Sostener] Para cancelar la prohibición, repita el mismo procedimiento.
Precaución: Evite usar el dispositivo USB si puede amenazar la seguridad de conducción. No extraiga ni conecte repetidamente el dispositivo USB mientras parpadee “READING” en la pantalla. No ponga en marcha el motor del coche si hay un dispositivo USB conectado. Detenga la reproducción antes de desconectar un dispositivo USB. Para evitar el borrado accidental, asegúrese de sacar copia de respaldo de todos los datos importantes.
ESPAÑOL Uso de dispositivos Bluetooth ® Para las operaciones Bluetooth, se deberá conectar el adaptador Bluetooth (KS-BTA200) (no suministrado) al jack del cambiador de CD en la parte trasera de esta unidad. • Consulte también las instrucciones suministradas con el adaptador Bluetooth y el dispositivo Bluetooth. • Consulte la lista (incluida en la caja) para comprobar en qué países puede utilizar la función Bluetooth ®.
la búsqueda y conexión. En el dispositivo que se desea conectar, ingrese el mismo código PIN que el ingresado para esta unidad. Aparece “CONNECTED” en la pantalla. Ahora la conexión ha quedado establecida y usted puede usar el dispositivo a través de la unidad. El dispositivo permanece registrado aún después de desconectarlo. Utilice “CONNECT” (o active “AUTO CNNCT”) para conectar el mismo dispositivo a partir de la siguiente vez. (Véase lo siguiente y la página 27).
Usar el teléfono celular Bluetooth ESPAÑOL 1 2 3 Seleccione “BT PHONE”. Acceda al menú Bluetooth. — Haga una llamada o realice ajustes utilizando el menú de ajuste Bluetooth. (Véase lo siguiente y la página 27). Cuando entra una llamada... La fuente cambiará automáticamente a “BT PHONE”. • La pantalla parpadeará en azul (consulte “RING COLOR” en la página 30). Cuando “AUTO ANSWER” está activado... La unidad contesta automáticamente las llamadas entrantes, consulte la página 27.
Marcación directa: 1 Seleccione “NUMBER”. Uso del reproductor de audio Bluetooth 2 Seleccione un número. Si la reproducción no se inicia, opere el reproductor de audio Bluetooth para comenzar la reproducción. [Gire] Salto hacia atrás/salto hacia adelante 3 Muévase a la posición del número siguiente (o anterior). 4 Repita los pasos 2 y 3 hasta que termine de ingresar el número de teléfono. 5 ESPAÑOL Seleccione “BT AUDIO”.
Escuchando el cambiador de CD ESPAÑOL Se recomienda usar un cambiador de CD-compatible con MP3 JVC (no suministrado) con este receptor. Puede conectar un cambiador de CD al jack del cambiador de CD en la parte trasera de la unidad. • Solamente se podrán reproducir discos CD (incluyendo CD Text) y MP3 convencionales. Preparativos: Asegúrese de que esté seleccionado “CH/IPOD” en el ajuste “SELECT SRC” = “EXT IN”; consulte la página 31. 1 2 Seleccione “CD-CH”.
Antes de la operación, conecte cualquiera de las dos unidades siguientes (no suministradas) al jack del cambiador de CD de la parte trasera de esta unidad. • Sistema de radio satelital JVC SIRIUS, SC-C1 y KS-SRA100, PnP, SC-VDOC1 y KS-SRA100, para escuchar la radio satelital SIRIUS. • Sistema XM satellite radio, JVC Smart Digital Adapter–XMDJVC100, CNP2000UC y CNPJVC1 para escuchar la radio XM satellite.
1 2 Seleccione “SIRIUS” o “XM”. 3 Seleccione el canal de audición. Seleccione una categoría. SIRIUS: Si selecciona “ALL”, puede sintonizar todos los canales de todas las categorías. ESPAÑOL • Al mantener pulsado el botón, los canales se cambian rápidamente. • Durante la búsqueda, se omiten los canales no válidos y aquellos a los que no está suscrito. XM: Si no selecciona un canal en el lapso de 15 segundos, se cancelará la categoría seleccionada en el paso 2.
Puede conectar el iPod/iPhone mediante el siguiente cable o adaptador: Cable o adaptador Para hacer funcionar Cable USB 2.0 (accesorio del iPod/iPhone) Consulte “Cuando se conecta con el cable USB” a continuación. Adaptador de interfaz para iPod—KS-PD100 (no Consulte “Cuando se conecta con el adaptador de interfaz” suministrado)* en la página 22. * No podrá conectar el iPhone.
Cómo seleccionar los modos de reproducción REPEAT ONE RPT ESPAÑOL 1 [Sostener] ALL RPT Se llama el menú del modo de reproducción. RANDOM 2 SONG RND [Gire] = [Pulse] REPEAT Ô RANDOM 3 [Gire] = [Pulse] Funciona de igual manera que “Repetir Una” del iPod/iPhone. Funciona de igual manera que “Repetir Todas” del iPod/iPhone. Funciona de igual manera que “Aleatorio Canciones” del iPod/ iPhone.
Seleccionar una pista en el menú Cómo seleccionar los modos de reproducción 1 Ingrese al menú principal. 1 [Sostener] Este modo se cancelará si no se efectúa ninguna operación durante unos 5 segundos. 2 [Gire] = [Pulse] 2 Seleccione el menú deseado. REPEAT Ô RANDOM 3 ESPAÑOL Se llama el menú del modo de reproducción. [Gire] = [Pulse] PLAYLISTS Ô ARTISTS Ô ALBUMS Ô SONGS Ô GENRES Ô COMPOSERS Ô (vuelta al comienzo) • Si pulsa y mantiene pulsado el botón se saltarán 10 elementos a la vez.
ESPAÑOL Compra de sus canciones favoritas Puede comprar fácilmente las canciones que marcó mientras estaba escuchando programas HD Radio (consulte la página 11)—iTunes Tagging. Para comprar las canciones marcadas, deberá realizar los siguientes pasos: 1 Transfiera los PSD de las canciones marcada al iPod/ iPhone. (Consulte “Transfiriendo el PSD marcado a su iPod/iPhone”). 2 Transfiera los PSD de las canciones marcadas a iTunes, y luego compre las canciones en iTunes Store.
Podrá conectar un componente externo a: • EXT INPUT: Jack del cambiador de CD de la parte trasera de esta unidad utilizando los siguientes adaptadores (no suministrados): – KS-U57: Para conectar el componente con conectores de clavija – KS-U58: Para conectar el componente con conector mini estéreo Preparativos: Asegúrese de que esté seleccionado “EXT INPUT” en el ajuste “SELECT SRC” = “EXT IN”; consulte la página 31. • AUX IN: Jack de entrada en el panel de control.
Selección de un modo de sonido preajustado Podrá seleccionar un modo de sonido preajustado adecuado al género musical. ESPAÑOL o Seleccionando desde el menú. (Consulte también la página 28.) [Sostener] Se llama el menú. [Gire] = [Pulse] • Repita este procedimiento. Seleccione “EQ” = “USER/ROCK/CLASSIC/ POPS/HIP HOP/JAZZ/FLAT”.
Ajustes Bluetooth 1 Seleccione “BT PHONE” o “BT AUDIO”. 2 Acceda al menú Bluetooth. Menú de ajustes ( : Inicial) AUTO CNNCT (conectar) Al encender la unidad, la conexión se establece automáticamente con... OFF: Ningún dispositivo Bluetooth. LAST: El dispositivo Bluetooth conectado en último término. ORDER: El dispositivo Bluetooth registrado disponible encontrado en primer lugar. ESPAÑOL Los ajustes listados en la columna derecha se pueden cambiar según sus preferencias. 3 Seleccione “SETTINGS”.
Operaciones de los menús 1 Llame el menú. 2 Seleccione la opción deseada. 3 Repita el paso 2, si es necesario. [Gire] = [Pulse] • Para volver al menú anterior, pulse BACK. • Para salir del menú, pulse DISP o MENU.
TUNER *3 *4 *5 *6 Configuraciones seleccionables, [página de referencia] • DIMMER AUTO: Al encender los faros, la pantalla se oscurece.*3 • DIMMER OFF: Se cancela. • DIMMER ON: La iluminación de la pantalla y de los botones se oscurece. • SCROLL ONCE: Desplaza una vez la información visualizada. • SCROLL AUTO: El desplazamiento se repite (a intervalos de 5 segundos). • SCROLL OFF: Se cancela. Pulsando DISP durante más de 1 segundo podrá desplazar la indicación independientemente del ajuste.
MENU COLOR RING COLOR ESPAÑOL COLOR Categoría Opciones del menú COLOR 01 — COLOR 29, USER MENU COLOR Color de los menús RING COLOR *7 Color del anillo FADER*8 Atenuador AUDIO BALANCE *9 Balance VOL ADJUST Ajuste de volumen SUB.W FREQ Frecuencia de corte del subwoofer Configuraciones seleccionables, [página de referencia] Seleccione uno de los colores preajustados o de usuario para la iluminación de la pantalla y los botones (excepto EQ/ /0).
IPOD SWITCH TAG ALL CLR SELECT SRC SUB.W LEVEL Nivel de subwoofer BEEP Tono de pulsación de teclas AMP GAIN *10 Control de ganancia del amplificador AM *11 Emisora AM EXT IN *12, *13 Entrada externa AUX IN *14 Entrada auxiliar TAG ALL CLR Eliminar todas las etiquetas marcadas IPOD SWITCH *15 Control del iPod/ iPhone Ajuste seleccionable, [página de referencia] SUB.W 00 — SUB.W 08: • BEEP OFF: • BEEP ON: Ajusta el nivel de salida del subwoofer. [Inicial: SUB.
Ajustes de color Selección de color para la pantalla y los botones ESPAÑOL • Consulte también la página 30. [Sostener] Se llama el menú. [Gire] = [Pulse] 4 [Gire] = [Pulse] 5 Seleccione un color primario. [Gire] = [Pulse] • Repita este procedimiento. Seleccione “COLOR” = “COLOR 01” – “COLOR 29”/“USER” Creando sus propios colores —USER Color Podrá crear sus propios colores—“DAY COLOR” o “NIGHT COLOR”. • DAY COLOR: color para la pantalla y los botones.
Más sobre este receptor Operaciones de los discos Precaución sobre la reproducción de DualDisc • También es posible conectar la alimentación pulsando el botón SRC en la unidad. Si está preparada la fuente, también se iniciará la reproducción. • El lado no DVD de un “DualDisc” no es compatible con la norma “Compact Disc Digital Audio”. Por consiguiente, no se recomienda usar el lado no DVD de un DualDisc en este producto.
ESPAÑOL • Los CD-RWs pueden requerir un tiempo de lectura mayor debido a que la reflectancia de los CD-RWs es menor que la de los CDs regulares. • No utilice los CD-Rs o CD-RWs siguientes: – Discos con pegatinas, etiquetas o un sello de protección adheridos a la superficie. – Discos en los cuales las etiquetas pueden imprimirse directamente mediante una impresora de chorro de tinta. El uso de estos discos a temperaturas o humedad elevadas podrá producir fallos de funcionamiento o daños a la unidad.
Operaciones Bluetooth General • Absténgase de realizar actividades complicadas mientras conduce, como por ejemplo, marcar números, utilizar la guía telefónica, etc. Cuando tenga que realizar tales actividades, detenga el coche en un lugar seguro. • Dependiendo de la versión de Bluetooth, puede suceder que algunos dispositivos Bluetooth no se puedan conectar a esta unidad. • Esta unidad podría no funcionar con algunos dispositivos Bluetooth.
ESPAÑOL • Puede disfrutar de iTunes Tagging con los siguientes tipos de iPods/iPhones: – iPod classic, versión de software 1,0 o posterior – iPod nano (3ra. generación), versión de software 1,0 o posterior – iPod nano (4ta. generación), versión de software 1,0 o posterior – iPod Touch, versión de software 2,1 o posterior – iPhone/iPhone 3G, versión de software 2,1 o posterior • Si el iPod/iPhone no funciona correctamente, por favor actualice su software de iPod/iPhone a la versión más reciente.
Localización de averías Soluciones/Causas • No se puede escuchar elsonido a través de los altavoces. • Ajuste el volumen al nivel óptimo. • Inspeccione los cables y las conexiones. • El receptor no funciona en absoluto. Reinicialice el receptor (consulte la página 3). • “AUX IN” no se puede seleccionar. Verifique el ajuste “SELECT SRC” = “AUX IN” (consulte la página 31). • No aparece nada en la pantalla. Verifique el ajuste de color de “USER” (consulte la página 32).
Reproducción del disco Reproducción de MP3/WMA ESPAÑOL Síntomas Soluciones/Causas • No se puede reproducir el disco. Inserte correctamente el disco. • No se puede reproducir el CD-R/CD-RW. • No se pueden saltar las pistas del CD-R/ CD-RW. • Inserte un CD-R/CD-RW finalizado. • Finalice el CD-R/CD-RW con el componente utilizado para la grabación. • No es posible reproducir ni expulsar el disco. • Desbloquee el disco (consulte la página 12).
Reproducción USB Soluciones/Causas • Se generan ruidos. • La pista reproducida no es un formato de archivo reproducible. Salte a otro archivo. • No añada el código de extensión <.mp3> o <.wma> a pistas que no sean MP3 o WMA. • “READING” permanece parpadeando en la pantalla. • • • • • Aparece “NO FILE” en la pantalla. Compruebe que la carpeta seleccionada, el dispositivo USB conectado o el iPod/iPhone contenga un archivo reproducible.
Cambiador de CD Bluetooth *2 ESPAÑOL Síntomas Soluciones/Causas • El dispositivo Bluetooth no detecta la unidad. La unidad sólo se puede conectar con un teléfono celular Bluetooth y un dispositivo de audio Bluetooth por vez. Mientras se está conectando un dispositivo, esta unidad no puede ser detectada por otro dispositivo. Desconecte el dispositivo conectado actualmente y repita la búsqueda. • El dispositivo Bluetooth no es detectado por la unidad. • Verifique el ajuste Bluetooth del dispositivo.
Síntomas Soluciones/Causas • El sonido no se escucha. Aparece “UPDATING” o “UPDATE XXX%” en la pantalla. El receptor está actualizando la información de canal y tarda algunos minutos en finalizar. • Aparece “NO SIGNAL” o “ACQUIRING” en la pantalla. Muévase hacia un área donde las señales sean más fuertes. ESPAÑOL • El texto “CALL 1-888-539-SIRIUS TO Se inicia la suscripción a la radio satelital SIRIUS SUBSCRIBE” (llame al 1-888-539-SIRIUS (consulte la página 19).
ESPAÑOL Síntomas • El iPod/iPhone no se enciende o no funciona. • El sonido está distorsionado. • Aparece “NO IPOD” en la pantalla. iPod/iPhone • La reproducción se detiene. • Aparece “NO FILES” en la pantalla. • Aparece “RESET 1” – “RESET 7” en la pantalla. • Aparece “RESET 8” en la pantalla. • Los controles del iPod/iPhone no funcionarán después de desconectarlo de esta unidad. • El PSD marcado no se puede transferir al iPod/iPhone.
Mantenimiento Conectores Condensación de humedad Podría condensarse humedad en el lente del interior de la unidad, en los siguientes casos: • Después de encender el calefactor del automóvil. • Si hay mucha humedad en el habitáculo. Si se produce condensación, la unidad podría no funcionar correctamente. En este caso, saque el disco y deje el receptor encendido durante algunas horas hasta que se evapore la humedad. Para mantener los discos limpios Un disco sucio podría no reproducirse correctamente.
ESPAÑOL Especificaciones SECCIÓN DEL AMPLIFICADOR DE AUDIO Salida de potencia: 20 W RMS × 4 canales a 4 Ω y ≤ 1% THD+N Relación señal a ruido: 80 dBA (referencia: 1 W en 4 Ω) Impedancia de carga: Gama de control del Frecuencias: ecualizador: Nivel: Respuesta de frecuencias: Nivel/impedancia salida línea: KD-AHD59: KD-HDR50: Nivel/impedancia salida subwoofer: KD-AHD59: KD-HDR50: Impedancia de salida: Otro terminal: 4 Ω (tolerancia de 4 Ω a 8 Ω) 60 Hz, 150 Hz, 400 Hz, 1 kHz, 2,4 kHz, 6 kHz, 15 kHz ±10 dB 40
SECCIÓN DEL REPRODUCTOR DE CD Número de canales: Respuesta de frecuencias: Gama dinámica: Relación señal a ruido: Lloro y trémolo: Formato de decodificación MP3: (MPEG1/2 Audio Layer 3) Formato de decodificación WMA (Windows Media® Audio): Reproductor de discos compactos Captor óptico sin contacto (láser semiconductor) 2 canales (estereofónicos) 5 Hz a 20 000 Hz 96 dB 98 dB Inferior al límite medible Máx. velocidad de bits: 320 kbps Máx.
FRANÇAIS Merci pour avoir acheté un produit JVC. Veuillez lire attentivement toutes les instructions avant d’utiliser l’appareil afin de bien comprendre son fonctionnement et d’obtenir les meilleures performances possibles. Attention: Tout changement ou modification non approuvé par JVC peut annuler l’autorité de l’utilisateur d’utiliser l’appareil. IMPORTANT POUR PRODUITS LASER 1. PRODUIT LASER CLASSE 1 2. ATTENTION: N’ouvrez pas le couvercle supérieur.
TABLE DES MATIERES Retrait/fixation du panneau de commande... 3 Comment réinitialiser votre appareil ........... 3 Comment forcer l’éjection d’un disque ........ 3 Détachement... FONCTIONNEMENT Opérations de base ...................................... 4 Attachement... Préparation .................................................. 7 Écoute de la radio......................................... 8 Disque/USB ..................................................
Opérations de base Utilisation du panneau de commande FRANÇAIS 1 2 3 4 p q w e 5 *1 6 r 1 • FM/AM: – Choisissez le canal multiplex HD Radio™. – Recherchez les stations HD Radio uniquement [Maintenez pressée la touche]. • SIRIUS/XM: Sélection de la catégorie. • CD/USB/CD-CH: Sélection d’un dossier. • IPOD: Accès au menu principal/Pause de la lecture/Confirmation de votre choix. • BT PHONE/BT AUDIO: Affiche/retourne au menu Bluetooth précédent. 2 • Met l’appareil sous tension.
Fenêtre d’affichage 3 456 w 1 État du périphérique Bluetooth (Numéro du périphérique, [P: 1 – 5]; puissance du signal, [ : 0 – 3]*; indication de batterie, [ : 0 – 3]*) 2 Indicateur Tr (plage) 3 Affichage de la source/Numéro de préréglage/ Numéro de disque/Numéro de plage/Numéro de dossier/Informations sur les réglages et les listes 4 Indicateur (USB) 5 Indicateur (iPod/iPhone) 6 Indicateur HD (émission HD Radio™) 7 Indicateurs de mode de lecture/indicateurs d’option—RND (aléatoire), (disque), (dossier),
FRANÇAIS 1 • Appuyez brièvement sur cette touche pour mettre l’appareil sous tension ou atténuer le son si l’appareil est déjà sous tension. • Maintenez cette touche pressée pour mettre l’appareil hors tension. 2 • Choisit la station radio préréglée si vous appuyez brièvement. • Choisit une canal multiplex HD Radio si vous maintenez la touche pressée. • Change le dossier du support MP3/WMA.
• Quand l’appareil est hors tension: L’heure actuelle de l'horloge est affichée si “CLOCK DISP” est réglé sur “CLOCK OFF” (voir page 28).
Écoute de la radio Vous pouvez accorder à la fois les émissions conventionnelles et HD Radio. • Si vous souhaitez faire une recherche uniquement sur les stations HD Radio, référez-vous à “Recherche de station HD Radio uniquement” à la page 9.
Lors de la réception de canaux multiplex HD Radio... HD1 WXYZ-FM Numéro du canal Choisissez le canal souhaité. 4 Choisissez “MONO ON”. [Tournez] = [Appuyez sur la touche] La réception est améliorée, mais l’effet stéréo est perdu. • L’indicateur ST s’éteint. Pour rétablir l'effet stéréo, répétez la même procédure et choisissez “MONO OFF”. • “LINKING” apparaît pendant la liaison à un canal multiplex.
Mémorisation des stations Vous pouvez prérégler un maximum de 18 stations pour FM et de 6 stations pour AM. • Les canaux multiplex HD Radio peuvent aussi être préréglés. Préréglage manuel Ex.: Mémorisation de la station FM de fréquence 92,50 MHz sur le numéro de préréglage “P04”. 1 Réglez la station ou le canal que vous souhaitez prérégler. Préréglage automatique—SSM (Mémorisation automatique séquentielle des stations puissantes) FRANÇAIS 1 Pendant l’écoute d’une radio... 92.
Balisation de vos morceaux préférés Certaines émission HD Radio fournissez les données PSD (Program Service Data) pour une morceau. Vous pouvez baliser les morceaux et mémoriser ses données PSD (60 morceaux maximum) lors de l’écoute d’un morceau— Balisage pour iTunes. • Pour en savoir plus sur l’achat des morceaux balisés, référez-vous à la page 24.
Disque/USB FRANÇAIS Lecture d’un disque 1 Mise sous tension de l’appareil. 2 Insérez un disque. Toutes les plages sont reproduites répétitivement jusqu’à ce que vous changiez la source ou éjectiez le disque. Arrête la lecture et éjecte le disque • “NO DISC” apparaît. Appuyez sur SRC pour écouter une autre source de lecture. Interdiction de l’éjection du disque [Maintenez pressée la touche] Pour annuler l’interdiction, répétez la même procédure.
Attention: Opérations des disques/fichiers Sélection d’une plage/dossier Sélection des modes de lecture Vous pouvez utiliser un des modes de lecture suivants à la fois. FRANÇAIS • Éviter d’utiliser le périphérique USB s’il peut gêner une conduite une conduite en toute sécurité. • Ne déconnectez puis reconnectez pas le périphérique USB répétitivement pendant que “READING” clignote sur l’affichage. • Ne démarrez pas le moteur de la voiture si un périphérique USB est connecté.
Utilisation d’appareil Bluetooth ® FRANÇAIS Pour les opérations Bluetooth, il faut connecter l’adaptateur Bluetooth (KS-BTA200) (non fourni) à la prise de changeur de CD à l’arrière de cet appareil. • Référez-vous aussi aux instructions fournies avec l’adaptateur Bluetooth et le périphérique Bluetooth. • Référez-vous à la liste (comprise dans la boîte) pour vérifier les pays où vous pouvez utiliser la fonction Bluetooth ®.
la recherche et réaliser la connexion. Sur le périphérique à connecter, entrez le même code PIN que vous venez juste d’entrer sur cet appareil. “CONNECTED” apparaît sur l’affichage. Maintenant la connexion est établie et vous pouvez utiliser le périphérique à travers cet appareil. Le périphérique reste enregistré même après que vous le déconnectez. Utilisez “CONNECT” (ou mettez en service “AUTO CNNCT”) pour connecter le même périphérique la prochaine fois. (Référezvous à ce qui suit et à la page 27.
Utilisation d’un téléphone portable Bluetooth 1 2 3 Choisissez “BT PHONE”. Affichez le menu Bluetooth. — Faites un appel ou des réglages en utilisant le menu de réglage Bluetooth. (Référez-vous à ce qui suit et à la page 27.) FRANÇAIS Quand un appel arrive... La source change automatiquement sur “BT PHONE”. • L’affichage clignote en bleu (voir “RING COLOR” à la page 30.) Quand “AUTO ANSWER” est en service... L’appareil répond automatiquement aux appels entrant, voir page 27.
Composition directe: 1 Choisissez “NUMBER”. Utilisation d’un lecteur audio Bluetooth Choisissez “BT AUDIO”. [Tournez] 3 Déplacez-vous à la position du chiffre suivant (ou précédent). 4 Dépétez les étapes 2 et 3 jusqu’à ce que vous terminiez d’entrer le numéro de téléphone. 5 Composition vocale: 1 Choisissez “VOICE”. Saut vers l’arrière/saut vers l’avant Mise en pause/démarrage de la lecture* Affichez le menu Bluetooth (voir page 27) FRANÇAIS 2 Choisissez un nombre.
Écoute du changeur de CD Il est recommandé d’utiliser un changeur de CD JVC compatible MP3 (non fourni) avec votre autoradio. Vous pouvez connecter un changeur de CD à la prise de changeur de CD à l’arrière de l’appareil. • Vous pouvez uniquement reproduire les CD ordinaire (y compris les CD Text) et les disques MP3. Préparation: Assurez-vous que “CH/IPOD” est choisi pour le réglage “SELECT SRC” = “EXT IN” voir page 31. FRANÇAIS 1 2 3 Choisissez “CD-CH”. Entrée en mode de liste.
Écoute de la radio satellite Avant de commencer, connectez un des appareils suivants (non fournis) à la prise du changeur de CD à l’arrière de l’appareil. • Système de radio satellite JVC SIRIUS, SC-C1 et KS-SRA100, PnP, SC-VDOC1 et KS-SRA100, pour l’écoute de la radio satellite SIRIUS. • Système radio satellite XM, Adaptateur numérique intelligent JVC–XMDJVC100, CNP2000UC et CNPJVC1 pour écouter la radio satellite XM.
FRANÇAIS 1 2 Choisissez “SIRIUS” ou “XM”. 3 Choisissez un canal à écouter. Choisissez une catégorie. SIRIUS: Si vous choisissez “ALL”, vous pouvez accorder tous les canaux de toutes les catégories. • Maintenir la touche pressée permet de changer les canaux rapidement. • Pendant la recherche, les canaux invalides et ceux auxquels vous n’avez pas souscrits sont sautés. XM: Si vous ne choisissez pas de canal avant 15 secondes, la catégorie choisie à l’étape 2 est annulée.
Écoute de iPod/iPhone Vous pouvez connecter le iPod/iPhone en utilisant le câble ou l’adaptateur suivant: Câble/adaptateur Pour réaliser l’opération Câble USB 2.0 (accessoire du iPod/iPhone) Référez-vous à “Lors de la connexion avec le câble USB” ci-dessous. Adaptateur d’interface pour iPod—KS-PD100 (non Référez-vous à “Lors de la connexion avec l’adaptateur fourni)* d’interface” à la page 22. * Vous ne pouvez pas connecter le iPhone.
Sélection des modes de lecture 1 REPEAT ONE RPT [Maintenez pressée la touche] 2 Le menu de mode de lecture est affiché. ALL RPT [Tournez] = [Appuyez sur la touche] RANDOM REPEAT Ô RANDOM FRANÇAIS 3 [Tournez] = [Appuyez sur la touche] SONG RND Fonctionne de la même façon que la fonction “Répéter Un” pour iPod/iPhone. Fonctionne de la même façon que la fonction “Répéter Tous” pour iPod/iPhone. Fonctionne de la même façon que la fonction “Aléatoire Morceaux” pour iPod/iPhone.
Sélection des modes de lecture 1 [Maintenez pressée la touche] 1 Entrez dans le menu principal. Le menu de mode de lecture est affiché. 2 [Tournez] = [Appuyez sur la touche] Ce mode est annulé si aucune opération n’est réalisée pendant environ 5 secondes. 2 Choisissez le menu souhaité. REPEAT Ô RANDOM 3 [Tournez] = [Appuyez sur la touche] REPEAT PLAYLISTS Ô ARTISTS Ô ALBUMS Ô SONGS Ô GENRES Ô COMPOSERS Ô (retour au début) • Maintenir pressée la touche permet de sauter 10 éléments à la fois.
Achat de vos morceaux préférés FRANÇAIS Vous pouvez acheter facilement les morceaux que vous avez balisé lors de l’écoute des programmes HD Radio (voir page 11)—Balisage iTunes. Pour achter les morceaux balisés, vous devez réaliser les opérations suivantes: 1 Transférez les données PSD des morceaux balisés sur le iPod/iPhone. (Référez-vous à “Transfert des données PSD balisées sur votre iPod/iPhone”.) 2 Transférez les données PSD des morceaux balisés sur iTunes, puis achetez les morceaux à iTunes Store.
Vous pouvez connecter un appareil extérieur à: • EXT INPUT: La prise de changeur de CD à l’arrière de cet appareil en utilisant les adaptateurs suivants (non fournis): – KS-U57: Pour connecter l’appareil avec les prises Cinch – KS-U58: Pour connecter l’appareil avec les prises Cinch stéréo Préparation: Assurez-vous que “EXT INPUT” est choisi pour le réglage “SELECT SRC” = “EXT IN”, voir page 31. • AUX IN: Prise d’entrée sur le panneau de commande.
Sélection d’un mode sonore préréglé Vous pouvez sélectionner un mode sonore préréglé adapté à votre genre de musique. ou Sélection à partir du menu. (Référez-vous aussi à la page 28.) [Maintenez pressée la touche] FRANÇAIS Le menu est affiché. [Tournez] = [Appuyez sur la touche] • Répétez cette procédure. Choisissez “EQ” = “USER/ROCK/CLASSIC/ POPS/HIP HOP/JAZZ/FLAT”.
Réglages Bluetooth 1 Choisissez “BT PHONE” ou “BT AUDIO”. 2 Affichez le menu Bluetooth. 3 Choisissez “SETTINGS”. 4 Choisissez une option de réglage. *1 Apparaît uniquement quand un téléphone Bluetooth est connecté. *2 Apparaît uniquement quand un téléphone Bluetooth est connecté et qu’il est compatible avec les messages textuels. 5 Changez le réglage souhaité.
Utilisation des menus 1 Appelez le menu. 2 Choisissez l’élément souhaité. 3 Répéter l’étape 2 si nécessaire. [Tournez] = [Appuyez sur la touche] [Maintenez pressée la touche] • Pour revenir au menu précédent, appuyez sur BACK. • Pour quitter le menu, appuyez sur DISP ou MENU.
TUNER FRANÇAIS DISPLAY Catégorie Articles du menu Réglages pouvant être choisis, [page de référence] DIMMER • DIMMER AUTO: Assombrit l’affichage quand vous allumez les feux de la Gradateur voiture.*3 • DIMMER OFF: Annulation. • DIMMER ON: Assombrit l’éclairage de l’affichage de des touches. SCROLL*4 • SCROLL ONCE: Fait défiler une fois les informations affichées. Défilement • SCROLL AUTO: Répète le défilement (à 5 secondes d’intervalle). • SCROLL OFF: Annulation.
FRANÇAIS RING COLOR MENU COLOR COLOR Catégorie Articles du menu Réglages pouvant être choisis, [page de référence] COLOR 01 — COLOR 29, USER MENU COLOR Couleur du menu RING COLOR *7 Couleur d’avertisseur téléphonique AUDIO FADER*8 Fader BALANCE *9 Balance VOL ADJUST Ajustement du volume SUB.W FREQ Fréquence de coupure du caisson de grave Choisissez un des préréglage ou une couleur personnelle pour l’éclairage de /0).
IPOD SWITCH TAG ALL CLR SUB.W LEVEL Niveau du caisson de grave BEEP Tonalité des touches AMP GAIN *10 Commande du gain de l’amplificateur SUB.W 00 — SUB.W 08: Ajuste le niveau de sortie du caisson de grave. [Réglage initial: SUB.W 04] • BEEP OFF: • BEEP ON: Met hors service la tonalité des touches. Met en service la tonalité des touches. • LOW POWER: VOLUME 00 – VOLUME 30 (Choisissez ce réglage si la puissance maximum de chaque enceinte est inférieure à 50 W pour éviter tout dommage des enceintes.
Réglages de la couleur Sélection de la couleur pour l’affichage et les touches • Référez-vous aussi à la page 30. [Maintenez pressée la touche] Le menu est affiché. FRANÇAIS [Tournez] = [Appuyez sur la touche] 4 [Tournez] = [Appuyez sur la touche] 5 Choisissez une couleur primaire. [Tournez] = [Appuyez sur la touche] • Répétez cette procédure.
Pour en savoir plus à propos de cet autoradio • Vous pouvez aussi mettre l’appareil sous tension en appuyant sur la touche SRC. Si la source est prête, la lecture démarre aussi. Mise hors tension de l’appareil • Si vous mettez l’appareil hors tension pendant l’écoute d’une plage, la lecture reprendra à partir du point où elle a été interrompue la prochaine fois que vous mettez l’appareil sous tension. Généralités • Si vous changez la source pendant l’écoute d’un disque, la lecture s’arrête.
• Les CD-RW nécessite un temps d’initialisation plus long à cause de leur indice de réflexion plus faible que celui des CD- ordinaires. • N’utilisez pas les CD-R ou CD-RW suivants: – Disques avec des autocollants, des étiquettes ou un sceau protecteur collés à leur surface. – Disques sur lesquels une étiquette peut être imprimée directement avec une imprimante à jet d’encre. Utiliser de tels disques par haute température ou humidité peut entraîner un mauvais fonctionnement ou endommager l’appareil.
Opérations Bluetooth Généralités • Pendant que vous conduisez, ne réalisez pas d’opérations compliquées telles que la composition d’un numéro, l’utilisation du répertoire téléphonique, etc. Pour réaliser ces opérations, arrêtez votre voiture dans un endroit sûr. • Il se peut que certains périphériques Bluetooth ne puissent pas être connectés à cet appareil en fonction de la version Bluetooth du périphérique. • Cet appareil peut ne pas fonctionner avec certains périphériques Bluetooth.
FRANÇAIS • Vous pouvez profiter du balisage iTunes avec les types de iPod/iPhone suivants: – iPod classic, version du logiciel 1.0 ou ultérieure – Logiciel iPod nano (3e génération) version 1.0 ou supérieur – Logiciel iPod nano (4e génération) version 1.0 ou supérieur – iPod Touch, version du logiciel 2.1 ou ultérieure – iPhone/iPhone 3G, version du logiciel 2.
Guide de dépannage Symptôme Remèdes/Causes • Aucun son n’est entendu des enceintes. • Ajustez le volume sur le niveau optimum. • Vérifiez les cordons et les connexions. • Cet autoradio ne fonctionne pas du tout. Réinitialisez l’autoradio (voir page 3). • Vous ne pouvez pas choisir “AUX IN”. Cochez le réglage “SELECT SRC” = “AUX IN” (voir page 31). • Rien n’apparaît sur l’affichage. Vérifiez le réglage de couleur “USER” (voir page 32). • Le préréglage automatique SSM ne fonctionne pas.
Symptôme Remèdes/Causes • Le disque ne peut pas être reproduit. Insérez le disque correctement. Lecture de disque Lecture MP3/WMA FRANÇAIS • Le CD-R/CD-RW ne peut pas être reproduit. • Insérez un CD-R/CD-RW finalisé. • Les plages sur les le CD-R/CD-RW ne • Finalisez le CD-R/CD-RW avec l’appareil que vous avez peuvent pas être sautées. utilisé pour l’enregistrement. • Le disque ne peut pas être reproduit ni éjecté. • Déverrouillez le disque (voir page 12). • Forcez l’éjection du disque (voir page 3).
Lecture USB Remèdes/Causes • Du bruit est produit. • La plage reproduite n’est pas dans un format de fichier reproductible. Passez à un autre fichier. • N’ajoutez pas le code d’extension <.mp3> ou <.wma> à des plages non MP3 ou WMA. • “READING” continue de clignoter sur l’affichage. • La durée d’initialisation varie en fonction du périphérique USB. • N’utilisez pas trop de hiérarchies ni de dossiers. • Mettez l’appareil hors tension puis de nouveau sous tension.
Symptôme • Le périphérique Bluetooth ne détecte pas l’appareil. • L’appareil ne réalise pas le pairage avec le périphérique Bluetooth. Bluetooth *2 FRANÇAIS • L’appareil ne détecte pas le périphérique Bluetooth. • Il y a un écho ou du bruit. • Le son du téléphone est de mauvaise qualité. Changeur de CD • Le son est interrompu ou saute pendant la lecture d’un lecteur audio Bluetooth. • Le lecteur audio connecté ne peut pas être commandé. • “NO DISC” apparaît sur l’affichage.
Symptôme Remèdes/Causes • “CALL 1-888-539-SIRIUS TO SUBSCRIBE” défile sur l’affichage lors de l’écoute de la radio satellite SIRIUS. Démarrez la suscription pour la radio satellite SIRIUS (voir page 19). • Aucun son n’est entendu. “UPDATING” ou “UPDATE XXX%” apparaît sur l’affichage. L’autoradio est en train de mettre à jour les informations des canaux et cela prend plusieurs minutes. • “NO SIGNAL” ou “ACQUIRING” apparaît sur l’affichage. Déplacez-vous dans un endroit où les signaux sont plus forts.
iPod/iPhone FRANÇAIS Symptôme Remèdes/Causes • iPod/iPhone ne peut pas être mis sous tension ou ne fonctionne pas. • Vérifiez le câble de connexion et le raccordement. • Mettez à jour la version du micrologiciel du iPod/ iPhone. • Chargez la batterie du iPod/iPhone. • Réinitialisez iPod/iPhone. • Vérifiez si le réglage “IPOD SWITCH” est correct (voir page 31). • Le son est déformé. Mettez hors service l’égaliseur sur cet appareil ou sur iPod/iPhone. • “NO IPOD” apparaît sur l’affichage.
Entretien Connecteurs Condensation d’humidité De la condensation peut se produire sur la lentille à l’intérieur de l’appareil dans les cas suivants: • Après le démarrage du chauffage dans la voiture. • Si l’intérieur de la voiture devient très humide. Si cela se produit, l’appareil risque de ne pas fonctionner correctement. Dans ce cas, éjectez le disque et laissez l’autoradio sous tension pendant quelques heures jusqu’à ce que l’humidité se soit évaporée.
FRANÇAIS Spécifications SECTION DE L’AMPLIFICATEUR AUDIO Puissance de sortie: 20 W RMS × 4 canaux à 4 Ω et avec ≤ 1% THD+N Rapport signal sur bruit: 80 dBA (référence: 1 W pour 4 Ω) Impédance de charge: Plage de commande de Fréquences: l’égaliseur: Niveau: Réponse en fréquence: Niveau de sortie de ligne/Impédance: KD-AHD59: KD-HDR50: Niveau de sortie du caisson de grave/ KD-AHD59: Impédance: KD-HDR50: Impédance de sortie: Autre prise: TUNER SECTION (Compatible avec le système HD Radio) Plage de FM: avec l
SECTION DU LECTEUR CD Nombre de canaux: Réponse en fréquence: Plage dynamique: Rapport signal sur bruit: Pleurage et scintillement: Format de décodage MP3: (MPEG1/2 Audio Layer 3) Format de décodage WMA (Windows Media® Audio): Lecteur de disque compact Capteur optique sans contact (laser semiconducteur) 2 canaux (stéréo) 5 Hz à 20 000 Hz 96 dB 98 dB Inférieur à la limite mesurable Débit binaire maximum: 320 kbps Débit binaire maximum: 192 kbps FRANÇAIS Type: Système de détection du signal: SECTION USB
Having TROUBLE with operation? Please reset your unit Refer to page of How to reset your unit Still having trouble?? USA ONLY Call 1-800-252-5722 http://www.jvc.com We can help you! EN, SP, FR © 2008 Victor Company of Japan, Limited KD-HDR50[J]7.indb 2 1208MNMMDWJEIN 08.11.