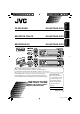
KD-AR770/KD-G720 RECEPTOR CON CD KD-AR770/KD-G720 RECEPTEUR CD KD-AR770/KD-G720 FRANÇAIS ESPAÑOL ENGLISH CD RECEIVER For canceling the display demonstration, see page 8. Para cancelar la demostración en pantalla, consulte la página 8. Pour annuler la démonstration des affichages, référez-vous à la page 8. For installation and connections, refer to the separate manual. Para la instalación y las conexiones, refiérase al manual separado.
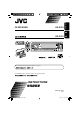
KD-G725 ENGLISH CD RECEIVER KD-G725 For canceling the display demonstration, see page 6. 6 For installation and connections, refer to the separate manual. INSTRUCTIONS GET0355-005A [UT] Cover_KD-G725[UT]005A_f.
ENGLISH Thank you for purchasing a JVC product. Please read all instructions carefully before operation, to ensure your complete understanding and to obtain the best possible performance from the unit. IMPORTANT FOR LASER PRODUCTS 1. CLASS 1 LASER PRODUCT 2. CAUTION: Do not open the top cover. There are no user serviceable parts inside the unit; leave all servicing to qualified service personnel. 3. CAUTION: Visible and invisible laser radiation when open and interlock failed or defeated.
Press briefly. CONTENTS Control panel ................................... 4 Remote controller — RM-RK50 ............. 5 Getting started ................................. 6 ENGLISH How to read this manual • Button operations are mainly explained with the illustrations in the table below. • Some related tips and notes are explained in “More about this unit” (see pages 18 – 21). Basic operations .................................................... 6 Press repeatedly. Press either one.
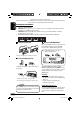
ENGLISH Control panel Parts identification Display window 1 BAND button 2 • Control dial • (standby/on attenuator) button 3 DISP (display) button 4 Remote sensor • DO NOT expose the remote sensor to strong light (direct sunlight or artificial lighting).
Remote controller — RM-RK50 ENGLISH Main elements and features Installing the lithium coin battery (CR2025) Aim the remote controller directly at the remote sensor on the unit. Make sure there is no obstacle in between. Warning: • Do not install any battery other than CR2025 or its equivalent; otherwise, it may explode. • Store the battery in a place where children cannot reach to avoid risk of accident.
ENGLISH 6 2 R (reverse) / F (forward) 3 buttons • Searches for stations if pressed briefly. • Fast-forwards or reverses the track if pressed and held. • Changes the tracks if pressed briefly. • While listening to an iPod or a D. player (in menu selecting mode): – Selects an item if pressed briefly. (Then, press D ∞ to confirm the selection.) – Skips 10 items at a time if pressed and held. @ Adjust the sound as you want. (See page 12.
3 To tune in to a station manually Finish the procedure. ENGLISH In step ! on the left... 1 To check the current clock time while the power is turned off To check other information while listening to the radio Clock = Station name* =Frequency =(back to the beginning) 2 Select a desired station frequency. * FM/AM: If no name is assigned to a station, “NO NAME” appears. To assign a title to a station, see page 15.
ENGLISH 3 Disc/USB memory operations “SSM” appears, then disappears when automatic presetting is over. Local FM stations with the strongest signals are searched and stored automatically in the FM band. Playing a disc in the unit All tracks will be played repeatedly until you change the source or eject the disc. Manual presetting Ex.: Storing FM station of 92.5 MHz into preset number 4 of the FM1 band.
This unit can play MP3/WMA tracks stored in a USB memory. All tracks in the USB memory will be played repeatedly until you change the source. • Removing the USB memory will also stop playback. ~ Ÿ USB input terminal About MP3 and WMA tracks MP3 and WMA “tracks” (words “file” and “track” are used interchangeably) are recorded in “folders.” About the CD changer ENGLISH Playing from a USB memory It is recommended to use a JVC MP3compatible CD changer with your unit.
ENGLISH To go to the next or previous folders (only for MP3/WMA/USB) Other main functions Skipping tracks quickly during play For MP3 tracks: For WMA tracks: Only possible on JVC MP3-compatible CD changer To locate a particular track (for CD) or folder (for MP3/WMA/USB) directly To select a number from 01 – 06: • For MP3/WMA/USB, you can skip tracks within the same folder. Ex.
Selecting the playback modes You can use only one of the following playback modes at a time. While playing an audio CD or a CD Text 1 2 ENGLISH Changing the display information Select your desired playback mode. 7 Repeat play While playing an MP3/WMA*2 disc or USB memory • When “TAG DISP” is set to “TAG ON” (see page 14) Mode Plays repeatedly TRK RPT : The current track. FLDR RPT*4 : All tracks of the current folder. DISC RPT*5 : All tracks of the current disc.
ENGLISH Sound adjustments Indication [Range] You can select a preset sound mode suitable to the music genre (C-EQ: custom equalizer).
ENGLISH General settings — PSM You can change PSM (Preferred Setting Mode) items listed in the table that follows. 1 2 3 Adjust the PSM item selected. 4 Repeat steps 2 and 3 to adjust the other PSM items if necessary. 5 Finish the procedure. Select a PSM item. Ex.: When “DIMMER” is selected Indications Selectable settings, [reference page] DEMO Display demonstration DEMO ON : [Initial]; Display demonstration will be activated automatically if no operation is done for about 20 seconds, [6].
ENGLISH Indications Selectable settings, [reference page] WOOFER Subwoofer cutoff frequency LOW : Frequencies lower than 90 Hz are sent to the MID : [Initial]; Frequencies lower than 135 Hz are sent to HIGH : Frequencies lower than 180 Hz are sent to the subwoofer. the subwoofer. subwoofer. EXT IN*2 External input CHANGER : [Initial]; To use a JVC CD changer, [8], an Apple iPod or a JVC D. player, [16]. EXT IN : To use any other external component, [18].
You can assign titles to station frequencies and CDs (both in this unit and the CD changer). Sources 3 Repeat steps 1 and 2 until you finish entering the title. Maximum number of characters Station frequencies Up to 8 characters (up to 30 station frequencies including both FM and AM) CDs/CD-CH* Up to 32 characters (up to 30 discs) * You cannot assign a title to a CD Text or an MP3/WMA disc or a USB memory. 4 ENGLISH 2 Move to the next (or previous) character position.
ENGLISH iPod®/D. player operations ⁄ • Make sure the equalizer on the iPod or D. player is deactivated. This unit is ready for operating an Apple iPod or a JVC D. player from the control panel. Before operating your iPod or D. player: Connect either one of the following (separately purchased) to the CD changer jack on the rear of this unit. • Interface adapter for iPod®—KS-PD100 for controlling an iPod. • D. player interface adapter—KS-PD500 for controlling a D. player.
Confirm the selection. 7 Random play To move back to the previous menu, press 5. • If a track is selected, playback starts automatically. • If the selected item has another layer, you will enter the layer. Repeat steps 2 and 3 until the desired track is played. • Holding 4 /¢ can skip 10 items at a time. *3 The menu selecting mode will be canceled: – If no operations are done for about 5 seconds. – When you confirm the selection of a track.
ENGLISH Other external component operations You can connect an external component to the CD changer jack on the rear using the Line Input Adapter—KS-U57 (not supplied) or AUX Input Adapter—KS-U58 (not supplied). • For connection, see Installation/Connection Manual (separate volume). For listening to the the USB memory, see pages 9 – 11; For iPod, or D.player, see pages 16 and 17. More about this unit Basic operations Turning on the power • By pressing SRC on the unit, you can also turn on the power.
Playing a disc • While fast-forwarding or reversing on an MP3 or WMA disc, you can only hear intermittent sounds. Playing a CD-R or CD-RW • Use only “finalized” CD-Rs or CD-RWs. • This unit can play back only files of the same type which are first detected if a disc includes both audio CD (CD-DA) files and MP3/ WMA files. • This unit can play back multi-session discs; however, unclosed sessions will be skipped while playing.
ENGLISH – WMA files copy-protected with DRM. – Files which have the data such as WAVE, ATRAC3, etc. • The search function works but search speed is not constant. Playing MP3/WMA tracks from a USB memory • While playing from a USB memory, the playback order may differ from other players. • This unit may be unable to play back some USB memories or some files due to their characteristics or recording conditions.
Notice: When operating an iPod or a D. player, some operations may not be performed correctly or as intended. In this case, visit the following JVC web site: For iPod users: For D. player users: ENGLISH – Depends on the condition of communication between the iPod or D. player and the unit.
What appears to be trouble is not always serious. Check the following points before calling a service center. Symptoms MP3/WMA playback Disc playback FM/AM General ENGLISH Troubleshooting Remedies/Causes • Sound cannot be heard from the speakers. • Adjust the volume to the optimum level. • Check the cords and connections. • The unit does not work at all. Reset the unit (see page 2). • SSM automatic presetting does not work. Store stations manually. • Static noise while listening to the radio.
USB memory playback Remedies/Causes • Tracks do not play back in the order you have intended them to play. Playback order is determined when the files are recorded. • Elapsed playing time is not correct. This sometimes occurs while playing. This is caused by how the tracks are recorded on the disc. • “NO FILES” appears on the display. Insert a disc that contains MP3/WMA tracks. • Correct characters are not displayed (e.g. album name).
CD changer iPod/D. player playback ENGLISH Symptoms Remedies/Causes • “NO DISC” appears on the display. Insert a disc into the magazine. • “NO MAG” appears on the display. Insert the magazine. • “RESET 8” appears on the display. Connect this unit and the CD changer correctly and press the reset button of the CD changer. • “RESET 1” – “RESET 7” appears on the display. Press the reset button of the CD changer. • The CD changer does not work at all. Reset the unit (see page 2). • The iPod or D.
AUDIO AMPLIFIER SECTION Maximum Power Output: Front: 50 W per channel Rear: 50 W per channel Continuous Power Output (RMS): Front: 19 W per channel into 4 Ω, 40 Hz to 20 000 Hz at no more than 0.8% total harmonic distortion. Rear: 19 W per channel into 4 Ω, 40 Hz to 20 000 Hz at no more than 0.8% total harmonic distortion.
Having TROUBLE with operation? Please reset your unit Refer to page of How to reset your unit EN, CT © 2005 Victor Company of Japan, Limited Rear_005A_f.
KD-G725 Installation/Connection Manual ϰ༬ ો˿̱ GET0355-010A 1205DTSMDTJEIN EN, CT © 2005 Victor Company of Japan, Limited [UT] ˁ̂ ENGLISH This unit is designed to operate on 12 V DC, NEGATIVE ground electrical systems. If your vehicle does not have this system, a voltage inverter is required, which can be purchased at JVC car audio dealers.
INSTALLATION (IN-DASH MOUNTING) ϰ༬ ༬éׇ֤ϛᄮ ˗ؼڸ The following illustration shows a typical installation. If you have any questions or require information regarding installation kits, consult your JVC car audio dealers or a company supplying kits. • If you are not sure how to install this unit correctly, have it installed by a qualified technician.
ˁ̂ ENGLISH ྑཕો ELECTRICAL CONNECTIONS A Typical connections / նڅܔોሉ̅٘ ોሉ̥ ! ۯஅᐓފԆԾ˖ڄለཔéʿᇧڄለࠓʹጅᘷࡌ๑ᖢé ྐʍለ˺ڄለ֜ԾԽڄ˺ለϚᖄиʕ̈́Љʿψé Before connecting: Check the wiring in the vehicle carefully. Incorrect connection may cause serious damage to this unit. The leads of the power cord and those of the connector from the car body may be different in color.
B Connecting the external amplifiers and/or subwooferƅો͚ો؟ʩወ֝ƅචࡍљࡗಚᑶወ ̣̈́؞ʨ̣˥ঠڄԆԾΘᝂᑵԦé ë અჲለ ᕇиઘЉΎиঙ ֜մ̧༫ʕڄჲለ৹գç̣̣̈́۔ཫʹጅනм ჲé ë આಚᑶወ֝͵ጆᔄෆèκોʖ̸ୋ؟ʩወêઆ͵ጆڅಚᑶወોሉ؟ˀΈê You can connect amplifiers to upgrade your car stereo system. • Connect the remote lead (blue with white stripe) to the remote lead of the other equipment so that it can be controlled through this unit. • Disconnect the speakers from this unit, connect them to the amplifier.
ENGLISH INFORMATION (For U.S.A.) This equipment has been tested and found to comply with the limits for a Class B digital device, pursuant to Part 15 of the FCC Rules. These limits are designed to provide reasonable protection against harmful interference in a residential installation. This equipment generates, uses, and can radiate radio frequency energy and, if not installed and used in accordance with the instructions, may cause harmful interference to radio communications.
How to read this manual • Button operations are mainly explained with the illustrations in the table below. • Some related tips and notes are explained in “More about this unit” (see pages 23 – 26). Press briefly. Press repeatedly. Press either one. Press and hold until your desired response begins. Press and hold both buttons at the same time. The following marks are used to indicate... CONTENTS Control panel — KD-AR770 and KD-G720 ........ 4 Remote controller — RM-RK50 ..............
ENGLISH Control panel — KD-AR770 and KD-G720 Parts identification 1 BAND button 2 • Control dial • (standby/on attenuator) button 3 DISP (display) button 4 Remote sensor • DO NOT expose the remote sensor to strong light (direct sunlight or artificial lighting).
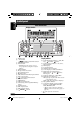
ENGLISH Display window ; Track information indicators—TAG (ID3 Tag), (track/file), (folder) a Tuner reception indicators—ST (stereo), MO (monaural) s Main display d Tr (track) indicator f LOUD (loudness) indicator g Source display / Volume level indicator h Playback mode / item indicators— RND (random), (disc), (folder), RPT (repeat) j Track type indicators*—WMA, MP3 k Playback source indicators*—CH (CD changer), DISC (built-in CD player) l EQ (equalizer) indicator / Sound mode (C-EQ: custom equalizer) i
ENGLISH Warning: • Do not install any battery other than CR2025 or its equivalent; otherwise, it may explode. • Store the battery in a place where children cannot reach to avoid risk of accident. • To prevent the battery from over-heating, cracking, or starting a fire: – Do not recharge, short, disassemble, heat the battery, or dispose of it in a fire. – Do not leave the battery with other metallic materials. – Do not poke the battery with tweezers or similar tools.
⁄ Adjust the volume. Basic operations ~ Turn on the power. Volume level appears. Ÿ ENGLISH Getting started Volume level indicator @ Adjust the sound as you want. (See pages 13 and 14.) Caution on volume setting: *1 You cannot select these sources if they are not ready or not connected. *2 Only for KD-AR770. ! Discs produce very little noise compared with other sources. Lower the volume before playing a disc to avoid damaging the speakers by the sudden increase of the output level.
ENGLISH Basic settings • See also “General settings — PSM” on pages 14 – 16. Radio operations ~ 1 2 Ÿ Lights up when receiving an FM stereo broadcast with sufficient signal strength. 1 Canceling the display demonstrations Select “DEMO,” then “DEMO OFF.” 2 Setting the clock Select “CLOCK H” (hour), then adjust the hour. Select “CLOCK M” (minute), then adjust the minute. 3 Selected band appears. ! Start searching for a station. Finish the procedure.
Lights up when monaural mode is activated. Manual presetting Ex.: Storing FM station of 92.5 MHz into preset number 4 of the FM1 band. 1 ENGLISH When an FM stereo broadcast is hard to receive 2 Reception improves, but stereo effect will be lost. 3 Preset number flashes for a while. To restore the stereo effect, repeat the same procedure. “MONO OFF” appears and the MO indicator goes off. Storing stations in memory You can preset six stations for each band.
ENGLISH Disc/USB memory operations Playing a disc in the unit All tracks will be played repeatedly until you change the source or eject the disc. To stop play and eject the disc Playing from a USB memory This unit can play MP3/WMA tracks stored in a USB memory. All tracks in the USB memory will be played repeatedly until you change the source. • Removing the USB memory will also stop playback.
MP3 and WMA “tracks” (words “file” and “track” are used interchangeably) are recorded in “folders.” To locate a particular track (for CD) or folder (for MP3/WMA/USB) directly ENGLISH About MP3 and WMA tracks To select a number from 01 – 06: About the CD changer It is recommended to use a JVC MP3-compatible CD changer with your unit. • You can also connect MP3-incompatible CD changers. However, these units are not compatible with MP3 discs.
ENGLISH 2 Changing the display information Each time you press the button, you can skip 10 tracks. • After the last track, the first track will be selected and vice versa. While playing an audio CD or a CD Text 3 Prohibiting disc ejection You can lock a disc in the loading slot. While playing an MP3/WMA*2 disc or a USB memory • When “TAG DISP” is set to “TAG ON” (see page 16) • When “TAG DISP” is set to “TAG OFF” To cancel the prohibition, repeat the same procedure.
You can use only one of the following playback modes at a time. Sound adjustments You can select a preset sound mode suitable to the music genre (C-EQ: custom equalizer). 1 2 Select your desired playback mode. 7 Repeat play Mode Plays repeatedly TRK RPT : The current track. FLDR RPT*1 : All tracks of the current folder. DISC RPT*2 : All tracks of the current disc. RPT OFF : Cancels.
ENGLISH Indication, [Range] BAS*1 (bass), [–06 to +06] Adjust the bass. TRE*1 (treble), [–06 to +06] Adjust the treble. FAD*2 (fader), [R06 to F06] Adjust the front and rear speaker balance. BAL*3 (balance), [L06 to R06] Adjust the left and right speaker balance. General settings — PSM You can change PSM (Preferred Setting Mode) items (except “SID”) listed in the table that follows. 1 2 Select a PSM item.
Selectable settings, [reference page] DEMO Display demonstration DEMO ON : [Initial]; Display demonstration will be activated automatically if no operation is done for about 20 seconds, [8]. DEMO OFF : Cancels.
ENGLISH Indications Selectable settings, [reference page] WOOFER Subwoofer cutoff frequency LOW MID HIGH ADJ*6 : Frequencies lower than 90 Hz are sent to the subwoofer. : [Initial]; Frequencies lower than 135 Hz are sent to the subwoofer. : Frequencies lower than 180 Hz are sent to the subwoofer. LINE Line input level VOL 00 – VOL 05 : Adjust the line input level properly when an external component is connected to the LINE IN plugs.
character position. You can assign titles to station frequencies and CDs (both in this unit and in the CD changer). Sources Station frequencies 3 Repeat steps 1 and 2 until you Maximum number of characters Up to 8 characters (up to 30 station frequencies including both FM and AM) ENGLISH 2 Move to the next (or previous) Title assignment finish entering the title. 4 Finish the procedure.
ENGLISH Satellite radio operations This unit is satellite (SAT) Radio Ready— compatible with both SIRIUS Satellite radio and XM Satellite radio. Before operating your satellite radio: • For connection, see Installation/Connection Manual (separate volume). • Refer also to the Instructions supplied with your SIRIUS Satellite radio or XM Satellite radio. • “SIRIUS” and the SIRIUS dog logo are registered trademarks of SIRIUS Satellite Radio Inc.
4 Contact XM Satellite radio on Once completed, the unit tunes in to one of the available channels (Channel 4 or higher). Listening to the SIRIUS Satellite radio 1 Listening to the XM Satellite radio ENGLISH the internet at to activate your subscription, or you can call 1-800XM-RADIO (1-800-967-2346). 1 2 3 Select a channel for listening. Holding the button changes the channels rapidly. 2 Searching for category/channel 3 Select a category.
Select a channel for listening. ENGLISH 2 Storing channels in memory You can preset six channels for each band. Current channel number Ex.: Storing a channel into preset number 4. 1 2 Tune in to a channel you want. Preset number flashes for a while. Ex.: When you select “COUNTRY” for Category Search If no operation is done for about 15 seconds, Category Search is canceled. In Channel Search, channel name and channel number appear on the display during search.
Adjust the volume. ENGLISH iPod®/D. player operations ! This unit is ready for operating an Apple iPod or a JVC D. player from the control panel. Before operating your iPod or D. player: Connect either one of the following (separately purchased) to the CD changer jack on the rear of this unit. • Interface adapter for iPod®—KS-PD100 for controlling an iPod. • D. player interface adapter—KS-PD500 for controlling a D. player. • For connection, see Installation/Connection Manual (separate volume).
ENGLISH Selecting a track from the menu 1 Enter the main menu. Now the 5/∞/ 4/¢ buttons work as the menu selecting buttons*1. *1 The menu selecting mode will be canceled: – If no operations are done for about 5 seconds. – When you confirm the selection of a track. 2 Select the desired menu. For iPod: PLAYLIST Ô ARTISTS Ô ALBUMS Ô SONGS Ô GENRES Ô COMPOSER Ô (back to the beginning) For D. player: PLAYLIST Ô ARTIST Ô ALBUM Ô GENRE Ô TRACK Ô (back to the beginning) 3 Confirm the selection.
More about this unit Basic operations You can connect an external component to the CD changer jack on the rear using the Line Input Adapter—KS-U57 (not supplied) or AUX Input Adapter—KS-U58 (not supplied). • For connection, see Installation/Connection Manual (separate volume). Turning on the power For listening to the USB memory, see pages 10 – 13; For Satellite radio, iPod, or D. player, see pages 18 – 22.
ENGLISH Inserting a disc Playing an MP3/WMA disc • When a disc is inserted upside down, “PLEASE” and “EJECT” appear alternately on the display. Press 0 to eject the disc. • Do not insert 8 cm (3-3/16") discs (single CD) and unusual shape discs (heart, flower, etc.) into the loading slot. • This unit can play back MP3/WMA files with the extension code <.mp3> or <.wma> (regardless of the letter case—upper/lower). • This unit can show the names of albums, artists (performer), and Tag (Version 1.0, 1.1, 2.
Playing MP3/WMA tracks from a USB memory • While playing from a USB memory, the playback order may differ from other players. • This unit may be unable to play back some USB memories or some files due to their characteristics or recording conditions. • Depending on the shape of the USB memories and connection ports, some USB memories may not be attached properly or the connection might be loose. • It is not recommended to use a USB memory wider than 20 mm as it will block you from pressing the 0 button.
ENGLISH iPod® or D. player operations • When you turn on this unit, the iPod or D. player is charged through this unit. • While the iPod or D. player is connected, all operations from the iPod or D. player are disabled. Perform all operations from this unit. • The text information may not be displayed correctly. – Some characters such as accented letters cannot be shown correctly on the display. – Depends on the condition of communication between the iPod or D. player and the unit.
Sticker Warped disc Sticker residue Stick-on label ENGLISH Do not use the following discs: Troubleshooting What appears to be trouble is not always serious. Check the following points before calling a service center. MP3/WMA playback Disc playback FM/AM General Symptoms Remedies/Causes • Sound cannot be heard from the speakers. • Adjust the volume to the optimum level. • Check the cords and connections. • The unit does not work at all. Reset the unit (see page 2).
USB memory playback MP3/WMA playback ENGLISH Symptoms Remedies/Causes • Noise is generated. Skip to another track or change the disc. (Do not add the extension code <.mp3> or <.wma> to non-MP3 or WMA tracks.) • A longer readout time is required (“CHECK” keeps flashing on the display). Do not use too many hierarchies and folders. • Tracks do not play back in the order you have intended them to play. Playback order is determined when the files are recorded. • Elapsed playing time is not correct.
Satellite radio Remedies/Causes • “NO DISC” appears on the display. Insert a disc into the magazine. • “NO MAG” appears on the display. Insert the magazine. • “RESET 8” appears on the display. Connect this unit and the CD changer correctly and press the reset button of the CD changer. • “RESET 1” – “RESET 7” appears on the display. Press the reset button of the CD changer. • The CD changer does not work at all. Reset the unit (see page 2).
Satellite radio iPod/D. player playback ENGLISH Symptoms Remedies/Causes • “OFF AIR” appears on the display while listening to the XM Satellite radio. Selected channel is not broadcasting at this time. Select another channel or continue listening to the previous channel. • “LOADING” appears on the display while listening to the XM Satellite radio. The unit is loading the channel information and audio. Text information are temporarily unavailable. • “RESET 8” appears on the display.
AUDIO AMPLIFIER SECTION Power Output: 20 W RMS × 4 Channels at 4 Ω and ≤ 1% THD+N Signal to Noise Ratio: 80 dBA (reference: 1 W into 4 Ω) Load Impedance: 4 Ω (4 Ω to 8 Ω allowance) Tone Control Range: Bass: ±10 dB at 100 Hz Treble: ±10 dB at 10 kHz Frequency Response: 40 Hz to 20 000 Hz Line-Out Level/Impedance: KD-AR770: 4.0 V /20 kΩ load (full scale) KD-G720: 2.5 V /20 kΩ load (full scale) Output Impedance: 1 kΩ Subwoofer-Out Level/Impedance: 2.
Having TROUBLE with operation? Please reset your unit Refer to page of How to reset your unit Still having trouble?? USA ONLY Call 1-800-252-5722 http://www.jvc.com We can help you! EN, SP, FR © 2005 Victor Company of Japan, Limited Rear_KD-AR770[J]2.
KD-AR770/KD-G720 Installation/Connection Manual Manual de instalación/conexión Manuel d’installation/raccordement 1205DTSMDTJEIN EN, SP, FR © 2005 Victor Company of Japan, Limited GET0354-002A [J] ENGLISH ESPAÑOL FRANÇAIS This unit is designed to operate on 12 V DC, NEGATIVE ground electrical systems. If your vehicle does not have this system, a voltage inverter is required, which can be purchased at JVC car audio dealers.
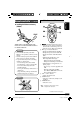
INSTALLATION (IN-DASH MOUNTING) INSTALACION (MONTAJE EN EL TABLERO DE INSTRUMENTOS) INSTALLATION (MONTAGE DANS LE TABLEAU DE BORD) The following illustration shows a typical installation. If you have any questions or require information regarding installation kits, consult your JVC car audio dealer or a company supplying kits. • If you are not sure how to install this unit correctly, have it installed by a qualified technician. La siguiente ilustración muestra una instalación típica.
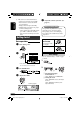
ENGLISH ESPAÑOL ELECTRICAL CONNECTIONS A CONEXIONES ELECTRICAS Connect the colored leads of the power cord in the order specified in the illustration below. 2 3 Antes de la conexión: Verifique atentamente el conexionado del vehículo. Una conexión incorrecta podría producir daños graves en la unidad. Los cordones del cable de alimentación y los del conector procedentes de la carrocería del automóvil podrían ser de diferentes en color.
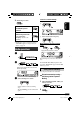
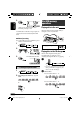
C Connecting the external components / Conexión de los componentes externos / Connexion des appareils extérieurs JVC CD changer, SIRIUS Satellite radio, XM Satellite radio, Apple iPod®, or JVC D. player / Cambiador de CD de JVC, radio satelital SIRIUS, radio satelital XM, iPod® de Apple o reproductor JVC D. / Changeur de CD JVC, radio satellite SIRIUS, radio satellite XM, iPod® Apple ou lecteur D. JVC • Set “CHANGER” for the external input setting (See page 16 of the INSTRUCTIONS.
KD-G725 ENGLISH CD RECEIVER KD-G725 For canceling the display demonstration, see page 6. 6 For installation and connections, refer to the separate manual. INSTRUCTIONS GET0355-001A [U/UH] Cover_KD-G725[U-UH]001A.
ENGLISH Thank you for purchasing a JVC product. Please read all instructions carefully before operation, to ensure your complete understanding and to obtain the best possible performance from the unit. IMPORTANT FOR LASER PRODUCTS 1. CLASS 1 LASER PRODUCT 2. CAUTION: Do not open the top cover. There are no user serviceable parts inside the unit; leave all servicing to qualified service personnel. 3. CAUTION: Visible and invisible laser radiation when open and interlock failed or defeated.
Press briefly. CONTENTS Control panel ................................... 4 Remote controller — RM-RK50 ............. 5 Getting started ................................. 6 ENGLISH How to read this manual • Button operations are mainly explained with the illustrations in the table below. • Some related tips and notes are explained in “More about this unit” (see pages 18 – 21). Basic operations .................................................... 6 Press repeatedly. Press either one.
ENGLISH Control panel Parts identification Display window 1 BAND button 2 • Control dial • (standby/on attenuator) button 3 DISP (display) button 4 Remote sensor • DO NOT expose the remote sensor to strong light (direct sunlight or artificial lighting).
Remote controller — RM-RK50 ENGLISH Main elements and features Installing the lithium coin battery (CR2025) Aim the remote controller directly at the remote sensor on the unit. Make sure there is no obstacle in between. Warning: • Do not install any battery other than CR2025 or its equivalent; otherwise, it may explode. • Store the battery in a place where children cannot reach to avoid risk of accident.
ENGLISH 6 2 R (reverse) / F (forward) 3 buttons • Searches for stations if pressed briefly. • Fast-forwards or reverses the track if pressed and held. • Changes the tracks if pressed briefly. • While listening to an iPod or a D. player (in menu selecting mode): – Selects an item if pressed briefly. (Then, press D ∞ to confirm the selection.) – Skips 10 items at a time if pressed and held. @ Adjust the sound as you want. (See page 12.
3 To tune in to a station manually Finish the procedure. ENGLISH In step ! on the left... 1 To check the current clock time while the power is turned off To check other information while listening to the radio Clock = Station name* =Frequency =(back to the beginning) 2 Select a desired station frequency. * FM/AM: If no name is assigned to a station, “NO NAME” appears. To assign a title to a station, see page 15.
ENGLISH 3 Disc/USB memory operations “SSM” appears, then disappears when automatic presetting is over. Local FM stations with the strongest signals are searched and stored automatically in the FM band. Playing a disc in the unit All tracks will be played repeatedly until you change the source or eject the disc. Manual presetting Ex.: Storing FM station of 92.5 MHz into preset number 4 of the FM1 band.
This unit can play MP3/WMA tracks stored in a USB memory. All tracks in the USB memory will be played repeatedly until you change the source. • Removing the USB memory will also stop playback. ~ Ÿ USB input terminal About MP3 and WMA tracks MP3 and WMA “tracks” (words “file” and “track” are used interchangeably) are recorded in “folders.” About the CD changer ENGLISH Playing from a USB memory It is recommended to use a JVC MP3compatible CD changer with your unit.
ENGLISH To go to the next or previous folders (only for MP3/WMA/USB) Other main functions Skipping tracks quickly during play For MP3 tracks: For WMA tracks: Only possible on JVC MP3-compatible CD changer To locate a particular track (for CD) or folder (for MP3/WMA/USB) directly To select a number from 01 – 06: • For MP3/WMA/USB, you can skip tracks within the same folder. Ex.
Selecting the playback modes You can use only one of the following playback modes at a time. While playing an audio CD or a CD Text 1 2 ENGLISH Changing the display information Select your desired playback mode. 7 Repeat play While playing an MP3/WMA*2 disc or USB memory • When “TAG DISP” is set to “TAG ON” (see page 14) Mode Plays repeatedly TRK RPT : The current track. FLDR RPT*4 : All tracks of the current folder. DISC RPT*5 : All tracks of the current disc.
ENGLISH Sound adjustments Indication [Range] You can select a preset sound mode suitable to the music genre (C-EQ: custom equalizer).
ENGLISH General settings — PSM You can change PSM (Preferred Setting Mode) items listed in the table that follows. 1 2 3 Adjust the PSM item selected. 4 Repeat steps 2 and 3 to adjust the other PSM items if necessary. 5 Finish the procedure. Select a PSM item. Ex.: When “DIMMER” is selected Indications Selectable settings, [reference page] DEMO Display demonstration DEMO ON : [Initial]; Display demonstration will be activated automatically if no operation is done for about 20 seconds, [6].
ENGLISH Indications Selectable settings, [reference page] WOOFER Subwoofer cutoff frequency LOW : Frequencies lower than 90 Hz are sent to the MID : [Initial]; Frequencies lower than 135 Hz are sent to HIGH : Frequencies lower than 180 Hz are sent to the subwoofer. the subwoofer. subwoofer. EXT IN*2 External input CHANGER : [Initial]; To use a JVC CD changer, [8], an Apple iPod or a JVC D. player, [16]. EXT IN : To use any other external component, [18].
You can assign titles to station frequencies and CDs (both in this unit and the CD changer). Sources 3 Repeat steps 1 and 2 until you finish entering the title. Maximum number of characters Station frequencies Up to 8 characters (up to 30 station frequencies including both FM and AM) CDs/CD-CH* Up to 32 characters (up to 30 discs) * You cannot assign a title to a CD Text or an MP3/WMA disc or a USB memory. 4 ENGLISH 2 Move to the next (or previous) character position.
ENGLISH iPod®/D. player operations ⁄ • Make sure the equalizer on the iPod or D. player is deactivated. This unit is ready for operating an Apple iPod or a JVC D. player from the control panel. Before operating your iPod or D. player: Connect either one of the following (separately purchased) to the CD changer jack on the rear of this unit. • Interface adapter for iPod®—KS-PD100 for controlling an iPod. • D. player interface adapter—KS-PD500 for controlling a D. player.
Confirm the selection. 7 Random play To move back to the previous menu, press 5. • If a track is selected, playback starts automatically. • If the selected item has another layer, you will enter the layer. Repeat steps 2 and 3 until the desired track is played. • Holding 4 /¢ can skip 10 items at a time. *3 The menu selecting mode will be canceled: – If no operations are done for about 5 seconds. – When you confirm the selection of a track.
ENGLISH Other external component operations You can connect an external component to the CD changer jack on the rear using the Line Input Adapter—KS-U57 (not supplied) or AUX Input Adapter—KS-U58 (not supplied). • For connection, see Installation/Connection Manual (separate volume). For listening to the the USB memory, see pages 9 – 11; For iPod, or D.player, see pages 16 and 17. More about this unit Basic operations Turning on the power • By pressing SRC on the unit, you can also turn on the power.
Playing a disc • While fast-forwarding or reversing on an MP3 or WMA disc, you can only hear intermittent sounds. Playing a CD-R or CD-RW • Use only “finalized” CD-Rs or CD-RWs. • This unit can play back only files of the same type which are first detected if a disc includes both audio CD (CD-DA) files and MP3/ WMA files. • This unit can play back multi-session discs; however, unclosed sessions will be skipped while playing.
ENGLISH – WMA files copy-protected with DRM. – Files which have the data such as WAVE, ATRAC3, etc. • The search function works but search speed is not constant. Playing MP3/WMA tracks from a USB memory • While playing from a USB memory, the playback order may differ from other players. • This unit may be unable to play back some USB memories or some files due to their characteristics or recording conditions.
Notice: When operating an iPod or a D. player, some operations may not be performed correctly or as intended. In this case, visit the following JVC web site: For iPod users: For D. player users: ENGLISH – Depends on the condition of communication between the iPod or D. player and the unit.
What appears to be trouble is not always serious. Check the following points before calling a service center. Symptoms MP3/WMA playback Disc playback FM/AM General ENGLISH Troubleshooting Remedies/Causes • Sound cannot be heard from the speakers. • Adjust the volume to the optimum level. • Check the cords and connections. • The unit does not work at all. Reset the unit (see page 2). • SSM automatic presetting does not work. Store stations manually. • Static noise while listening to the radio.
USB memory playback Remedies/Causes • Tracks do not play back in the order you have intended them to play. Playback order is determined when the files are recorded. • Elapsed playing time is not correct. This sometimes occurs while playing. This is caused by how the tracks are recorded on the disc. • “NO FILES” appears on the display. Insert a disc that contains MP3/WMA tracks. • Correct characters are not displayed (e.g. album name).
CD changer iPod/D. player playback ENGLISH Symptoms Remedies/Causes • “NO DISC” appears on the display. Insert a disc into the magazine. • “NO MAG” appears on the display. Insert the magazine. • “RESET 8” appears on the display. Connect this unit and the CD changer correctly and press the reset button of the CD changer. • “RESET 1” – “RESET 7” appears on the display. Press the reset button of the CD changer. • The CD changer does not work at all. Reset the unit (see page 2). • The iPod or D.
AUDIO AMPLIFIER SECTION Maximum Power Output: Front: 50 W per channel Rear: 50 W per channel Continuous Power Output (RMS): Front: 19 W per channel into 4 Ω, 40 Hz to 20 000 Hz at no more than 0.8% total harmonic distortion. Rear: 19 W per channel into 4 Ω, 40 Hz to 20 000 Hz at no more than 0.8% total harmonic distortion.
Having TROUBLE with operation? Please reset your unit Refer to page of How to reset your unit EN, TH © 2005 Victor Company of Japan, Limited Rear_KD-G725[U-UH]001A.
KD-G725 Installation/Connection Manual °“√µ‘¥µ—Èß/§ŸË¡◊Õ°“√µ‘¥µ—Èß GET0355-006A 1205DTSMDTJEIN EN, TH © 2005 Victor Company of Japan, Limited [U/UH] ENGLISH ‰∑¬ This unit is designed to operate on 12 V DC, NEGATIVE ground electrical systems. If your vehicle does not have this system, a voltage inverter is required, which can be purchased at JVC car audio dealers.
INSTALLATION (IN-DASH MOUNTING) °“√µ‘¥µ—Èß (°“√ª√–°Õ∫·ºßÀπÈ“ª—∑¡Ï‡¢È“) The following illustration shows a typical installation. If you have any questions or require information regarding installation kits, consult your JVC car audio dealers or a company supplying kits. • If you are not sure how to install this unit correctly, have it installed by a qualified technician.
ENGLISH ‰∑¬ ELECTRICAL CONNECTIONS A °“√‡™◊ËÕ¡‚¥¬„™È ‰øøÈ“ Typical connections / °“√‡™◊ËÕ¡µËÕ·∫∫ª°µ Before connecting: Check the wiring in the vehicle carefully.
B Connecting the external amplifiers and/or subwoofer / µËÕ·Õ¡æ≈‘ø“¬‡ÕÕ√Ï·≈–/À√◊Õ´—∫«Ÿø‡øÕ√ϥȓππÕ° You can connect amplifiers to upgrade your car stereo system. • Connect the remote lead (blue with white stripe) to the remote lead of the other equipment so that it can be controlled through this unit. • Disconnect the speakers from this unit, connect them to the amplifier. Leave the speaker leads of this unit unused.
KD-G725 ALAT PENERIMA CD KD-G725 INDONESIA ENGLISH CD RECEIVER For canceling the display demonstration, see page 6. Untuk membatalkan tampilan demonstrasi, lihat halaman 6. For installation and connections, refer to the separate manual. Untuk instalasi dan penyambungan, lihat buku pedoman terpisah. INSTRUCTIONS BUKU PETUNJUK GET0355-004A [UN] Cover_KD-G725[UN]3.
ENGLISH Thank you for purchasing a JVC product. Please read all instructions carefully before operation, to ensure your complete understanding and to obtain the best possible performance from the unit. IMPORTANT FOR LASER PRODUCTS 1. CLASS 1 LASER PRODUCT 2. CAUTION: Do not open the top cover. There are no user serviceable parts inside the unit; leave all servicing to qualified service personnel. 3. CAUTION: Visible and invisible laser radiation when open and interlock failed or defeated.
Press briefly. CONTENTS Control panel ................................... 4 Remote controller — RM-RK50 ............. 5 Getting started ................................. 6 ENGLISH How to read this manual • Button operations are mainly explained with the illustrations in the table below. • Some related tips and notes are explained in “More about this unit” (see pages 18 – 21). Basic operations .................................................... 6 Press repeatedly. Press either one.
ENGLISH Control panel Parts identification Display window 1 BAND button 2 • Control dial • (standby/on attenuator) button 3 DISP (display) button 4 Remote sensor • DO NOT expose the remote sensor to strong light (direct sunlight or artificial lighting).
Remote controller — RM-RK50 ENGLISH Main elements and features Installing the lithium coin battery (CR2025) Aim the remote controller directly at the remote sensor on the unit. Make sure there is no obstacle in between. Warning: • Do not install any battery other than CR2025 or its equivalent; otherwise, it may explode. • Store the battery in a place where children cannot reach to avoid risk of accident.
ENGLISH 6 2 R (reverse) / F (forward) 3 buttons • Searches for stations if pressed briefly. • Fast-forwards or reverses the track if pressed and held. • Changes the tracks if pressed briefly. • While listening to an iPod or a D. player (in menu selecting mode): – Selects an item if pressed briefly. (Then, press D ∞ to confirm the selection.) – Skips 10 items at a time if pressed and held. @ Adjust the sound as you want. (See page 12.
3 To tune in to a station manually Finish the procedure. ENGLISH In step ! on the left... 1 To check the current clock time while the power is turned off To check other information while listening to the radio Clock = Station name* =Frequency =(back to the beginning) 2 Select a desired station frequency. * FM/AM: If no name is assigned to a station, “NO NAME” appears. To assign a title to a station, see page 15.
ENGLISH 3 Disc/USB memory operations “SSM” appears, then disappears when automatic presetting is over. Local FM stations with the strongest signals are searched and stored automatically in the FM band. Playing a disc in the unit All tracks will be played repeatedly until you change the source or eject the disc. Manual presetting Ex.: Storing FM station of 92.5 MHz into preset number 4 of the FM1 band.
This unit can play MP3/WMA tracks stored in a USB memory. All tracks in the USB memory will be played repeatedly until you change the source. • Removing the USB memory will also stop playback. ~ Ÿ USB input terminal About MP3 and WMA tracks MP3 and WMA “tracks” (words “file” and “track” are used interchangeably) are recorded in “folders.” About the CD changer ENGLISH Playing from a USB memory It is recommended to use a JVC MP3compatible CD changer with your unit.
ENGLISH To go to the next or previous folders (only for MP3/WMA/USB) Other main functions Skipping tracks quickly during play For MP3 tracks: For WMA tracks: Only possible on JVC MP3-compatible CD changer To locate a particular track (for CD) or folder (for MP3/WMA/USB) directly To select a number from 01 – 06: • For MP3/WMA/USB, you can skip tracks within the same folder. Ex.
Selecting the playback modes You can use only one of the following playback modes at a time. While playing an audio CD or a CD Text 1 2 ENGLISH Changing the display information Select your desired playback mode. 7 Repeat play While playing an MP3/WMA*2 disc or USB memory • When “TAG DISP” is set to “TAG ON” (see page 14) Mode Plays repeatedly TRK RPT : The current track. FLDR RPT*4 : All tracks of the current folder. DISC RPT*5 : All tracks of the current disc.
ENGLISH Sound adjustments Indication [Range] You can select a preset sound mode suitable to the music genre (C-EQ: custom equalizer).
ENGLISH General settings — PSM You can change PSM (Preferred Setting Mode) items listed in the table that follows. 1 2 3 Adjust the PSM item selected. 4 Repeat steps 2 and 3 to adjust the other PSM items if necessary. 5 Finish the procedure. Select a PSM item. Ex.: When “DIMMER” is selected Indications Selectable settings, [reference page] DEMO Display demonstration DEMO ON : [Initial]; Display demonstration will be activated automatically if no operation is done for about 20 seconds, [6].
ENGLISH Indications Selectable settings, [reference page] WOOFER Subwoofer cutoff frequency LOW : Frequencies lower than 90 Hz are sent to the MID : [Initial]; Frequencies lower than 135 Hz are sent to HIGH : Frequencies lower than 180 Hz are sent to the subwoofer. the subwoofer. subwoofer. EXT IN*2 External input CHANGER : [Initial]; To use a JVC CD changer, [8], an Apple iPod or a JVC D. player, [16]. EXT IN : To use any other external component, [18].
You can assign titles to station frequencies and CDs (both in this unit and the CD changer). Sources 3 Repeat steps 1 and 2 until you finish entering the title. Maximum number of characters Station frequencies Up to 8 characters (up to 30 station frequencies including both FM and AM) CDs/CD-CH* Up to 32 characters (up to 30 discs) * You cannot assign a title to a CD Text or an MP3/WMA disc or a USB memory. 4 ENGLISH 2 Move to the next (or previous) character position.
ENGLISH iPod®/D. player operations ⁄ • Make sure the equalizer on the iPod or D. player is deactivated. This unit is ready for operating an Apple iPod or a JVC D. player from the control panel. Before operating your iPod or D. player: Connect either one of the following (separately purchased) to the CD changer jack on the rear of this unit. • Interface adapter for iPod®—KS-PD100 for controlling an iPod. • D. player interface adapter—KS-PD500 for controlling a D. player.
Confirm the selection. 7 Random play To move back to the previous menu, press 5. • If a track is selected, playback starts automatically. • If the selected item has another layer, you will enter the layer. Repeat steps 2 and 3 until the desired track is played. • Holding 4 /¢ can skip 10 items at a time. *3 The menu selecting mode will be canceled: – If no operations are done for about 5 seconds. – When you confirm the selection of a track.
ENGLISH Other external component operations You can connect an external component to the CD changer jack on the rear using the Line Input Adapter—KS-U57 (not supplied) or AUX Input Adapter—KS-U58 (not supplied). • For connection, see Installation/Connection Manual (separate volume). For listening to the the USB memory, see pages 9 – 11; For iPod, or D.player, see pages 16 and 17. More about this unit Basic operations Turning on the power • By pressing SRC on the unit, you can also turn on the power.
Playing a disc • While fast-forwarding or reversing on an MP3 or WMA disc, you can only hear intermittent sounds. Playing a CD-R or CD-RW • Use only “finalized” CD-Rs or CD-RWs. • This unit can play back only files of the same type which are first detected if a disc includes both audio CD (CD-DA) files and MP3/ WMA files. • This unit can play back multi-session discs; however, unclosed sessions will be skipped while playing.
ENGLISH – WMA files copy-protected with DRM. – Files which have the data such as WAVE, ATRAC3, etc. • The search function works but search speed is not constant. Playing MP3/WMA tracks from a USB memory • While playing from a USB memory, the playback order may differ from other players. • This unit may be unable to play back some USB memories or some files due to their characteristics or recording conditions.
Notice: When operating an iPod or a D. player, some operations may not be performed correctly or as intended. In this case, visit the following JVC web site: For iPod users: For D. player users: ENGLISH – Depends on the condition of communication between the iPod or D. player and the unit.
What appears to be trouble is not always serious. Check the following points before calling a service center. Symptoms MP3/WMA playback Disc playback FM/AM General ENGLISH Troubleshooting Remedies/Causes • Sound cannot be heard from the speakers. • Adjust the volume to the optimum level. • Check the cords and connections. • The unit does not work at all. Reset the unit (see page 2). • SSM automatic presetting does not work. Store stations manually. • Static noise while listening to the radio.
USB memory playback Remedies/Causes • Tracks do not play back in the order you have intended them to play. Playback order is determined when the files are recorded. • Elapsed playing time is not correct. This sometimes occurs while playing. This is caused by how the tracks are recorded on the disc. • “NO FILES” appears on the display. Insert a disc that contains MP3/WMA tracks. • Correct characters are not displayed (e.g. album name).
CD changer iPod/D. player playback ENGLISH Symptoms Remedies/Causes • “NO DISC” appears on the display. Insert a disc into the magazine. • “NO MAG” appears on the display. Insert the magazine. • “RESET 8” appears on the display. Connect this unit and the CD changer correctly and press the reset button of the CD changer. • “RESET 1” – “RESET 7” appears on the display. Press the reset button of the CD changer. • The CD changer does not work at all. Reset the unit (see page 2). • The iPod or D.
AUDIO AMPLIFIER SECTION Maximum Power Output: Front: 50 W per channel Rear: 50 W per channel Continuous Power Output (RMS): Front: 19 W per channel into 4 Ω, 40 Hz to 20 000 Hz at no more than 0.8% total harmonic distortion. Rear: 19 W per channel into 4 Ω, 40 Hz to 20 000 Hz at no more than 0.8% total harmonic distortion.
Having TROUBLE with operation? Please reset your unit Refer to page of How to reset your unit Ada MASALAH dengan cara pengoperasian? Setel kembali unit Anda Lihat halaman mengenai Bagaimana mereset unit anda EN, IN © 2005 Victor Company of Japan, Limited Rear_KD-G725{UN]3.
KD-G725 Installation/Connection Manual Manual Pemasangan/Penyambungan GET0355-009A 1205DTSMDTJEIN EN, IN © 2005 Victor Company of Japan, Limited [UN] ENGLISH INDONESIA This unit is designed to operate on 12 V DC, NEGATIVE ground electrical systems. If your vehicle does not have this system, a voltage inverter is required, which can be purchased at JVC car audio dealers. Alat penerima ini didisain untuk beroperasi hanya pada 12 V DC, sistem listrik tanah NEGATIVE.
INSTALLATION (IN-DASH MOUNTING) PEMASANGAN (BINGKAI-DALAM DASH) The following illustration shows a typical installation. If you have any questions or require information regarding installation kits, consult your JVC car audio dealers or a company supplying kits. • If you are not sure how to install this unit correctly, have it installed by a qualified technician. Ilustrasi berikut menunjukkan sebuah tipe pemasangan.
ENGLISH INDONESIA ELECTRICAL CONNECTIONS A SAMBUNGAN-SAMBUNGAN LISTRIK Typical connections / Ciri khas sambungan-sambungan Before connecting: Check the wiring in the vehicle carefully. Incorrect connection may cause serious damage to this unit. The leads of the power cord and those of the connector from the car body may be different in color. Sebelum penyambungan: Cek perkabelan dalam mobil dengan hati-hati. Penyambungan yang tidak benar mungkin menyebabkan kerusakan serius pada alat penerima.
B Connecting the external amplifiers and/or subwoofer / Penyambungan penguat eksternal dan/atau subwoofer Anda dapat menyambungkan penguat untuk meningkatkan sistem stereo mobil anda. • Sambungkan ujung jauh (biru dengan strip putih) ke ujung jauh dari peralatan lain sehingga dapat dikontrol melalui alat penerima ini. • Putuskan sambungan speaker-speaker dari alat penerima ini, sambungkan ini ke penguat. Biarkan ujung speaker dari alat penerima ini tidak digunakan.
CD RECEIVER KD-G724 For canceling the display demonstration, see page 6. For installation and connections, refer to the separate manual. INSTRUCTIONS GET0356-001A [UI] Cover_KD-G724[UI]f.
Thank you for purchasing a JVC product. Please read all instructions carefully before operation, to ensure your complete understanding and to obtain the best possible performance from the unit. IMPORTANT FOR LASER PRODUCTS 1. CLASS 1 LASER PRODUCT 2. CAUTION: Do not open the top cover. There are no user serviceable parts inside the unit; leave all servicing to qualified service personnel. 3. CAUTION: Visible and invisible laser radiation when open and interlock failed or defeated.
How to read this manual • Button operations are mainly explained with the illustrations in the table below. • Some related tips and notes are explained in “More about this unit” (see pages 18 – 21). Press briefly. CONTENTS Control panel ................................... 4 Remote controller — RM-RK50 ............. 5 Getting started ................................. 6 Basic operations .................................................... 6 Press repeatedly. Press either one.
Control panel Parts identification Display window 1 BAND button 2 • Control dial • (standby/on attenuator) button 3 DISP (display) button 4 Remote sensor • DO NOT expose the remote sensor to strong light (direct sunlight or artificial lighting).
Remote controller — RM-RK50 Main elements and features Installing the lithium coin battery (CR2025) Aim the remote controller directly at the remote sensor on the unit. Make sure there is no obstacle in between. Warning: • Do not install any battery other than CR2025 or its equivalent; otherwise, it may explode. • Store the battery in a place where children cannot reach to avoid risk of accident.
6 2 R (reverse) / F (forward) 3 buttons • Searches for stations if pressed briefly. • Fast-forwards or reverses the track if pressed and held. • Changes the tracks if pressed briefly. • While listening to an iPod or a D. player (in menu selecting mode): – Selects an item if pressed briefly. (Then, press D ∞ to confirm the selection.) – Skips 10 items at a time if pressed and held. @ Adjust the sound as you want. (See page 12.
3 To tune in to a station manually Finish the procedure. In step ! on the left... 1 To check the current clock time while the power is turned off To check other information while listening to the radio Clock = Station name* =Frequency =(back to the beginning) 2 Select a desired station frequency. * FM/AM: If no name is assigned to a station, “NO NAME” appears. To assign a title to a station, see page 15.
3 Disc/USB memory operations “SSM” appears, then disappears when automatic presetting is over. Local FM stations with the strongest signals are searched and stored automatically in the FM band. Playing a disc in the unit All tracks will be played repeatedly until you change the source or eject the disc. Manual presetting Ex.: Storing FM station of 92.5 MHz into preset number 4 of the FM1 band. 1 To stop play and eject the disc 2 Playing discs in the CD changer 3 Preset number flashes for a while.
Playing from a USB memory This unit can play MP3/WMA tracks stored in a USB memory. All tracks in the USB memory will be played repeatedly until you change the source. • Removing the USB memory will also stop playback. ~ Ÿ USB input terminal About MP3 and WMA tracks MP3 and WMA “tracks” (words “file” and “track” are used interchangeably) are recorded in “folders.” About the CD changer It is recommended to use a JVC MP3compatible CD changer with your unit.
To go to the next or previous folders (only for MP3/WMA/USB) Other main functions Skipping tracks quickly during play For MP3 tracks: For WMA tracks: Only possible on JVC MP3-compatible CD changer To locate a particular track (for CD) or folder (for MP3/WMA/USB) directly To select a number from 01 – 06: • For MP3/WMA/USB, you can skip tracks within the same folder. Ex.
Changing the display information Selecting the playback modes You can use only one of the following playback modes at a time. While playing an audio CD or a CD Text 1 2 Select your desired playback mode. 7 Repeat play While playing an MP3/WMA*2 disc or USB memory • When “TAG DISP” is set to “TAG ON” (see page 14) Mode Plays repeatedly TRK RPT : The current track. FLDR RPT*4 : All tracks of the current folder. DISC RPT*5 : All tracks of the current disc.
Sound adjustments Indication [Range] You can select a preset sound mode suitable to the music genre (C-EQ: custom equalizer). Preset values BAS TRE LOUD (bass) (treble) (loudness) Indication (For) USER (Flat sound) 00 ROCK (Rock or disco music) +03 +01 ON CLASSIC (Classical music) +01 –02 OFF POPS (Light music) +04 +01 OFF HIP HOP (Funk or rap music) +02 00 ON JAZZ (Jazz music) +02 +03 OFF 00 OFF Adjusting the sound You can adjust the sound characteristics to your preference.
General settings — PSM You can change PSM (Preferred Setting Mode) items listed in the table that follows. 1 2 3 Adjust the PSM item selected. 4 Repeat steps 2 and 3 to adjust the other PSM items if necessary. 5 Finish the procedure. Select a PSM item. Ex.: When “DIMMER” is selected Indications Selectable settings, [reference page] DEMO Display demonstration DEMO ON : [Initial]; Display demonstration will be activated automatically if no operation is done for about 20 seconds, [6].
Indications Selectable settings, [reference page] WOOFER Subwoofer cutoff frequency LOW : Frequencies lower than 90 Hz are sent to the MID : [Initial]; Frequencies lower than 135 Hz are sent to HIGH : Frequencies lower than 180 Hz are sent to the subwoofer. the subwoofer. subwoofer. EXT IN*2 External input CHANGER : [Initial]; To use a JVC CD changer, [8], an Apple iPod or a JVC D. player, [16]. EXT IN : To use any other external component, [18].
2 Move to the next (or previous) character position. Title assignment You can assign titles to station frequencies and CDs (both in this unit and the CD changer). Sources 3 Repeat steps 1 and 2 until you finish entering the title. Maximum number of characters Station frequencies Up to 8 characters (up to 30 station frequencies including both FM and AM) CDs/CD-CH* Up to 32 characters (up to 30 discs) * You cannot assign a title to a CD Text or an MP3/WMA disc or a USB memory.
iPod®/D. player operations ⁄ • Make sure the equalizer on the iPod or D. player is deactivated. This unit is ready for operating an Apple iPod or a JVC D. player from the control panel. Before operating your iPod or D. player: Connect either one of the following (separately purchased) to the CD changer jack on the rear of this unit. • Interface adapter for iPod®—KS-PD100 for controlling an iPod. • D. player interface adapter—KS-PD500 for controlling a D. player.
3 Confirm the selection. 7 Random play To move back to the previous menu, press 5. • If a track is selected, playback starts automatically. • If the selected item has another layer, you will enter the layer. Repeat steps 2 and 3 until the desired track is played. • Holding 4 /¢ can skip 10 items at a time. *3 The menu selecting mode will be canceled: – If no operations are done for about 5 seconds. – When you confirm the selection of a track.
Other external component operations You can connect an external component to the CD changer jack on the rear using the Line Input Adapter—KS-U57 (not supplied) or AUX Input Adapter—KS-U58 (not supplied). • For connection, see Installation/Connection Manual (separate volume). For listening to the the USB memory, see pages 9 – 11; For iPod, or D.player, see pages 16 and 17. More about this unit Basic operations Turning on the power • By pressing SRC on the unit, you can also turn on the power.
• When a disc is inserted upside down, “PLEASE” and “EJECT” appear alternately on the display. Press 0 to eject the disc. Playing a disc • While fast-forwarding or reversing on an MP3 or WMA disc, you can only hear intermittent sounds. Playing a CD-R or CD-RW • Use only “finalized” CD-Rs or CD-RWs. • This unit can play back only files of the same type which are first detected if a disc includes both audio CD (CD-DA) files and MP3/ WMA files.
– WMA files copy-protected with DRM. – Files which have the data such as WAVE, ATRAC3, etc. • The search function works but search speed is not constant. Playing MP3/WMA tracks from a USB memory • While playing from a USB memory, the playback order may differ from other players. • This unit may be unable to play back some USB memories or some files due to their characteristics or recording conditions.
– Depends on the condition of communication between the iPod or D. player and the unit. • If the text information includes more than 8 characters, it scrolls on the display (see also page 13). This unit can display up to 40 characters. Notice: When operating an iPod or a D. player, some operations may not be performed correctly or as intended. In this case, visit the following JVC web site: For iPod users: For D. player users:
Troubleshooting What appears to be trouble is not always serious. Check the following points before calling a service center. MP3/WMA playback Disc playback FM/AM General Symptoms Remedies/Causes • Sound cannot be heard from the speakers. • Adjust the volume to the optimum level. • Check the cords and connections. • The unit does not work at all. Reset the unit (see page 2). • SSM automatic presetting does not work. Store stations manually. • Static noise while listening to the radio.
USB memory playback MP3/WMA playback Symptoms Remedies/Causes • Tracks do not play back in the order you have intended them to play. Playback order is determined when the files are recorded. • Elapsed playing time is not correct. This sometimes occurs while playing. This is caused by how the tracks are recorded on the disc. • “NO FILES” appears on the display. Insert a disc that contains MP3/WMA tracks. • Correct characters are not displayed (e.g. album name).
iPod/D. player playback CD changer Symptoms Remedies/Causes • “NO DISC” appears on the display. Insert a disc into the magazine. • “NO MAG” appears on the display. Insert the magazine. • “RESET 8” appears on the display. Connect this unit and the CD changer correctly and press the reset button of the CD changer. • “RESET 1” – “RESET 7” appears on the display. Press the reset button of the CD changer. • The CD changer does not work at all. Reset the unit (see page 2). • The iPod or D.
Specifications AUDIO AMPLIFIER SECTION Maximum Power Output: Front: 50 W per channel Rear: 50 W per channel Continuous Power Output (RMS): Front: 19 W per channel into 4 Ω, 40 Hz to 20 000 Hz at no more than 0.8% total harmonic distortion. Rear: 19 W per channel into 4 Ω, 40 Hz to 20 000 Hz at no more than 0.8% total harmonic distortion.
Having TROUBLE with operation? Please reset your unit Refer to page of How to reset your unit EN © 2005 Victor Company of Japan, Limited Rear_KD-G724[UI]f.
KD-G724 Installation/Connection Manual GET0356-002A 1205DTSMDTJEIN EN © 2005 Victor Company of Japan, Limited [UI] This unit is designed to operate on 12 V DC, NEGATIVE ground electrical systems. If your vehicle does not have this system, a voltage inverter is required, which can be purchased at JVC car audio dealers. INSTALLATION (IN-DASH MOUNTING) WARNINGS The following illustration shows a typical installation.
ELECTRICAL CONNECTIONS A Typical connections Before connecting: Check the wiring in the vehicle carefully. Incorrect connection may cause serious damage to this unit. The leads of the power cord and those of the connector from the car body may be different in color. 1 2 3 Connect the colored leads of the power cord in the order specified in the illustration below. Connect the antenna cord. Finally connect the wiring harness to the unit.
FRANÇAIS ENGLISH CD RECEIVER RECEPTEUR CD KD-G722/KD-G721 For canceling the display demonstration, see page 7. Pour annuler la démonstration des affichages, référez-vous à la page 7. For installation and connections, refer to the separate manual. Pour l’installation et les raccordements, se référer au manuel séparé. INSTRUCTIONS MANUEL D’INSTRUCTIONS GET0357-003A [EX/EU] Cover_KD-G722_003A_3.
ENGLISH Thank you for purchasing a JVC product. Please read all instructions carefully before operation, to ensure your complete understanding and to obtain the best possible performance from the unit. IMPORTANT FOR LASER PRODUCTS 1. CLASS 1 LASER PRODUCT 2. CAUTION: Do not open the top cover. There are no user serviceable parts inside the unit; leave all servicing to qualified service personnel. 3. CAUTION: Visible and invisible laser radiation when open and interlock failed or defeated.
Press briefly. Press repeatedly. CONTENTS Control panel — KD-G722 and KD-G721 ......... 4 Remote controller — RM-RK50 ............... 5 Getting started ................................. 7 ENGLISH How to read this manual • Button operations are mainly explained with the illustrations in the table below. • Some related tips and notes are explained in “More about this unit” (see pages 22 – 25). Basic operations .................................................... 7 Radio operations ......................
ENGLISH Control panel — KD-G722 and KD-G721 Parts identification 1 BAND button 2 • Control dial (standby/on attenuator) button • 3 DISP (display) button 4 Remote sensor • DO NOT expose the remote sensor to strong light (direct sunlight or artificial lighting).
ENGLISH Display window a Track information indicators—TAG (ID3 Tag), (track/file), (folder) s Tuner reception indicators—ST (stereo), MO (monaural) d RDS indicators—TP, PTY, AF, REG f Main display g Tr (track) indicator h LOUD (loudness) indicator j Source display / Volume level indicator k Playback mode / item indicators— RND (random), (disc), (folder), RPT (repeat) l Tracks type indicators*—WMA, MP3 / Playback source indicators*—CH (CD changer), DISC (built-in CD player) z EQ (equalizer) indicator x So
ENGLISH Warning: • Do not install any battery other than CR2025 or its equivalent; otherwise, it may explode. • Store the battery in a place where children cannot reach to avoid risk of accident. • To prevent the battery from over-heating, cracking, or starting a fire: – Do not recharge, short, disassemble, heat the battery, or dispose of it in a fire. – Do not leave the battery with other metallic materials. – Do not poke the battery with tweezers or similar tools.
To restore the sound, press it again. Basic operations ~ ENGLISH To drop the volume in a moment (ATT) Getting started Turn on the power. To turn off the power Ÿ Basic settings • See also “General settings — PSM” on pages 16 – 18. 1 * You cannot select these sources if they are not ready or not connected. 2 ! 1 Canceling the display demonstrations Select “DEMO,” then “DEMO OFF.” For FM/AM tuner 2 Setting the clock Select “CLOCK H” (hour), then adjust the hour.
ENGLISH Radio operations When an FM stereo broadcast is hard to receive ~ Lights up when monaural mode is activated. Ÿ Lights up when receiving an FM stereo broadcast with sufficient signal strength. Reception improves, but stereo effect will be lost. To restore the stereo effect, repeat the same procedure. “MONO OFF” appears and the MO indicator goes off. Selected band appears. ! Storing stations in memory Start searching for a station. You can preset six stations for each band.
Ex.: Storing FM station of 92.5 MHz into preset number 4 of the FM1 band. 1 2 3 Preset number flashes for a while. FM RDS operations What you can do with RDS RDS (Radio Data System) allows FM stations to send an additional signal along with their regular programme signals.
ENGLISH ! Start searching for your favorite programme. If there is a station broadcasting a programme of the same PTY code as you have selected, that station is tuned in.
To deactivate the PTY Standby Reception, select “OFF” for the PTY code (see page 16). The PTY indicator goes off. Disc/USB memory operations ENGLISH • If the PTY indicator flashes, PTY Standby Reception is not yet activated. To activate PTY Standby Reception, tune in to another station providing these signals. The PTY indicator will stop flashing and remain lit. Playing a disc in the unit All tracks will be played repeatedly until you change the source or eject the disc.
ENGLISH Playing from a USB memory This unit can play MP3/WMA tracks stored in a USB memory. All tracks in the USB memory will be played repeatedly until you change the source. • Removing the USB memory will also stop playback. ~ Ÿ USB input terminal About MP3 and WMA tracks MP3 and WMA “tracks” (words “file” and “track” are used interchangeably) are recorded in “folders.” About the CD changer It is recommended to use a JVC MP3-compatible CD changer with your unit.
2 Each time you press the button, you can skip 10 tracks. • After the last track, the first track will be selected and vice versa. To select a number from 01 – 06: To select a number from 07 – 12: • To use direct folder access on MP3/WMA/ USB, it is required that folders are assigned with 2-digit numbers at the beginning of their folder names—01, 02, 03, and so on.
ENGLISH Changing the display information Selecting the playback modes You can use only one of the following playback modes at a time. While playing an audio CD or a CD Text 1 2 Select your desired playback mode. 7 Repeat play While playing an MP3/WMA*2 disc or a USB memory • When “TAG DISP” is set to “TAG ON” (see page 18) Mode Plays repeatedly TRK RPT : The current track. FLDR RPT*4 : All tracks of the current folder. DISC RPT*5 : All tracks of the current disc.
Sound adjustments Indication, [Range] 1 BAS*1 (bass), [–06 to +06] Adjust the bass. ENGLISH You can select a preset sound mode suitable to the music genre (C-EQ: custom equalizer). TRE*1 (treble), [–06 to +06] Adjust the treble. FAD*2 (fader), [R06 to F06] Adjust the front and rear speaker balance. 2 BAL (balance), [L06 to R06] Adjust the left and right speaker balance.
ENGLISH General settings — PSM You can change PSM (Preferred Setting Mode) items listed in the table that follows. 3 Adjust the PSM item selected. 4 Repeat steps 2 and 3 to adjust the other PSM items if necessary. 5 Finish the procedure. 1 2 Select a PSM item. Indications Selectable settings, [reference page] DEMO DEMO ON : [Initial]; Display demonstration will be activated Display demonstration automatically if no operation is done for about 20 seconds, [7]. DEMO OFF : Cancels.
Selectable settings, [reference page] TA VOL Traffic announcement volume [Initial: VOL 15]; VOL 00 — VOL 30 or 50*1, [10] P-SEARCH Programme search ON OFF : Using the AF data, the unit tunes in to another frequency broadcasting the same programme as the original preset RDS station is if the preset station signals are not sufficient. : [Initial]; Cancels.
ENGLISH Indications Selectable settings, [reference page] TAG DISP Tag display TAG ON TAG OFF AMP GAIN Amplifier gain control : [Initial]; Shows the Tag information while playing MP3/ WMA tracks, [14]. : Cancels. You can change the maximum volume level of this unit. LOW PWR : VOL 00 – VOL 30 (Select this if the maximum power of the speaker is less than 50 W to prevent them from being damaged.
• Make sure the equalizer on the iPod or D. player is deactivated. This unit is ready for operating an Apple iPod or a JVC D. player from the control panel. Before operating your iPod or D. player: Connect either one of the following (separately purchased) to the CD changer jack on the rear of this unit. • Interface adapter for iPod®—KS-PD100 for controlling an iPod. • D. player interface adapter—KS-PD500 for controlling a D. player. • For connection, see Installation/Connection Manual (separate volume).
ENGLISH 2 Select the desired menu. For iPod: PLAYLIST Ô ARTISTS Ô ALBUMS Ô SONGS Ô GENRES Ô COMPOSER Ô (back to the beginning) For D. player: PLAYLIST Ô ARTIST Ô ALBUM Ô GENRE Ô TRACK Ô (back to the beginning) 3 Confirm the selection. To move back to the previous menu, press 5. • If a track is selected, playback starts automatically. • If the selected item has another layer, you will enter the layer. Repeat steps 2 and 3 until the desired track is played. • Holding 4/¢ can skip 10 items at a time.
! Turn on the connected component and start playing the source. ~ ENGLISH Ÿ Adjust the volume. Ÿ ! ⁄ Start searching for an ensemble. Adjust the sound as you want. (See page 15.) When an ensemble is received, searching stops. To stop searching, press the same button again. To check the current clock time while listening to an external component EXT IN Ô Clock ⁄ Select a service (either primary or secondary) to listen to.
ENGLISH 2 Select the preset number (1 – 6) you want to store into. Preset number flashes for a while. When shipped from the factory, Alternative Frequency Reception is activated. To deactivate the Alternative Frequency Reception, see page 17.
Playing a CD-R or CD-RW • Network-Tracking Reception requires two types of RDS signals—PI (Programme Identification) and AF (Alternative Frequency) to work correctly. Without receiving these data correctly, NetworkTracking Reception will not operate correctly. • If a Traffic Announcement is received by TA Standby Reception, the volume level automatically changes to the preset level (TA VOL) if the current level is lower than the preset level.
ENGLISH • This unit can play back MP3/WMA files meeting the conditions below: – Bit rate: 8 kbps — 320 kbps – Sampling frequency: 48 kHz, 44.1 kHz, 32 kHz (for MPEG-1) 24 kHz, 22.05 kHz, 16 kHz (for MPEG-2) – Disc format: ISO 9660 Level 1/Level 2, Romeo, Joliet, Windows long file name • The maximum number of characters for file/ folder names vary among the disc format used (includes 4 extension characters—<.mp3> or <.wma>).
DAB tuner operations • “AUTO” setting for “DIMMER” may not work correctly on some vehicles, particularly on those having a control dial for dimming. In this case, change the “DIMMER” setting to any other than “AUTO.” • If you change the “AMP GAIN” setting from “HIGH PWR” to “LOW PWR” while the volume level is set higher than “VOL 30,” the unit automatically changes the volume level to “VOL 30.” • Only primary DAB services can be presetted even when you store a secondary service.
ENGLISH To keep discs clean To play new discs A dirty disc may not play correctly. If a disc does become dirty, wipe it with a soft cloth in a straight line from center to edge. • Do not use any solvent (for example, conventional record cleaner, spray, thinner, benzine, etc.) to clean discs. New discs may have some rough spots around the inner and outer edges. If such a disc is used, this unit may reject the disc. To remove these rough spots, rub the edges with a pencil or ball-point pen, etc.
USB memory playback Remedies/Causes • Noise is generated. Skip to another track or change the disc. (Do not add the extension code <.mp3> or <.wma> to non-MP3 or WMA tracks.) • A longer readout time is required (“CHECK” keeps flashing on the display). Do not use too many hierarchies and folders. • Tracks do not play back in the order you have intended them to play. Playback order is determined when the files are recorded. • Elapsed playing time is not correct. This sometimes occurs while playing.
CD changer DAB iPod/D. player playback ENGLISH Symptoms Remedies/Causes • “NO DISC” appears on the display. Insert a disc into the magazine. • “NO MAG” appears on the display. Insert the magazine. • “RESET 8” appears on the display. Connect this unit and the CD changer correctly and press the reset button of the CD changer. • “RESET 1” – “RESET 7” appears on the display. Press the reset button of the CD changer. • The CD changer does not work at all. Reset the unit (see page 2).
AUDIO AMPLIFIER SECTION Maximum Power Output: Front: 50 W per channel Rear: 50 W per channel Continuous Power Output (RMS): Front: 19 W per channel into 4 Ω, 40 Hz to 20 000 Hz at no more than 0.8% total harmonic distortion. Rear: 19 W per channel into 4 Ω, 40 Hz to 20 000 Hz at no more than 0.8% total harmonic distortion.
Having TROUBLE with operation? Please reset your unit Refer to page of How to reset your unit Vous avez des PROBLÈMES de fonctionnement? Réinitialisez votre appareil Référez-vous à la page intitulée Comment réinitialiser votre appareil EN, FR © 2005 Victor Company of Japan, Limited Rear_KD-G722_003A_2.
KD-G722/KD-G721 Installation/Connection Manual Manuel d’installation/raccordement GET0357-010A 1205DTSMDTJEIN EN, FR © 2005 Victor Company of Japan, Limited [EX/EU] ENGLISH FRANÇAIS This unit is designed to operate on 12 V DC, NEGATIVE ground electrical systems. If your vehicle does not have this system, a voltage inverter is required, which can be purchased at JVC IN-CAR ENTERTAINMENT dealers. Cet appareil est conçu pour fonctionner sur des sources de courant continu de 12 V à masse NEGATIVE.
INSTALLATION (IN-DASH MOUNTING) INSTALLATION (MONTAGE DANS LE TABLEAU DE BORD) The following illustration shows a typical installation. If you have any questions or require information regarding installation kits, consult your JVC IN-CAR ENTERTAINMENT dealer or a company supplying kits. • If you are not sure how to install this unit correctly, have it installed by a qualified technician. L’illustration suivante est un exemple d’installation typique.
ENGLISH FRANÇAIS ELECTRICAL CONNECTIONS RACCORDEMENTS ELECTRIQUES A If your car is equipped with the ISO connector / Si votre voiture est équippée d’un connecteur ISO • Connect the ISO connectors as illustrated. • Connectez les connecteurs ISO comme montré sur l’illustration. From the car body De la carrosserie de la voiture For some VW/Audi or Opel (Vauxhall) automobile / Pour certaine voiture VW/Audi ou Opel (Vauxhall) You may need to modify the wiring of the supplied power cord as illustrated.
C Connecting the external amplifiers and/or subwoofer / Connexion d’amplificateurs extérieurs et/ou d’un caisson de grave You can connect amplifiers to upgrade your car stereo system. • Connect the remote lead (blue with white stripe) to the remote lead of the other equipment so that it can be controlled through this unit. • Disconnect the speakers from this unit, connect them to the amplifier. Leave the speaker leads of this unit unused.
РУCCKИЙ DEUTSCH ENGLISH CD RECEIVER CD-RECEIVER РЕСИВЕР С ПРОИГРЫВАТЕЛЕМ КОМПАКТ-ДИСКОВ KD-G722/KD-G721 For canceling the display demonstration, see page 7. Zum Abbrechen der Displaydemonstration siehe Seite 7. Информацию об отмене демонстрации функций дисплея см. на стр. 7. For installation and connections, refer to the separate manual. Für den Einbau und die Anschlüsse siehe das eigenständige Handbuch. Указания по установке и выполнению соединений приводятся в отдельной инструкции.
ENGLISH Thank you for purchasing a JVC product. Please read all instructions carefully before operation, to ensure your complete understanding and to obtain the best possible performance from the unit. IMPORTANT FOR LASER PRODUCTS 1. CLASS 1 LASER PRODUCT 2. CAUTION: Do not open the top cover. There are no user serviceable parts inside the unit; leave all servicing to qualified service personnel. 3. CAUTION: Visible and invisible laser radiation when open and interlock failed or defeated.
Press briefly. Press repeatedly. CONTENTS Control panel — KD-G722 and KD-G721 ......... 4 Remote controller — RM-RK50 ............... 5 Getting started ................................. 7 ENGLISH How to read this manual • Button operations are mainly explained with the illustrations in the table below. • Some related tips and notes are explained in “More about this unit” (see pages 22 – 25). Basic operations .................................................... 7 Radio operations ......................
ENGLISH Control panel — KD-G722 and KD-G721 Parts identification 1 BAND button 2 • Control dial (standby/on attenuator) button • 3 DISP (display) button 4 Remote sensor • DO NOT expose the remote sensor to strong light (direct sunlight or artificial lighting).
ENGLISH Display window a Track information indicators—TAG (ID3 Tag), (track/file), (folder) s Tuner reception indicators—ST (stereo), MO (monaural) d RDS indicators—TP, PTY, AF, REG f Main display g Tr (track) indicator h LOUD (loudness) indicator j Source display / Volume level indicator k Playback mode / item indicators— RND (random), (disc), (folder), RPT (repeat) l Tracks type indicators*—WMA, MP3 / Playback source indicators*—CH (CD changer), DISC (built-in CD player) z EQ (equalizer) indicator x So
ENGLISH Warning: • Do not install any battery other than CR2025 or its equivalent; otherwise, it may explode. • Store the battery in a place where children cannot reach to avoid risk of accident. • To prevent the battery from over-heating, cracking, or starting a fire: – Do not recharge, short, disassemble, heat the battery, or dispose of it in a fire. – Do not leave the battery with other metallic materials. – Do not poke the battery with tweezers or similar tools.
To restore the sound, press it again. Basic operations ~ ENGLISH To drop the volume in a moment (ATT) Getting started Turn on the power. To turn off the power Ÿ Basic settings • See also “General settings — PSM” on pages 16 – 18. 1 * You cannot select these sources if they are not ready or not connected. 2 ! 1 Canceling the display demonstrations Select “DEMO,” then “DEMO OFF.” For FM/AM tuner 2 Setting the clock Select “CLOCK H” (hour), then adjust the hour.
ENGLISH Radio operations When an FM stereo broadcast is hard to receive ~ Lights up when monaural mode is activated. Ÿ Lights up when receiving an FM stereo broadcast with sufficient signal strength. Reception improves, but stereo effect will be lost. To restore the stereo effect, repeat the same procedure. “MONO OFF” appears and the MO indicator goes off. Selected band appears. ! Storing stations in memory Start searching for a station. You can preset six stations for each band.
Ex.: Storing FM station of 92.5 MHz into preset number 4 of the FM1 band. 1 2 3 Preset number flashes for a while. FM RDS operations What you can do with RDS RDS (Radio Data System) allows FM stations to send an additional signal along with their regular programme signals.
ENGLISH ! Start searching for your favorite programme. If there is a station broadcasting a programme of the same PTY code as you have selected, that station is tuned in.
To deactivate the PTY Standby Reception, select “OFF” for the PTY code (see page 16). The PTY indicator goes off. Disc/USB memory operations ENGLISH • If the PTY indicator flashes, PTY Standby Reception is not yet activated. To activate PTY Standby Reception, tune in to another station providing these signals. The PTY indicator will stop flashing and remain lit. Playing a disc in the unit All tracks will be played repeatedly until you change the source or eject the disc.
ENGLISH Playing from a USB memory This unit can play MP3/WMA tracks stored in a USB memory. All tracks in the USB memory will be played repeatedly until you change the source. • Removing the USB memory will also stop playback. ~ Ÿ USB input terminal About MP3 and WMA tracks MP3 and WMA “tracks” (words “file” and “track” are used interchangeably) are recorded in “folders.” About the CD changer It is recommended to use a JVC MP3-compatible CD changer with your unit.
2 Each time you press the button, you can skip 10 tracks. • After the last track, the first track will be selected and vice versa. To select a number from 01 – 06: To select a number from 07 – 12: • To use direct folder access on MP3/WMA/ USB, it is required that folders are assigned with 2-digit numbers at the beginning of their folder names—01, 02, 03, and so on.
ENGLISH Changing the display information Selecting the playback modes You can use only one of the following playback modes at a time. While playing an audio CD or a CD Text 1 2 Select your desired playback mode. 7 Repeat play While playing an MP3/WMA*2 disc or a USB memory • When “TAG DISP” is set to “TAG ON” (see page 18) Mode Plays repeatedly TRK RPT : The current track. FLDR RPT*4 : All tracks of the current folder. DISC RPT*5 : All tracks of the current disc.
Sound adjustments Indication, [Range] 1 BAS*1 (bass), [–06 to +06] Adjust the bass. ENGLISH You can select a preset sound mode suitable to the music genre (C-EQ: custom equalizer). TRE*1 (treble), [–06 to +06] Adjust the treble. FAD*2 (fader), [R06 to F06] Adjust the front and rear speaker balance. 2 BAL (balance), [L06 to R06] Adjust the left and right speaker balance.
ENGLISH General settings — PSM You can change PSM (Preferred Setting Mode) items listed in the table that follows. 3 Adjust the PSM item selected. 4 Repeat steps 2 and 3 to adjust the other PSM items if necessary. 5 Finish the procedure. 1 2 Select a PSM item. Indications Selectable settings, [reference page] DEMO DEMO ON : [Initial]; Display demonstration will be activated Display demonstration automatically if no operation is done for about 20 seconds, [7]. DEMO OFF : Cancels.
Selectable settings, [reference page] TA VOL Traffic announcement volume [Initial: VOL 15]; VOL 00 — VOL 30 or 50*1, [10] P-SEARCH Programme search ON OFF : Using the AF data, the unit tunes in to another frequency broadcasting the same programme as the original preset RDS station is if the preset station signals are not sufficient. : [Initial]; Cancels.
ENGLISH Indications Selectable settings, [reference page] TAG DISP Tag display TAG ON TAG OFF AMP GAIN Amplifier gain control : [Initial]; Shows the Tag information while playing MP3/ WMA tracks, [14]. : Cancels. You can change the maximum volume level of this unit. LOW PWR : VOL 00 – VOL 30 (Select this if the maximum power of the speaker is less than 50 W to prevent them from being damaged.
• Make sure the equalizer on the iPod or D. player is deactivated. This unit is ready for operating an Apple iPod or a JVC D. player from the control panel. Before operating your iPod or D. player: Connect either one of the following (separately purchased) to the CD changer jack on the rear of this unit. • Interface adapter for iPod®—KS-PD100 for controlling an iPod. • D. player interface adapter—KS-PD500 for controlling a D. player. • For connection, see Installation/Connection Manual (separate volume).
ENGLISH 2 Select the desired menu. For iPod: PLAYLIST Ô ARTISTS Ô ALBUMS Ô SONGS Ô GENRES Ô COMPOSER Ô (back to the beginning) For D. player: PLAYLIST Ô ARTIST Ô ALBUM Ô GENRE Ô TRACK Ô (back to the beginning) 3 Confirm the selection. To move back to the previous menu, press 5. • If a track is selected, playback starts automatically. • If the selected item has another layer, you will enter the layer. Repeat steps 2 and 3 until the desired track is played. • Holding 4/¢ can skip 10 items at a time.
! Turn on the connected component and start playing the source. ~ ENGLISH Ÿ Adjust the volume. Ÿ ! ⁄ Start searching for an ensemble. Adjust the sound as you want. (See page 15.) When an ensemble is received, searching stops. To stop searching, press the same button again. To check the current clock time while listening to an external component EXT IN Ô Clock ⁄ Select a service (either primary or secondary) to listen to.
ENGLISH 2 Select the preset number (1 – 6) you want to store into. Preset number flashes for a while. When shipped from the factory, Alternative Frequency Reception is activated. To deactivate the Alternative Frequency Reception, see page 17.
Playing a CD-R or CD-RW • Network-Tracking Reception requires two types of RDS signals—PI (Programme Identification) and AF (Alternative Frequency) to work correctly. Without receiving these data correctly, NetworkTracking Reception will not operate correctly. • If a Traffic Announcement is received by TA Standby Reception, the volume level automatically changes to the preset level (TA VOL) if the current level is lower than the preset level.
ENGLISH • This unit can play back MP3/WMA files meeting the conditions below: – Bit rate: 8 kbps — 320 kbps – Sampling frequency: 48 kHz, 44.1 kHz, 32 kHz (for MPEG-1) 24 kHz, 22.05 kHz, 16 kHz (for MPEG-2) – Disc format: ISO 9660 Level 1/Level 2, Romeo, Joliet, Windows long file name • The maximum number of characters for file/ folder names vary among the disc format used (includes 4 extension characters—<.mp3> or <.wma>).
DAB tuner operations • “AUTO” setting for “DIMMER” may not work correctly on some vehicles, particularly on those having a control dial for dimming. In this case, change the “DIMMER” setting to any other than “AUTO.” • If you change the “AMP GAIN” setting from “HIGH PWR” to “LOW PWR” while the volume level is set higher than “VOL 30,” the unit automatically changes the volume level to “VOL 30.” • Only primary DAB services can be presetted even when you store a secondary service.
ENGLISH To keep discs clean To play new discs A dirty disc may not play correctly. If a disc does become dirty, wipe it with a soft cloth in a straight line from center to edge. • Do not use any solvent (for example, conventional record cleaner, spray, thinner, benzine, etc.) to clean discs. New discs may have some rough spots around the inner and outer edges. If such a disc is used, this unit may reject the disc. To remove these rough spots, rub the edges with a pencil or ball-point pen, etc.
USB memory playback Remedies/Causes • Noise is generated. Skip to another track or change the disc. (Do not add the extension code <.mp3> or <.wma> to non-MP3 or WMA tracks.) • A longer readout time is required (“CHECK” keeps flashing on the display). Do not use too many hierarchies and folders. • Tracks do not play back in the order you have intended them to play. Playback order is determined when the files are recorded. • Elapsed playing time is not correct. This sometimes occurs while playing.
CD changer DAB iPod/D. player playback ENGLISH Symptoms Remedies/Causes • “NO DISC” appears on the display. Insert a disc into the magazine. • “NO MAG” appears on the display. Insert the magazine. • “RESET 8” appears on the display. Connect this unit and the CD changer correctly and press the reset button of the CD changer. • “RESET 1” – “RESET 7” appears on the display. Press the reset button of the CD changer. • The CD changer does not work at all. Reset the unit (see page 2).
AUDIO AMPLIFIER SECTION Maximum Power Output: Front: 50 W per channel Rear: 50 W per channel Continuous Power Output (RMS): Front: 19 W per channel into 4 Ω, 40 Hz to 20 000 Hz at no more than 0.8% total harmonic distortion. Rear: 19 W per channel into 4 Ω, 40 Hz to 20 000 Hz at no more than 0.8% total harmonic distortion.
Having TROUBLE with operation? Please reset your unit Refer to page of How to reset your unit Haben Sie PROBLEME mit dem Betrieb? Bitte setzen Sie Ihr Gerät zurück Siehe Seite Zurücksetzen des Geräts Затруднения при эксплуатации? Пожалуйста, перезагрузите Ваше устройство Для получения информации о перезагрузке Вашего устройства обратитесь на соответствующую страницу EN, GE, RU © 2005 Victor Company of Japan, Limited Rear_KD-G722_006A_f.
KD-G722/KD-G721 Installation/Connection Manual Einbau/Anschlußanleitung GET0357-013A Руководство по установке/подключению 1205DTSMDTJEIN EN, GE, RU © 2005 Victor Company of Japan, Limited [EY] ENGLISH DEUTSCH РУССКИЙ This unit is designed to operate on 12 V DC, NEGATIVE ground electrical systems. If your vehicle does not have this system, a voltage inverter is required, which can be purchased at JVC IN-CAR ENTERTAINMENT dealers.
INSTALLATION (IN-DASH MOUNTING) EINBAU (IM ARMATURENBRETT) УСТАНОВКА (УСТАНОВКА В ПРИБОРНУЮ ПАНЕЛЬ) The following illustration shows a typical installation. If you have any questions or require information regarding installation kits, consult your JVC IN-CAR ENTERTAINMENT dealer or a company supplying kits. • If you are not sure how to install this unit correctly, have it installed by a qualified technician. Die folgende Abbildung zeigt einen typischen Einbau.
ENGLISH DEUTSCH ELECTRICAL CONNECTIONS A ELEKTRISCHE ANSCHLÜSSE You may need to modify the wiring of the supplied power cord as illustrated. • Contact your authorized car dealer before installing this unit. Es kann erforderlich sein, die Verdrahtung des mitgelieferten Stromkabels zu modifizieren, wie in der Abbildung gezeigt. • Wenden Sie sich vor dem Einbau dieses Receivers an Ihre Auto-Fachwerkstatt.
C Connecting the external amplifiers and/or subwoofer / Anschließen der externen Verstärker und/oder Subwoofer / Подключение внешних усилителей и/или низкочастотного динамика You can connect amplifiers to upgrade your car stereo system. • Connect the remote lead (blue with white stripe) to the remote lead of the other equipment so that it can be controlled through this unit. • Disconnect the speakers from this unit, connect them to the amplifier. Leave the speaker leads of this unit unused.
РУCCKИЙ ENGLISH CD RECEIVER РЕСИВЕР С ПРОИГРЫВАТЕЛЕМ КОМПАКТ-ДИСКОВ KD-G727 В соответствии с Законом Российской Федерации “О защите прав потребителей” срок службы (годности) данного товара “по истечении которого он может представлять опасность для жизни, здоровья потребителя, причинять вред его имуществу или окружающей среде” составляет семь (7) лет со дня производства.
ENGLISH Thank you for purchasing a JVC product. Please read all instructions carefully before operation, to ensure your complete understanding and to obtain the best possible performance from the unit. IMPORTANT FOR LASER PRODUCTS 1. CLASS 1 LASER PRODUCT 2. CAUTION: Do not open the top cover. There are no user serviceable parts inside the unit; leave all servicing to qualified service personnel. 3. CAUTION: Visible and invisible laser radiation when open and interlock failed or defeated.
Press briefly. Press repeatedly. CONTENTS Control panel ................................... 4 Remote controller — RM-RK50 ............... 5 Getting started ................................. 7 ENGLISH How to read this manual • Button operations are mainly explained with the illustrations in the table below. • Some related tips and notes are explained in “More about this unit” (see pages 22 – 25). Basic operations .................................................... 7 Radio operations ..................
ENGLISH Control panel Parts identification 1 BAND button 2 • Control dial (standby/on attenuator) button • 3 DISP (display) button 4 Remote sensor • DO NOT expose the remote sensor to strong light (direct sunlight or artificial lighting).
ENGLISH Display window a Track information indicators—TAG (ID3 Tag), (track/file), (folder) s Tuner reception indicators—ST (stereo), MO (monaural) d RDS indicators—TP, PTY, AF, REG f Main display g Tr (track) indicator h LOUD (loudness) indicator j Source display / Volume level indicator k Playback mode / item indicators— RND (random), (disc), (folder), RPT (repeat) l Tracks type indicators*—WMA, MP3 / Playback source indicators*—CH (CD changer), DISC (built-in CD player) z EQ (equalizer) indicator x So
ENGLISH Warning: • Do not install any battery other than CR2025 or its equivalent; otherwise, it may explode. • Store the battery in a place where children cannot reach to avoid risk of accident. • To prevent the battery from over-heating, cracking, or starting a fire: – Do not recharge, short, disassemble, heat the battery, or dispose of it in a fire. – Do not leave the battery with other metallic materials. – Do not poke the battery with tweezers or similar tools.
To restore the sound, press it again. Basic operations ~ ENGLISH To drop the volume in a moment (ATT) Getting started Turn on the power. To turn off the power Ÿ Basic settings • See also “General settings — PSM” on pages 16 – 18. 1 * You cannot select these sources if they are not ready or not connected. 2 ! 1 Canceling the display demonstrations Select “DEMO,” then “DEMO OFF.” For FM/AM tuner 2 Setting the clock Select “CLOCK H” (hour), then adjust the hour.
ENGLISH Radio operations When an FM stereo broadcast is hard to receive ~ Lights up when monaural mode is activated. Ÿ Lights up when receiving an FM stereo broadcast with sufficient signal strength. Reception improves, but stereo effect will be lost. To restore the stereo effect, repeat the same procedure. “MONO OFF” appears and the MO indicator goes off. ! Selected band appears. Start searching for a station. Storing stations in memory You can preset six stations for each band.
Ex.: Storing FM station of 92.5 MHz into preset number 4 of the FM1 band. 1 2 3 Preset number flashes for a while. FM RDS operations What you can do with RDS RDS (Radio Data System) allows FM stations to send an additional signal along with their regular programme signals.
ENGLISH ! Start searching for your favorite programme. If there is a station broadcasting a programme of the same PTY code as you have selected, that station is tuned in.
To deactivate the PTY Standby Reception, select “OFF” for the PTY code (see page 16). The PTY indicator goes off. Disc/USB memory operations ENGLISH • If the PTY indicator flashes, PTY Standby Reception is not yet activated. To activate PTY Standby Reception, tune in to another station providing these signals. The PTY indicator will stop flashing and remain lit. Playing a disc in the unit All tracks will be played repeatedly until you change the source or eject the disc.
ENGLISH Playing from a USB memory This unit can play MP3/WMA tracks stored in a USB memory. All tracks in the USB memory will be played repeatedly until you change the source. • Removing the USB memory will also stop playback. ~ Ÿ USB input terminal About MP3 and WMA tracks MP3 and WMA “tracks” (words “file” and “track” are used interchangeably) are recorded in “folders.” About the CD changer It is recommended to use a JVC MP3-compatible CD changer with your unit.
2 Each time you press the button, you can skip 10 tracks. • After the last track, the first track will be selected and vice versa. To select a number from 01 – 06: To select a number from 07 – 12: • To use direct folder access on MP3/WMA/ USB, it is required that folders are assigned with 2-digit numbers at the beginning of their folder names—01, 02, 03, and so on.
ENGLISH Changing the display information Selecting the playback modes You can use only one of the following playback modes at a time. While playing an audio CD or a CD Text 1 2 Select your desired playback mode. 7 Repeat play While playing an MP3/WMA*2 disc or a USB memory • When “TAG DISP” is set to “TAG ON” (see page 18) Mode Plays repeatedly TRK RPT : The current track. FLDR RPT*4 : All tracks of the current folder. DISC RPT*5 : All tracks of the current disc.
Sound adjustments Indication, [Range] 1 BAS*1 (bass), [–06 to +06] Adjust the bass. ENGLISH You can select a preset sound mode suitable to the music genre (C-EQ: custom equalizer). TRE*1 (treble), [–06 to +06] Adjust the treble. FAD*2 (fader), [R06 to F06] Adjust the front and rear speaker balance. 2 BAL (balance), [L06 to R06] Adjust the left and right speaker balance.
ENGLISH General settings — PSM You can change PSM (Preferred Setting Mode) items listed in the table that follows. 3 Adjust the PSM item selected. 4 Repeat steps 2 and 3 to adjust the other PSM items if necessary. 5 Finish the procedure. 1 2 Select a PSM item. Indications Selectable settings, [reference page] DEMO DEMO ON : [Initial]; Display demonstration will be activated Display demonstration automatically if no operation is done for about 20 seconds, [7]. DEMO OFF : Cancels.
Selectable settings, [reference page] TA VOL Traffic announcement volume [Initial: VOL 15]; VOL 00 — VOL 30 or 50*1, [10] P-SEARCH Programme search ON OFF : Using the AF data, the unit tunes in to another frequency broadcasting the same programme as the original preset RDS station is if the preset station signals are not sufficient. : [Initial]; Cancels.
ENGLISH Indications Selectable settings, [reference page] TAG DISP Tag display TAG ON TAG OFF AMP GAIN Amplifier gain control : [Initial]; Shows the Tag information while playing MP3/ WMA tracks, [14]. : Cancels. You can change the maximum volume level of this unit. LOW PWR : VOL 00 – VOL 30 (Select this if the maximum power of the speaker is less than 50 W to prevent them from being damaged.
character position. Preparations: Make sure “CHANGER” is selected for the external input setting, see page 17. ~ 3 Repeat steps 1 and 2 until you ENGLISH 2 Move to the next (or previous) finish entering the title. 4 Finish the procedure. Ÿ Playback starts automatically from where it has been paused*1 or stopped*2 previously. To erase the entire title In step 2 on page 18... ! Adjust the volume. iPod®/D. player operations This unit is ready for operating an Apple iPod or a JVC D.
ENGLISH Selecting a track from the menu 1 Enter the main menu. Now the 5/∞/ 4/¢ buttons work as the menu selecting buttons*3. *3 The menu selecting mode will be canceled: – If no operations are done for about 5 seconds. – When you confirm the selection of a track. 2 ONE RPT Functions the same as “Repeat One” of the iPod or “Repeat Mode = One” for the D. player. ALL RPT Functions the same as “Repeat All” of the iPod or “Repeat Mode = All” for the D. player. RPT OFF Cancels.
~ If “EXT IN” does not appear, see page 17 and select the external input (“EXT IN”). Ÿ ! Turn on the connected component and start playing the source. By connecting the DAB tuner, this unit can do the following: • Tracing the same programme automatically —Alternative Frequency Reception (see “DAB AF” on page 17). It is recommended to use DAB tuner KT-DB1000 with your unit. If you have another DAB tuner, consult your JVC IN-CAR ENTERTAINMENT dealer.
ENGLISH Storing DAB services in memory You can preset six DAB services (primary) for each band. 1 Select a service you want (see page 21). 2 Select the preset number (1 – 6) you want to store into. • While receiving an FM RDS station: When driving in an area where a DAB service is broadcasting the same programme as the FM RDS station is broadcasting, this unit automatically tunes in to the DAB service. When shipped from the factory, Alternative Frequency Reception is activated.
Playing a CD-R or CD-RW • Network-Tracking Reception requires two types of RDS signals—PI (Programme Identification) and AF (Alternative Frequency) to work correctly. Without receiving these data correctly, NetworkTracking Reception will not operate correctly. • If a Traffic Announcement is received by TA Standby Reception, the volume level automatically changes to the preset level (TA VOL) if the current level is lower than the preset level.
ENGLISH • This unit can play back MP3/WMA files meeting the conditions below: – Bit rate: 8 kbps — 320 kbps – Sampling frequency: 48 kHz, 44.1 kHz, 32 kHz (for MPEG-1) 24 kHz, 22.05 kHz, 16 kHz (for MPEG-2) – Disc format: ISO 9660 Level 1/Level 2, Romeo, Joliet, Windows long file name • The maximum number of characters for file/ folder names vary among the disc format used (includes 4 extension characters—<.mp3> or <.wma>).
DAB tuner operations • “AUTO” setting for “DIMMER” may not work correctly on some vehicles, particularly on those having a control dial for dimming. In this case, change the “DIMMER” setting to any other than “AUTO.” • If you change the “AMP GAIN” setting from “HIGH PWR” to “LOW PWR” while the volume level is set higher than “VOL 30,” the unit automatically changes the volume level to “VOL 30.” • Only primary DAB services can be presetted even when you store a secondary service.
ENGLISH To keep discs clean To play new discs A dirty disc may not play correctly. If a disc does become dirty, wipe it with a soft cloth in a straight line from center to edge. • Do not use any solvent (for example, conventional record cleaner, spray, thinner, benzine, etc.) to clean discs. New discs may have some rough spots around the inner and outer edges. If such a disc is used, this unit may reject the disc. To remove these rough spots, rub the edges with a pencil or ball-point pen, etc.
USB memory playback MP3/WMA playback Remedies/Causes • Noise is generated. Skip to another track or change the disc. (Do not add the extension code <.mp3> or <.wma> to non-MP3 or WMA tracks.) • A longer readout time is required (“CHECK” keeps flashing on the display). Do not use too many hierarchies and folders. • Tracks do not play back in the order you have intended them to play. Playback order is determined when the files are recorded. • Elapsed playing time is not correct.
CD changer DAB iPod/D. player playback ENGLISH Symptoms Remedies/Causes • “NO DISC” appears on the display. Insert a disc into the magazine. • “NO MAG” appears on the display. Insert the magazine. • “RESET 8” appears on the display. Connect this unit and the CD changer correctly and press the reset button of the CD changer. • “RESET 1” – “RESET 7” appears on the display. Press the reset button of the CD changer. • The CD changer does not work at all. Reset the unit (see page 2).
AUDIO AMPLIFIER SECTION Maximum Power Output: Front: 50 W per channel Rear: 50 W per channel Continuous Power Output (RMS): Front: 19 W per channel into 4 Ω, 40 Hz to 20 000 Hz at no more than 0.8% total harmonic distortion. Rear: 19 W per channel into 4 Ω, 40 Hz to 20 000 Hz at no more than 0.8% total harmonic distortion.
Having TROUBLE with operation? Please reset your unit Refer to page of How to reset your unit Затруднения при эксплуатации? Пожалуйста, перезагрузите Ваше устройство Для получения информации о перезагрузке Вашего устройства обратитесь на соответствующую страницу EN, RU © 2005 Victor Company of Japan, Limited Rear_KD-G727_001A_1.
KD-G727 Installation/Connection Manual Руководство по установке/подключению GET0358-002A 1205DTSMDTJEIN EN, RU © 2005 Victor Company of Japan, Limited [EE] ENGLISH РУССКИЙ This unit is designed to operate on 12 V DC, NEGATIVE ground electrical systems. If your vehicle does not have this system, a voltage inverter is required, which can be purchased at JVC IN-CAR ENTERTAINMENT dealers. Это устройство разработано для эксплуатации на 12 В постоянного напряжения с минусом на массе.
INSTALLATION (IN-DASH MOUNTING) УСТАНОВКА (УСТАНОВКА В ПРИБОРНУЮ ПАНЕЛЬ) The following illustration shows a typical installation. If you have any questions or require information regarding installation kits, consult your JVC IN-CAR ENTERTAINMENT dealer or a company supplying kits. • If you are not sure how to install this unit correctly, have it installed by a qualified technician. На следующих иллюстрациях показана типовая установка.
ENGLISH РУССКИЙ ELECTRICAL CONNECTIONS A ЭЛЕКТРИЧЕСКИЕ ПОДКЛЮЧЕНИЯ If your car is equipped with the ISO connector / Если автомобиль оснащен разъемом ISO • Connect the ISO connectors as illustrated. • Подключите разъемы ISO, как показано на рисунке. For some VW/Audi or Opel (Vauxhall) automobile / Для некоторых автомобилей VW/Audi или Opel (Vauxhall) You may need to modify the wiring of the supplied power cord as illustrated. • Contact your authorized car dealer before installing this unit.
C Connecting the external amplifiers and/or subwoofer / Подключение внешних усилителей и/или Низкочастотный динамик You can connect an amplifier to upgrade your car stereo system. • Connect the remote lead (blue with white stripe) to the remote lead of the other equipment so that it can be controlled through this unit. • Disconnect the speakers from this unit, connect them to the amplifier. Leave the speaker leads of this unit unused. Можно подключить усилители для обновления автомобильной стереосистемы.