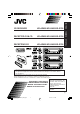
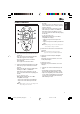
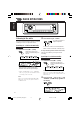
KD-AR800/KD-G800/KD-G700 RECEPTEUR CD KD-AR800/KD-G800/KD-G700 ENGLISH RECEPTOR CON CD ESPAÑOL KD-AR800/KD-G800/KD-G700 FRANÇAIS CD RECEIVER KD-AR800 SOUND ATT U R SOURCE F D VOL VOL KD-G800 SOUND ATT U R SOURCE F D VOL VOL KD-G700 SOUND ATT U R SOURCE F D VOL VOL • This unit is equipped with the display demonstration. To cancel it, see page 8. • Esta unidad está equipada con demostración en la pantalla. Para cancelarla, consulte la página 8.
ENGLISH INFORMATION (For U.S.A.) This equipment has been tested and found to comply with the limits for a Class B digital device, pursuant to Part 15 of the FCC Rules. These limits are designed to provide reasonable protection against harmful interference in a residential installation. This equipment generates, uses, and can radiate radio frequency energy and, if not installed and used in accordance with the instructions, may cause harmful interference to radio communications.
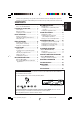
Thank you for purchasing a JVC product. Please read all instructions carefully before operation, to ensure your complete understanding and to obtain the best possible performance from the unit. How to reset your unit ............................... How to use the MODE button ................... 2 3 LOCATION OF THE BUTTONS ............ 4 Control panel ............................................. Remote controller ...................................... Preparing the remote controller ................
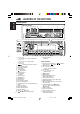
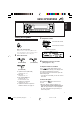
LOCATION OF THE BUTTONS ENGLISH Control panel Display window f c v b 2 1 g h j k 3 l / z m n , .
Remote controller SOUND ATT U R SOURCE F D VOL VOL 1 • Turns on the unit if pressed when the unit is turned off. • Turns off the unit if pressed and held until “SEE YOU” appears on the display. • Drops the volume level in a moment if pressed briefly. Press again to resume the volume. 2 • Selects the band while listening to the radio. Each time you press the button, the band changes. • Skips to the first file of the next folder while listening to an MP3 or a WMA disc.
ENGLISH Preparing the remote controller Before using the remote controller: • Aim the remote controller directly at the remote sensor on the main unit. Make sure there is no obstacle in between. 3. Return the battery holder. Insert again the battery holder by pushing it until you hear a clicking sound. (back side) Remote sensor • Do not expose the remote sensor to strong light (direct sunlight or artificial lighting).
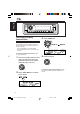
ENGLISH BASIC OPERATIONS 1 3 2 Turning on the power 1 3 Adjust the volume. Turn on the power. To increase the volume To decrease the volume Note on One-Touch Operation: When you select a source in step 2 below, the power automatically comes on. You do not have to press this button to turn on the power. 2 Volume level appears. Select the source. Volume level indicator 4 (For KD-AR800) (For KD-G800) Adjust the sound as you want. (See pages 23 – 25.
ENGLISH Canceling the display demonstration 3 When shipped from the factory, display demonstration has been activated, and starts automatically when no operations are done for about 20 seconds. • It is recommended to cancel the display demonstration before you use the unit for the first time. Select “DEMO OFF.
ENGLISH 4 Setting the clock 1 Finish the setting. Press and hold SEL (select) for more than 2 seconds so that one of the PSM items appears on the display. (PSM: see pages 26 and 27.) Note: To show the clock time on the display, see page 28. 2 To check other information during play, press DISP (display). Set the hour. 1 Select “CLOCK HOUR” if not shown on the display. 2 Adjust the hour. 1 3 2 Each time you press the button, the other information will be shown on the lower part of the display.
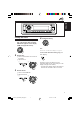
ENGLISH RADIO OPERATIONS Listening to the radio 2 Start searching for a station. To search for stations of higher frequencies You can use either automatic searching or manual searching to tune in to a particular station. Searching for a station automatically: Auto search 1 To search for stations of lower frequencies When a station is received, searching stops. Select the band (FM1 – 3, AM).
Tune in to a station you want while “M.SEEK” (manual seek) is still on the display. To tune in to stations of higher frequencies To tune in to stations of lower frequencies • If you release your finger from the button, the manual mode will automatically turns off after 5 seconds. • If you hold down the button, the frequency keeps changing (in 200 kHz intervals for FM and 10 kHz for AM) until you release the button.
ENGLISH 4 Manual preset You can preset up to 6 stations in each band (FM1, FM2, FM3, and AM) manually. Ex.: Storing FM station of 92.5 MHz into the preset number 1 of the FM1 band. 1 Select the band (FM1 – 3, AM) you want to store stations into (in this example, FM1). Each time you press the button, the band changes as follows: FM 1 (F1) 2 FM 2 (F2) FM 3 (F3) AM (A1) Tune in to a station (in this example, of 92.5 MHz).
ENGLISH CD OPERATIONS Refer to “MP3/WMA OPERATIONS” on pages 18 to 22 for operating MP3/WMA discs. The display changes to show the following: Playing a CD 1 Open the control panel.
ENGLISH To stop play and eject the CD Press 0. CD play stops and the control panel moves down. The CD automatically ejects from the loading slot. • If you change the source or turn the power off, CD play also stops (without ejecting the CD). Next time you select “CD” as the source, CD play starts from where playback has been stopped previously. To return the control panel to its previous position, press 0 again.
• Ex. 1: To select track number 32 while playing track number 6 To play back tracks repeatedly (Track Repeat Play) You can play back the current track repeatedly. 1 Press MODE to enter the functions mode while playing a CD. (Twice) (Three times) Track 6 \ 10 \ 20 \ 30 \ 31 \ 32 • Ex. 2: To select track number 8 while playing track number 36 (Three times) 2 Press RPT (repeat), while “MODE” is still on the display, so that “TRK RPT” appears on the display.
ENGLISH Playing a CD Text Prohibiting disc ejection In a CD Text, some information about the disc (its disc title, performer, and track title) is recorded. This CD Text information will be shown automatically when you play a CD Text. You can prohibit disc ejection and can lock a disc in the loading slot. To change the CD Text information manually, select text display mode while playing a CD Text. Press DISP (display) repeatedly.
What are MP3/WMA? MP3 is an abbreviation of Motion Picture Experts Group (or MPEG) Audio Layer 3. MP3 is simply a file format with a data compression ratio of 1:10 (128 Kbps*). WMA (Windows Media® Audio) is the digital audio compression format developed by Microsoft Corporation. * Bit rate is the average number of bits that one second of audio data will consume. The unit used is Kbps. To get a better audio quality, choose a higher bit rate. The most popular bit rate for encoding is 128 Kbps.
ENGLISH MP3/WMA OPERATIONS Refer also to “CD OPERATIONS” on pages 13 to 16. The display changes to show the following: Playing a disc 1 Open the control panel. Note on One-Touch Operation: When a disc is already in the loading slot, pressing CD/CD-CH LINE (for KD-AR800) or CD/CD-CH (for KD-G800) or CD (for KD-G700) turns on the unit and starts playback automatically. 2 Insert a disc into the loading slot.
Press 0. Playback stops and the control panel moves down. The disc automatically ejects from the loading slot. To change the display information While playing back an MP3/WMA file, you can change the disc information shown on the display. Press DISP (display) repeatedly.
ENGLISH To go to a particular file quickly within the current folder (+10 and –10 buttons) 1 Press MODE to enter the functions mode while playing a disc. 2 Press +10 or –10. To skip 10 files* forwards to the last file To skip 10 files* backwards to the first file * First time you press +10 or –10 button, the file skips to the nearest higher or lower file with a file number of multiple ten (ex. 10th, 20th, 30th).
Press 5 (up) while playing a disc to skip to the next folder. Each time you press the button consecutively, the next folder is located (and the first file in the folder starts playing, if recorded). Selecting the playback modes To play back files at random (Folder Random/Disc Random Play) You can play back all files of the current folder or all files on the disc at random. ENGLISH To skip to the next or previous folder 1 Press MODE to enter the functions mode while playing a disc.
ENGLISH To play back files repeatedly (Track Repeat/Folder Repeat Play) To play back only intros (Track Intro Scan/Folder Intro Scan) You can play back the current file or all the files in the current folder repeatedly. You can play back the first 15 seconds of each file sequentially. 1 Press MODE to enter the 1 Press MODE to enter the functions mode while playing a disc. functions mode while playing a disc.
SOUND ADJUSTMENTS level to “00.” You can adjust the sound characteristics to your preference. 1 Select the item you want to adjust. Each time you press the button, the adjustable items change as follows: *2 This takes effect only when a subwoofer is connected. *3 Normally the control dial works as the volume control. So you do not have to select “VOL” to adjust the volume level. *4 Depending on the amplifier gain control setting. (See page 30 for details.
ENGLISH Selecting preset sound modes (iEQ: intelligent equalizer) You can select a preset sound mode (iEQ: intelligent equalizer) suitable to the music genre. • There is a time limit in doing the following procedure. If the setting is canceled before you finish, start from step 1 again. 1 Press MODE to enter the functions mode. To cancel the preset sound mode, select “FLAT” in step 3. Notes: • You can adjust the preset sound modes temporarily.
FREQ (LOW, HI): Select the center frequency to adjust. WIDTH (LOW, MID): Select the band width level. LEVEL (LOW, MID, HI): Adjust the enhancement level. You can adjust the sound modes to your preference and store your own adjustments in memory (USER 1, USER 2 and USER 3). * By pressing ¢ or 4 directly move as follows: • There is a time limit in doing the following procedure. If the setting is canceled before you finish, start from step 1 again. 1 2 Press MODE to enter the functions mode.
ENGLISH OTHER MAIN FUNCTIONS Changing the general settings (PSM) 3 Adjust the PSM item selected. You can change the items listed in the table on page 27 by using the PSM (Preferred Setting Mode) control. Basic Procedure 1 2 Press and hold SEL (select) for more than 2 seconds so that one of the PSM items appears on the display. (See page 27.) 4 5 Repeat steps 2 and 3 to adjust the other PSM items if necessary. Finish the setting. Select the PSM item you want to adjust. Ex.
• For detailed operations of each PSM items, refer to the pages listed in the table.
ENGLISH To set the clock display—CLOCK DISP To select the level meter—LEVELMETER You can set the clock to be shown on the lower part of the display when the unit is turned on. When shipped from the factory, the clock is set to be shown on the display. You can select the level meter display according to your preference. When shipped from the factory, this mode is set to “LEVEL 1.” • CLK DISP ON: Clock display is turned on. • CLK DISP OFF: Clock display is turned off.
To select the subwoofer cutoff frequency —WOOFER FREQ (Only for KD-AR800/KD-G800) You can deactivate the key-touch tone if you do not want it to beep each time you press a button. When shipped from the factory, the key-touch tone is activated. When a subwoofer is connected to this unit, select an appropriate cutoff frequency level for your subwoofer. When shipped from the factory, the subwoofer cutoff frequency is set to “FREQ MID.” • BEEP ON: Activates the key-touch tone.
ENGLISH To select the external component to use —EXTERNAL IN (only for KD-AR800/KD-G800) To select the amplifier gain control —AMP.GAIN You can connect the external component to the CD changer jack on the rear using an adapter specially designed for the external component. When shipped from the factory, CD changer is selected as the external component. You can change the maximum volume level of this unit.
3 You can assign names to station frequencies, CDs (both in this unit and in the CD changer), and external component (Line Input—only for KD-AR800). After assigning a name, it will appears on the display when you select the source.
ENGLISH Changing the control panel angle You can change the angle of the control panel in four positions. CAUTION: NEVER insert your finger in between the control panel and the unit, as it may get caught or hurt. Press (angle) repeatedly to adjust the angle of the control panel to the position you want. The control panel angles changes as follows: ANGLE 01 ANGLE 02 ANGLE 04 ANGLE 03 Note: If you turn the power off, the control panel automatically returns to the closed position.
You can detach the control panel when leaving the car. When detaching or attaching the control panel, be careful not to damage the connectors on the back of the control panel and on the panel holder. Attaching the control panel 1 Insert the left side of the control panel into the groove on the panel holder. ENGLISH Detaching the control panel Detaching the control panel Before detaching the control panel, be sure to turn off the power. 1 2 3 Unlock the control panel.
ENGLISH CD CHANGER OPERATIONS This section is only for KD-AR800/KD-G800. Playing discs We recommend that you use the JVC MP3compatible CD changer with your unit. Select the CD changer (CD-CH). By using this CD changer, you can play back your original CD-Rs (Recordable) and CD-RWs (Rewritable) recorded either in audio CD format or in MP3 format. • You can also connect other CH-X series CD changers (except CH-X99 and CH-X100).
Note: Folder name appears on the display instead of “ROOT,” if an MP3 disc contains a folder. • When the current disc is a CD: Playback starts from the first track of the current disc. Selected disc number To go to a particular disc directly Press the number button corresponding to the disc number to start its playback (while the CD changer is playing). ENGLISH * When “CLOCK DISP” is set to “CLK DISP ON” (see page 28), the current indication will soon change to the clock time.
ENGLISH This operation is only possible when using JVC MP3-compatible CD changer (CH-X1500). To go to a track/file quickly (+10 and –10 buttons) 1 Press MODE to enter the functions mode while playing a disc. 2 To skip to the next or previous folder (only for MP3 discs) Press 5 (up) while playing an MP3 disc, to go to the next folder. Each time you press the button consecutively, the next folder is located, and the first file in the folder starts playback.
To play back tracks/files at random (Folder Random/Disc Random/Magazine Random Play) 1 Press MODE to enter the functions mode while playing a disc. For MP3 discs: FLDR RND DISC RND Canceled MAG RND Plays at random FLDR RND* and RND All files of the indicators current folder, then light up. files of the next folder and so on. DISC RND and RND All tracks/files of the indicators current (or specified) light up. disc. MAG RND RND indicator All tracks/files of the lights up. inserted discs.
ENGLISH Active indicator Mode Plays repeatedly TRK RPT RPT indicator The current (or lights up. specified) track/file. FLDR RPT* and RPT indicators light up. DISC RPT All files of the current (or specified) folder of the current disc. and RPT All tracks/files of the indicators current (or specified) light up. disc. * “FLDR RPT” is only applicable for MP3 disc.
ENGLISH EXTERNAL COMPONENT OPERATIONS This section is only for KD-AR800/KD-G800. 1 Playing an external component Select the external component (LINE IN/SIRIUS). For KD-AR800: Press CD/CD-CH LINE repeatedly. For KD-AR800: You can connect an external components to the LINE IN plugs on the rear. • You can also connect the SIRIUS tuner to the CD changer jack on the rear and select it as the external component. CD CD-CH (or SIRIUS) To select LINE IN, press and hold CD/CD-CH LINE.
ENGLISH ADDITIONAL INFORMATION Sound modes (preset frequency level settings) The list below shows the preset frequency level settings for each sound mode.
What appears to be trouble is not always serious. Check the following points before calling a service center. Causes Symptoms The volume level is set to the minimum level. Adjust it to the optimum level. Connections are incorrect. Check the cords and connections. • This unit does not work at all. The built-in microcomputer may have functioned incorrectly due to noise, etc. Press the reset button on the control panel. (The clock setting and preset stations stored in memory are erased.) (See page 2.
ENGLISH Symptoms Causes • Disc cannot be played back. Remedies No MP3/WMA files are recorded on the disc. Change the disc. MP3/WMA files do not have the extension code <.mp3> or <.wma> in their file names. Add the extension code <.mp3> or <.wma> to their file names. MP3/WMA Playback MP3/WMA files are not Change the disc. recorded in the format (Record MP3/WMA files using a compliant with ISO 9660 Level compliant application.) 1, Level 2, Romeo, or Joliet. • Noise is generated.
• “NO DISC” appears on the display. Causes Remedies No disc is in the magazine. Insert discs into the magazine. Discs are inserted upside down. Insert discs correctly. • “NO MAG” appears on the display. No magazine is loaded in the CD changer. Insert the magazine. • “RESET 8” appears on the display. This unit is not connected to the CD changer correctly. Connect this unit and the CD changer correctly and press the reset button of the CD changer. • “RESET 1” – “RESET 7” appears on the display.
ENGLISH MAINTENANCE Handling discs When playing a CD-R or CD-RW This unit has been designed to reproduce CDs, CD-Rs (Recordable), CD-RWs (Rewritable), and CD Texts. • This unit is also compatible with MP3 and WMA discs. How to handle discs Center holder When removing a disc from its case, press down the center holder of the case and lift the disc out, holding it by the edges. • Always hold the disc by the edges. Do not touch its recording surface.
AUDIO AMPLIFIER SECTION CD PLAYER SECTION Maximum Power Output: Front: 50 W per channel Rear: 50 W per channel Continuous Power Output (RMS): Front: 19 W per channel into 4 Ω, 40 Hz to 20 000 Hz at no more than 0.8% total harmonic distortion. Rear: 19 W per channel into 4 Ω, 40 Hz to 20 000 Hz at no more than 0.8% total harmonic distortion.
ESPAÑOL IMPORTANTE (EE.UU.) Este equipo se ha sometido a todo tipo de pruebas y cumple con las normas establecidas para dispositivos de Clase B, de conformidad con la Parte 15 de las reglas de la FCC (Comisión Federal de Comunicaciones). Estas reglas están diseñadas para asegurar una protección razonable contra este tipo de interferencias en las instalaciones residenciales. Este equipo genera y utiliza energía de radiofrecuencia.
Muchas gracias por la compra de un producto JVC. Como primer paso, por favor lea detenidamente este manual para comprender a fondo todas las instrucciones y obtener un máximo disfrute de esta unidad. CONTENIDO 2 3 UBICACIÓN DE LOS BOTONES ........... 4 Panel de control ........................................ Control remoto .......................................... Preparación del control remoto ................. 4 5 6 OPERACIONES BASICAS .................. 7 Conexión de la alimentación ...............
UBICACIÓN DE LOS BOTONES Panel de control Ventanilla de visualización g h j k l / z x ESPAÑOL f c v b 2 1 3 m n , .
Control remoto SOUND ATT U R SOURCE F D VOL VOL 1 • La unidad se enciende si es pulsado estando la unidad apagada. • La unidad se apaga si pulsa y mantiene pulsado hasta que aparezca “SEE YOU” en la pantalla. • El nivel de volumen disminuye instantáneamente si pulsa de manera breve. Vuelva a pulsar volver al volumen anterior. 2 • Selecciona la banda mientras está escuchando la radio. Cada vez que pulsa el botón, la banda cambia.
Preparación del control remoto ESPAÑOL Antes de emplear el control remoto: • Apunte el control remoto directamente hacia el sensor remoto de la unidad principal. Asegúrese de que no haya obstáculos en el camino. Sensor remoto • No exponga el sensor remoto a la luz intensa (luz solar directa o iluminación artificial). Instalación de la pila Cuando los límites de alcance o la efectividad del control remoto se reduce, reemplace la pila. 1. Retire la portapila.
1 3 2 Conexión de la alimentación 1 ESPAÑOL OPERACIONES BASICAS 3 Encienda la unidad. Ajuste el volumen. Para aumentar el volumen Para reducir el volumen Nota sobre la operación con pulsación única: La unidad se enciende automáticamente cuando usted selecciona la fuente en el paso 2 de abajo. No necesitará presionar este botón para encender la unidad. 2 Aparece el nivel de volumen. Reproduzca la fuente. Indicador de nivel de volumen 4 (Para KD-AR800) Ajuste el sonido según se desee.
ESPAÑOL Cancelación de la demostración en pantalla 3 La unidad se expide de fábrica con la demostración en pantalla activada para que se inicie automáticamente tras un período de inactividad de 20 segundos. • Se recomienda cancelar la demostración en pantalla antes de utilizar la unidad por primera vez. Seleccione “DEMO OFF”. DEMO OFF DEMO ON Para cancelar la demostración en pantalla, siga el procedimiento de abajo.
1 ESPAÑOL 4 Ajuste del reloj Finalice el ajuste. Pulse y mantenga pulsado SEL (selección) durante más de 2 segundos para que aparezca uno de los ítems de PSM en la pantalla. (PSM: consulte las páginas 26 y 27). Nota: Para mostrar la hora del reloj en la pantalla, consulte la página 28. 2 Para ver otra información durante la reproducción, pulse DISP (pantalla). Ajuste la hora. 1 Seleccione “CLOCK HOUR” si no está visualizado en la pantalla. 2 Ajuste la hora.
ESPAÑOL OPERACIONES DE LA RADIO Para escuchar la radio Para buscar emisoras de frecuencias más altas Podrá sintonizar una determinada emisora mediante búsqueda automática o búsqueda manual. Para buscar emisoras de frecuencias más bajas Para buscar una emisora automáticamente: Búsqueda automática 1 Seleccione la banda (FM1 – 3, AM). Cada vez que pulsa el botón, la banda cambia de la siguiente manera: FM 1 (F1) FM 2 (F2) FM 3 (F3) AM (A1) Aparece la banda seleccionada*.
Sintonice la emisora deseada mientras “M.SEEK” (búsqueda manual) permanece visualizado en la pantalla. Para sintonizar emisoras de frecuencias más altas Para sintonizar emisoras de frecuencias más bajas • Si aparta su dedo del botón, el modo manual se desactivará automáticamente después de 5 segundos. • Si mantiene el botón pulsado, la frecuencia cambiará continuamente (a intervalos de 200 kHz para FM y a intervalos de 10 kHz para AM) hasta soltarlo.
4 Preajuste manual ESPAÑOL Podrá preajustar manualmente hasta 6 emisoras en cada banda (FM1, FM2, FM3 y AM). Ej.: Almacenamiento de una emisora FM de 92,5 MHz en el número de preajuste 1 de la banda FM1. 1 Seleccione la banda (FM1 – 3, AM) en que desea almacenar las emisoras (en este ejemplo, FM1). Cada vez que pulsa el botón, la banda cambia de la siguiente manera: FM 1 (F1) 2 FM 2 (F2) FM 3 (F3) AM (A1) Sintonice la emisora (en este ejemplo de 92,5 MHz).
ESPAÑOL OPERACIONES DEL REPRODUCTOR DE CD Para los detalles sobre la operación con discos MP3/WMA, consulte “OPERACIONES CON MP3/WMA” en las páginas 18 a 22. La pantalla cambia para mostrar los siguientes: Reproducción de un CD 1 Indicador CD Abra el panel de control. Nota sobre la operación con pulsación única: Si pulsa CD/CD-CH LINE (para KD-AR800) o CD/CD-CH (para KD-G800) o CD (para KD-G700) habiendo un CD en la ranura de carga, la unidad se enciende y la reproducción se inicia automáticamente.
ESPAÑOL Para parar la reproducción y expulsar el CD Pulse 0. La reproducción del CD se para y el panel de control bascula hacia abajo. El CD será expulsado automáticamente de la ranura de carga. • Si cambia la fuente o desconecta la alimentación, la reproducción del CD también se para (sin que el CD sea expulsado). La próxima vez que selecciona “CD” como fuente, la reproducción del CD se iniciará desde donde la detuvo. Para que el panel de control vuelva a su posición anterior, pulse 0 otra vez.
• Ej. 1: Para seleccionar la pista número 32 mientras se está reproduciendo la pista número 6 Para reproducir las pistas repetidamente (Reproducción repetida de pistas) Podrá reproducir repetidamente la pista actual. 1 Pulse MODE para entrar en modo de funciones mientras se está reproduciendo un CD. 2 Pulse RPT (repetición) mientras Pista 6 (Dos veces) (Tres veces) \ 10 \ 20 \ 30 \ 31 \ 32 • Ej.
ESPAÑOL Reproducción del CD Text En el CD Text, se ha grabado cierta información relacionada con el disco (el título del disco, su ejecutante y título de la pista). Esta información de CD Text será mostrada automáticamente cuando se reproduce un CD Text. Para cambiar manualmente la información de CD Text, seleccione el modo de visualización de texto mientras se reproduce un CD Text. Pulse DISP (pantalla) repetidamente.
INTRODUCCIÓN DE MP3/WMA MP3 es abreviatura de Motion Picture Experts Group (o MPEG) Audio Layer 3. El MP3 es simplemente un formato de archivo con una relación de compresión de datos de 1:10 (128 Kbps*). WMA (Windows Media® Audio) es un formato de compresión de audio digital desarrollado por Microsoft Corporation. * La velocidad de bits es el número promedio de bits que consume un segundo de datos de audio. La unidad usada es Kbps.
ESPAÑOL OPERACIONES CON MP3/WMA Refiérase también a “OPERACIONES DEL REPRODUCTOR DE CD” en las páginas 13 a 16. La pantalla cambia para mostrar los siguientes: Reproducción de un disco 1 Nota sobre la operación con pulsación única: Si pulsa CD/CD-CH LINE (para KD-AR800) o CD/CD-CH (para KD-G800) o CD (para KD-G700) habiendo un disco en la ranura de carga, la unidad se enciende y la reproducción se inicia automáticamente. 2 Indicación de la fuente actual*1 Indicador CD Abra el panel de control.
Pulse 0. La reproducción se para y el panel de control bascula hacia abajo. El disco será expulsado automáticamente de la ranura de carga. Para cambiar la información en pantalla Mientras se reproduce un archivo MP3/WMA, podrá cambiar la información del disco mostrada en la pantalla. Pulse DISP (pantalla) repetidamente.
Para desplazarse rápidamente a un determinado archivo dentro de la carpeta actual (botones +10 y –10) 1 Pulse MODE para entrar en modo de ESPAÑOL funciones mientras se está reproduciendo un disco. 2 Pulse +10 o –10. Para saltar 10 archivos* hacia adelante hasta el último archivo Para saltar 10 archivos* hacia atrás hasta el primer archivo * La primera vez que pulsa el botón +10 o –10, se salta al número de archivo superior o inferior más próximo que sea múltiplo de diez (ej.: 10˚, 20˚, 30˚).
Pulse 5 (arriba) mientras se está reproduciendo un disco, para saltar a la siguiente carpeta. Cada vez que pulsa el botón consecutivamente, se localizará la siguiente carpeta (y se iniciará la reproducción del primer archivo de la carpeta, si está grabado). Selección de los modos de reproducción Para reproducir los archivos de forma aleatoria (Reproducción aleatoria de carpetas/de discos) Es posible reproducir al azar todos los archivos de la carpeta actual o todos los archivos del disco.
Para reproducir repetidamente los archivos (Reproducción repetida de pistas/de carpetas) Para reproducir sólo las introducciones musicales (Búsqueda de introducción de pistas/de carpetas) Podrá reproducir repetidamente el archivo actual o todos los archivos de la carpeta actual. Podrá reproducir secuencialmente los primeros 15 segundos de cada archivo. ESPAÑOL 1 Pulse MODE para entrar en 1 Pulse MODE para entrar en modo de funciones mientras se está reproduciendo un disco.
AJUSTES DEL SONIDO *1 Si está usando un sistema de dos altavoces, ajuste Ajuste del sonido el nivel del desvanecedor a “00”. 1 Seleccione el ítem que desea ajustar. Cada vez que pulsa el botón, los ítems ajustables cambian de la siguiente manera: conectado. *3 El dial de control funciona normalmente como control de volumen. Por lo tanto, no necesitará seleccionar “VOL” para ajustar el nivel de volumen. *4 Depende del ajuste de control de ganancia del amplificador.
ESPAÑOL Selección de los modos de sonido preajustados (iEQ: ecualizador inteligente) Permite seleccionar un modo de sonido preajustado (iEQ: ecualizador inteligente) adecuado al género musical. • Hay un límite de tiempo para realizar el siguiente procedimiento. Si el ajuste se cancela antes de haber terminado, comience otra vez desde el paso 1. 1 Pulse MODE para entrar en modo de funciones. Para cancelar el modo de sonido preajustado, seleccione “FLAT” en el paso 3.
Usted podrá ajustar los modos de sonido a su gusto y almacenar sus propios ajustes en la memoria (USER 1, USER 2 y USER 3). • Hay un límite de tiempo para realizar el siguiente procedimiento. Si el ajuste se cancela antes de haber terminado, comience otra vez desde el paso 1. 1 2 3 Pulse MODE para entrar en modo de funciones. LOW LEVEL MID LEVEL HI LEVEL 5 Ajuste el elemento de sonido seleccionado. Pulse EQ (ecualizador) mientras “MODE” permanece visualizado en la pantalla.
OTRAS FUNCIONES PRINCIPALES Cambio de los ajustes generales (PSM) 3 Ajuste el ítem de PSM seleccionado. ESPAÑOL Podrá cambiar las opciones listadas en la tabla de la página 27 utilizando el control PSM (Modo de ajustes preferidos). Procedimiento básico 1 2 Pulse y mantenga pulsado SEL (selección) durante más de 2 segundos para que aparezca uno de los ítems de PSM en la pantalla. (Consulte la página 27). 4 5 Repita los pasos 2 y 3 para ajustar los otros ítems PSM, si es necesario.
Los ítems de Modo de ajustes preferidos (PSM) Valores/ opciones seleccionables Indicaciones DEMO MODE Demostración en pantalla CLOCK HOUR Ajuste de la hora DEMO OFF CLOCK DISP Visualización del reloj LEVELMETER Medidor de nivel DIMMER MODE Modo reductor de luz BEEP SWITCH Tono de pulsación de teclas CONTRAST Contraste de la pantalla SCROLL MODE Modo de desplazamiento WOOFER FREQ*1 Frecuencia de corte del subwoofer LINE ADJ*2 Ajuste del nivel de entrada de línea EXTERNAL IN*1, *4 Componen
ESPAÑOL Para ajustar la visualización del reloj —CLOCK DISP Para seleccionar el medidor de nivel —LEVELMETER Podrá configurar el reloj para que aparezca en la parte inferior de la pantalla al encender la unidad. La unidad ha sido ajustada en fábrica para que el reloj se visualice en la pantalla. Podrá seleccionar la visualización de medidor de nivel según sus preferencias. La unidad se expide de fábrica con este modo ajustado a “LEVEL 1”. • CLK DISP ON: La visualización del reloj se activa.
Para seleccionar la frecuencia de corte del subwoofer—WOOFER FREQ (Sólo para Podrá desactivar el tono de pulsación de teclas si no desea que suene un pitido cada vez que pulsa un botón. La unidad se expide de fábrica con el tono de pulsación de teclas activado. KD-AR800/KD-G800) • BEEP ON: Tono de pulsación de teclas activado. • BEEP OFF: Tono de pulsación de teclas desactivado.
Para seleccionar el componente exterior a utilizar—EXTERNAL IN (Sólo para KD-AR800/ ESPAÑOL KD-G800) Podrá conectar el componente externo al jack del cambiador de CD de la parte trasera utilizando un adaptador especialmente diseñado para el componente externo. La unidad se expide de fábrica con el cambiador de CD seleccionado como componente exterior. • CHANGER: Para utilizar un cambiador de CD. • LINE IN: Para utilizar un componente externo que no sea el cambiador de CD (sólo para KD-G800).
3 Cada vez que pulsa el botón, el juego de caracteres cambia de la siguiente manera: Permite asignar nombres a las frecuencias de las emisoras, a los CDs (tanto en esta unidad como en el cambiador de CD), y al componente externo (Entrada de línea—sólo para KD-AR800). Una vez que se asigne un nombre, el mismo aparecerá en la pantalla al seleccionar la fuente.
Cambio del ángulo del panel de control ESPAÑOL El panel de control puede ajustarse a cuatro ángulos diferentes. PRECAUCIÓN: NUNCA introduzca su dedo entre el panel de control y la unidad, pues podría lastimarse al quedar aprisionado. Pulse (ángulo) repetidamente para ajustar el ángulo del panel de control a la posición deseada.
Desmontaje del panel de control Cómo instalar el panel de control 1 ESPAÑOL Podrá desmontar el panel de control cuando salga de su automóvil. Al desmontar o instalar el panel de control, preste atención para no dañar los conectores provistos al dorso del panel de control y en el portapanel. Inserte el lado izquierdo del panel de control en la ranura del portapanel. Cómo desmontar el panel de control Antes de desmontar el panel de control, asegúrese de desconectar la alimentación.
ESPAÑOL OPERACIÓN DEL CAMBIADOR DE CD Esta sección es solamente para KD-AR800/ KD-G800. Con esta unidad se recomienda utilizar el cambiador de CD de JVC compatible con MP3. Utilizando este cambiador de CD, podrá reproducir sus CD-Rs (Grabables) y CD-RWs (Reescribibles) originales grabados ya sea en formato audio CD o en formato MP3. • También se pueden conectar otros cambiadores de CD de la serie CH-X (excepto CH-X99 y CH-X100).
Nota: Si el disco MP3 contiene una carpeta, aparecerá el nombre de la carpeta en la pantalla, en lugar de “ROOT”. • Cuando el disco actual es un CD: La reproducción se inicia desde la primera pista del disco actual. Número de disco seleccionado Para seleccionar directamente un determinado disco Pulse el botón del número correspondiente al número de disco deseado para iniciar su reproducción (mientras el cambiador de CD está reproduciendo el CD).
ESPAÑOL Esta operación es posible únicamente cuando se utiliza el cambiador de CD compatible con MP3 de JVC (CH-X1500). • Ej. 2: Para seleccionar la pista/el archivo número 8 mientras se está reproduciendo la pista/el archivo número 36 Para desplazarse rápidamente a una pista/ un archivo (botones +10 y –10) 1 Pulse MODE para entrar en modo de funciones mientras se está reproduciendo un disco. (Tres veces) (Dos veces) Pista/ 36 \ 30 \ 20 \ 10 \ 9 \ 8 archivo 2 Pulse +10 o –10.
Modo Indicador activado Se reproducen de forma aleatoria FLDR RND* Los indicadores y RND se encienden. Todos los archivos de la carpeta actual, luego todos los archivos de la carpeta siguiente, y así sucesivamente. modo de funciones mientras se está reproduciendo un disco. DISC RND Los indicadores y RND se encienden. Todas las pistas/ los archivos del disco actual (o especificado). 2 Pulse RND (aleatoria) mientras MAG RND El indicador RND se enciende.
Modo ESPAÑOL TRK RPT Indicador activado El indicador RPT se enciende. Se reproducen repetidamente La pista/el archivo actual (o especificado). FLDR RPT* Los indicadores y RPT se encienden. Todos los archivos de la carpeta actual (o especificada) del disco actual. DISC RPT Todas las pistas/los archivos del disco actual (o especificado). Los indicadores y RPT se encienden. Indicador INT Ej.
Esta sección es solamente para KD-AR800/ KD-G800. 1 Reproducción de un componente exterior Seleccione el componente externo (LINE IN/SIRIUS). Para KD-AR800: Pulse CD/CD-CH LINE repetidamente. CD Para KD-AR800: Podrá conectar un componente externo a las clavijas LINE IN de la parte trasera. • También podrá conectar el sintonizador SIRIUS al jack del cambiador de CD en la parte trasera y seleccionarlo como componente externo.
INFORMACIÓN ADICIONAL Modos de sonido (ajustes de los niveles de frecuencia preajustados) En la lista de abajo se muestran los ajustes de niveles de frecuencia preajustados para cada modo de sonido.
LOCALIZACIÓN DE AVERIAS Lo que aparenta ser una avería podría resolverse fácilmente. Verifique los siguientes puntos antes de acudir al centro de servicio. Generalidades FM/AM Reproducción de disco Remedios El nivel de volumen está ajustado al mínimo. Ajustarlo al nivel óptimo. Las conexiones son incorrectas. Verifique los cables y las conexiones. • Esta unidad no funciona en absoluto. El microcomputador incorporado podría haber funcionado incorrectamente debido a los ruidos, etc.
Síntomas Causas No hay archivos MP3/WMA grabados en el disco. Cambie el disco. Los archivos MP3/WMA no tienen el código de extensión <.mp3> o <.wma> en sus nombres de archivo. Añada el código de extensión <.mp3> o <.wma> a sus nombres de archivo. Los archivos MP3/WMA no están grabados en un formato compatible con ISO 9660 Nivel 1, Nivel 2, Romeo o Joliet. Cambie el disco. (Grabe los archivos MP3/WMA utilizando una aplicación compatible). • Se generan ruidos.
Esta sección es solamente para KD-AR800/KD-G800 Remedios No hay disco en el magazín. Inserte los discos en el magazín. Los discos han sido insertados boca abajo. Inserte los discos correctamente. • “NO MAG” aparece en la pantalla. No hay ningún magazín cargado en el cambiador de CD. Inserte el magazín. • “RESET 8” aparece en la pantalla. La unidad no está correctamente conectada al cambiador de CD.
MANTENIMIENTO Manipulación de los discos ESPAÑOL Esta unidad ha sido diseñada para reproducir CDs, CD-Rs (Grabables), CD-RWs (Reescribibles), y CD Texts. • Esta unidad también es compatible con discos MP3 y WMA. Cómo tratar los discos Cuando saque un disco de Sujetador central su caja, presione el sujetador central de la caja y extraiga el disco agarrándolo por los bordes. • Siempre sujete el disco por los bordes. No toque su superficie de grabación.
ESPECIFICACIONES Máxima potencia de salida: Delantera: 50 W por canal Trasera: 50 W por canal Potencia de salida continua (RMS): Delantera: 19 W por canal en 4 Ω, 40 Hz a 20 000 Hz con una distorsión armónica total no mayor de 0,8%. Trasera: 19 W por canal en 4 Ω, 40 Hz a 20 000 Hz con una distorsión armónica total no mayor de 0,8%.
FRANÇAIS IMPORTANT POUR PRODUITS LASER 1. PRODUIT LASER CLASSE 1 2. ATTENTION: N’ouvrez pas le couvercle supérieur. Il n’y a aucune pièce réparable par l’utilisateur à l’intérieur de l’appareil; confiez toute réparation à un personnel qualifié. 3. ATTENTION: Risque de radiations laser visible et invisible quand l’appareil est ouvert et que le système de verrouillage ne fonctionne pas ou a été mis hors service. Évitez toute exposition directe au rayon.
Merci pour avoir acheté un produit JVC. Veuillez lire attentivement toutes les instructions avant d’utiliser l’appareil afin de bien comprendre son fonctionnement et d’obtenir les meilleures performances possibles. TABLE DES MATIÈRES 2 3 EMPLACEMENT DES TOUCHES .......... 4 Panneau de command .............................. Télécommande ......................................... Préparation de la télécommande .............. 4 5 6 FONCTIONNEMENT DE BASE ............ 7 Mise sous tension ....................
EMPLACEMENT DES TOUCHES Panneau de command Fenêtre d’affichage f FRANÇAIS c v b 2 1 g h j k 3 l / z m n , .
Télécommande SOUND ATT U R SOURCE F D VOL VOL 1 • Met l’appareil sous tension si vous appuyez sur cette touche quand l’appareil est hors tension. • Maintenez pressée jusqu’à ce que “SEE YOU” apparaisse sur l’affichage pour mettre l’appareil hors tension. • Appuyez brièvement sur cette touche pour couper le volume momentanément. Appuyez de nouveau le rétablir. 2 • Choisit la bande lors de l’écoute de la radio. Chaque fois que vous appuyez sur la touche, la bande change.
Préparation de la télécommande 3. Remettez le porte-pile en place. Insérez le porte-pile en le poussant jusqu’à ce que vous entendiez un déclic. FRANÇAIS Avant d’utiliser la télécommande: • Pointez la télécommande directement sur le capteur de télécommande de l’appareil principal. Assurez-vous qu’il n’y a pas d’obstacle entre les deux. Capteur de télécommande • Ne pas exposer le capteur de télécommande à un éclairage puissant (en plein soleil ou un éclairage artificiel).
FONCTIONNEMENT DE BASE 3 2 3 Mise sous tension 1 Mettez l’appareil sous tension. Ajustez le volume. FRANÇAIS 1 Pour augmenter le volume Pour diminuer le volume Remarque sur le fonctionnement monotouche: Quand vous choisissez la source à l’étape 2 cidessous, l’appareil se met automatiquement sous tension. Vous n’avez donc pas besoin d’appuyer d’abord sur cette touche pour mettre l’appareil sous tension. 2 Le niveau de volume apparaît. Indicateur du niveau de volume Choisissez la source.
FRANÇAIS Annulation de la démonstration des affichages 3 À l’expédition de l’usine, la démonstration des affichages est en service et celle-ci démarre automatiquement quand aucune opération n’est effectuée pendant environ 20 secondes. • Il est recommandé d’annuler la démonstration des affichages avant d’utiliser l’appareil pour la première fois. Choisissez “DEMO OFF”. DEMO OFF DEMO ON Pour annuler la démonstration des affichages, suivez la procédure ci-dessous.
1 4 Terminez le réglage. FRANÇAIS Réglage de l’horloge Maintenez pressée SEL (sélection) pendant plus de 2 secondes de façon que l’un des éléments PSM apparaisse sur l’affichage. (PSM: voir les pages 26 et 27.) Remarque: Pour afficher l’horloge sur l’affichage, référez-vous à la page 28. 2 Pour vérifier d’autres informations pendant la lecture, appuyez sur DISP (affichage). Réglez les heures. 1 Choisissez “CLOCK HOUR” s’il n’apparaît pas sur l’affichage. 2 Ajustez les heures.
FONCTIONNEMENT DE LA RADIO FRANÇAIS Écoute de la radio 2 Commencez la recherche d’une station. Pour rechercher des stations de fréquences supérieures Vous pouvez utiliser la recherche automatique ou l’accord manuel pour accorder une station particulière. Recherche d’une station automatiquement: Recherche automatique 1 Pour rechercher des stations de fréquences inférieures Quand une station est accordée, la recherche s’arrête. Choisissez la bande (FM1 – 3, AM).
Accordez la station que vous souhaitez pendant que “M.SEEK” (recherche manuelle) est toujours sur l’affichage. Pour accorder des stations de fréquences supérieures Pour accorder des stations de fréquences inférieures • Si vous relâchez la touche, le mode manuel est mis automatiquement hors service après 5 secondes.
4 Présélection manuelle Vous pouvez présélectionner manuellement un maximum de 6 stations pour chaque bande (FM1, FM2, FM3 et AM). Ex.: Mémorisation de la station FM située à 92,5 MHz sur le numéro de présélection 1 de la bande FM1. FRANÇAIS 1 Choisissez le numéro de la bande (FM1 – 3, AM) où vous souhaitez mémoriser la station (dans cet exemple, FM1).
FONCTIONNEMENT DU LECTEUR CD L’affichage change comme suit: FRANÇAIS Référez-vous à “FONCTIONNEMENT DES MP3/ WMA” aux pages 18 à 22 pour utiliser les disques MP3/WMA. Lecture d’un CD 1 Indicateur CD Ouvrez le panneau de commande. Remarque sur le fonctionnement monotouche: Si un CD se trouve déjà dans la fente d’insertion, appuyer sur CD/CD-CH LINE (pour le KD-AR800) ou CD/CD-CH (pour le KD-G800) ou CD (pour le KD-G700) met l’appareil sous tension et démarre la lecture automatiquement.
Pour arrêter la lecture et éjecter le CD FRANÇAIS Appuyez sur 0. La lecture de CD s’arrête et le panneau de commande se déplace vers le bas. Le CD est éjecté automatiquement de la fente d’insertion. • Si vous changez la source ou mettez l’appareil hors tension, la lecture de CD s’arrête aussi (sans que le CD soit éjecté). La prochaine fois que vous choisissez “CD” comme source, la lecture du CD commence à partir de l’endroit où elle a été interrompue.
Comment utiliser les touches +10 et –10 • Ex. 1: Pour choisir la plage numéro 32 pendant la lecture de la plage numéro 6 Pour reproduire les plages répétitivement (Lecture répétée de plage) Vous pouvez reproduire la plage actuelle répétitivement. 1 Appuyez sur MODE pour entrer en mode de fonction pendant la lecture d’un CD. Plage 6 (Deux fois) \ 10 \ 20 \ 30 \ 31 \ 32 • Ex.
Lecture d’un CD Text FRANÇAIS Dans un CD Text, certaines informations à propos du disque (le titre du disque, l’interprète et le titre de la plage) sont enregistrées. Ces informations de CD Text apparaissent automatiquement quand vous reproduisez un CD Text. Pour changer l’information de CD Text manuellement, choisissez le mode d’affichage de texte pendant la lecture d’un CD Text. Appuyez répétitivement sur DISP (affichage).
PRÉSENTATION DU FORMAT MP3/WMA MP3 est l’abréviation de Motion Picture Experts Group (ou MPEG) Audio Layer 3. MP3 est simplement un format de fichier avec un rapport de compression de données de 1:10 (128 Kbps*). WMA (Windows Media® Audio) est un format de compression numérique mis au point par Microsoft Corporation. * Le débit binaire et le nombre moyen de bits utilisés pour une seconde de données audio. Cet appareil utilise un débit de 1 Kbps.
FRANÇAIS FONCTIONNEMENT DES MP3/WMA Référez-vous aussi “FONCTIONNEMENT DU LECTEUR CD” aux pages 13 à 16. L’affichage change comme suit: Lecture d’un disque 1 Ouvrez le panneau de commande. Remarque sur le fonctionnement monotouche: Si un disque se trouve déjà dans la fente d’insertion, appuyer sur CD/CD-CH LINE (pour le KD-AR800) ou CD/CD-CH (pour le KD-G800) ou CD (pour le KD-G700) met l’appareil sous tension et démarre la lecture automatiquement. 2 Insérez un disque dans la fente d’insertion.
Appuyez sur 0. La lecture s’arrête et le panneau de commande se déplace vers le bas. Le disque est éjecté automatiquement de la fente d’insertion. Pour changer l’information sur l’affichage Pendant la lecture d’un fichier MP3/WMA, vous pouvez change l’information du disque qui apparaît sur l’affichage. Appuyez répétitivement sur DISP (affichage).
Pour aller rapidement à un fichier particulier dans le dossier actuel (touches +10 et –10) 1 Appuyez sur MODE pour entrer en mode de fonction pendant la lecture d’un disque. FRANÇAIS 2 Appuyez sur +10 ou –10.
Appuyez sur 5 (haut) pendant la lecture d’un disque pour sauter au dossier suivant. Chaque fois que vous appuyez sur la touche consécutivement, le dossier suivant est localisé (et le premier fichier du dossier est reproduit, s’il y en a un). Sélection d’un mode de lecture Pour reproduire les fichiers dans un ordre aléatoire (Lecture aléatoire de dossier/ disque) Vous pouvez reproduire tous les fichiers du dossier actuel ou tous les fichiers du disque dans un ordre aléatoire.
Pour reproduire des fichiers répétitivement (Lecture répétée de plage/ dossier) Pour reproduire uniquement les introductions (balayage des introductions des plages/dossiers) Vous pouvez reproduire le fichier actuel ou tous les fichiers du dossier actuel répétitivement. Vous pouvez reproduire les 15 premières secondes de chaque fichier séquentiellement. 1 Appuyez sur MODE pour entrer 1 Appuyez sur MODE pour entrer en mode, de fonction pendant la lecture d’un disque.
AJUSTEMENT DU SON *1 Si vous utilisez un système à deux enceintes, réglez Ajustement du son le niveau de fader sur “00”. 1 Choisissez l’élément que vous souhaitez ajuster. Chaque fois que vous appuyez sur la touche, l’élément ajustable change comme suit: connecté. *3 Normalement, la molette de commande fonctionne comme commande de volume. Alors, vous n’avez pas besoin de choisir “VOL” pour ajuster le niveau de volume. *4 En fonction du réglage de commande du gain de l’amplificateur.
Sélection des modes sonores préréglés (iEQ: égaliseur intelligent) FRANÇAIS Vous pouvez choisir un mode sonore préréglé (iEQ: égaliseur intelligent) en fonction du genre de musique. • Il y a un temps limite pour effectuer les étapes suivantes. Si le réglage est annulé avant que vous ne terminiez, recommencez à partir de l’étape 1. 1 Appuyez sur MODE pour entrer en mode de fonction. Pour annuler le mode sonore préréglé, choisissez “FLAT” à l’étape 3.
Mémorisation de vos propres modes sonores FREQ (LOW, HI): Choisit la fréquence médium à ajuster. WIDTH (LOW, MID): Choisit le niveau de la bande passante. LEVEL (LOW, MID, HI): Ajuste le niveau d’accentuation. Vous pouvez ajuster les modes sonores comme vous le souhaitez et mémoriser votre propre ajustement (USER 1, USER 2 et USER 3). * En appuyant sur ¢ ou 4 vous pouvez changer le réglage directement comme suit: • Il y a un temps limite pour effectuer les étapes suivantes.
AUTRES FONCTIONS PRINCIPALES Modification des réglages généraux (PSM) 3 Ajustez l’élément PSM choisi. Vous pouvez changer les éléments qui apparaissent dans le tableau de la page 27 en utilisant le réglage PSM (mode des réglages préférés). Procédure de base FRANÇAIS 1 2 Maintenez pressée SEL (sélection) pendant plus de 2 secondes de façon que l’un des éléments PSM apparaisse sur l’affichage. (Voir la page 27). 4 5 Répétez, si nécessaire, les étapes 2 et 3 pour ajuster les autres éléments PSM.
Les éléments Preferred Setting Mode—Mode de réglage préféré (PSM) • Pour des informations détaillées sur chaque réglage PSM, référez-vous aux pages données dans le tableau.
FRANÇAIS Pour régler l’affichage de l’horloge —CLOCK DISP Pour choisir l’indication du niveau —LEVELMETER Vous pouvez régler l’horloge pour qu’elle apparaisse dans la partie inférieure de l’affichage quand l’appareil est sous tension. À l’expédition de l’usine, l’horloge est réglée pour apparaître sur l’affichage. Vous pouvez choisir l’affichage de l’indication du niveau selon vos préférences. À l’expédition de l’usine, ce mode est réglé sur “LEVEL 1”.
Mise en/hors service de la tonalité sonore —BEEP SWITCH Pour choisir la fréquence de coupure du caisson de grave—WOOFER FREQ Vous pouvez mettre hors service la tonalité sonore si vous ne souhaitez pas entendre un “bip” sonore chaque fois que vous appuyez sur une touche. À l’expédition de l’usine, la tonalité sonore est en service.
FRANÇAIS Sélection de l’appareil extérieur pour utiliser—EXTERNAL IN (Uniquement pour le Pour choisir la commande de gain de l’amplificateur—AMP.GAIN KD-AR800/KD-G800) Vous pouvez connecter un appareil extérieur à prise du changeur de CD située à l’arrière en utilisant un adaptateur conçu spécialement pour l’appareil extérieur. À l’expédition de l’usine, le changeur CD est choisi comme appareil extérieur. Vous pouvez changer le niveau de volume maximum de cet appareil.
3 Vous pouvez affecter des noms aux fréquences des stations, aux CD (qui se trouvent dans cet appareil et dans les changeurs de CD) et à l’appareil extérieur (Entrée de ligne—uniquement pour le KD-AR800). Une fois que le nom a été affecté, il apparaît sur l’affichage quand vous choisissez la source. Choisissez le jeu de caractères que vous souhaitez utiliser pendant que la position du premier caractère clignote.
Changement de l’angle du panneau de commande Vous pouvez changer l’angle du panneau de commande parmi quatre positions. ATTENTION: N’INSÉREZ JAMAIS votre doigt entre le panneau de commande et l’appareil, il pourrait se coincer et être blessé. FRANÇAIS Appuyez répétitivement sur (angle) pour ajuster l’angle du panneau de commande à la position souhaitée.
Vous pouvez détacher le panneau de commande quand vous quittez la voiture. Lors du détachement ou de la remise en place du panneau de commande, faites attention de ne pas endommager les connecteurs situés à l’arrière du panneau et sur le porte-panneau. Comment attacher le panneau de commande 1 Insérez le côté gauche du panneau de commande dans la rainure située du côté droit du porte-panneau.
FRANÇAIS FONCTIONNEMENT DU CHANGEUR DE CD Cette section est uniquement pour le KD-AR800/KD-G800. Nous vous recommandons d’utiliser le changeur de CD compatible MP3 JVC avec votre appareil. En utilisant ce changeur de CD, vous pouvez reproduire vos CD-R (Enregistrables) et CD-RW (Réinscriptibles) originaux enregistrés au format CD audio ou au format MP3. • Vous pouvez aussi connecter un autre changeur de CD de la série CH-X (sauf le CH-X99 et le CH-X100).
* Quand “CLOCK DISP” est réglé sur “CLK DISP ON” (voir page 28), l’indication actuelle change sur l’affichage de l’horloge. Remarque: Le nom du dossier apparaît sur l’affichage à la place de “ROOT” si un disque MP3 contient un dossier. Pour aller directement à un disque particulier Appuyez sur la touche numérique correspondante au numéro de disque souhaité pour commencer sa reproduction (alors que le changeur de CD est en lecture).
Cette opération est possible uniquement lors de l’utilisation d’un changeur de CD JVC compatible MP3 (CH-X1500). • Ex. 2: Pour choisir la plage ou le fichier numéro 8 pendant la lecture de la plage ou le fichier numéro 36 Pour aller rapidement à une plage/fichier (touches +10 et –10) 1 Appuyez sur MODE pour entrer en mode de fonction pendant la lecture d’un disque. (Trois fois) (Deux fois) FRANÇAIS Plage/fichier 36 \ 30 \ 20 \ 10 \ 9 \ 8 2 Appuyez sur +10 ou –10.
Pour reproduire les plages/fichiers dans un ordre aléatoire (Lecture aléatoire de dossier/disque/magasin) lndicateur allumé Mode Reproduit aléatoirement FLDR RND* Les indicateurs et RND s’allument. Tous les fichiers du dossier actuel, puis les fichiers du dossier suivant, etc. DISC RND Les indicateurs et RND s’allument. Toutes les plages/ fichiers du disque actuel (ou spécifié). MAG RND L’indicateur Toutes les plages/ RND s’allume. fichiers des disques en place.
Indicateur allumé Mode FRANÇAIS TRK RPT Reproduit répétitivement L’indicateur La plage/le fichier RPT s’allume. actuel (ou spécifié). FLDR RPT* Les indicateurs et RPT s’allument. Tous les fichiers du dossier actuel (ou spécifié) du disque actuel. DISC RPT Toutes les plages/ fichiers du disque actuel (ou spécifié). Les indicateurs et RPT s’allument. Indicateur INT Ex.: Quand vous choisissez “TRK INT” Remarque: L’indicateur MP3 s’allume aussi si le disque en cours de lecture est un disque MP3.
Cette section est uniquement pour le KD-AR800/KD-G800. 1 Lecture de l’appareil extérieur Pour le KD-AR800: Appuyez répétitivement sur CD/CD-CH LINE. Pour le KD-AR800: Vous pouvez connecter un appareil extérieur aux fichiers LINE IN à l’arrière de l’appareil. • Vous pouvez aussi connecter le tuner SIRIUS à la prise du changeur de CD à l’arrière et le choisir comme appareil extérieur. CD CD-CH (ou SIRIUS) Pour choisir LINE IN, maintenez pressée CD/CD-CH LINE.
INFORMATIONS ADDITIONNELLES Modes sonores (réglages des niveaux de fréquences préréglés) La liste ci-dessous donne les réglages des niveaux de fréquences préréglés pour chaque mode sonore.
DÉPANNAGE Ce qui apparaît comme un problème n’est pas toujours très sérieux. Vérifier les points suivants avant d’appeler un centre de réparation. Symptômes Causes Remèdes Le niveau de volume est réglé au Ajustez-la sur le niveau optimum. niveau minimum. Les connexions sont incorrectes. Vérifiez les cordons et les connexions. • Cet appareil ne Le micro-ordinateur intégré peut Appuyez sur la touche de fonctionne pas du tout.
Lecture MP3/WMA FRANÇAIS Symptômes Causes Remèdes • Le disque ne peut pas être reproduit. Aucun fichier MP3/WMA n’est enregistré sur le disque. Changez le disque. Les fichiers MP3/WMA ne possèdent pas de code d’extension <.mp3> ou <.wma> dans leur nom de fichier. Ajoutez les codes d’extension <.mp3> ou <.wma> au nom des fichiers. Les fichiers MP3/WMA ne sont pas enregistrés dans un format compatible avec ISO 9660 Niveau 1, Niveau 2, Romeo ou Joliet. Changez le disque.
Cette section est uniquement pour le KD-AR800/KD-G800 Remèdes Il n’y a pas de disque dans le magasin. Insérez des disques dans le magasin. Les disques sont insérés à l’envers. Insérez les disques correctement. • “NO MAG” apparaît sur l’affichage. Aucun magasin n’est en place dans le changeur CD. Mettez un magasin en place. • “RESET 8” apparaît sur l’affichage. Cet appareil n’est pas connecté correctement à un changeur de CD.
ENTRETIEN Manipulation des disques Cet appareil est conçu pour reproduire les CD, CD-R (Enregistrables), CD-RW (Réinscriptibles) et les CD Text. • Cet appareil est aussi compatible avec les disques MP3 et WMA. FRANÇAIS Manipulation des disques Pour retirer un disque de Support central son boîtier, faites pression sur e support central du boîtier et retirez le disque en le tenant par ses arêtes. • Tenez toujours le disque par ses arêtes. Ne touchez pas la surface enregistrée.
SECTION AMPLIFICATEUR AUDIO SECTION LECTEUR CD Puissance de sortie maximum: Avant: 50 W par canal Arrière: 50 W par canal Puissance de sortie en mode continu (RMS): Avant: 19 W par canal pour 4 Ω, 40 Hz à 20 000 Hz à moins de 0,8% de distorsion harmonique totale. Arrière: 19 W par canal pour 4 Ω, 40 Hz à 20 000 Hz à moins de 0,8% de distorsion harmonique totale.
http://www.jvcmobile.com Visit us on-line for Technical Support & Customer Satisfaction Survey. US RESIDENTS ONLY Having TROUBLE with operation? Please reset your unit Refer to page of How to Reset Still having trouble?? USA ONLY Call 1-800-252-5722 http://www.jvc.com We can help you! EN, SP, FR 1203KKSMDTJEIN © 2003 VICTOR COMPANY OF JAPAN, LIMITED Cover001A_KD-AR800_G800[J]f.
Instructions CD RECEIVER KD-AR800/KD-G800/KD-G700