ENGLISH NEDERLANDS FRANÇAIS CD RECEIVER RECEPTEUR CD CD-RECEIVER KD-DB711 For canceling the display demonstration, see page 7. Pour annuler la démonstration des affichages, référez-vous à la page 7. Zie bladzijde 7 voor het annuleren van de displaydemonstratie. For installation and connections, refer to the separate manual. Pour l’installation et les raccordements, se référer au manuel séparé. Bijzonderheden over de installatie en aansluiting van het apparaat vindt u in de desbetreffende handleiding.
ENGLISH Thank you for purchasing a JVC product. Please read all instructions carefully before operation, to ensure your complete understanding and to obtain the best possible performance from the unit. IMPORTANT FOR LASER PRODUCTS 1. CLASS 1 LASER PRODUCT 2. CAUTION: Do not open the top cover. There are no user serviceable parts inside the unit; leave all servicing to qualified service personnel. 3. CAUTION: Visible and invisible laser radiation when open and interlock failed or defeated.
2 2 4 4 Disc operations ...................... 16 Playing a disc ..................................... 16 ....... 5 Sound adjustments ................ 20 Selecting preset sound modes (C-EQ: custom equalizer) .................. 20 How to reset your unit ........................... How to forcibly eject a disc ................... How to read this manual ........................ How to use the MODE button ............... Control panel — KD-DB711 Parts identification .................................
ENGLISH How to read this manual The following methods are used to made the explanations simple and easy-to-understand: • Some related tips and notes are explained in “More about this receiver” (see pages 28−30). • Button operations are mainly explained with the illustrations as follows: How to use the MODE button If you press MODE, the receiver goes into functions mode, then the number buttons and ¢/4 buttons work as different function buttons. Ex.: When number button 2 works as MO (monaural) button.
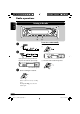
KD-DB711 ENGLISH Control panel — Parts identification Display window 1 2 3 4 5 6 7 8 9 p q w e r t y u i o ; +/– buttons DISP (display) button Loading slot Display window MODE button 0 (eject) button ¢/4 buttons (standby/on/attenuator) button SEL (select) button Remote sensor • See page 26.
ENGLISH Getting started Basic operations ~ Turn on the power. Ÿ Select a source. ⁄ Adjust the volume level. Volume level appears. Volume level indicator @ You cannot select some sources if they are not ready. ! Adjust the sound as you want. (See pages 20 and 21.) To drop the volume in a moment (ATT) • For FM/AM tuner: • For DAB tuner: To restore the sound, press it again. To turn off the power 6 EN06-11_KD-DB711[EX]f.
ENGLISH Canceling the display demonstration Setting the clock 1 If no operations are done for about 20 seconds, display demonstration starts. [Initial: DEMO ON]—see page 23. 1 2 3 4 Finish the procedure. 2 Set the hour, minute, and clock system. 1 Select “CLOCK H” (hour), then adjust the hour. 2 Select “CLOCK M” (minute), then adjust the minute. 3 Select “24H/12H,” then select “24H” (hour) or “12H” (hour). 3 Finish the procedure.
ENGLISH Radio operations Listening to the radio To tune in to a station manually ~ In step ! on the left... 1 Ÿ Lights up when receiving an FM stereo broadcast with sufficient signal strength. 2 Select the desired station frequencies. Selected band appears. ! Start searching for a station. When a station is received, searching stops. To stop searching, press the same button again. 8 EN06-11_KD-DB711[EX]f.
1 Storing stations in memory You can preset six stations for each band. ENGLISH When an FM stereo broadcast is hard to receive FM station automatic presetting— SSM (Strong-station Sequential Memory) 2 1 Lights up when monaural mode is activated. 2 Select the FM band (FM1 – FM3) Reception improves, but stereo effect will be lost. To restore the stereo effect, repeat the same procedure so that “MONO OFF” appears. • The MO indicator also goes off. you want to store into.
ENGLISH Manual presetting Ex.: Storing FM station of 92.5 MHz into the preset number 4 of the FM1 band. Listening to a preset station 1 1 2 2 3 Select the preset station (1 – 6) you want. 3 • If the preset station is an FM RDS station, you can use Programme Search (see page 23). To check the current clock time while listening to an FM (non-RDS) or AM station 4 • For FM RDS stations, see pages 11 − 13. Preset number flashes for a while. 10 EN06-11_KD-DB711[EX]f.
ENGLISH FM RDS operations Searching for your favorite FM RDS programme You can tune in to a station broadcasting your favorite programme by searching for a PTY code —PTY Search. ! Start searching for your favorite programme. ~ The last selected PTY code appears. Ÿ Select one of your favorite programme type. If there is a station broadcasting a programme of the same PTY code as you have selected, that station is tuned in. PTY codes or Select one of the twenty-nine PTY codes.
ENGLISH What you can do with RDS Radio Data System (RDS) allows FM stations to send an additional signal along with their regular programme signals.
PTY Standby Reception allows the receiver to switch temporarily to your favorite PTY programme from any source other than AM. To select your favorite PTY code, and activate the PTY Standby Reception, see page 23. • PTY Standby Reception also works for searching a DAB service. The PTY indicator either lights up or flashes. • If the PTY indicator lights up, PTY Standby Reception is activated. • If the PTY indicator flashes, PTY Standby Reception is not yet activated.
ENGLISH DAB tuner operations Listening to the DAB tuner To tune in to an ensemble manually ~ In step ! on the left... 1 Ÿ ! 2 Select the desired ensemble frequencies. Start searching for an ensemble. What is DAB system? When an ensemble is received, searching stops. To stop searching, press the same button again. ⁄ Select a service (either primary or secondary) to listen to. DAB can deliver CD quality sound without any annoying interference and signal distortion.
You can preset six DAB services (primary) for each band. 1 Perform steps ~ to ⁄ on page 14, to select a service you want. 2 Select the preset number (1 – 6) you want to store into. Tracking the same programme— Alternative Frequency Reception You can keep listening to the same programme by activating the Alternative Frequency Reception. ENGLISH Storing DAB services in memory When shipped from the factory, Alternative Frequency Reception is activated.
ENGLISH Disc operations Playing a disc All tracks will be played repeatedly until you change the source or eject the disc. About MP3 and WMA discs • When inserting an audio CD or a CD Text disc: MP3 and WMA (Windows Media® Audio) “tracks” (words “file” and “track” are used interchangeably) are recorded in “folders.
Fast-forwards. To locate a particular track (for CD) or folder (for MP3 or WMA discs) directly To select a number from 01 – 06: ENGLISH To fast-forward or reverse the track Reverses. To select a number from 07 – 12: To go to the next or previous tracks To the following tracks. To the beginning of the current track, then the previous tracks.
ENGLISH Changing the display information While playing an audio CD or a CD Text *1 If the current disc is an audio CD, “NO NAME” appears. While playing an MP3 or WMA disc • When “TAG DISP” is set to “TAG ON” (see page 24) *2 If an MP3/WMA file does not have ID3 tags, folder name and file name appear. In this case, the TAG indicator will not light up. • When “TAG DISP” is set to “TAG OFF” 18 EN12-19_KD-DB711[EX]f.
ENGLISH Selecting the playback modes You can use only one of the following playback modes at a time. 1 2 Select your desired playback mode. Repeat play Mode Plays repeatedly TRK RPT: The current track. • RPT lights up. FLDR RPT*: All tracks of the current folder. • and RPT light up. RPT OFF: Cancels. Ex.: When “TRK RPT” is selected while playing an MP3 disc Random play Mode Plays at random FLDR RND*: All tracks of the current folder, then tracks of the next folder and so on. • RND and light up.
ENGLISH Sound adjustments Selecting preset sound modes (C-EQ: custom equalizer) You can select a preset sound mode suitable to the music genre. ~ Ÿ Indication For: Preset values BAS*1 TRE*2 LOUD*3 USER (Flat sound) 00 00 OFF ROCK Rock or disco music +03 +01 ON CLASSIC Classical music +01 –02 OFF POPS Light music +04 +01 OFF HIP HOP Funk or rap music +02 00 ON JAZZ Jazz music +02 +03 OFF *1 BAS: Bass *2 TRE: Treble *3 LOUD: Loudness Ex.
You can adjust the sound characteristics to your preference. 1 Ex.: When “TRE” is selected Indication BAS*1 To do: Range Adjust the bass. –06 (min.) to +06 (max.) TRE*1 (treble) Adjust the treble. –06 (min.) to +06 (max.) FAD*2 (fader) Adjust the front and rear speaker balance. R06 (Rear only) to F06 (Front only) BAL (balance) Adjust the left and right speaker balance.
ENGLISH General settings — PSM Basic procedure You can note your PSM setting in the table below. You can change PSM (Preferred Setting Mode) items listed in the table that follows. DEMO 1 CLOCK M CLOCK H 24H/12H CLK ADJ AF-REG PTY-STBY TA VOL 2 Select a PSM item. P-SEARCH DAB AF DAB VOL DAB ANT DIMMER TEL Ex.: When you select “DIMMER” 3 Adjust the PSM item selected. SCROLL TAG DISP AMP GAIN 4 Repeat steps 2 and 3 to adjust the other PSM items if necessary. 5 Finish the procedure.
Selectable settings, [reference page] DEMO Display demonstration DEMO ON: CLOCK H Hour adjustment 0 – 23 (1 – 12), [7] [Initial: 0 (0:00)] CLOCK M Minute adjustment 00 – 59, [7] [Initial: 00 (0:00)] 24H/12H 24 hours or 12 hours time display 12H O 24H, [7] [Initial: 24H] CLK ADJ Clock adjustment AUTO: [Initial]; Display demonstration will be activated automatically if no operation is done for about 20 seconds, [7]. DEMO OFF: Cancels.
ENGLISH Indications Selectable settings, [reference page] DAB AF Alternative frequency reception AF ON: [Initial]; Traces the programme among DAB services and FM RDS stations, [15]. AF OFF: Cancels. DAB VOL DAB volume adjustment You can adjust the volume level (VOL –12 — VOL +12) of DAB tuner to match the FM sound level and store it in memory. [Initial: VOL 00] DAB ANT DAB aerial You can allow this receiver to supply the power to the DAB aerial with the booster (not supplied).
When detaching or attaching the control panel, be careful not to damage the connectors on the back of the control panel and on the panel holder. Attaching the control panel ENGLISH Detaching the control panel Detaching the control panel Before detaching the control panel, be sure to turn off the power. 25 EN20-26_KD-DB711[EX]f.
ENGLISH Using the remote controller — This receiver can be remotely controlled as instructed here (with an optionally purchased remote controller). We recommend that you use remote controller RM-RK60 with your receiver. • When operating, aim the remote controller directly at the remote sensor on the receiver. Make sure there is no obstacle in between.
How to clean the connectors Frequent detachment will deteriorate the connectors. To minimize this possibility, periodically wipe the connectors with a cotton swab or cloth moistened with alcohol, being careful not to damage the connectors. To keep discs clean A dirty disc may not play correctly. If a disc does become dirty, wipe it with a soft cloth in a straight line from center to edge. • Do not use any solvent (for example, conventional record cleaner, spray, thinner, benzine, etc.) to clean discs.
ENGLISH More about this receiver Basic operations FM RDS operations Turning on the power • If you want to know more about RDS, visit «http://www.rds.org.uk». • Network-Tracking Reception requires two types of RDS signals—PI (Programme Identification) and AF (Alternative Frequency) to work correctly. Without receiving these data correctly, NetworkTracking Reception will not operate. • If a Traffic Announcement is received, the volume level (TA Volume) automatically changes to the preset level.
Playing a CD-R or CD-RW Caution for DualDisc playback • Use only “finalized” CD-Rs or CD-RWs. • This receiver can play back only the files of the same type which is first detected if a disc includes both audio CD (CD-DA) files and MP3/WMA files. • This receiver can play back multi-session discs; however, unclosed sessions will be skipped while playing.
ENGLISH Playing an MP3/WMA disc • This receiver can play back MP3/WMA files with the extension code <.mp3> or <.wma> (regardless of the letter case—upper/lower). • This receiver can show the names of albums, artists (performer), and ID3 Tag (Version 1.0, 1.1, 2.2, 2.3, or 2.4) for MP3 files and for WMA files. • This receiver can handle only one-byte characters. No other characters can be correctly displayed.
What appears to be trouble is not always serious. Check the following points before calling a service center. Symptoms Adjust it to the optimum level. Connections are incorrect. Check the cords and connections. • The receiver does not work at all. The built-in microcomputer may have functioned incorrectly due to noise, etc. Reset the receiver (see page 2). • SSM automatic presetting does not work. Signals are too weak. Store stations manually. • Static noise while listening to the radio.
ENGLISH Symptoms Remedies No MP3/WMA tracks are recorded on the disc. Change the disc. MP3/WMA tracks do not have the extension code <.mp3> or <.wma> in their file names. Add the extension code <.mp3> or <.wma> to their file names. MP3/WMA tracks are not recorded in the format compliant with ISO 9660 Level 1, Level 2, Romeo, or Joliet. Change the disc. (Record MP3/WMA tracks using a compliant application.) • Noise is generated.
AUDIO AMPLIFIER SECTION Maximum Power Output: Front: 50 W per channel Rear: 50 W per channel Continuous Power Output (RMS): Front: 19 W per channel into 4 Ω, 40 Hz to 20 000 Hz at no more than 0.8% total harmonic distortion. Rear: 19 W per channel into 4 Ω, 40 Hz to 20 000 Hz at no more than 0.8% total harmonic distortion.
Having TROUBLE with operation? Please reset your unit Refer to page of How to reset your unit Vous avez des PROBLÈMES de fonctionnement? Réinitialisez votre appareil Référez-vous à la page intitulée Comment réinitialiser votre appareil Hebt u PROBLEMEN met de bediening? Stel het apparaat terug Zie de pagina met de paragraaf Het apparaat terugstellen EN, FR, NL © 2005 Victor Company of Japan, Limited Rear_KD-DB711[EX]f.
KD-DB711 Installation/Connection Manual Manuel d’installation/raccordement Handleiding voor installatie/aansluiting LVT1309-009A 0105MNMMDWJEIN EN, FR, NL [EX] ENGLISH FRANÇAIS This unit is designed to operate on 12 V DC, NEGATIVE ground electrical systems. If your vehicle does not have this system, a voltage inverter is required, which can be purchased at JVC INCAR ENTERTAINMENT dealer. Parts list for installation and connection The following parts are provided for this receiver.
Removing the receiver Retrait de l’appareil Verwijderen van de receiver • Before removing the receiver, release the rear section. • Avant de retirer l’appareil, libérez la section arrière. • Voordat u het apparaat verwijdert, moet u het achtergedeelte losmaken. 3 1 Insert the two handles, then pull them as illustrated so that the receiver can be removed. Insérez les deux poignées, puis tirez de la façon illustrée de façon à retirer l’appareil.
ENGLISH NEDERLANDS FRANÇAIS ELECTRICAL CONNECTIONS RACCORDEMENTS ELECTRIQUES ELEKTRISCHE VERBINDINGEN To prevent short circuits, we recommend that you disconnect the battery’s negative terminal and make all electrical connections before installing the receiver. • Be sure to ground this unit to the car’s chassis again after installation.
PRECAUTIONS on power supply and speaker connections: PRECAUTIONS sur l’alimentation et la connexion des enceintes: VOORZORGSMAATREGELEN bij het verbinden van de stroomkabeld en de luidsprekers: • DO NOT connect the speaker leads of the power cord to the car battery; otherwise, the unit will be seriously damaged. • BEFORE connecting the speaker leads of the power cord to the speakers, check the speaker wiring in your car.