DVD/CD RECEIVER KD-ADV5380/KD-DV5300 ENGLISH RECEPTOR CON DVD/CD KD-ADV5380/KD-DV5300 ESPAÑOL RÉCEPTEUR DVD/CD KD-ADV5380/KD-DV5300 FRANÇAIS For canceling the display demonstration, see page 7. Para cancelar la demostración en pantalla, consulte la página 7. Pour annuler la démonstration des affichages, référez-vous à la page 7. For installation and connections, refer to the separate manual. Para la instalación y las conexiones, refiérase al manual separado.
ENGLISH Thank you for purchasing a JVC product. Please read all instructions carefully before operation, to ensure your complete understanding and to obtain the best possible performance from the unit. INFORMATION (For U.S.A.) This equipment has been tested and found to comply with the limits for a Class B digital device, pursuant to Part 15 of the FCC Rules. These limits are designed to provide reasonable protection against harmful interference in a residential installation.
• Your preset adjustments will also be erased. How to forcibly eject a disc • Be careful not to drop the disc when it ejects. • If this does not work, reset your unit. How to use functions mode If you press M MODE, the unit goes into functions mode, then the number buttons and 5/∞ buttons work as different function buttons.
ENGLISH Detaching the control panel This product incorporates copyright protection technology that is protected by U.S. patents and other intellectual property rights. Use of this copyright protection technology must be authorized by Macrovision, and is intended for home and other limited viewing uses only unless otherwise authorized by Macrovision. Reverse engineering or disassembly is prohibited. KD-ADV5380 is equipped with the steering wheel remote control function.
INTRODUCTIONS Playable disc type ...................................................................................... 6 ENGLISH CONTENTS Preparation ............................................................................................... 7 OPERATIONS Basic operations • Control panel ....................................................................................... 8 • Remote controller (RM-RK241).............................................................. 9 Listening to the radio .......
ENGLISH Playable disc type Disc type DVD DVD Recordable/Rewritable (DVD-R *2/-RW, +R/+RW *3) DVD-RAM Dual Disc CD/VCD CD Recordable/Rewritable (CD-R/-RW) • Compliant to ISO 9660 level 1, level 2, Romeo, Joliet Recording format, file type, etc DVD-Video (Region Code numbers include “1”) * Playable 1 DVD-Audio DVD-ROM DVD-Video DivX Video MPEG-1/MPEG-2 Video MP3/WMA/WAV JPEG/MPEG4 DVD-VR, +VR All DVD side Non-DVD side Audio CD (CD-DA)/DTS-CD *4 VCD (Video CD) CD-Text CD-ROM CD-I (CD-I Ready) CD-DA DivX
ENGLISH Preparation Cancel the display demonstration and set the clock • See also page 28. When the power is turned off: Check the current clock time When the power is turned on: Change the display information ~ Ÿ !]⁄ Turn on the power. Enter the PSM settings. Cancel the display demonstrations Select “DEMO,” then “DEMO OFF.” Set the clock Select “CLOCK H” (hour), then adjust the hour. Select “CLOCK M” (minute), then adjust the minute. @ Finish the procedure. INTRODUCTIONS EN02-07_ADV5380[J]2.
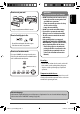
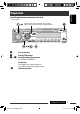
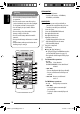
ENGLISH Basic operations — Control panel • • • • FM/AM: Select preset station. SIRIUS/XM: Select category. DISC: Select title/folder. IPOD/D.PLAYER: Enter the main menu/ Pause or stop playback/Confirm selection. Change the display information. Select the sound mode. • Turn on the power. • Turn off the power [Hold]. • Attenuate the sound (if the power is on). Display window Loading slot Volume control [Turn] Eject disc. • Adjust the sound mode. • Enter the PSM settings [Hold].
Display window Playback mode/item indicators (Random/Repeat) Playback source indicators Tuner reception indicators Equalizer indicator Sound mode indicators Source display/Preset No./Track No./ Folder No./Disc No./Chapter No.
ENGLISH Warning: To prevent accidents and damage • Do not install any battery other than CR2025 or its equivalent. • Do not leave the remote controller in a place (such as dashboards) exposed to direct sunlight for a long time; otherwise, it may explode. • Store the battery in a place where children cannot reach. • Do not recharge, short, disassemble, heat the battery, or dispose of it in a fire. • Do not leave the battery with other metallic materials.
For Apple iPod/JVC D. player operations: • ∞ : Pauses/stops or resumes playback. 5 : Enters the main menu. (Now 5/∞/4 / ¢ work as the menu selecting buttons.) *3 • 4 / ¢ (in menu selecting mode): – Selects an item if pressed briefly. (Then, press ∞ to confirm the selection.) – Skips 10 items at a time if pressed and held. • 4/¢: – Reverse skip/forward skip if pressed briefly. – Reverse search/forward search if pressed and held. e Shows the on-screen bar.
ENGLISH Listening to the radio Change the display information * If no name is assigned to a station, “NO NAME” appears. To assign a name to a station, see page 32. Select preset station. ~ Ÿ ! Lights up when receiving an FM stereo broadcast with sufficient signal strength. Select “FM/AM.” Select the bands. Search for a station to listen—Auto Search. Manual Search: Hold either one of the buttons until “M” flashes on the display, then press it repeatedly.
Before performing any operations... Turn on the monitor to watch the playback picture. If you turn on the monitor, you can also control playback of other discs by referring to the monitor screen. (See pages 17 – 20.) The disc type is automatically detected, and playback starts automatically (for DVD: automatic start depends on its internal program). If the current disc does not have any disc menu, all tracks will be played repeatedly until you change the source or eject the disc.
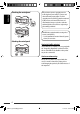
ENGLISH Operations using the control panel Pressing (or holding) the following buttons allows you to...
ENGLISH Operations using the remote controller—RM-RK241 : Stop play : Pause (Frame by frame playback if pressed during pause.) : Start play : Reverse/forward chapter search *1 • Slow motion *2 during pause. No sound can be heard. : Press: Select chapter (during play or pause) Hold: Reverse/fast-forward chapter search *3 : Select title : Select audio language : Select subtitle language : Select view angle To search for chapter/title directly 1 Select chapter/title search. Using menu driven features...
ENGLISH : Stop play : Pause (Frame by frame playback if pressed during pause.) : Start play : Reverse/forward track search *1 • Forward slow motion *2 during pause. No sound can be heard. (Reverse slow motion does not work.
Enlarging the view—Zoom in (DVD/DivX/MPEG Video/VCD) 1 While holding , press ENGLISH During moving picture playback... repeatedly. 2 Move the enlarged portion. • To cancel zoom, select “ZOOM OFF.” Operations using the on-screen bar (DVD/DivX/MPEG Video/VCD) These operations are possible on the monitor using the remote controller. ~ Show the on-screen bar (see page 18). (twice) Ÿ Select an item. ! Make a selection. If pop-up menu appears... .
ENGLISH On-screen bar Ex.: DVD-Video Information Operation 1 Disc type 2 • DVD-Video/DTS-CD: Audio signal format type • VCD: and channel PBC 3 Playback mode *1 DVD-Video: T. RPT: Title repeat C. RPT: Chapter repeat DivX/MPEG Video: T. RPT: Track repeat F. RPT: Folder repeat VCD *2: T. RPT: Track repeat D. RND: Disc random T.
Operations using the control screen (DivX/MPEG Video/MP3/WMA/WAV/CD) ~ ENGLISH These operations are possible on the monitor using the remote controller. Show the control screen. DivX/MPEG Video: Press during play. MP3/WMA/WAV/CD: Automatically appear during play. Ÿ Select “Folder” column or “Track” column (except for CD). ! Select a folder or track. ⁄ Start playback. DivX/MPEG Video: Press . MP3/WMA/WAV/CD: Playback starts automatically.
ENGLISH Mode Playback functions F. RPT (folder repeat): Repeat current folder T. RPT (track repeat): Repeat current track F. INT (folder intro): Plays the beginning 15 seconds of first tracks of all folders of the current disc T. INT (track intro): Plays the beginning 15 seconds of all tracks of the current disc D. RND (disc random): Randomly play all tracks F.
ENGLISH Listening to the CD changer Change the display information (see page 13) It is recommended to use a JVC MP3-compatible CD changer with your unit. • You can only play conventional CDs (including CD Text) and MP3 discs. ~ Ÿ Select “CD-CH.” Select a disc to start playing. Press: For selecting disc number 1 – 6. Hold: For selecting disc number 7 – 12. Press: Select track Hold: Reverse/fast-forward track MP3: Select folders After pressing , press the following buttons to...
ENGLISH Listening to the satellite radio Before operating, connect either one of the following (separately purchased) to the CD changer jack on the rear of this unit. • JVC SIRIUS radio DLP—Down Link Processor, for listening to the SIRIUS Satellite radio. • XMDirect™ Universal Tuner Box—Using a JVC Smart Digital Adapter (XMDJVC100: not supplied), for listening to the XM Satellite radio. GCI (Global Control Information) update • If channels are updated after subscription, updating starts automatically.
* Only for SIRIUS Satellite radio ENGLISH Change the display information Select preset channel. ~ Ÿ Select “SIRIUS” or “XM.” Select the bands. SIRIUS: XM: ! ⁄ Select a category. Select a channel to listen. • Holding the button changes the channels rapidly. • SIRIUS: If you select “ALL” in step !, you can tune in to all the channels of all categories. • XM: If you do not select a channel within 15 seconds, category selected in step ! is canceled.
ENGLISH Listening to the iPod / D. player Change the display information Before operating, connect either one of the following (separately purchased) to the CD changer jack on the rear of this unit. • Interface adapter for iPod—KS-PD100 for controlling an iPod. • D. player interface adapter—KS-PD500 for controlling a D. player. Preparations Make sure “CHANGER” is selected for the external input setting, see page 29. ~ Ÿ For D.
, press the following buttons to... ENGLISH After pressing Functions the same as “Repeat One” or “Repeat Mode = One.” Functions the same as “Repeat All” or “Repeat Mode = All.” ONE RPT: ALL RPT: ALBM RND *: Functions the same as “Shuffle Albums” of the iPod. SONG RND/RND ON: Functions the same as “Shuffle Songs” or “Random Play = On.” • To cancel repeat play or random play, select “RPT OFF” or “RND OFF.” * iPod: Functions only if you select “ALL” in “ALBUMS” of the main “MENU.
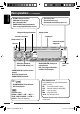
ENGLISH Concept diagram of the external device connection • For connection, see Installation/Connection manual (separate volume). AUX input terminal on the control panel MD player, etc., [25] SIRIUS Satellite radio (JVC DLP), [22] Unit XM Satellite radio, [22] MD player, etc., [25] CD changer jack Control panel MD player, etc., [25] (see page 29 of the ”EXT IN” setting) SIRIUS Satellite radio (JVC PnP) JVC CD changer, [21] Apple iPod, [24] (see page 29 of the ”EXT IN” setting) JVC D.
Adjusting the sound 1 You can change PSM (Preferred Setting Mode) items (except “SID”) listed in the table on pages 28 and 29. Adjust the level. BAS *1 (bass) Adjust the bass. –06 to +06 TRE *1 (treble) Adjust the treble. –06 to +06 FAD *2 (fader) Adjust the front and rear speaker balance. R06 to F06 BAL (balance) Adjust the left and right speaker balance. L06 to R06 LOUD ON or LOUD *1 (loudness) Boost low and high frequencies to LOUD OFF produce a well-balanced sound at low volume level. VOL.
ENGLISH Indication Item ( : Initial) Setting, [reference page] • DEMO ON : Display demonstration will be activated automatically if no DEMO Display demonstration operation is done for about 20 seconds, [7]. • DEMO OFF : Cancels. CLK DISP *1 Clock display • ON • OFF : Clock time is shown on the display at all times when the power is turned off. : Cancels; pressing DISP will show the clock time for about 5 seconds when the power is turned off, [7].
Item ( : Initial) Setting, [reference page] DIMMER Dimmer • ON • OFF : Dims the display illumination. : Cancels. SCROLL *5 Scroll • ONCE • AUTO • OFF : Scrolls the track information once. : Repeats scrolling (at 5-second intervals). : Cancels. (Holding DISP can scroll the display regardless of the setting.) EXT IN *6 External input • CHANGER • EXT IN : To use a JVC CD changer, [21], or an Apple iPod/a JVC D. player, [24]. : To use any other external component than the above, [25].
ENGLISH Disc setup menu These operations are possible on the monitor using the remote controller. ~ Enter the disc setup menu while stop. Ÿ Select a menu. ! Select an item you want to set up. ⁄ Select an option. • To cancel pop-up menu, press . To return to normal screen LANGUAGE Menu Item Setting MENU LANGUAGE Select the initial disc menu language. Refer also to “Language codes” on page 38. AUDIO LANGUAGE Select the initial audio language. Refer also to “Language codes” on page 38.
Setting MONITOR TYPE Select the monitor type to watch a wide screen picture on your monitor. OSD POSITION Select the on-screen bar position on the monitor. • 1 : Higher position • 2 : Lower position (Guidance below the disc setup menu will disappear.) FILE TYPE Select the file type to play. • AUDIO : Play MP3/WMA/WAV files. • VIDEO : Play DivX/MPEG Video files. DIGITAL AUDIO OUTPUT Select the signal format to be emitted through the DIGITAL OUT (Optical) terminal. • OFF : Cancels.
ENGLISH Assigning titles You can assign titles to 30 station frequencies (FM and AM) and up to 8 characters for each title. ~ Ÿ ! To erase the entire title In step Ÿ on the left... Select FM/AM. Show the title entry screen. Assign a title. Available characters 1 Select a character. 2 Move to the next (or previous) character position. 3 Repeat steps 1 and 2 until you finish entering the title. ⁄ 32 Finish the procedure. SETTINGS EN30-37_ADV5380[J]2.
How to clean the connectors Frequent detachment will deteriorate the connectors. To minimize this possibility, periodically wipe the connectors with a cotton swab or cloth moistened with alcohol, being careful not to damage the connectors. To keep discs clean A dirty disc may not play correctly. If a disc does become dirty, wipe it with a soft cloth in a straight line from center to edge. • Do not use any solvent (for example, conventional record cleaner, spray, thinner, benzine, etc.) to clean discs.
ENGLISH More about this unit General Turning on the power • By pressing SRC on the unit, you can also turn on the power. If the source is ready, playback starts. Turning off the power • If you turn off the power while listening to a disc, disc play will start automatically, next time you turn on the power. FM/AM Storing stations in memory • During SSM search... – Received stations are preset in No. 1 (lowest frequency) to No. 6 (highest frequency). – When SSM is over, the station stored in No.
• This unit can play back DivX files with the extension code <.divx>, <.div>, <.avi> (regardless of the letter case—upper/lower). • This unit supports DivX 6.x, 5.x, 4.x, and 3.11. • This unit supports DivX Media Format files, <.divx> or <.avi>. • This unit can display a unique registration code— DivX Video-on-Demand (VOD—a kind of Digital Rights Management). For activation and more details, visit . • Audio stream should conform to MP3 or Dolby Digital.
ENGLISH General settings—PSM • If you change the “AMP GAIN” setting from “HIGH PWR” to “LOW PWR” while the volume level is set higher than “VOL 30,” the unit automatically changes the volume level to “VOL 30.” Disc setup menu • When the language you have selected is not recorded on a disc, the original language is automatically used as the initial language. In addition, for some discs, the initial languages settings will not work as you set due to their internal disc programming.
During playback, the following guide icons may appear for a while on the monitor. : : : : : : Playback Pause DVD-Video/VCD: Forward slow motion DVD-Video: Reverse slow motion Forward search Reverse search DVD: The following icons appear at the beginning of a scene containing: : : : Multi-subtitle languages Multi-audio languages Multi-angle views ENGLISH On-screen guide icons • Manufactured under license from Dolby Laboratories. Dolby and the double-D symbol are trademarks of Dolby Laboratories.
ENGLISH Language codes Code Language Code Language Code Language Code Language Code Language OC ST AA Afar FA Persian KL AB Abkhazian FI Finnish KM Cambodian Greenlandic Occitan AF Afrikaans FJ Fiji KN Kannada OR Oriya SW Swahili AM Ameharic FO Faroese KO Korean (KOR) PA Panjabi TA TE OM (Afan) Oromo SU Sesotho Sundanese Tamil AR Arabic FY Frisian KS Kashmiri PL Polish AS Assamese GA Irish KU Kurdish PS Pashto, Pushto TG Tajik Telugu AY Aymara GD S
ENGLISH Troubleshooting Remedy/Cause General • Sound cannot be heard from the speakers. • Adjust the volume to the optimum level. • Check the cords and connections. • The unit does not work at all. Reset the unit (see page 3). • SSM automatic presetting does not work. Store stations manually. • Static noise while listening to the radio. Connect the antenna firmly. • Disc cannot be played back. Insert the disc correctly. • Disc can be neither played back nor ejected.
DivX/MPEG Video/MP3/WMA/WAV CD changer ENGLISH Symptom Remedy/Cause • Longer readout time is required. Readout time varies due to the complexity of the folder/ file configuration. Do not use too many hierarchies and folders. • Tracks cannot play back as you have intended them to play. Playback order is determined when files are recorded. • No sound can be heard when picture is displayed while playing a DivX/MPEG Video file.
Symptom Remedy/Cause iPod/D. player Satellite radio ENGLISH • “NO (information)*” scrolls on the display No text information for the selected channel. while listening to the SIRIUS Satellite radio. • “---” appears on the display while listening to the XM Satellite radio. • “---” appears on the display for about 2 seconds, then returns to the previous channel while listening to the XM Satellite radio. Selected channel is no longer available or is unauthorized.
ENGLISH Specifications Power Output: 20 W RMS × 4 Channels at 4 Ω and ≤ 1% THD+N AUDIO AMPLIFIER SECTION Signal to Noise Ratio: 80 dBA (reference: 1 W into 4 Ω) Load Impedance: Tone Control Range: Audio Output Level: 4 Ω (4 Ω to 8 Ω allowance) Bass: ±12 dB at 100 Hz Treble: ±12 dB at 10 kHz Digital (DIGITAL OUT: Optical): Signal wave length: 660 nm Output level: –21 dBm to –15 dBm Line-Out Level/Impedance: 2.
Signal Detection System: Non-contact optical pickup (semiconductor laser) Frequency Response: 2 channels (stereo) DVD, fs=48 kHz/96 kHz: 16 Hz to 22 000 Hz CD, fs=44.1 kHz: 16 Hz to 20 000 Hz Dynamic Range: 96 dB Signal-to-Noise Ratio: 98 dB DVD/CD PLAYER SECTION Wow and Flutter: DivX/MPEG Video: Less than measurable limit Video: Max.
Having TROUBLE with operation? Please reset your unit Refer to page of How to reset your unit Still having trouble?? USA ONLY Call 1-800-252-5722 http://www.jvc.com We can help you! EN, SP, FR © 2006 Victor Company of Japan, Limited Rear_KD-ADV5380[J]3.
KD-ADV5380/KD-DV5300 Installation/Connection Manual Manual de instalación/conexión Manuel d’installation/raccordement GET0444-002A 1206DTSMDTJEIN [J] EN, SP, FR © 2006 Victor Company of Japan, Limited ENGLISH ESPAÑOL FRANÇAIS This unit is designed to operate on 12 V DC, NEGATIVE ground electrical systems. If your vehicle does not have this system, a voltage inverter is required, which can be purchased at JVC car audio dealers.
Parts list for installation and connection Lista de piezas para instalación y conexión If any item is missing, consult your JVC car audio dealer immediately. Si hay algún elemento faltante, consulte inmediatamente con su concesionario de JVC de equipos de audio para automóviles.
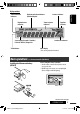
INSTALLATION (IN-DASH MOUNTING) INSTALACION (MONTAJE EN EL TABLERO DE INSTRUMENTOS) INSTALLATION (MONTAGE DANS LE TABLEAU DE BORD) The following illustration shows a typical installation. If you have any questions or require information regarding installation kits, consult your JVC car audio dealer or a company supplying kits. • If you are not sure how to install this unit correctly, have it installed by a qualified technician. La siguiente ilustración muestra una instalación típica.
ENGLISH ESPAÑOL ELECTRICAL CONNECTIONS A FRANÇAIS CONEXIONES ELECTRICAS RACCORDEMENTS ELECTRIQUES Typical connections / Conexiones tipicas / Raccordements typiques Before connecting: Check the wiring in the vehicle carefully. Incorrect connection may cause serious damage to this unit. The leads of the power cord and those of the connector from the car body may be different in color. 1 Connect the colored leads of the power cord in the order specified in the illustration below.
C Connecting the crimp connector / Conexión del conector de presión / Connexion de la cosse sertie Wire connecting the battery and the parking brake switch. Conecte el cable del freno de estacionamiento a este punto. Fil connectant la batterie et l’interrupteur de frein de stationnement. Contact the metallic part of the crimp to the wires inside. Conecte la parte metálica de la sujeción a los cables de dentro. Mettez en contact la partie métallique de la cosse à sertir et des fils intérieurs.
G Connecting the external components / Conexión delos componentes externos / Connexion des appareils extérieurs You can connect these components in series as illustrated below. Los componentes externos se pueden conectar en serie, tal como se muestra en el diagrama siguiente. Vous pouvez connecter ces appareils en série comme montrée sur l’illustration. • To use JVC CD changer, Apple iPod or JVC D. player, set the external input setting to “CHANGER” (see page 29 of the INSTRUCTIONS).