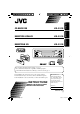
RECEPTOR CON CD KD-G110 RECEPTEUR CD KD-G110 ENGLISH KD-G110 FRANÇAIS ESPAÑOL CD RECEIVER For canceling the display demonstration, see page 7. Para cancelar la demostración en pantalla, consulte la página 7. Pour annuler la démonstration des affichages, référez-vous à la page 7. For installation and connections, refer to the separate manual. Para la instalación y las conexiones, refiérase al manual separado. Pour l’installation et les raccordements, se référer au manuel séparé.
ENGLISH Thank you for purchasing a JVC product. Please read all instructions carefully before operation, to ensure your complete understanding and to obtain the best possible performance from the unit. INFORMATION (For U.S.A.) This equipment has been tested and found to comply with the limits for a Class B digital device, pursuant to Part 15 of the FCC Rules. These limits are designed to provide reasonable protection against harmful interference in a residential installation.
2 2 4 4 Sound adjustments ................ 12 Selecting preset sound modes (C-EQ: custom equalizer) .................. 12 KD-G110 ......... 5 Parts identification................................. 5 General settings — PSM ......... 14 How to reset your unit ........................... How to forcibly eject a disc................... How to read this manual........................ How to use the MODE button ............... Control panel — Adjusting the sound ...............................
ENGLISH How to read this manual The following methods are used to made the explanations simple and easy-to-understand: • Some related tips and notes are explained in “More about this receiver” (see page 17). • Button operations are mainly explained with the illustrations as follows: How to use the MODE button If you press MODE, the receiver goes into functions mode, then the number buttons work as different function buttons. Ex.: When number button 2 works as MO (monaural) button. Press briefly.
KD-G110 ENGLISH Control panel — Parts identification Display window 1 2 3 4 5 6 7 8 9 p q w e r t y u i +/– buttons DISP (display) button Loading slot Display window MODE button 0 (eject) button ¢/4 buttons (standby/on/attenuator) button SEL (select) button MO (monaural) button SSM (Strong-station Sequential Memory) button CD button FM/AM button RPT (repeat) button RND (random) button EQ (equalizer) button (control panel release) button Number buttons Display window o Tuner reception indicators MO (mo
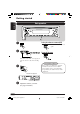
ENGLISH Getting started Basic operations To drop the volume in a moment (ATT) ~ To restore the sound, press it again. Ÿ To turn off the power You cannot select “CD” as the playback source if there is no disc in the loading slot. Caution on volume setting: ! Discs produce very little noise compared with other sources. Lower the volume before playing a disc to avoid damaging the speakers by the sudden increase of the output level. Volume level appears.
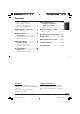
Setting the clock 1 If no operations are done for about 20 seconds, display demonstration starts. [Initial: DEMO ON]—see page 14. 1 ENGLISH Canceling the display demonstrations 2 Set the hour and minute. 1 Select “CLOCK H” (hour), then adjust the hour. 2 Select “CLOCK M” (minute), 2 then adjust the minute. 3 Finish the procedure. 3 To check the current clock time when the power is turned off 4 Finish the procedure. To activate the display demonstration In step 3 above... 7 EN06-09_KD-G110[J]f.
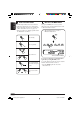
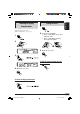
ENGLISH Radio operations Listening to the radio ~ 2 Select the desired station frequencies. Lights up when receiving an FM stereo broadcast with sufficient signal strength. Selected band appears. Ÿ When an FM stereo broadcast is hard to receive 1 Start searching for a station. 2 When a station is received, searching stops. To stop searching, press the same button again. Lights up when monaural mode is activated. To tune in to a station manually In step Ÿ above...
2 ENGLISH Storing stations in memory You can preset six stations for each band. FM station automatic presetting— SSM (Strong-station Sequential Memory) 1 Select the FM band (FM1 – FM3) you want to store into. 3 2 Preset number flashes for a while. 3 Listening to a preset station 1 2 Select the preset station (1 – 6) you “SSM” flashes, then disappears when automatic presetting is over. want. Local FM stations with the strongest signals are searched and stored automatically in the FM band.
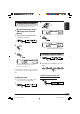
ENGLISH Disc operations Playing a disc All tracks will be played repeatedly until you stop playback. To fast-forward or reverse the track Fast-forwards. Reverses. To go to the next or previous tracks Total playing time of Total track number the inserted disc of the inserted disc To the following tracks. To the beginning of the current track, then the previous tracks.
You can lock a disc in the loading slot. To check the current clock time while listening to a disc ENGLISH Prohibiting disc ejection To cancel the prohibition, repeat the same procedure. Selecting the playback modes You can use only one of the following playback modes at a time. 1 2 Select your desired playback mode. Repeat play Mode Plays repeatedly TRK RPT: RPT OFF: The current track. • RPT lights up. Cancels repeat play. Mode Plays at random Ex.
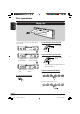
ENGLISH Sound adjustments Selecting preset sound modes (C-EQ: custom equalizer) You can select a preset sound mode suitable to the music genre. ~ Ex.
You can adjust the sound characteristics to your preference. 1 Indication BAS*1 To do: Adjust the bass. –06 (min.) to +06 (max.) TRE*1 (treble) Adjust the treble. –06 (min.) to +06 (max.) FAD*2 (fader) Adjust the front and rear speaker balance. R06 (Rear only) to F06 (Front only) BAL (balance) Adjust the left and right speaker balance. L06 (Left only) to R06 (Right only) LOUD*1 (loudness) Boost low and high frequencies to produce a wellbalanced sound at low volume level.
ENGLISH General settings — PSM 3 Adjust the PSM item selected. Basic procedure You can change PSM (Preferred Setting Mode) items listed on the table that follows. 1 4 Repeat steps 2 and 3 to adjust the other PSM items if necessary. 2 Select a PSM item. 5 Finish the procedure. Ex.
When detaching or attaching the control panel, be careful not to damage the connectors on the back of the control panel and on the panel holder. Attaching the control panel ENGLISH Detaching the control panel Detaching the control panel Before detaching the control panel, be sure to turn off the power. 15 EN14-19_KD-G110[J]f.
ENGLISH Maintenance How to clean the connectors Frequent detachment will deteriorate the connectors. To minimize this possibility, periodically wipe the connectors with a cotton swab or cloth moistened with alcohol, being careful not to damage the connectors. To keep discs clean A dirty disc may not play correctly. If a disc does become dirty, wipe it with a soft cloth in a straight line from center to edge. • Do not use any solvent (for example, conventional record cleaner, spray, thinner, benzine, etc.
Basic operations Playing a CD-R or CD-RW Turning off the power • Use only “finalized” CD-Rs or CD-RWs. • This receiver can play back multi-session discs; however, unclosed sessions will be skipped while playing. • Some CD-Rs or CD-RWs may not play back on this receiver because of their disc characteristics, and for the following causes: – Discs are dirty or scratched. – Moisture condensation occurs on the lens inside the receiver. – The pickup lens inside the receiver is dirty.
ENGLISH Troubleshooting What appears to be trouble is not always serious. Check the following points before calling a service center. Symptoms FM/AM Disc playback Remedies The volume level is set to the minimum level. Adjust it to the optimum level. Connections are incorrect. Check the cords and connections. • The receiver does not work at all. The built-in microcomputer may have functioned incorrectly due to noise, etc. Reset the receiver (see page 2). • SSM automatic presetting does not work.
AUDIO AMPLIFIER SECTION Power Output: 18 W RMS × 4 Channels at 4 Ω and ≤ 1% THD+N Signal to Noise Ratio: 80 dBA (reference: 1 W into 4 Ω) Load Impedance: 4 Ω (4 Ω to 8 Ω allowance) Tone Control Range: Bass: ±10 dB at 100 Hz Treble: ±10 dB at 10 kHz Frequency Response: 40 Hz to 20 000 Hz Line-Out Level/Impedance: 2.0 V/20 kΩ load (full scale) Output Impedance: 1 kΩ TUNER SECTION Frequency Range: FM: 87.5 MHz to 107.9 MHz (with channel interval set to 200 kHz) 87.5 MHz to 108.
Muchas gracias por la compra de un producto JVC. Como primer paso, por favor lea detenidamente este manual para comprender a fondo todas las instrucciones y obtener un máximo disfrute de esta unidad. ESPAÑOL IMPORTANTE (EE.UU.) Este equipo se ha sometido a todo tipo de pruebas y cumple con las normas establecidas para dispositivos de Clase B, de conformidad con la Parte 15 de las reglas de la FCC (Comisión Federal de Comunicaciones).
2 2 4 4 Ajustes del sonido .................. 12 Selección de los modos de sonido preajustados (C-EQ: ecualizador personalizable) ................................ 12 Panel de control — KD-G110 ..... 5 Cómo ajustar el sonido .......................... 13 Cómo reposicionar su unidad ................ Cómo expulsar el disco por la fuerza .... Cómo leer este manual .......................... Cómo usar el botón MODE ................... Identificación de las partes ....................
ESPAÑOL Cómo leer este manual Para que las explicaciones sean más simples y fáciles de entender, hemos adoptado los siguientes métodos: • Algunas notas y consejos relacionados se explican posteriormente en “Más sobre este receptor” (consulte la página 17).
Panel de control — KD-G110 Identificación de las partes ESPAÑOL Ventanilla de visualización 1 2 3 4 5 6 7 8 9 p q w e r t y u i Botones +/– Botón DISP (visualizar) Ranura de carga Ventanilla de visualización Botón MODE Botón 0 (expulsión) Botones ¢/4 Botón (atenuador/espera/ encendido) Botón SEL (seleccionar) Botón MO (monaural) Botón SSM (Memoria secuencial de las emisoras más fuertes) Botón CD Botón FM/AM Botón RPT (repetición) Botón RND (aleatoria) Botón EQ (ecualizador) Botón (liberación del panel
Procedimientos iniciales ESPAÑOL Operaciones básicas Para disminuir el volumen en un instante (ATT) ~ Para restablecer el sonido, púlselo otra vez. Ÿ Para apagar la unidad No podrá seleccionar “CD” como fuente de reproducción si no hay ningún disco en la ranura de carga. ! Precaución sobre el ajuste de volumen: Los discos producen muy poco ruido al compararse con otras fuentes.
Puesta en hora del reloj 1 Si no se efectúa ninguna operación durante unos 20 segundos, se iniciará la demostración en pantalla. [Inicial: DEMO ON]—consulte la página 14. 1 2 Ajuste la hora y los minutos. 1 Seleccione “CLOCK H” (hora) y, seguidamente ajuste la hora. 2 Seleccione “CLOCK M” (minutos) y, seguidamente ajuste los minutos. ESPAÑOL Cancelación de las demostraciones en pantalla 2 3 Finalice el procedimiento.
Operaciones de la radio ESPAÑOL Para escuchar la radio 2 Seleccione las frecuencias de las emisoras deseadas. ~ Se enciende cuando se recibe una radiodifusión FM estéreo con una intensidad de señal suficiente. Cuando una radiodifusión en FM estéreo sea difícil de recibir Aparece la banda seleccionada. Ÿ 1 Comience la búsqueda de la emisora. 2 La búsqueda se interrumpe cuando se recibe una emisora. Para detener la búsqueda, presione nuevamente el mismo botón.
Cómo almacenar emisoras en la memoria 2 Preajuste automático de emisoras FM—SSM (Memoria secuencial de las emisoras más fuertes) ESPAÑOL Se pueden preajustar seis emisoras para cada banda. 3 1 Seleccione la banda FM (FM1 – FM3) en la que desea almacenar. El número de preajuste parpadea durante unos momentos. 2 Cómo escuchar una emisora preajustada 3 1 2 Seleccione la emisora preajustada “SSM” parpadea, y luego desaparece al finalizar el preajuste automático. (1 – 6) deseada.
Operaciones de los discos ESPAÑOL Para reproducir un disco Todas las pistas se reproducen repetidamente hasta que usted detenga la reproducción. Para el avance rápido o el retroceso de la pista Avanza rápidamente. Retrocede. Para ir a las pistas siguientes o anteriores Tiempo de reproducción total del disco insertado Número total de pistas del disco insertado A las pistas siguientes. Al comienzo de la pista actual, luego a las pistas anteriores.
Prohibición de la expulsión del disco ESPAÑOL Podrá bloquear un disco en la ranura de carga. Para verificar la hora actual mientras escucha un disco Para cancelar la prohibición, repita el mismo procedimiento. Cómo seleccionar los modos de reproducción Podrá utilizar solamente uno de los siguientes modos de reproducción a la vez. 1 2 Seleccione el modo de reproducción deseado. Reproducción repetida Modo Reproduce repetidamente TRK RPT: La pista actual. • RPT se enciende.
Ajustes del sonido ESPAÑOL Selección de los modos de sonido preajustados (C-EQ: ecualizador personalizable) Podrá seleccionar un modo de sonido preajustado adecuado al género musical. Indicación Para: Valores preajustados BAS*1 TRE*2 LOUD*3 ~ Ej.
Usted puede ajustar las características de sonido según sus preferencias. 1 Indicación BAS*1 (graves) Para: Ajustar los graves. –06 (mín.) a +06 (máx.) TRE*1 (agudos) Ajustar los agudos. –06 (mín.) a +06 (máx.) FAD*2 (fader) Ajusta el balance de los altavoces delanteros y traseros. R06 (Trasero solamente) a F06 (Delantero solamente) BAL (balance) Ajusta el balance de los altavoces izquierdo y derecho. L06 (Izquierdo solamente) a R06 (Derecho solamente) Ej.
Configuraciones generales — PSM 3 Ajuste la opción de PSM Procedimiento básico seleccionada. ESPAÑOL Podrá cambiar las opciones PSM (Modo de ajustes preferidos) listadas en la tabla siguiente. 1 4 Repita los pasos 2 y 3 para ajustar las otras opciones de PSM, si fuera necesario. 2 Seleccione una opción de PSM. 5 Finalice el procedimiento. Ej.
Desmontaje del panel de control Al desmontar o instalar el panel de control, preste atención para no dañar los conectores provistos al dorso del mismo y en el portapanel. Fijación del panel de control Desmontaje del panel de control ESPAÑOL Antes de desmontar el panel de control, asegúrese de desconectar la alimentación. 15 SP14-19_KD-G110[J]1.
Mantenimiento ESPAÑOL Cómo limpiar los conectores Un desmontaje frecuente producirá el deterioro de los conectores. Para reducir esta posibilidad al mínimo, limpie periódicamente los conectores con un palillo de algodón, teniendo cuidado de no dañar los conectores. Para mantener los discos limpios Un disco sucio podría no reproducirse correctamente. Si se llegara a ensuciar un disco, límpielo con un lienzo suave, en línea recta desde el centro hacia el borde.
Operaciones básicas Reproducción de un CD-R o CD-RW Apagado de la unidad • Utilice sólo CD-Rs o CD-RWs “finalizados”. • Este receptor puede reproducir discos multisesión; no obstante, las sesiones no cerradas serán omitidas durante la reproducción. • Puede suceder que algunos discos CD-Rs o CD-RWs no se puedan reproducir en este receptor debido a las características propias de los mismos, o por una de las siguientes causas: – Los discos están sucios o rayados.
Localización de averías Lo que aparenta ser una avería podría resolverse fácilmente. Verifique los siguientes puntos antes de llamar al centro de servicio. General • No se puede escuchar el sonido a través de los altavoces. Reproducción del disco FM/AM ESPAÑOL Síntomas Causas Soluciones El nivel de volumen está ajustado al minimo. Ajústelo al nivel óptimo. Conexiones incorrectas. Inspeccione los cables y las conexiones. • El receptor no funciona en absoluto.
Especificaciones Salida de potencia: 18 W RMS x 4 canales a 4 Ω y ≤ 1% THD+N Relación señal a ruido: 80 dBA (referencia: 1 W en 4 Ω) Impedancia de carga: 4 Ω (tolerancia de 4 Ω a 8 Ω) Gama de control de tono: Graves: ±10 dB a 100 Hz Agudos: ±10 dB a 10 kHz Respuesta de frecuencias: 40 Hz a 20 000 Hz Nivel/impedancia salida línea: 2,0 V/20 kΩ de carga (plena escala) Impedancia de salida: 1 kΩ SECCIÓN DEL SINTONIZADOR Gama de frecuencias: FM: 87,5 MHz a 107,9 MHz (con el intervalo entre canales ajustado a
FRANÇAIS Merci pour avoir acheté un produit JVC. Veuillez lire attentivement toutes les instructions avant d’utiliser l’appareil afin de bien comprendre son fonctionnement et d’obtenir les meilleures performances possibles. IMPORTANT POUR PRODUITS LASER 1. PRODUIT LASER CLASSE 1 2. ATTENTION: N’ouvrez pas le couvercle supérieur. Il n’y a aucune pièce réparable par l’utilisateur à l’intérieur de l’appareil; confiez toute réparation à un personnel qualifié. 3.
Table des matières 2 2 4 4 Ajustements sonores .............. 12 Sélection des modes sonores préréglés (C-EQ: égaliseur personnalisé) .......... 12 Panneau de commande — KD-G110 ................................ 5 Réglages généraux — PSM .... 14 Identification des parties........................ Retrait du panneau de commande .......................... 15 Entretien ................................ 16 7 7 Fonctionnement de la radio.... 8 Écoute de la radio................................
Comment lire ce manuel FRANÇAIS Les méthodes suivantes sont utilisées pour rendre les explications simples et faciles à comprendre. • Certains conseils et remarques sont donnés dans la section “Pour en savoir plus à propos de cet autoradio” (voir page 17). • L’utilisation des touches est expliquée principalement à l’aide d’illustrations, comme montré ci-après.
Panneau de commande — KD-G110 Identification des parties FRANÇAIS Fenêtre d’affichage 1 2 3 4 5 6 7 8 9 p q w e r t y u i Touches +/– Touche DISP (affichage) Fente d’insertion Fenêtre d’affichage Touche MODE Touche 0 (éjection) Touches ¢/4 Touche (attente/sous tension/ atténuation) Touche SEL (sélection) Touche MO (monophonique) Touche SSM (mémorisation automatique séquentielle des stations puissantes) Touche CD Touche FM/AM Touche RPT (répétition) Touche RND (aléatoire) Touche EQ (égaliseur) Touche (
Pour commencer FRANÇAIS Opérations de base Pour couper le volume momentanément (ATT) ~ Pour rétablir le son, appuyez de nouveau sur la touche. Ÿ Pour mettre l’appareil hors tension Vous ne pouvez pas choisir “CD” comme source de lecture si aucun disque ne se trouve dans la fente d’insertion. Précautions sur le réglage du volume: ! Les disques produisent très peut de bruit par rapport aux autres sources.
Si aucune opération n’est effectuée pendant environ 20 secondes, la démonstration des affichages démarre. [Réglage initial: DEMO ON]—voir page 14. 1 2 Réglage de l’horloge 1 2 Réglez les heures et les minutes. 1 Choisissez “CLOCK H” (heures), puis ajustez les heures. 2 Choisissez “CLOCK M” (minutes), puis ajustez les minutes. FRANÇAIS Annulation de la démonstration des affichages 3 Terminez la procédure. 3 Pour vérifier l’heure actuelle quand l’appareil est hors tension 4 Terminez la procédure.
Fonctionnement de la radio FRANÇAIS Écoute de la radio 2 Choisissez la fréquence de station souhaitée. ~ S’allume lors de la réception d’une émission FM stereo avec un signal suffisamment fort. La bande choisie apparaît. Ÿ Démarrez la recherche d’une station. Quand une émission FM stéréo est difficile à recevoir 1 2 Quand une station est reçue, la recherche s’arrête. Pour arrêter la recherche, appuyez de nouveau sur la même touche. S’allume quand le mode monophonique est mis en service.
Mémorisation des stations 2 Vous pouvez prérégler six stations pour chaque bande. Préréglage automatique des stations FM—SSM (mémorisation automatique séquentielle des stations puissantes) 3 FRANÇAIS 1 Choisissez la bande FM (FM1 – FM3) pour laquelle vous souhaitez mémoriser les stations. Le numéro de préréglage clignote un instant. 2 Écoute d’une station préréglée 3 1 2 Choisissez la station préréglée (1 – 6) souhaitée. “SSM” clignote, puis disparaît quand le préréglage automatique est terminé.
Opérations des disques FRANÇAIS Lecture d’un disque Toutes les plages sont reproduites répétitivement jusqu’à ce que vous arrêtiez la lecture. Pour faire avancer ou reculer rapidement la plage Avance rapide. Retour rapide. Pour aller aux plages suivantes ou précédentes Durée de lecture totale du disque inséré Nombre total de plages du disque inséré Pour aller aux plages suivantes. Pour aller au début de la plage actuelle, puis aux plages précédentes.
Interdiction de l’éjection du disque Pour vérifier l’heure actuelle lors de l’écoute d’un disque FRANÇAIS Vous pouvez verrouiller un disque dans la fente d’insertion. Pour annuler l’interdiction, répétez la même procédure. Sélection des modes de lecture Vous pouvez utiliser un des modes de lecture suivants à la fois. 1 2 Choisissez le mode de lecture souhaité. Lecture répétée Mode Reproduit répétitivement TRK RPT: RPT OFF: La plage actuelle. • RPT s’allume. Annule la lecture répétée.
Ajustements sonores FRANÇAIS Sélection des modes sonores préréglés (C-EQ: égaliseur personnalisé) Vous pouvez sélectionner un mode sonore préréglé adapté à votre genre de musique. ~ Indication Valeurs préréglées BAS*1 TRE*2 LOUD*3 USER (Pas d’effet) 00 00 OFF ROCK Musique +03 rock ou disco +01 ON CLASSIC Musique classique +01 –02 OFF POPS Musique légère +04 +01 OFF HIP HOP Musique funk ou rap +02 00 ON JAZZ Musique jazz +02 +03 OFF Ex.
Vous pouvez ajuster les caractéristiques du son comme vous le souhaitez. 1 Indication La courbe graphique change quand vous ajustez le niveau. Plage BAS*1 (graves) Ajuste les graves. –06 (min.) à +06 (max.) TRE*1 (aigus) Ajuste les aigus. –06 (min.) à +06 (max.) FAD*2 (fader) Ajustez la balance R06 (arrière avant-arrière des seulement) enceintes. à F06 (avant seulement) BAL (balance) Ajustez la balance L06 (gauche gauche-droite des seulement) enceintes.
Réglages généraux — PSM 3 Ajustez l’option PSM choisie. Procédure de base Vous pouvez changer les options PSM (mode des réglages préférés) de la table suivante. 1 4 Répétez les étapes 2 et 3 pour ajuster les autres options PSM si nécessaire. FRANÇAIS 2 Choisissez une option PSM. 5 Terminez la procédure. Ex.
Retrait du panneau de commande Lors du retrait ou de la fixation du panneau de commande, assurez-vous de ne pas endommager les connexion à l’arrière du panneau de commande et sur le porte-panneau. Fixation du panneau de commande Retrait du panneau de commande FRANÇAIS Avant de retirer le panneau de commande, assurez-vous de mettre l’appareil hors tension. 15 FR14-19_KD-G110[J]1.
Entretien Comment nettoyer les connecteurs FRANÇAIS Un détachement fréquent détériorera les connecteurs. Pour minimiser ce problème, frottez périodiquement les connecteurs avec un coton tige ou un chiffon imprégné d’alcool, en faisant attention de ne pas endommager les connecteurs. Pour garder les disques propres Un disque sale peut ne pas être reproduit correctement. Si un disque est sale, essuyez-le avec un chiffon doux, en ligne droite du centre vers les bords.
Opérations de base Lecture d’un CD-R ou CD-RW Mise hors tension de l’appareil • Utilisez uniquement des CD-R ou CD-RW “finalisés”. • Cet autoradio peut reproduire les disques multisession; mais les sessions non fermée sont sautées lors de la lecture. • Certains CD-R ou CD-RW ne peuvent pas être reproduits sur cet autoradio à cause de leurs caractéristiques et des causes suivantes: – Les disques sont sales ou rayés. – De l’humidité s’est condensée sur la lentille à l’intérieur de l’autoradio.
Guide de dépannage Ce qui apparaît être un problème n’est pas toujours sérieux. Vérifiez les points suivants avant d’appeler un centre de service. Symptôme Généralités Lecture de disque FM/AM FRANÇAIS • Aucun son n’est entendu des enceintes. Causes Remèdes Le niveau de volume est réglé sur le niveau minimum. Ajustez-le sur le niveau correct. Les connexions sont incorrectes. Vérifiez les cordons et les connexions. • Cet autoradio ne fonctionne pas du tout.
Spécifications Puissance de sortie: 18 W RMS × 4 canaux à 4 Ω et avec ≤ 1% THD+N Rapport signal sur bruit: 80 dBA (référence: 1 W pour 4 Ω) Impédance de charge: 4 Ω (4 Ω à 8 Ω admissible) Plage de commande de tonalité: Graves: ±10 dB à 100 Hz Aigus: ±10 dB à 10 kHz Réponse en fréquence: 40 Hz à 20 000 Hz Niveau de sortie de ligne/impédance: 2,0 V/20 kΩ en charge (pleine échelle) Impédance de sortie: 1 kΩ SECTION DU TUNER Plage de fréquences: FM: 87,5 MHz à 107,9 MHz (avec l’intervalle des canaux réglé sur
Having TROUBLE with operation? Please reset your unit Refer to page of How to reset your unit Still having trouble?? USA ONLY Call 1-800-252-5722 http://www.jvc.com We can help you! EN, SP, FR © 2005 Victor Company of Japan, Limited Rear_KD-G110[J]f.