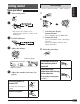
KD-G126/KD-G125 KD-G126/KD-G125 KD-G126 KD-G126 KD-G125 KD-G125 For canceling the display demonstration, see page 5. 5 For installation and connections, refer to the separate manual.
ENGLISH Thank you for purchasing a JVC product. Please read all instructions carefully before operation, to ensure your complete understanding and to obtain the best possible performance from the unit. IMPORTANT FOR LASER PRODUCTS 1. CLASS 1 LASER PRODUCT 2. CAUTION: Do not open the top cover. There are no user serviceable parts inside the unit; leave all servicing to qualified service personnel. 3. CAUTION: Visible and invisible laser radiation when open and interlock failed or defeated.
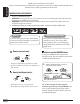
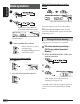
• Button operations are mainly explained with the illustrations in the table below. • is used to indicate an indicator is displayed for the corresponding operation. • Some related tips and notes are explained in “More about this unit” (see pages 11 and 12). Press briefly. CONTENTS Control panel — KD-G126 and KD-G125 ........ 4 Getting started ................................. 5 Basic operations .................................................... 5 ENGLISH How to read this manual Radio operations ......
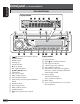
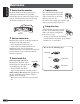
ENGLISH Control panel — KD-G126 and KD-G125 Parts identification Display window 1 2 3 4 5 6 7 8 9 p q w e r t y u i 4 (standby/on/attenuator) button SOURCE button BAND button Loading slot Display window 0 (eject) button EQ (equalizer) button ¢/4 buttons Control dial SEL (select) button DISP (display) button MO (monaural) button SSM (Strong-station Sequential Memory) button Number buttons RPT (repeat) button RND (random) button M MODE button (control panel release) button Display window o ; a s d f DIS
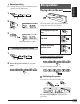
Getting started Turn on the power. 1 ENGLISH • See also “General settings — PSM” on page 9. Basic operations ~ Basic settings 2 Ÿ 1 Canceling the display demonstrations * You cannot select “DISC” as the playback source if there is no disc in the loading slot. Select “DEMO,” then “DEMO OFF.” 2 Setting the clock ! For FM/AM tuner ⁄ Adjust the volume. Select “CLOCK H” (hour), then adjust the hour. Select “CLOCK M” (minute), then adjust the minute. 3 Finish the procedure. . level appears.
ENGLISH Radio operations When an FM stereo broadcast is hard to receive ~ Ÿ Lights up when monaural mode is activated. Lights up when receiving an FM stereo broadcast with sufficient signal strength. Reception improves, but stereo effect will be lost. To restore the stereo effect, repeat the same procedure “MONO OFF” appears and the MO indicator goes off. Selected band appears. ! Start searching for a station. When a station is received, searching stops.
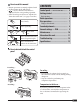
Ex.: Storing FM station of 92.5 MHz into preset number 4 of the FM1 band. 1 Disc operations Playing a disc in the unit ENGLISH Manual presetting 2 All tracks will be played repeatedly until you change the source or eject the disc. To stop play and eject the disc 3 To fast-forward or reverse the track Preset number flashes for a while.
ENGLISH Selecting the playback modes You can use only one of the following playback modes at a time. Adjusting the sound You can adjust the sound characteristics to your preference. 1 2 Select your desired playback mode. 7 Repeat play Mode *1 Displayed only when “L/O MODE” is set to “WOOFER” (see page 9). Plays repeatedly TRK RPT RPT OFF Indication, [Range] : The current track. : Cancels. BAS*2 (bass), [–06 to +06] Adjust the bass. 7 Random play TRE*2 (treble), [–06 to +06] Adjust the treble.
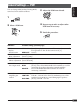
You can change PSM (Preferred Setting Mode) items listed in the table that follows. 3 Adjust the PSM item selected. ENGLISH General settings — PSM 1 2 Select a PSM item. 4 5 Repeat steps 2 and 3 to adjust other PSM items if necessary. Finish the procedure. Indications Selectable settings, [reference page] DEMO Display demonstration DEMO ON : [Initial]; Display demonstration will be activated automatically if no operation is done for about 20 seconds, [5]. DEMO OFF : Cancels.
ENGLISH Maintenance How to clean the connectors Frequent detachment will deteriorate the connectors.To minimize this possibility, periodically wipe the connectors with a cotton swab or cloth moistened with alcohol, being careful not to damage the connectors. To play new discs New discs may have some rough spots around the inner and outer edges. If such a disc is used, this unit may reject the disc. To remove these rough spots, rub the edges with a pencil or ball-point pen, etc.
Basic operations Inserting a disc Turning on the power • When a disc is inserted upside down, the disc automatically ejects. • Do not insert 8 cm discs (single CD) and unusual shape discs (heart, flower, etc.) into the loading slot. • By pressing SOURCE on the unit, you can also turn on the power. If the source is ready, playback also starts.
ENGLISH Ejecting a disc General settings—PSM • If the ejected disc is not removed within 15 seconds, the disc is automatically inserted again into the loading slot to protect it from dust. (Disc will not play this time.) • If you change the “AMP GAIN” setting from “HIGH PWR” to “LOW PWR” while the volume level is set higher than “VOL 30,” the unit automatically changes the volume level to “VOL 30.” Troubleshooting What appears to be trouble is not always serious.
AUDIO AMPLIFIER SECTION Maximum Power Output: Front: 50 W per channel Rear: 50 W per channel Continuous Power Output (RMS): Front: 19 W per channel into 4 Ω, 40 Hz to 20 000 Hz at no more than 0.8% total harmonic distortion. Rear: 19 W per channel into 4 Ω, 40 Hz to 20 000 Hz at no more than 0.8% total harmonic distortion.
Having TROUBLE with operation? Please reset your unit Refer to page of How to reset your unit EN, TH © 2005 Victor Company of Japan, Limited 1005DTSMDTJEIN
KD-G126/KD-G125 Installation/Connection Manual °“√μ‘¥μ—Èß/§ŸË¡◊Õ°“√μ‘¥μ—Èß GET0331-006A 1005DTSMDTJEIN EN, TH © 2005 Victor Company of Japan, Limited [U/UH] ‰∑¬ ENGLISH This unit is designed to operate on 12 V DC, NEGATIVE ground electrical systems. If your vehicle does not have this system, a voltage inverter is required, which can be purchased at JVC car audio dealers.
INSTALLATION (IN-DASH MOUNTING) °“√μ‘¥μ—Èß (°“√ª√–°Õ∫·ºßÀπÈ“ª—∑¡Ï‡¢È“) The following illustration shows a typical installation. If you have any questions or require information regarding installation kits, consult your JVC car audio dealer or a company supplying kits. • If you are not sure how to install this unit correctly, have it installed by a qualified technician.
‰∑¬ ENGLISH °“√‡™◊ËÕ¡‚¥¬„™È ‰øøÈ“ ELECTRICAL CONNECTIONS A Typical connections / °“√‡™◊ËÕ¡μËÕ·∫∫ª°μ Before connecting: Check the wiring in the vehicle carefully.
B Connecting the external amplifier or subwoofer / μËÕ·Õ¡ª≈‘ø“¬‡ÕÕ√ÏÀ√◊Õ´—∫«Ÿø‡øÕ√ϥȓππÕ° §ÿ≥ “¡“√∂μËÕ°—∫·Õ¡æ≈‘ø“¬‡ÕÕ√Ï ‡æ◊ËÕ‡æ‘Ë¡§ÿ≥ ¿“æ‡ ’¬ß„ÀÈ°—∫√–∫∫ ‡μÕ√‘‚Õ¢Õß√∂¬πμÏ • μËÕ “¬μ–°—Ë«√–¬–‰°≈ ( ’πÈ”‡ß‘π≈“¬¢“«) ‡¢È“°—∫ “¬μ–°—Ë«√–¬–‰°≈¢ÕßÕÿª°√≥ÏÕ◊Ëπ Ê ‡æ◊ËÕ®– “¡“√∂§«∫§ÿ¡‚¥¬™ÿ¥ª√– °Õ∫π’ȉ¥È • ∂Õ¥≈”‚æßÕÕ°®“°™ÿ¥ª√–°Õ∫π’È ·≈È«μËÕ‡¢È“°—∫‡§√◊ËÕߢ¬“¬ ∑‘Èß “¬μ–°—Ë«≈”‚æߢÕß™ÿ¥ª√–°Õ∫π’ȉ«È You can connect an amplifier to upgrade your car stereo system.