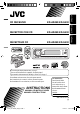
CD RECEIVER KD-AR480/KD-G430 ENGLISH RECEPTOR CON CD KD-AR480/KD-G430 ESPAÑOL RÉCEPTEUR CD KD-AR480/KD-G430 FRANÇAIS For canceling the display demonstration, see page 7. Para cancelar la demostración en pantalla, consulte la página 7. Pour annuler la démonstration des affichages, référez-vous à la page 7. For installation and connections, refer to the separate manual. Para la instalación y las conexiones, refiérase al manual separado.
ENGLISH Thank you for purchasing a JVC product. Please read all instructions carefully before operation, to ensure your complete understanding and to obtain the best possible performance from the unit. INFORMATION (For U.S.A.) This equipment has been tested and found to comply with the limits for a Class B digital device, pursuant to Part 15 of the FCC Rules. These limits are designed to provide reasonable protection against harmful interference in a residential installation.
: External CD changer operations. : Indicator displayed for the corresponding operation. How to reset your unit CONTENTS Control panel — KD-AR480/KD-G430 .......... 4 Remote controller — RM-RK50 ............. 5 Getting started ................................ 6 ENGLISH The following marks are used to indicate... : Built-in CD player operations. Basic operations ................................................... 6 Radio operations ............................. 7 Disc operations .......................
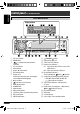
ENGLISH Control panel — KD-AR480 / KD-G430 Parts identification Display window 1 SRC (source) button 2 B BAND button 3 (standby/on attenuator) button / 4 5 6 7 8 9 p q w e r t y u Control dial SEL (select) button Display window 5 (up) / ∞ (down) buttons EQ (equalizer) button Remote sensor DO NOT expose the remote sensor to strong light (direct sunlight or artificial lighting).
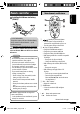
Remote controller — RM-RK50 ENGLISH Main elements and features Installing the lithium coin battery (CR2025) For USA-California Only: This product contains a CR Coin Cell Lithium Battery which contains Perchlorate Material—special handling may apply. See www.dtsc.ca.gov/hazardouswaste /perchlorate Aim the remote controller directly at the remote sensor on the unit. Make sure there is no obstacle in between.
5 SOURCE button ENGLISH • Selects the source. ! 6 2 R (reverse) / F (forward) 3 buttons • Searches for stations if pressed briefly. • Fast-forwards or reverses the track if pressed and held. • Changes the tracks if pressed briefly. • While listening to the satellite radio: – Changes the channels if pressed briefly. – Changes the channels rapidly if pressed and held. • While listening to an iPod or a D. player (in menu selecting mode): – Selects an item if pressed briefly.
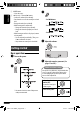
! • See also “General settings — PSM” on pages 12 – 14. When a station is received, searching stops. To stop searching, press the same button again. 1 2 Start searching for a station. ENGLISH Basic settings To tune in to a station manually In step ! above... 1 1 Canceling the display demonstrations Select “DEMO,” then “DEMO OFF.” 2 Setting the clock Select “CLOCK H” (hour), then adjust the hour. Select “CLOCK M” (minute), then adjust the minute. 3 2 Select a desired station frequency.
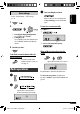
Listening to a preset station ENGLISH Storing stations in memory You can preset six stations for each band. FM station automatic presetting— SSM (Strong-station Sequential Memory) 1 Select the FM band (FM1 – FM3) you want to store into. 2 1 2 Select the preset station (1 – 6) you want. or To check other information while listening to the radio 3 Clock = Station name* = Frequency = (back to the beginning) “SSM” flashes, then disappears when automatic presetting is over.
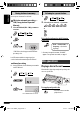
To fast-forward or reverse the track All discs in the magazine will be played repeatedly until you change the source. • Ejecting the magazine will also stop playback. To go to the next or previous tracks ~ Ÿ * If you have changed the external input setting to “EXT IN” (see page 14), you cannot select the CD changer. To go to the next or previous folders (only for MP3 or WMA discs) Select a disc.
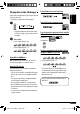
ENGLISH Other main functions Changing the display information Skipping tracks quickly during play Only possible on JVC MP3-compatible CD changer While playing an audio CD or a CD Text • For MP3 or WMA discs, you can skip tracks within the same folder. Ex.
You can use only one of the following playback modes at a time. Sound adjustments You can select a preset sound mode suitable to the music genre (iEQ: intelligent equalizer). 1 2 ENGLISH Selecting the playback modes Select your desired playback mode. Preset values 7 Repeat play Mode BAS*1 MID*2 TRE*3 S.BS*4 Plays repeatedly Indication (For) TRK RPT FLDR RPT*1 : The current track. : All tracks of the current folder. USER (Flat sound) 00 00 00 OFF DISC RPT*2 : All tracks of the current disc.
ENGLISH Adjusting the sound You can adjust the sound characteristics to your preference. *4 This adjustment will not affect the subwoofer output. *5 Range adjustment for super bass is adjustable only when it is set to “S.BS ON.“ *6 Depending on the amplifier gain control setting. (See page 14 for details.) 1 2 General settings — PSM You can change PSM (Preferred Setting Mode) items (except “SID”) listed in the table that follows. 1 Indication, [Range] BAS*2 (bass), [–06 to +06] Adjust the bass.
Item ( : Initial) Setting, [reference page] DEMO Display demonstration • DEMO ON : Display demonstration will be activated automatically if no operation is done for about 20 seconds, [7]. : Cancels. CLK DISP*1 Clock display • ON • DEMO OFF • OFF CLOCK H Hour adjustment 1 – 12 : Clock display is shown on the display even when the power is turned off. : Cancels; pressing D DISP will show the clock time for about 5 seconds when the power is turned off, [7]. [Initial: 1 (1:00)], [7].
ENGLISH Indications Item ( : Initial) Setting, [reference page] SCROLL*5 Scroll • ONCE • AUTO • OFF : : : • L/O MODE Line output mode • REAR : Select if both the LINE OUT terminals are used for connecting the speakers (through an external amplifier). : Select if the REAR LINE OUT terminals are used for connecting a subwoofer (through an external amplifier). WOOFER*6 Subwoofer cutoff frequency • LOW • MID • HIGH : Frequencies lower than 90 Hz are sent to the subwoofer.
To erase the entire title In step 2 on the left... ENGLISH Title assignment You can assign names to 30 station frequencies (FM and AM) and up to 8 characters for each station name. 1 Select FM/AM. Satellite radio operations This unit is satellite (SAT) Radio Ready—compatible with both SIRIUS Satellite radio and XM Satellite radio. 2 Show the title entry screen. Before operating your satellite radio: • For connection, see Installation/Connection Manual (separate volume).
ENGLISH Activate your SIRIUS subscription after connection: 3 Check your XM Satellite radio ID labelled on the casing of the XMDirectTM Universal Tuner Box, or tune in to “Channel 0” (see page 17). 1 4 Contact XM Satellite radio on the internet at to activate your subscription, or you can call 1-800-XM-RADIO (1-800-967-2346). Once completed, the unit tunes in to one of the available channels (Channel 4 or higher). 2 JVC DLP starts updating all the SIRIUS channels.
1 • While searching, invalid and unsubscribed channels are skipped. Checking the XM Satellite radio ID 2 3 While selecting “XM1,” “XM2,” or “XM3,” select “Channel 0.” Select a channel for listening. Holding the button changes the channels rapidly. Searching for category/channel You can search for programs by category (Category Search) or channel number (Channel Search). • In Category Search, you can tune in to the channels of the selected category.
ENGLISH 3 Select the preset channel (1 – 6) you want. Preparations: Make sure “CHANGER” is selected for the external input setting, see page 14. ~ To change the display information while listening to a channel Ÿ Clock = Category name = Channel name = Artist name = Composer name* = Song/ program name/title = (back to the beginning) * Only for SIRIUS Satellite radio. Playback starts automatically from where it has been paused*1 or stopped*2 previously. ! Adjust the volume. iPod / D.
Selecting a track from the menu 1 Enter the main menu. Now the 5/∞/ 4 /¢ as the menu selecting buttons*. buttons work * The menu selecting mode will be canceled: – If no operations are done for about 5 seconds. – When you confirm the selection of a track. 2 Select your desired playback mode. 7 Repeat play ONE RPT Functions the same as “Repeat One” of the iPod or “Repeat Mode = One” for the D. player. Select the desired menu.
ENGLISH Other external component Ÿ operations ! Turn on the connected component and start playing the source. Adjust the volume. You can connect an external component to... • CD changer jack on the rear using the Line Input Adapter—KS-U57 (not supplied) or AUX Input Adapter—KS-U58 (not supplied) for any other components (except iPod and D. player). • AUX (auxiliary) input jack on the control panel. ⁄ For connection, see Installation/Connection Manual (separate volume).
Caution for DualDisc playback • The Non-DVD side of a “DualDisc” does not comply with the “Compact Disc Digital Audio” standard. Therefore, the use of Non-DVD side of a DualDisc on this product may not be recommended. General • This unit has been designed to reproduce CDs/CD Texts, and CD-Rs (Recordable)/CD-RWs (Rewritable) in audio CD (CD-DA), MP3 and WMA formats. • When a disc is inserted upside down, “PLEASE” and “EJECT” appear alternately on the display. Press 0 to eject the disc.
ENGLISH – MP3 files encoded with Layer 1/2. – WMA files encoded with lossless, professional, and voice format. – WMA files which are not based upon Windows Media® Audio. – WMA files copy-protected with DRM. – Files which have the data such as AIFF, ATRAC3, etc. • The search function works but search speed is not constant. Changing the source • If you change the source, playback also stops. Next time you select “CD” for the playback source, disc play starts from where it has been stopped previously.
How to clean the connectors Frequent detachment will deteriorate the connectors. To minimize this possibility, periodically wipe the connectors with a cotton swab or cloth moistened with alcohol, being careful not to damage the connectors. To keep discs clean A dirty disc may not play correctly. If a disc does become dirty, wipe it with a soft cloth in a straight line from center to edge. • Do not use any solvent (for example, conventional record cleaner, spray, thinner, benzine, etc.) to clean discs.
What appears to be trouble is not always serious. Check the following points before calling a service center. Symptoms MP3/WMA playback Disc playback FM/AM General ENGLISH Troubleshooting Remedies/Causes • Sound cannot be heard from the speakers. • Adjust the volume to the optimum level. • Check the cords and connections. • The unit does not work at all. Reset the unit (see page 3). • SSM automatic presetting does not work. Store stations manually. • Static noise while listening to the radio.
CD changer Remedies/Causes • Elapsed playing time is not correct. This sometimes occurs during play. This is caused by how the tracks are recorded on the disc. • “PLEASE” and “EJECT” appear alternately on the display. Insert a disc that contains MP3/WMA tracks. • Correct characters are not displayed (e.g. album name). This unit can only display letters (upper case), numbers, and a limited number of symbols. • “NO DISC” appears on the display. Insert a disc into the magazine.
Satellite radio ENGLISH Symptoms Remedies/Causes • “OFF AIR” appears on the display while listening to the XM Satellite radio. Selected channel is not broadcasting at this time. Select another channel or continue listening to the previous channel. • “LOADING” appears on the display while listening to the XM Satellite radio. The unit is loading the channel information and audio. Text information are temporarily unavailable. • “RESET 8” appears on the display. • Satellite radio does not work at all.
AUDIO AMPLIFIER SECTION CD PLAYER SECTION Power Output: 20 W RMS × 4 Channels at 4 Ω and ≤ 1% THD+N Signal-to-Noise Ratio: 80 dBA (reference: 1 W into 4 Ω) Load Impedance: 4 Ω (4 Ω to 8 Ω allowance) Tone Control Range: Bass/ Mid-range/ ±12 dB at 60 Hz/ 1 kHz/ Treble: 7.5 kHz Frequency Response: 40 Hz to 20 000 Hz Line-Out Level/Impedance: KD-AR480: 4.0V/20 kΩ load (full scale) KD-G430: 2.5 V/20 kΩ load (full scale) Subwoofer-Out 2.
Muchas gracias por la compra de un producto JVC. Como primer paso, por favor lea detenidamente este manual para comprender a fondo todas las instrucciones y obtener un máximo disfrute de esta unidad. ESPAÑOL IMPORTANTE (EE.UU.) Este equipo se ha sometido a todo tipo de pruebas y cumple con las normas establecidas para dispositivos de Clase B, de conformidad con la Parte 15 de las reglas de la FCC (Comisión Federal de Comunicaciones).
Cómo reposicionar su unidad CONTENIDO Panel de control — KD-AR480/KD-G430...... 4 Control remoto — RM-RK50 ................. 5 Procedimientos iniciales .................. 6 Operaciones básicas ............................................. 6 Operaciones de la radio .................... 7 Operaciones de los discos ................. 8 Para reproducir un disco en el receptor ............... 8 Para reproducir discos en el cambiador de CD ..... 9 • También se borrarán los ajustes preestablecidos por usted.
Panel de control — KD-AR480 / KD-G430 Identificación de las partes ESPAÑOL Ventanilla de visualización 1 Botón SRC (fuente) 2 Botón B BAND 3 Botón (atenuador/en espera encendido) 4 5 6 7 8 9 p q w e r t y u / Disco de control Botón SEL (seleccionar) Ventanilla de visualización Botones 5 (arriba) / ∞ (abajo) Botón EQ (ecualizador) Sensor remoto NO exponga el sensor remoto a una luz potente (luz solar directa o iluminación artificial).
Control remoto — RM-RK50 Elementos principales y funciones ESPAÑOL Instalación de la pila botón de litio (CR2025) Sólo para EE.UU.-California: Este producto contiene una batería de litio CR de tipo botón que contiene perclorato (puede requerirse una manipulación especial). Visite www.dtsc.ca.gov/hazardouswaste/perchlorate Apunte el control remoto directamente hacia el sensor remoto del receptor. Asegúrese de que no hayan obstáculos entremedio.
5 Botón SOURCE • Selecciona la fuente. ! ESPAÑOL 6 Botones 2 R (retroceso) / F (avance) 3 • Efectúa la búsqueda de emisoras si lo pulsa brevemente. • Efectúa el avance rápido o el retroceso de la pista si lo pulsa y mantiene pulsado. • Cambia las pistas si lo pulsa brevemente. • Mientras escucha la radio satelital: – Cambia los canales si lo pulsa brevemente. – Cambia rápidamente los canales si lo pulsa y mantiene pulsado. • Mientras escucha un iPod o un reproductor D.
! • Véase también “Configuraciones generales — PSM” en las páginas 12 a 14. Comience la búsqueda de la emisora. La búsqueda se interrumpe cuando se recibe una emisora. Para detener la búsqueda, presione nuevamente el mismo botón. 1 2 Para sintonizar manualmente una emisora En el paso ! de arriba... 1 Cancelación de las demostraciones en pantalla Seleccione “DEMO” y, a continuación, “DEMO OFF”. 2 Puesta en hora del reloj Seleccione “CLOCK H” (hora) y, seguidamente ajuste la hora.
Cómo escuchar una emisora preajustada Cómo almacenar emisoras en la memoria ESPAÑOL Se pueden preajustar seis emisoras para cada banda. Preajuste automático de emisoras FM—SSM (Memoria secuencial de las emisoras más fuertes) 1 Seleccione la banda FM (FM1 – FM3) en la que desea almacenar. 1 2 Seleccione la emisora preajustada (1 – 6) deseada. o 2 Para verificar la otra información mientras escucha la radio 3 “SSM” parpadea, y luego desaparece al finalizar el preajuste automático.
Todos los discos del cargador se reproducen repetidamente hasta que usted cambie la fuente. • La reproducción también cesa al expulsar el cargador. Para el avance rápido o el retroceso de la pista Para ir a las pistas siguientes o anteriores ~ * Si ha cambiado el ajuste de entrada exterior a “EXT IN” (consulte la página 14), no se podrá seleccionar el cambiador de CD.
Otras funciones principales Cambio de la información en pantalla Salto rápido de las pistas durante la reproducción ESPAÑOL Posible solamente en un cambiador de CDcompatible con MP3 de JVC • Si es un disco MP3 o WMA, podrá saltar pistas dentro de la misma carpeta. Ej.
Cómo seleccionar los modos de reproducción Podrá utilizar solamente uno de los siguientes modos de reproducción a la vez. Ajustes del sonido Podrá seleccionar un modo de sonido preajustado adecuado al género musical (iEQ: ecualizador inteligente). 2 Seleccione el modo de reproducción deseado. 7 Reproducción repetida Modo TRK RPT FLDR RPT*1 Reproduce repetidamente DISC RPT*2 : La pista actual. : Todas las pistas de la carpeta actual. : Todas las pistas del disco actual. RPT OFF : Se cancela.
Cómo ajustar el sonido Usted puede ajustar las características de sonido según sus preferencias. *4 Este ajuste no puede afecta la salida del subwoofer. *5 La gama de los supergraves es ajustable solamente poniéndolo en “S.BS ON”. *6 Dependiendo del ajuste de control de ganancia del amplificador. (Para los detalles, consulte la página 14). ESPAÑOL 1 2 Indicación, [Margen] BAS*2 (graves), [–06 a +06] Ajustar los graves.
Opción ( : Inicial) Ajuste, [página de referencia] DEMO Demostración en pantalla • DEMO ON : La demostración en pantalla se activará automáticamente si no se efectúa ninguna operación durante unos 20 segundos, [7]. : Se cancela. CLK DISP*1 Indicación del reloj • ON • DEMO OFF • OFF : El reloj siempre mostrará la hora en la pantalla aunque la unidad esté apagada. : Se cancela; al pulsar D DISP el reloj mostrará la hora por unos 5 segundos cuando la unidad esté apagada, [7].
ESPAÑOL Indicaciones Opción ( : Inicial) Ajuste, [página de referencia] SCROLL*5 Desplazamiento • ONCE • AUTO • OFF : : : • L/O MODE Modo de salida de línea • REAR : Selecciónelo si ambos terminales LINE OUT se utilizan para conectar los altavoces (a través de un amplificador externo). : Selecciónelo si los terminales REAR LINE OUT se utilizan para conectar un subwoofer (a través de un amplificador externo).
Asignación de título Para borrar el título entero En el paso 2 de la izquierda... 1 2 Selecciona FM/AM. Muestre la pantalla de entrada de título. Operaciones de la radio satelital Esta es una unidad “Satellite (SAT) Radio Ready”— compatible tanto con la radio satelital SIRIUS y la radio satelital XM. ESPAÑOL Puede asignar nombres a 30 frecuencias de emisoras (FM y AM) y hasta un máximo de 8 caracteres para cada nombre de emisora.
Active la suscripción de SIRIUS después de la conexión: 3 Consulte el número de identificación de la radio satelital XM que aparece en la etiqueta de la carcasa del Sintonizador universal XMDirectTM o sintonice el “Channel 0” (consulte la página 17). 1 4 Para activar su suscripción, visite el sitio web ESPAÑOL 2 de la radio satelital XM en o llame al 1-800-XM-RADIO (1-800-967-2346).
En búsqueda por canal, el nombre y el número del canal aparecen en la pantalla durante la búsqueda. Para escuchar la radio satelital XM 1 Para consultar el número de identificación de la radio satelital XM 2 3 Seleccione el canal de audición. Mientras selecciona “XM1”, “XM2”, o “XM3” seleccione “Channel 0”. Al mantener pulsado el botón, los canales se cambian rápidamente. La pantalla muestra alternativamente “RADIO ID” y el número de identificación de 8 caracteres alfanuméricos.
3 Seleccione el canal preajustado (1 – 6) deseado. Preparativos: Asegúrese de que se ha seleccionado “CHANGER” para el ajuste de entrada externa, consulte la página 14. ~ ESPAÑOL Para cambiar la información en pantalla mientras escucha un canal Ÿ Reloj = Nombre de la categoría = Nombre del canal = Nombre del artista = Nombre del compositor* = Nombre de la canción/ programa/título = (vuelta al comienzo) * Sólo para la radio satelital SIRIUS. Operaciones del iPod / reproductor D.
Seleccionar una pista en el menú 1 Cómo seleccionar los modos de reproducción Ingrese al menú principal. Ahora los botones 5/∞/ 4/¢ funcionan como botones selectores de menús*. * El modo de selección de menú será cancelado: – Si no se realiza ninguna operación durante aproximadamente 5 segundos. – Cuando usted confirma la selección de una pista. 2 Seleccione el menú deseado. Para iPod: PLAYLIST Ô ARTISTS Ô ALBUMS Ô SONGS Ô GENRES Ô COMPOSER Ô (vuelta al comienzo) Para el reproductor D.
ESPAÑOL Operaciones del otro componente externo Podrá conectar un componente externo a... • Jack del cambiador de CD en la parte trasera, utilizando Adaptador de entrada de línea— KS-U57 (no suministrado) o Adaptador de entrada AUX—KS-U58 (no suministrado) para cualesquier otros componentes (excepto iPod y reproductor D.). • Jack de entrada AUX (auxiliar) en el panel de control. Para la conexión, consulte el Manual de instalación/ conexión (volumen separado).
Operaciones de los discos Precaución sobre la reproducción de DualDisc • El lado no DVD de un “DualDisc” no es compatible con la norma “Compact Disc Digital Audio”. Por consiguiente, no se recomienda usar el lado no DVD de un DualDisc en este producto. – Discos en los cuales las etiquetas pueden imprimirse directamente mediante una impresora de chorro de tinta. El uso de estos discos a temperaturas o humedad elevadas podría producir fallos de funcionamiento o daños a la unidad.
ESPAÑOL – Archivos MP3 codificados con Layer 1/2. – Archivos WMA codificados con formatos sin pérdida, profesional, y de voz. – Archivos WMA no basados en Windows Media® Audio. – Archivos formateados WMA protegidos contra copia por DRM. – Archivos que disponen de datos tales como AIFF, ATRAC3, etc. • La función de búsqueda funciona pero la velocidad de búsqueda no es constante. Cambio de la fuente • Si cambia de fuente, la reproducción también se interrumpe.
Cómo limpiar los conectores Un desmontaje frecuente producirá el deterioro de los conectores. Para reducir esta posibilidad al mínimo, limpie periódicamente los conectores con un palillo de algodón, teniendo cuidado de no dañar los conectores. Para mantener los discos limpios Un disco sucio podría no reproducirse correctamente. Si se llegara a ensuciar un disco, límpielo con un lienzo suave, en línea recta desde el centro hacia el borde.
Localización de averías Lo que aparenta ser una avería podría resolverse fácilmente. Verifique los siguientes puntos antes de llamar al centro de servicio. General FM/AM ESPAÑOL Síntomas • No se puede escuchar el sonido a través de los altavoces. • Ajuste el volumen al nivel óptimo. • Inspeccione los cables y las conexiones. • El receptor no funciona en absoluto. Reinicialice el receptor (consulte la página 3). • El preajuste automático SSM no funciona. Almacene manualmente las emisoras.
Soluciones/Causas • El tiempo de reproducción transcurrido no escorrecto. Esto sucede a veces durante la reproducción. Esto depende de cómo fueron grabadas las pistas en el disco. • “PLEASE” y “EJECT” aparecen alternativamente en la pantalla. Inserte un disco que contenga pistas MP3/WMA. • No se visualizan los caracteres correctos (por ej.: nombre del álbum). Esta unidad sólo puede visualizar letras (mayúsculas), números, y un número limitado de símbolos. • Aparece “NO DISC” en la pantalla.
Radio satelital ESPAÑOL Síntomas Soluciones/Causas • La señal “OFF AIR” aparece en la pantalla mientras escucha la radio satelital XM. El canal seleccionado no está emitiendo en ese momento. Seleccione otro canal o continúe escuchando el canal anterior. • La señal “LOADING” aparece en la pantalla mientras escucha la radio satelital XM. El receptor está cargando la información del canal y el audio. La información de texto no está disponible temporalmente. • Aparece “RESET 8” en la pantalla.
SECCIÓN DEL AMPLIFICADOR DE AUDIO SECCIÓN DEL REPRODUCTOR DE CD Salida de potencia: 20 W RMS × 4 canales a 4 Ω y ≤ 1% THD+N Relación señal a ruido: 80 dBA (referencia: 1 W en 4 Ω) Impedancia de carga: 4 Ω (tolerancia de 4 Ω a 8 Ω) Gama de control de tono: Graves/ Rango medio/ ±12 dB a 60 Hz/ 1 kHz/ Agudos: 7,5 kHz Respuesta de frecuencias: 40 Hz a 20 000 Hz Nivel/impedancia salida línea: KD-AR480: 4,0V/20 kΩ de carga (plena escala) KD-G430: 2,5 V/20 kΩ de carga (plena escala) Nivel/impedancia salida 2,5 V
FRANÇAIS Merci pour avoir acheté un produit JVC. Veuillez lire attentivement toutes les instructions avant d’utiliser l’appareil afin de bien comprendre son fonctionnement et d’obtenir les meilleures performances possibles. Précautions: Tout changement ou modification non approuvé par JVC peut annuler l’autorité de l’utilisateur d’utiliser l’appareil. IMPORTANT POUR PRODUITS LASER 1. PRODUIT LASER CLASSE 1 2. ATTENTION: N’ouvrez pas le couvercle supérieur.
: Utilisation du changeur de CD extérieur. : Indicateur affiché pour l’opération correspondante. Comment réinitialiser votre appareil TABLE DES MATIERES Panneau de commande — KD-AR480/ KD-G430 ........................................... 4 Télécommande — RM-RK50 ................. 5 Pour commencer.............................. 6 Opérations de base............................................... 6 Fonctionnement de la radio ............. 7 Opérations des disques ....................
Panneau de commande — KD-AR480 / KD-G430 Identification des parties FRANÇAIS Fenêtre d’affichage 1 Touche SRC (source) 2 Touche B BAND 3 Touche (attente/sous tension 4 5 6 7 8 9 p q w e r t y u atténuation) / Molette de commande Touche SEL (sélection) Fenêtre d’affichage Touches 5 (haut) / ∞ (bas) Touche EQ (égaliseur) Capteur de télécommande N’EXPOSEZ PAS le capteur de télécommande à une forte lumière (lumière directe du soleil ou éclairage artificiel).
Télécommande — RM-RK50 Composants principaux et caractéristiques Pour Californie des États-Unis seulement: Cet appareil contient une pile-bouton CR au lithium qui contient du perchlorate—une manipulation spéciale peut être requise. Voir www.dtsc.ca.gov/ hazardouswaste/perchlorate Dirigez la télécommande directement sur le capteur de télécommande de autoradio. Assurezvous qu’il n’y a pas d’obstacle entre les deux.
5 Touche SOURCE • Choisit la source. ! FRANÇAIS 6 Touches 2 R (retour) / F (avance) 3 • Recherche les stations si pressées brièvement. • Avance ou recule rapidement la plage si les touches sont maintenues pressées. • Appuyez brièvement sur les touches pour changer. • Pendant l’écoute de la radio satellite: – Change les canaux si les touches sont pressées brièvement. – Change les canaux rapidement si les touches sont maintenues pressées. • Lors de l’écoute de iPod ou d’un lecteur D.
Réglages de base ! • Référez-vous aussi aux “Réglages généraux — PSM” aux pages 12 – 14. Démarrez la recherche d’une station. Quand une station est reçue, la recherche s’arrête. Pour arrêter la recherche, appuyez de nouveau sur la même touche. 1 2 Pour accorder une station manuellement À l’étape ! ci-dessus... affichages Choisissez “DEMO”, puis “DEMO OFF”. 2 Réglage de l’horloge Choisissez “CLOCK H” (heures), puis ajustez les heures. Choisissez “CLOCK M” (minutes), puis ajustez les minutes.
Écoute d’une station préréglée Mémorisation des stations Vous pouvez prérégler six stations pour chaque bande. Préréglage automatique des stations FM—SSM (Mémorisation automatique séquentielle des stations puissantes) FRANÇAIS 1 Choisissez la bande FM (FM1 – FM3) pour laquelle vous souhaitez mémoriser les stations. 1 2 Choisissez la station préréglée (1 – 6) souhaitée.
Lecture de disques dans le changeur de CD Pour faire avancer ou reculer rapidement la plage Tous les disques dans le magasin sont reproduits répétitivement jusqu’à ce que vous changiez la source. • Éjecter le magasin arrête aussi la lecture. * Si vous avez changé le réglage de l’entrée extérieure sur “EXT IN” (voir page 14), vous ne pouvez pas choisir le changeur de CD. Ÿ Choisissez un disque.
Autres fonctions principales Pour sauter les plages rapidement pendant la lecture FRANÇAIS Possible uniquement sur un changeur de CD JVC compatible MP3 Changement des informations sur l’affichage Lors de la lecture d’un CD ou d’un CD Text • Pour les disques MP3 ou WMA, vous pouvez sauter des plages à l’intérieur du même dossier. Ex.
Sélection des modes de lecture Vous pouvez utiliser un des modes de lecture suivants à la fois. 1 Vous pouvez sélectionner un mode sonore préréglé adapté à votre genre de musique (iEQ: égaliseur intelligent). Choisissez le mode de lecture souhaité. 7 Lecture répétée Mode TRK RPT FLDR RPT*1 : : DISC RPT* : Reproduit répétitivement La plage actuelle. Toutes les plages du dossier actuel. Toutes les plages du disque actuel. Annulation. Valeurs préréglées BAS*1 MID*2 TRE*3 S.
Ajustement du son Vous pouvez ajuster les caractéristiques du son comme vous le souhaitez. 1 FRANÇAIS 2 Indication, [Plage] BAS*2 (graves), [–06 à +06] Ajuste les graves. MID*2 (médiums), [–06 à +06] Ajustez le niveau sonore des fréquences des médiums. TRE*2 (aigus),[–06 à +06] Ajuste les aigus. *4 Cet ajustement n’affecte pas la sortie du caisson de grave. *5 La plage d’ajustement des super graves est utilisable uniquement quand ce réglage est sur “S.BS ON”.
Indications Élément ( : Réglage initial) Réglage, [page de référence] DEMO Démonstration des affichages • DEMO ON : La démonstration des affichages entre en service si aucune opération n’est réalisée pendant environ 20 secondes, [7]. : Annulation. CLK DISP*1 Affichage de l’horloge • ON CLOCK H Ajustement des heures 1 – 12 [Réglage initial: 1 (1:00)], [7]. CLOCK M Ajustement des minutes 00 – 59 [Réglage initial: 00 (1:00)], [7].
FRANÇAIS Indications Élément Réglage, [page de référence] ( : Réglage initial) SCROLL*5 Défilement • ONCE • AUTO • OFF : : : • L/O MODE Mode de sortie de ligne • REAR : Choisissez ce réglage si les deux prises LINE OUT sont utilisées pour connecter les enceintes (à travers un amplificateur). : Choisissez ce réglage si les prises REAR LINE OUT sont utilisées pour connecter un caisson de grave (à travers un amplificateur).
Affectation d’un titre Pour effacer tout le titre À l’étape 2 ci-à gauche... Vous pouvez affecter un nom à 30 fréquences de station (FM et AM) et un maximum de 8 caractères pour chaque nom. 2 Choisissez FM/AM. Affiche l’écran d’entrée de titre. Utilisation de la radio satellite Cet appareil est prêt pour la radio satellite (SAT)— compatible à la fois avec la radio satellite SIRIUS et la radio satellite XM.
Activez votre suscription SIRIUS après la connexion: 3 Vérifiez le numéro d’identification de votre radio satellite XM sur le boîte du tuner universelle XMDirectTM ou accordez le “Channel 0” (voir page 17). 1 4 Contactez la radio satellite XM sur Internet à l’adresse pour activer votre suscription ou appelez le 1-800-XM-RADIO (1-800-967-2346). Une fois cette procédure terminée, l’appareil accorde un des canaux disponibles (Canal 4 ou supérieur).
Dans la recherche de canal, le nom du canal et le numéro de canal apparaissent sur l’affichage pendant la recherche. Écoute de la radio satellite XM 1 • Pendant la recherche, les canaux invalides et ceux auxquels vous n’avez pas souscrits sont sautés. Vérification du numéro d’identification de la radio satellite XM 2 Choisissez le canal à écouter. Maintenir la touche pressée permet de changer les canaux rapidement.
3 Choisissez le canal préréglé (1 – 6) souhaitée. Préparations: Assurez-vous que “CHANGER” est choisi pour le réglage de l’entrée extérieure, voir page 14. Pour changer les informations affichées lors de l’écoute d’un canal ~ FRANÇAIS Ÿ Horloge = Nom de la catégorie = Nom du canal = Nom de l’artiste = Nom du compositeur* = Nom de la chanson/ programme/titre = (retour au début) * Uniquement pour la radio satellite SIRIUS. Utilisation de iPod / lecteur D.
Sélection d’une plage à partir du menu 1 Entrez dans le menu principal. 2 2 7 Lecture répétée * Le mode de sélection de menu est annulé: – Si aucune opération n’est effectuée pendant environ 5 secondes. – Quand vous validez le choix d’une plage. ONE RPT Fonctionne de la même façon que “Répéter Un” pour iPod ou que “Mode répétition = Un” pour le lecteur D. Choisissez le menu souhaité. Pour iPod: PLAYLIST Ô ARTISTS Ô ALBUMS Ô SONGS Ô GENRES Ô COMPOSER Ô (retour au début) Pour le lecteur D.
Utilisation d’un autre appareil extérieur FRANÇAIS Vous pouvez connecter un appareil extérieur à... • Prise du changeur de CD à l’arrière en utilisant Adaptateur d’entrèe de ligne—KS-U57 (non fourni) ou adaptateur d’entrèe AUX—KS-U58 (non fourni) pour n’importe quel autre appareil (sauf iPod et lecteur D.). • Prise d’entrée AUX (auxiliaire) sur le panneau de commande. Pour les connexions, référez-vous au Manuel d’installation/raccordement (volume séparé).
Précautions pour la lecture de disques à double face • La face non DVD d’un disque à “DualDisc” n’est pas compatible avec le standard “Compact Disc Digital Audio”. Par conséquent, l’utilisation de la face non DVD d’un disque à double face sur cet appareil n’est pas recommandée. Généralités • Cet autoradio est conçu pour reproduire les CD/CD Text et les CD-R (enregistrables)/CD-RW (réinscriptibles) au format CD audio (CD-DA), MP3 et WMA.
– Fichiers MP3 codés avec Layer 1/2. – Fichiers WMA codés sans perte, professionnels et formats vocaux. – Fichiers WMA qui ne sont pas basés sur Windows Media® Audio. – Fichiers au format WMA protégés contre la copie avec DRM. – Fichiers qui contiennent des données telles que AIFF, ATRAC3, etc. • La fonction de recherche fonctionne mais la vitesse de recherche n’est pas constante. • Si vous changez la source, la lecture s’arrête aussi.
Entretien Comment nettoyer les connecteurs Un détachement fréquent détériorera les connecteurs. Pour minimiser ce problème, frottez périodiquement les connecteurs avec un coton tige ou un chiffon imprégné d’alcool, en faisant attention de ne pas endommager les connecteurs. Pour garder les disques propres Un disque sale peut ne pas être reproduit correctement. Si un disque est sale, essuyez-le avec un chiffon doux, en ligne droite du centre vers les bords.
Guide de dépannage Ce qui apparaît être un problème n’est pas toujours sérieux. Vérifiez les points suivants avant d’appeler un centre de service. FM/AM Lecture MP3/WMA Lecture de disque FRANÇAIS Généralités Symptôme Remèdes/Causes • Aucun son n’est entendu des enceintes. • Ajustez le volume sur le niveau optimum. • Vérifiez les cordons et les connexions. • Cet autoradio ne fonctionne pas du tout. Réinitialisez l’autoradio (voir page 3).
Remèdes/Causes • La durée de lecture écoulée n’est pascorrecte. Cela se produit quelque fois pendant la lecture. C’est causé par la façon don’t les plages ont été enregistrées sur le disque. • “PLEASE” et “EJECT” apparaissent alternativement sur l’affichage. Insérez un disque contenant des plages MP3/WMA. • Les caractères corrects ne sont pas affichés (ex.: nom de l’album). Cet appareil peut uniquement afficher les lettres (majuscules), les chiffres et un nombre limité de symboles.
Radio satellite Symptôme Remèdes/Causes • “OFF AIR” apparaît sur l’affichage lors de l’écoute de la radio satellite XM. Le canal choisi n’est pas diffusé actuellement. Choisissez un autre canal ou continuez d’écouter le canal précédent. • “LOADING” apparaît sur l’affichage lors de l’écoute de la radio satellite XM. L’appareil est en train de changer les informations du canal et audio. Le texte d’information est temporairement indisponible. • “RESET 8” apparaît sur l’affichage.
SECTION DE L’AMPLIFICATEUR AUDIO SECTION DU LECTEUR CD Puissance de sortie: 20 W RMS × 4 canaux à 4 Ω et avec ≤ 1% THD+N Rapport signal sur bruit: 80 dBA (référence: 1 W pour 4 Ω) Impédance de charge: 4 Ω (4 Ω à 8 Ω admissible) Plage de commande de tonalité: Graves/Médiums/ ±12 dB à 60 Hz/ 1 kHz/ Aigus: 7,5 kHz Type: Lecteur de disque compact Système de détection du Capteur optique sans contact signal: (laser semi-conducteur) Nombre de canaux: 2 canaux (stéréo) Réponse en fréquence: 5 Hz à 20 000 Hz Plag
Having TROUBLE with operation? Please reset your unit Refer to page of How to reset your unit Still having trouble?? USA ONLY Call 1-800-252-5722 http://www.jvc.com We can help you! EN, SP, FR © 2006 Victor Company of Japan, Limited Rear_KD-AR480_430[J]2.