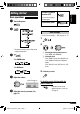
CD RECEIVER KD-G431 For canceling the display demonstration, see page 5. For installation and connections, refer to the separate manual. INSTRUCTIONS GET0410-003A [EX/EU] Cover_KD-G431_003A_f.
ENGLISH Thank you for purchasing a JVC product. Please read all instructions carefully before operation, to ensure your complete understanding and to obtain the best possible performance from the unit. IMPORTANT FOR LASER PRODUCTS 1. CLASS 1 LASER PRODUCT 2. CAUTION: Do not open the top cover. There are no user serviceable parts inside the unit; leave all servicing to qualified service personnel. 3. CAUTION: Visible and/or invisible class 1M laser radiation when open.
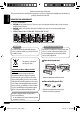
CONTENTS : Built-in CD player operations. : External CD changer operations. : Indicator displayed for the corresponding operation. How to use the M MODE button If you press M MODE, the unit goes into functions mode, then the number buttons and 5/∞ buttons work as different function buttons. Ex.: When number button 2 works as MO (monaural) button.
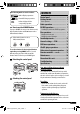
ENGLISH Control panel Parts identification Display window 1 2 3 4 5 6 7 8 9 p q w e r t y u i o Control dial 0 (eject) button Loading slot T/P (traffic programme/programme type) button DISP (display) button 4 /¢ buttons Display window (standby/on attenuator) button AUX (auxiliary) input jack 5 (up) / ∞ (down) buttons SEL (select) button BAND button SRC (source) button Remote sensor ; RND (random) button a M MODE button s (control panel release) button d Disc information indicators— • You can control t
To drop the volume in a moment (ATT) Basic operations To restore the sound, press the button again. ~ Turn on the power. ENGLISH Getting started To turn off the power Ÿ Basic settings • See also “General settings — PSM” on pages 13 –15. 1 2 * You cannot select these sources if they are not ready or not connected. 1 Canceling the display demonstrations Select “DEMO,” then “DEMO OFF.” 2 Setting the clock Select “CLOCK H” (hour), then adjust the hour. Select “CLOCK M” (minute), then adjust the minute.
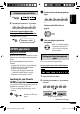
ENGLISH Radio operations Storing stations in memory You can preset six stations for each band. ~ FM station automatic presetting— SSM (Strong-station Sequential Memory) Ÿ Lights up when receiving an FM stereo broadcast with sufficient signal strength. 1 Select the FM band (FM1 – FM3) you want to store into. 88.3 ! Start searching for a station. When a station is received, searching stops. To stop searching, press the same button again.
Ÿ 1 2 Select one of your favorite programme types. or Select the preset station (1 – 6) you want. ENGLISH Listening to a preset station Select one of the PTY codes (see page 9). To check the current clock time while listening to an FM (non-RDS) or AM station • For FM RDS stations, see page 9. Frequency Ô Clock ! Start searching for your favorite programme. If there is a station broadcasting a programme of the same PTY code as you have selected, that station is tuned in.
ENGLISH 3 Repeat steps 1 and 2 to store other PTY codes into other preset numbers. 4 Finish the procedure. Using the standby receptions TA Standby Reception TA Standby Reception allows the unit to switch temporarily to Traffic Announcement (TA) from any source other than AM. The volume changes to the preset TA volume level if the current level is lower than the preset level (see page 14). To activate TA Standby Reception The TP (Traffic Programme) indicator either lights up or flashes.
Usually when you press the number buttons, the preset station is tuned in. If the signals from the FM RDS preset station are not sufficient for good reception, this unit, using the AF data, tunes in to another frequency broadcasting the same programme as the original preset station is broadcasting. • The unit takes some time to tune in to another station using programme search. • See also page 14.
To fast-forward or reverse the track ENGLISH Other main functions Skipping tracks quickly during play Only possible on JVC MP3-compatible CD changer To go to the next or previous tracks • For MP3 or WMA discs, you can skip tracks within the same folder. To go to the next or previous folders (only for MP3 or WMA discs) Ex.: To select track 32 while playing a track whose number is a single digit (1 to 9) 1 For MP3 discs: For WMA discs: 2 Each time you press the button, you can skip 10 tracks.
Selecting the playback modes You can use only one of the following playback modes at a time. While playing an audio CD or a CD Text 1 2 ENGLISH Changing the display information Select your desired playback mode. 7 Repeat play While playing an MP3 or a WMA*2 disc • When “TAG DISP” is set to “TAG ON” (see page 14) Mode Plays repeatedly TRK RPT : The current track. FLDR RPT *1 : All tracks of the current folder. DISC RPT *2 : All tracks of the current disc.
ENGLISH Sound adjustments Adjusting the sound You can select a preset sound mode suitable to the music genre (iEQ: intelligent equalizer). You can adjust the sound characteristics to your preference. 1 1 2 2 Indication, [Range] Preset values BAS*1 MID*2 TRE*3 S.BS*4 Indication (For) BAS*1 (bass), [–06 to +06] Adjust the bass. 00 00 00 OFF MID*1 (mid-range), [–06 to +06] Adjust the mid-range frequencies sound level.
You can change PSM (Preferred Setting Mode) items listed in the table that follows. ENGLISH General settings — PSM 3 Adjust the PSM item selected. 4 Repeat steps 2 and 3 to adjust other PSM items if necessary. 5 Finish the procedure. 1 2 Select a PSM item. Indications Item ( : Initial) Selectable settings, [reference page] DEMO Display demonstration • DEMO ON : Display demonstration will be activated automatically if no operation is done for about 20 seconds, [5]. : Cancels.
ENGLISH Indications Item ( : Initial) Selectable settings, [reference page] PTY-STBY*2 PTY standby OFF, PTY codes : Activates PTY Standby Reception with one of the PTY codes, [9]. TA VOL*2 Traffic announcement volume [Initial: VOL 15] VOL 00 – VOL 30 or 50*3 P-SEARCH*2 Programme search • ON • OFF : Activates Programme Search, [9]. : Cancels. DAB AF*4 Alternative frequency reception • AF ON : Traces the programme among DAB services and FM RDS stations, [8, 16]. : Cancels.
Item ( : Initial) IF BAND • AUTO Intermediate frequency band • WIDE Selectable settings, [reference page] : Increases the tuner selectivity to reduce interference noises between close stations. (Stereo effect may be lost.) : Subject to the interference noises from adjacent stations, but sound quality will not be degraded and the stereo effect will remain.
ENGLISH Storing DAB services in memory You can preset six DAB services (primary) for each band. 1 2 Select a service you want (see steps ~ to ⁄ on page 15). Select the preset number (1 – 6) you want to store into. • While receiving an FM RDS station: When driving in an area where a DAB service is broadcasting the same programme as the FM RDS station is broadcasting, this unit automatically tunes in to the DAB service. When shipped from the factory, Alternative Frequency Reception is activated.
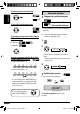
Preparations: Selecting a track from the menu 1 ENGLISH Make sure “CHANGER” is selected for the external input setting, see page 14. Enter the main menu. ~ Ÿ Now the 5/∞/4 /¢ the menu selecting buttons*. Playback starts automatically from where it has been paused*1 or stopped*2 previously. ! ⁄ 2 buttons work as Select the desired menu. Adjust the volume. For iPod: PLAYLIST Ô ARTISTS Ô ALBUMS Ô SONGS Ô GENRES Ô COMPOSER Ô (back to the beginning) Adjust the sound as you want. (See page 12.
ENGLISH Selecting the playback modes 1 2 Select your desired playback mode. 7 Repeat play ONE RPT Functions the same as “Repeat One” of the iPod or “Repeat Mode = One” for the D. player. ALL RPT Functions the same as “Repeat All” of the iPod or “Repeat Mode = All” for the D. player. RPT OFF Cancels. 7 Random play Other external component operations You can connect an external component to...
! ⁄ Turn on the connected component and start playing the source. Adjust the volume. Adjust the sound as you want. (See page 12.) To check the other information while listening to an external component AUX IN or EXT IN Ô Clock Warning: • Do not install any battery other than CR2025 or its equivalent; otherwise, it may explode. • Do not leave the remote controller in a place (such as dashboards) exposed to direct sunlight for a long time; otherwise, it may explode.
ENGLISH 2 5 U (up) / D (down) ∞ buttons 3 4 5 6 • Changes the FM/AM/DAB bands with 5 U. • Changes the preset stations (or DAB services) with D ∞. • Changes the folder of the MP3/WMA discs. • While playing an MP3 disc on an MP3-compatible CD changer: – Changes the disc if pressed briefly. – Changes the folder if pressed and held. • While listening to an Apple iPod or a JVC D. player: – Pauses/stops or resumes playback with D ∞. – Enters the main menu with 5 U.
More about this unit Basic operations Turning on the power • By pressing SRC on the unit, you can also turn on the power. If the source is ready, playback also starts. ENGLISH To keep discs clean A dirty disc may not play correctly. If a disc does become dirty, wipe it with a soft cloth in a straight line from center to edge. • Do not use any solvent (for example, conventional record cleaner, spray, thinner, benzine, etc.) to clean discs.
ENGLISH • If you want to know more about RDS, visit . Disc operations Caution for DualDisc playback • The Non-DVD side of a “DualDisc” does not comply with the “Compact Disc Digital Audio” standard. Therefore, the use of Non-DVD side of a DualDisc on this product may not be recommended. General • This unit has been designed to reproduce CDs/CD Texts, and CD-Rs (Recordable)/CD-RWs (Rewritable) in audio CD (CD-DA), MP3 and WMA formats.
Changing the source • If you change the source, playback also stops (without ejecting the disc). Next time you select “DISC” for the playback source, disc play starts from where it has been stopped previously. Ejecting a disc • If the ejected disc is not removed within 15 seconds, the disc is automatically inserted again into the loading slot to protect it from dust. • After ejecting a disc, “NO DISC” appears and you cannot operate some of the buttons.
What appears to be trouble is not always serious. Check the following points before calling a service center. Symptoms MP3/WMA playback Disc playback FM/AM General ENGLISH Troubleshooting Remedies/Causes • Sound cannot be heard from the speakers. • Adjust the volume to the optimum level. • Check the cords and connections. • The unit does not work at all. Reset the unit (see page 2). • SSM automatic presetting does not work. Store stations manually. • Static noise while listening to the radio.
Playback order is determined when the files are recorded. • Elapsed playing time is not correct. This sometimes occurs during play. This is caused by how the tracks are recorded on the disc. • “PLEASE” and “EJECT“ appear alternately on the display. Insert a disc that contains MP3/WMA tracks. • Correct characters are not displayed (e.g. album name). This unit can only display letters (upper case), numbers, and a limited number of symbols. • “NO DISC” appears on the display.
iPod/D. player playback ENGLISH Symptoms Remedies/Causes • The iPod or D. player does not turn on or does not work. • Check the connecting cable and its connection. • Update the firmware version. • Change the battery. • Buttons do not work as intended. The functions of the buttons have been changed. Press M MODE before performing the operation. • The sound is distorted. Deactivate the equalizer either on the unit or the iPod/D. player. • “NO IPOD” or “NO DP” appears on the display.
AUDIO AMPLIFIER SECTION CD PLAYER SECTION Maximum Power Output: Front/Rear: 50 W per channel Continuous Power Output (RMS): Front/Rear: 19 W per channel into 4 Ω, 40 Hz to 20 000 Hz at no more than 0.8% total harmonic distortion. Load Impedance: 4 Ω (4 Ω to 8 Ω allowance) Tone Control Range: Bass: ±12 dB at 60 Hz Mid-range: ±12 dB at 1 kHz Treble: ±12 dB at 7.5 kHz Frequency Response: 40 Hz to 20 000 Hz Signal-to-Noise Ratio: 70 dB Line-Out Level/ 2.
Having TROUBLE with operation? Please reset your unit Refer to page of How to reset your unit Dear Customer, This apparatus is in conformance with the valid European directives and standards regarding electromagnetic compatibility and electrical safety. European representative of Victor Company of Japan, Limited is: JVC Technology Centre Europe GmbH Postfach 10 05 52 61145 Friedberg Germany EN, FR © 2006 Victor Company of Japan, Limited Rear_KD-G431_003A_f.