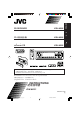
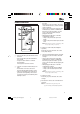
ENGLISH CD RECEIVER KD-LH305 !" KD-LH305 ‰∑¬ `a= ‡§√◊ËÕ߇≈Ëπ CD KD-LH305 KD-LH305 • This unit is equipped with the display demonstration. To cancel it, see page 8. • ! !"#$%&'("#)*+,- 8 • ‡§√◊ËÕßπ’È ‰¥È√—∫°“√µ‘¥µ—Èß°“√ “∏‘µ¿“æª√–°Õ∫ À“°µÈÕß°“√¬°‡≈‘° ‚ª√¥¥Ÿ ÀπÈ“ 8 For installation and connections, refer to the separate manual. !"#$%&'()*+,-./0 °√ÿ≥“¥Ÿ§ŸË¡◊Õ∑’Ë·¬°µË“ßÀ“° „π°“√µ‘¥µ—Èß·≈–°“√‡™◊ËÕ¡µËÕ INSTRUCTIONS !" §”·π–π” GET0202-001B [U] COVER_KD-LH305[U]1.
ENGLISH IMPORTANT FOR LASER PRODUCTS 1. CLASS 1 LASER PRODUCT 2. CAUTION: Do not open the top cover. There are no user serviceable parts inside the unit; leave all servicing to qualified service personnel. 3. CAUTION: Visible and invisible laser radiation when open and interlock failed or defeated. Avoid direct exposure to beam. 4. REPRODUCTION OF LABEL: CAUTION LABEL, PLACED OUTSIDE THE UNIT.
ENGLISH Thank you for purchasing a JVC product. Please read all instructions carefully before operation, to ensure your complete understanding and to obtain the best possible performance from the unit. CONTENTS 2 GRAPHIC DISPLAYS ....................... 29 LOCATION OF THE BUTTONS ............ 4 Downloading images and animations ....... 30 Deleting unwanted files ............................. 32 Activating the downloaded images and animations ..............................................
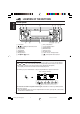
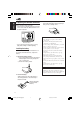
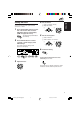
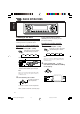
LOCATION OF THE BUTTONS ENGLISH Control panel 1 2 3 4 5 6 7 8 KD-LH305 9 1 2 3 4 5 6 7 8 p w er t y q 9 p q w e r t y Control dial (standby/on attenuator) button ANGLE button Display window 5 (up) button FM/AM button 0 (eject) button 4 /¢ buttons SEL (select) button D DISP (display) button Number buttons M MODE button Remote sensor ∞ (down) button CD/CD-CH (CD changer) button (control panel release) button Illumination Navigation for easy operations If you use M MODE or SEL (select), the displa
Remote controller S ENGLISH 3 • Selects the preset stations while listening to the radio. Each time you press the button, the preset station number increases, and the selected station is tuned in. • Skips to the first track of the previous folder while listening to an MP3 or a WMA disc. Each time you press the button, you can move to the previous folder and start playing the first track. • While playing an MP3 disc on an MP3compatible CD changer; – Skips to the previous disc if pressed briefly.
ENGLISH Preparing the remote controller Before using the remote controller: • Aim the remote controller directly at the remote sensor on the main unit. Make sure there is no obstacle in between. Remote sensor • Do not expose the remote sensor to strong light (direct sunlight or artificial lighting). Installing the battery When the controllable range or effectiveness of the remote controller decreases, replace the battery. 1. Remove the battery holder.
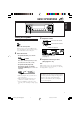
ENGLISH BASIC OPERATIONS 3 1 Turning on the power 1 2 3 Adjust the volume. To increase the volume Turn on the power. To decrease the volume Note on One-Touch Operation: When you select a source in step 2 below, the power automatically comes on. You do not have to press this button to turn on the power. 2 Volume level appears. Select the source. • To operate the tuner, press FM/AM. TUNER Then, press FM/AM repeatedly to select the band (FM1, FM2, FM3, or AM).
ENGLISH To drop the volume in a moment 2 Press briefly while listening to any source. “ATT” starts flashing on the display, and the volume level will drop in a moment. To resume the previous volume level, press the button briefly again. • If you turn the control dial, you can also restore the sound. Press number button 1 to select “MOVIE”—Movie category of the PSM settings. The “Graphics” setting screen appears on the display. To turn off the power Press and hold for more than one second.
1 Select “Clock Min” (minute). 2 Adjust the minute. You can also set the clock system to either 24 hours or 12 hours. 1 1 2 Press and hold SEL (select) for more than 2 seconds so that one of the PSM items appears on the display. (PSM: see pages 36 and 37.) The next-step-operation buttons start flashing. 2 Set the minute. ENGLISH 4 Setting the clock 5 Set the clock system. 1 Select “24H/12H.” 2 Select “24Hours” or “12Hours.
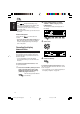
ENGLISH RADIO OPERATIONS Listening to the radio You can use either automatic searching or manual searching to tune in to a particular station. Searching for a station automatically: Auto search 1 To stop searching before a station is received, press the same button you have pressed for searching. Searching for a station manually: Manual search 1 Each time you press the button, the band changes as follows: Select the band (FM1 – 3, AM).
Tune in to a station you want while “Manual Search” is flashing. To tune in to stations of higher frequencies When an FM stereo broadcast is hard to receive: Set the FM reception mode to “Mono On.” 1 Press M MODE while listening to an FM ENGLISH 3 stereo broadcast. To tune in to stations of lower frequencies • If you release your finger from the button, the manual mode automatically turns off after about 5 seconds.
ENGLISH Storing stations in memory You can use one of the following two methods to store broadcasting stations in memory. • Automatic preset of FM stations: SSM (Strongstation Sequential Memory) • Manual preset of both FM and AM stations FM station automatic preset: SSM You can preset 6 local FM stations in each FM band (FM1, FM2, and FM3). 1 Select the FM band (FM1 – 3) you want to store FM stations into.
Press and hold the number button (in this example, 1) for more than 2 seconds. The display pattern automatically changes to the small animation display (see page 14). Tuning in to a preset station You can easily tune in to a preset station. Remember that you must store stations first. If you have not stored them yet, see “Storing stations in memory” on pages 12 and 13. ENGLISH 3 Selecting a preset station directly 1 Select the band (FM1 – 3, AM).
ENGLISH Selecting a preset station using the preset station list If you forget what stations are stored in which preset numbers, you can check the preset station list, then select your desired station. 1 Select the band (FM1 – 3, AM). Each time you press the button, the band changes as follows: Changing the display pattern By pressing D DISP, you can change the information shown on the display. Each time you press the button, the display patterns change as follows: Ex.
ENGLISH DISC OPERATIONS This unit has been designed to reproduce CDs, CD-Rs (Recordable), CD-RWs (Rewritable), and CD Texts. • This unit is also compatible with MP3 and WMA discs. For details about these discs, refer to “A Guide to MP3/WMA” (separate volume). Playing a disc 1 Open the control panel. About MP3 and WMA discs MP3 and WMA (Windows Media® Audio) “tracks” (word “file” is not used to indicate MP3 or WMA files, “track” is used in this manual) are recorded in “folders.
ENGLISH Display indications when inserting an audio CD or a CD Text: Total track number and total playing time of the inserted CD Display indications when inserting an MP3 or a WMA discs: Total folder and track numbers MP3 indicator* Current track and elapsed playing time Notes: • MP3 or WMA discs require a longer readout time. (It differs due to the complexity of the folder/track configuration.) • The unit cannot read or play an MP3 track without the extension code <.
When an MP3 or a WMA folder includes an image file edited by Image Converter (supplied in the CD-ROM), you can show the image on the display while the tracks in the folder are played back. • While reading an image file, no sounds come out (“Image Link” is shown on the display during this period). Album 1 (Folder 1) Music001.mp3 Music002.mp3 Music003.mp3 To activate ImageLink, follow the procedure below: • See also “Changing the general settings (PSM)” on page 36.
ENGLISH Locating a track or a particular portion on a disc To go to a track quickly 1 Press M MODE while playing a disc. “Mode” appears on the display. The next-step-operation buttons start flashing. To fast-forward or reverse the track Press and hold ¢ , while playing a disc, to fast-forward the track. Press and hold 4 reverse the track. , while playing a disc, to See page 30 for this function. Note: During this operation on an MP3 or WMA disc, you can only hear intermittent sounds.
IMPORTANT: To directly select the folders using the number button(s), it is required that folders are assigned 2 digit numbers at the beginning of their folder names. (This can only be done during the recording of CD-Rs or CD-RWs.) Ex.: If folder name is “01 ABC” = Press 1 to go to Folder 01 ABC. If folder name is “1 ABC,” pressing 1 does not work. If folder name is “12 ABC” = Press and hold 6 (12) to go to Folder 12 ABC.
ENGLISH Selecting a folder and a track using the name lists Selecting a track and start playback 1 The following operations are only possible when playing an MP3 or a WMA disc. Press and hold 5 (up) or ∞ (down) so that the folder name list of the inserted disc appears on the display. The current playing folder will be highlighted on the display. You can show the folder name and track name lists on the display while playing a disc. Then, select a folder or a track you want to start playback with.
To play back tracks repeatedly (Repeat Play) To play back tracks at random (Random Play) You can play back the current track (or a folder for MP3 and WMA discs) repeatedly. You can play back all tracks on the disc (or a folder for MP3 and WMA discs) at random. 1 Press M MODE while playing a disc. “Mode” appears on the display. The next-step-operation buttons start flashing. 1 Press M MODE while playing a disc. “Mode” appears on the display. The next-step-operation buttons start flashing.
ENGLISH To play back only intros (Intro Scan) Prohibiting disc ejection You can play back the first 15 seconds of each track sequentially. You can prohibit disc ejection and can lock a disc in the loading slot. 1 Press M MODE while playing a disc. While pressing SEL (select), press and hold 0 (eject) for more than 2 seconds. “Mode” appears on the display. The next-step-operation buttons start flashing. 2 Press number button 1 repeatedly while “Mode” is still on the display.
By pressing D DISP, you can change the information shown on the display. If the information cannot be shown at a time, it will scroll on the display. See also “To select the scroll mode—Scroll” on page 38. Some characters or symbols will not be shown (will be blanked or substituted) on the display.
ENGLISH SOUND ADJUSTMENTS 2 Adjusting the sound You can set the speaker output balance, subwoofer output level, and input level of each source. • There is a time limit in doing the following procedure. If the setting is canceled before you finish, start from step 1 again. 1 Make adjustments. • To adjust fader and balance—Fad, Bal: You can make these two adjustments at the same time. • If you are using a two-speaker system, set the fader level to “00.” • Press 5 (up) or ∞ (down) to adjust the fader.
Selecting preset sound modes (iEQ: intelligent equalizer) You can select a preset sound mode (iEQ: intelligent equalizer) suitable to the music genre. ENGLISH • To adjust the input level of each source —Vol Adj: Volume adjustment level can be separately stored for each source—CD, AM, Line in, and CD changer. Before making an adjustment, select an appropriate source for which you want to make an adjustment.
ENGLISH 2 To cancel the sound mode, select “FLAT” in step 2. Press the number button to select the sound mode you want. • This unit has two sound mode selection screens. To move to the other screen, press 5 (up) or ∞ (down). Notes: • You can adjust the preset sound modes temporarily. However, your temporary adjustments will be reset when you select another sound mode. • For details about the preset settings of each sound mode, see table below.
4 Make adjustments as you like. You can adjust the sound modes to your preference and store your own adjustments in memory (USER 1, USER 2, and USER 3). 1) Press ¢ or 4 to select the frequency band—60Hz, 150Hz, 400Hz, 1kHz, 2.4kHz, 6kHz, 12kHz. 2) Press 5 (up) or ∞ (down) to adjust the level of the selected band within the range of –05 to +05. 3) Repeat steps 1) and 2) to adjust the other frequency bands. • There is a time limit in doing the following procedure.
ENGLISH Selecting the display theme You can select the theme of the display during playback. View 1: A scenery display appears. • Positive pattern display: • There is a time limit in doing the following procedure. If the setting is canceled before you finish, start from step 1 again. 1 • Negative pattern display: Select “THEME.” Each time you press the button, the adjustable items change as follows: iEQ Fad/Bal Sub Out View 2: A scenery display appears.
GRAPHIC DISPLAYS ENGLISH With the supplied Image Converter CD-ROM, you can edit your own favorite pictures and use them as the opening screen, ending screen, and graphic screen while playing a source. What is Image Converter? Image Converter is a JVC’s original software to produce customize images to be shown on your JVC Car Audio.
ENGLISH Downloading images and animations 2 Before starting the following procedure, prepare a CD-R including still images (pictures) and animations (movies). • The supplied Image Converter CD-ROM includes sample images and animations, so you can use this disc as your first trial. IMPORTANT: • Still images (pictures) should have , and animations (movies) should have as their extension code in their file names.
• Ending : Ending screen To download an animation to be shown before the unit is turned off. (You can store only one animation consisting of a maximum of 30 frames.) • Picture : Graphic screen* To download a still image to be shown if no operation is done for about 20 seconds. (You can store 90 frames of still images—one frame each.) If you want to cancel the procedure, press D DISP. 7 • Movie : Graphic screen* To download an animation to be shown if no operation is done for about 20 seconds.
ENGLISH 9 Select (highlight) a file you want to download. Deleting unwanted files • When “BACK” is shown on the display above number button 5, you can go back to the previous screen by pressing number button 5. To delete all the stored files at a time 1 Press M MODE while playing any source. The file name appears, and the unit will ask you “Download OK?” 10 If it is OK, press number button 1 to start downloading. Downloading starts, and “Downloading...” appears on the display.
6 Press number button 5 to resume the source indication screen. 1 Press M MODE while playing any source. “Mode” appears on the display. The next-step-operation buttons start flashing. 2 Press number button 6 to show the download ENGLISH To delete the files stored for “Opening,” “Ending,” “Picture (all stored images at a time),” and “Movie” To delete the stored files for “Picture” (one by one) 1 Press M MODE while playing any source. “Mode” appears on the display.
ENGLISH 6 Press number button 3 to start erasure. “Now Deleting...” appears while erasing the selected file. When erasure is over, the name list of the stored file appears again. 3 Select “Opening” (opening screen setting) or “Ending” (ending screen setting). 7 To delete more files, repeat from steps 5 and 6. 8 Press D DISP to resume the source indication screen. Activating the downloaded images and animations Ex.: When you select “Opening” 4 Select “User.
Press number button 1 to select “MOVIE”—Movie category of the PSM settings. The “Graphics” setting screen appears on the display. Selecting a still image for graphic display—User Picture You cannot select “UserPict.” as a PSM item in the following cases: • If no image is stored in “Picture,” or • “UserPict.” is not selected for the “Graphics” setting (see the left column). 1 3 Select “UserMovie,” “UserSlide,” or “UserPict.
ENGLISH OTHER MAIN FUNCTIONS 3 Changing the general settings (PSM) You can change the items listed on the table below and on page 37 by using the PSM (Preferred Setting Mode) control. • The PSM items are grouped into six categories—MOVIE, CLOCK, DISP (display), TUNER, AUDIO, and COLOR. • By pressing ¢ or 4 repeatedly, you can also move to another category. 4 Basic Procedure 1 Adjust the PSM item selected.
Clock Hr Hour adjustment Clock Min Minute adjustment 24H/12H 24 hours or 12 hours Scroll Scroll mode Selectable values/items Factory-preset settings See page 1 – 12 (0 – 23) 1 (1:00AM) 9 00 – 59 00 (1:00AM) 9 12Hours 9 Once 38 Auto 40 Any time – Any time 6PM – 7AM 40 1 – 10 5 38 Auto 38 12Hours 24Hours Once Auto Off DISP (display) Dimmer Dimmer mode From– To*3 Dimmer time setting Contrast Contrast LCD Type Display type Auto Off Time Set On Positive Auto AUDI
ENGLISH To show the graphics on the display —Graphics To adjust the display contrast level —Contrast You can change the graphics shown on the display. These graphics appear if no operation is done for about 20 seconds (except for “ImageLink”). Adjust the display contrast (1 – 10) to make the display indications clear and legible. • Int Demo: Display demonstration (animation) and playback source indication appears alternately (see page 8).
To select the telephone muting—Telephone In some areas, adjacent stations may interfere with each other. If this interference occurs, noise may be heard. This mode is used when a cellular phone system is connected. Depending on the phone system used, select either “Muting1” or “Muting2,” whichever mutes the sounds from this unit. • Auto: • Muting1: • Wide: When this type of interference occurs, this unit automatically increases the tuner selectivity so that interference noise will be reduced.
ENGLISH Selecting the dimmer mode 4 Set the dimmer mode as you like. You can dim the display at night automatically or as you set the timer. Note: Auto Dimmer equipped with this unit may not work correctly on some vehicles, particularly on those having a control dial for dimming. In this case, select any other than “Auto.” 1 • Auto: Activates Auto Dimmer. When you turn on the car head lights, the display automatically dims. • Off: Cancels Auto Dimmer. • On: Always dims the display.
4 As you turn the control dial, the colors change as follows: You can set the display color using the PSM control. You can select your favorite color for each source (or for all sources). You can also create your own colors, and set them as the display color.
ENGLISH Creating your own color—User 4 You can create your own colors—“Day” and “Night,” and select them as the display color for any desired source. • Day: Can be used as your user color during the day time*. • Night: Can be used as your user color during the night time*. Select the user color adjustment screen. One of the user color adjustment screens appears. “User Day” or “User Night” is shown on the left side of the display. * Depends on the “Dimmer” setting.
3 You can assign names to station frequencies, CDs (both in this unit and in the CD changer), and the external component. After assigning a name, it will appears on the display when you select the source.
ENGLISH Changing the control panel angle You can change the angle of the control panel to four positions. CAUTION: NEVER insert your finger in between the control panel and the unit, as it may get caught or hurt. Press ANGLE repeatedly to adjust the angle of the control panel to the position you want. The control panel angles changes as follows: A B D C Note: If you turn the power off, the control panel automatically returns to the closed position.
You can detach the control panel when leaving the car. When detaching or attaching the control panel, be careful not to damage the connectors on the back of the control panel and on the panel holder. Attaching the control panel 1 Insert the left side of the control panel into the groove on the panel holder. ENGLISH Detaching the control panel Detaching the control panel Before detaching the control panel, be sure to turn off the power. 1 2 Unlock the control panel.
ENGLISH CD CHANGER OPERATIONS We recommend that you use the JVC MP3compatible CD changer with your unit. Playing discs By using this CD changer, you can play back your original CD-Rs (Recordable) and CD-RWs (Rewritable) recorded either in audio CD format or in MP3 format. • You can also connect other CH-X series CD changers (except CH-X99 and CH-X100). However, they are not compatible with MP3 discs, so you cannot play back MP3 discs. • You cannot use the KD-MK series CD changers with this unit.
Selected disc number To go to a particular disc directly Press the number button corresponding to the disc number to start its playback (while the CD changer is playing). ENGLISH • When the current disc is a CD: Playback starts from the first track of the current disc. • To select a disc number from 01 – 06: Press 1 (7) – 6 (12) briefly. • To select a disc number from 07 – 12: Press and hold 1 (7) – 6 (12) for more than one second.
ENGLISH This operation is only possible when using JVC MP3-compatible CD changer (CH-X1500). How to go to the desired track quickly • Ex. 1: To select track number 32 while playing track number 6 To go to a track quickly 1 Press M MODE while playing a disc. “Mode” appears on the display. The next-step-operation buttons start flashing. Track 6 (Three times) \ 10 \ 20 \ 30 (Twice) \ 31 \ 32 • Ex. 2 : To select track number 8 while playing track number 36 See page 30 for this function. Ex.
If you forget what discs are loaded in the CD changer, you can show the disc name list and select a disc in the list shown on the display. • The display can show only six names at a time. 1 While playing a disc, press and hold 5 (up) or ∞ (down) until a disc name list appears on the display. While playing an MP3 disc, you can also show the folder name list(s) and track name list(s) on the display, then select a folder or track.
ENGLISH Selecting the playback modes To play back tracks at random (Random Play) 1 Press M MODE during play. “Mode” appears on the display. The next-step-operation buttons start flashing. 2 Press number button 3 repeatedly while “Mode” is still on the display. Note: MP3 indicator also lights up if the current playing disc is an MP3 disc. To cancel random play, select “Random Off” by pressing number button 3 repeatedly or press number button 4 in step 2.
Active indicator Plays repeatedly Each time you press the button, intro scan mode changes as follows: For MP3 discs: Repeat Track (track repeat) indicator lights up. The current (or specified) track. Repeat Folder* (folder repeat) indicator lights up. All tracks of the current (or specified) folder of the current disc. (disc repeat) indicator lights up. All tracks of the current (or specified) disc. Repeat Disc * “Repeat Folder” is only applicable for MP3 disc.
ENGLISH EXTERNAL COMPONENT OPERATIONS Playing an external component 2 You can connect the external component to the CD changer jack on the rear using the Line Input Adapter KS-U57 (not supplied). 3 Preparations: • For connecting the Line Input Adapter KS-U57 and the external component, refer to the Installation/ Connection Manual (separate volume). • Before operating the external component using the following procedure, select the external input correctly.
What appears to be trouble is not always serious. Check the following points before calling a service center. Symptoms General FM/AM Remedies The volume level is set to the minimum level. Adjust it to the optimum level. Connections are incorrect. Check the cords and connections. • This unit does not work at all. The built-in microcomputer may have functioned incorrectly due to noise, etc. Press the reset button on the control panel. (Your preset adjustments will also be erased.) (See page 2.
ENGLISH Symptoms Causes • Disc cannot be played back. Remedies No MP3/WMA tracks are recorded on the disc. Change the disc. MP3/WMA tracks do not have the extension code <.mp3> or <.wma> in their track names. Add the extension code <.mp3> or <.wma> to their track names. MP3/WMA tracks are not Change the disc. recorded in the format (Record MP3/WMA tracks using compliant with ISO 9660 Level a compliant application.) 1, Level 2, Romeo, or Joliet.
• Download does not seem to finish. You are trying to download an animation of many frames. This is normal (see page 30). • Animation does not move. Temperature in the car compartment is very low— (LOW TEMP.) indicator appears. Wait until the operating temperature resumes—until (LOW TEMP.) indicator goes off. No disc is in the magazine. Insert discs into the magazine. Discs are inserted upside down. Insert discs correctly. • “No Magazine” flashes on the display.
ENGLISH MAINTENANCE Handling discs When playing a CD-R or CD-RW This unit has been designed to reproduce CDs, CD-Rs (Recordable), CD-RWs (Rewritable), and CD Texts. • This unit is also compatible with MP3 and WMA discs. How to handle discs When removing a disc Center holder from its case, press down the center holder of the case and lift the disc out, holding it by the edges. • Always hold the disc by the edges. Do not touch its recording surface.
AUDIO AMPLIFIER SECTION CD PLAYER SECTION Maximum Power Output: Front: 50 W per channel Rear: 50 W per channel Continuous Power Output (RMS): Front: 19 W per channel into 4 Ω, 40 Hz to 20 000 Hz at no more than 0.8% total harmonic distortion. Rear: 19 W per channel into 4 Ω, 40 Hz to 20 000 Hz at no more than 0.8% total harmonic distortion. Load Impedance: 4 Ω (4 Ω to 8 Ω allowance) Equalizer Control Range: Frequencies: 60 Hz, 150 Hz, 400 Hz, 1 kHz, 2.
CD qÒGA l u¹œ«— w d KD-LH305 KD-LH305 Æ∏ W×H# dE½« ¨÷«dF²Ýô« WHOþË ¡UG ô Æ÷dF « WýUA ÷«dF²Ý« WHOþuÐ œË Ò e “UN'« «c¼ ÆqBHM*« ULOKF² « VO² WFł«d vłd¹ ¨ öOu² «Ë VO d² « UOKLF ULOKF² « qO œ EN, CT, TH, AR 1203KKSMDTJEIN © 2003 VICTOR COMPANY OF JAPAN, LIMITED Cover Ara_KD-LH305[U]f 2 2/12/03, 9:16 AM
KD-LH305 GET0202-003A [U] Installation/Connection Manual !"#$ °“√µ‘¥µ—Èß/§ŸË¡◊Õ°“√µ‘¥µ—Èß qOHu² «ØVO d² « 1203KKSMDTJEIN EN, CT, TH, AR ULOKFð VÒO² ENGLISH This unit is designed to operate on 12 V DC, NEGATIVE ground electrical systems. If your vehicle does not have this system, a voltage inverter is required, which can be purchased at JVC car audio dealers. !"#$% 12V !"#$%&' !"#$%&'()*+,-.
When using the optional stay / !"# / ‡¡◊ËÕ„™Èµ— «¬÷¥·∫∫‡≈◊Õ°‰¥È (“¡“√∂‡≈◊Õ°‡ª‘¥§È“߉«È ‰¥È) / WOBU{ô« W'UŽb « «b;²Ý« bMŽ When installing the unit without using the sleeve / !"#$%&'($ / ™ÿ¥ª√–°Õ∫‚¥¬‰¡Ë „™Èª≈Õ°ÀÿÈ¡ / wK«u « qJON « «b;²Ý« ÊËbÐ “UN'« V dð U'bMŽ In a Toyota for example, first remove the car radio and install the unit in its place. Fire wall !"TOYOTA !"#$% !"#$%&'()$*+,- .
ENGLISH A Typical Connections / !"#$ / Before connecting: Check the wiring in the vehicle carefully. Incorrect connection may cause serious damage to this unit. The leads of the power cord and those of the connector from the car body may be different in color. 1 2 3 Connect the colored leads of the power cord in the order specified in the illustration below. °“√‡™◊ËÕ¡µËÕ·∫∫ª°µ‘ / WOł–uLM « öO u² « !"#$%&'()*+%,& !"#$%&' !" #$%!&'(" )*+,-.
B Connections Adding Other Equipment / Amplifier / !" / ‡§√◊ËÕߢ¬“¬ / !"#$%&'()* +,-./$0 §ÿ≥ “¡“√∂µËÕ°—∫·Õ¡æ≈‘ø“¬‡ÕÕ√Ï ·≈–Õÿª°√≥ÏÕπ Ë◊ ʉ¥È ‡æ◊ÕË ‡æ‘¡Ë §ÿ≥ ¿“æ‡ ’¬ß„ÀÈ°—∫√–∫∫ ‡µÕ√‘‚Õ¢Õß√∂¬πµÏ • !"#$%&'$()*+,-./0 • µËÕ “¬µ–°—«Ë √–¬–‰°≈ ( π ’ ”È ‡ß‘π≈“¬¢“«) ‡¢È“°—∫ “¬µ–°—«Ë √–¬– !"#$%&'()'*+,-.