Having TROUBLE with operation? ENGLISH Please reset your unit FRANÇAIS Refer to page of How to reset your unit Vous avez des PROBLÈMES de fonctionnement? Réinitialisez votre appareil Référez-vous à la page intitulée Comment réinitialiser votre appareil KD-R412 / KD-R411 / KD-R35 / KD-R312 / KD-R311 CD RECEIVER / RÉCEPTEUR CD Dear Customer, This apparatus is in conformance with the valid European directives and standards regarding electromagnetic compatibility and electrical safety.
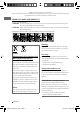
Thank you for purchasing a JVC product. Please read all instructions carefully before operation, to ensure your complete understanding and to obtain the best possible performance from the unit. IMPORTANT FOR LASER PRODUCTS 1. CLASS 1 LASER PRODUCT 2. CAUTION: Do not open the top cover. There are no user serviceable parts inside the unit; leave all servicing to qualified service personnel. 3. CAUTION: Visible and/or invisible class 1M laser radiation when open. Do not view directly with optical instruments.
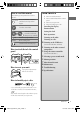
How to read this manual The following icons/symbols are used to indicate: CONTENTS 3 How to read this manual 3 How to attach/detach the control Press and hold the button(s) [Hold] until the desired operation begins. Turn the control dial. Turn the control dial to make a selection, then press to confirm.
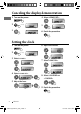
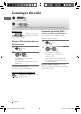
Canceling the display demonstration 1 Turn on the power. 4 Select . 2 5 [Hold] (Initial setting) 3 6 Finish the procedure. Setting the clock 1 Turn on the power. 2 6 Adjust the minute. [Hold] (Initial setting) 3 Select . 7 Select <24H/12H>. 4 Select . 8 Select <24 HOUR> or <12 HOUR>. 5 Adjust the hour. 9 Finish the procedure. 4 ENGLISH EN02-09_KD-R412_003A_4.
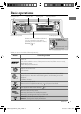
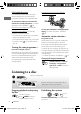
Basic operations Ejects the disc Control dial Display window Loading slot Detaches the panel Auxiliary input jack Remote sensor (for KD-R412/KD-R411) You can control this unit with an optionally purchased remote control, 12). RM-RK50 ( For KD-R412/ KD-R411/KD-R35 USB (Universal Serial Bus) input jack When you press or hold the following button(s)... Button General operation • Turns on. • Selects the available sources (if the power is turned on). If the source is ready, playback also starts.
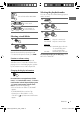
Listening to the radio ~ ] “FM” or “AM” Ÿ “ST” lights up when receiving an FM stereo broadcast with sufficient signal strength. Manual search Automatic presetting (FM)— “M” flashes, then press the button repeatedly. [Hold] SSM (Strong-station Sequential Memory) You can preset up to 18 stations for FM. While listening to a station... When an FM stereo broadcast is hard to receive 1 [Hold] 2 ] ] ] Reception improves, but stereo effect will be lost.
Manual presetting (FM/AM) You can preset up to 18 stations for FM and 6 stations for AM. Ex.: Storing FM station of 92.50 MHz into preset number “04.” 1 ] “92.50MHz” 2 [Hold] The following features are available only for FM Radio Data System stations. Searching for your favourite FM Radio Data System programme—PTY Search You can tune in to a station broadcasting your favourite programme by searching for a PTY code. 1 “PRESET MODE” flashes. 3 [Hold] The last selected PTY code appears.
PTY Standby Reception PTY Standby Reception allows the unit to switch temporarily to your favourite PTY programme from any source other than AM. To activate and select your favourite PTY code for PTY Standby Reception, see “Menu 14) operations: .” ( If the PTY indicator lights up, PTY Standby Reception is activated. If the PTY indicator flashes, PTY Standby Reception is not yet activated. • To activate the reception, tune in to another station providing these signals.
Selecting the playback modes Selects folder of the MP3/WMA You can use only one of the following playback modes at a time. 1 Selects track [Hold] 2 Fast-forwards or reverses the track ] “REPEAT” “RANDOM” 3 Selecting a track/folder 1 2 For MP3/WMA discs, select the desired folder, then the desired track by repeating step 2. • To return to the previous menu, press BACK.
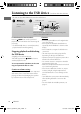
Listening to the USB device (For KD-R412/KD-R411/KD-R35) This unit can play MP3/WMA tracks stored in a USB device. ~ Ÿ USB input jack USB memory ] Turn on the power. All tracks will be played repeatedly until you change the source or detach the USB device. If a USB device has been attached... Pressing / SOURCE turns on the power and playback starts from where it has been stopped previously. • If a different USB device is currently attached, playback starts from the beginning.
Listening to the other external components You can connect an external component to the AUX (auxiliary) input jack on the control panel. Preparation: Make sure is selected for the = setting. ( 16) • For details, refer also to the instructions supplied with the adapter or external components. ~ Ÿ ! ⁄ ] “AUX IN” Turn on the connected component and start playing the source. ] Adjust the volume. Adjust the sound as you want.
Using the remote controller (For KD-R412/KD-R411) KD-R412/KD-R411 can be remotely controlled as instructed here (with an optionally purchased remote controller). We recommend that you use remote controller RM-RK50 with your unit. Installing the lithium coin battery (CR2025) Caution: • Danger of explosion if battery is incorrectly replaced. Replace only with the same or equivalent type. • Battery shall not be exposed to excessive heat such as sunshine, fire, or the like.
Selecting a preset sound mode You can select a preset sound mode suitable for the music genre. Storing your own sound mode You can store your own adjustments in memory. 1 FLAT = NATURAL = DYNAMIC = VOCAL BOOST = BASS BOOST = USER = (back to the beginning) 2 ] ] / / While listening, you can adjust the tone level of the selected sound mode. 1 [Hold] 3 [Hold] 2 Adjust the level (–06 to +06) of the selected tone (BASS / MIDDLE / TREBLE).
PRO EQ CLOCK Category Menu item 24H/12H Time display mode CLOCK ADJ *1 Clock adjustment BASS MIDDLE TREBLE DIMMER DISPLAY SCROLL *2 TUNER TAG DISPLAY SSM *3 Strong-station Sequential Memory AF-REG *4 Alternative frequency/ regionalization reception PTYSTANDBY *3, *4 *1 *2 *3 *4 14 Selectable setting, [ Initial: Underlined ] • 24 HOUR • 12 HOUR : For settings, • AUTO : The built-in clock is automatically adjusted using the CT (clock time) data in the Radio Data System signal. : Cancels. 13.
Category Menu item TUNER TA VOLUME *5 Traffic announcement volume P-SEARCH *5 Programme search MONO *7 Monaural mode IF BAND Intermediate frequency band Selectable setting, [ Initial: Underlined ] • VOLUME 00 – : — VOLUME 50 (or VOLUME 00 – VOLUME 30) *6 [ VOLUME 15 ] • SEARCH ON : Activates Programme Search. ( • SEARCH OFF : Cancels.
Category Menu item VOL ADJUST Volume adjust (For KD-R412/ KD-R411/KD-R35) AUDIO L/O MODE *11 Line output mode SUB.W FREQ *11, *12 Subwoofer cutoff frequency SUB.W LEVEL *11, *12 Subwoofer level BEEP TEL MUTING Telephone muting SRC SELECT AMP GAIN *13 Amplifier gain control AM *14 AM station AUX IN *15 Auxiliary input Selectable setting, [ Initial: Underlined ] VOL ADJ –05 — : Preset the volume adjustment level of VOL ADJ +05 each source (except FM), compared to the [ VOL ADJ 00 ] FM volume level.
More about this unit Basic operations Disc operations General Caution for DualDisc playback • If you turn off the power while listening to a track, playback will start from where it had been stopped previously next time you turn on the power. • If no operation is done for about 60 seconds after pressing MENU button, the operation will be canceled. • The Non-DVD side of a “DualDisc” does not comply with the “Compact Disc Digital Audio” standard.
• Some CD-Rs or CD-RWs may not play back on this unit because of their disc characteristics, or for the following reasons: – Discs are dirty or scratched. – Moisture condensation has occurred on the lens inside the unit. – The pickup lens inside the unit is dirty. – The files on the CD-R/CD-RW are written using the “Packet Write” method. – There are improper recording conditions (missing data, etc.) or media conditions (stained, scratched, warped, etc.).
Playing MP3/WMA tracks from a USB device (for KD-R412/KD-R411/ KD-R35) • While playing from a USB device, the playback order may differ from other players. • This unit may be unable to play back some USB devices or some files due to their characteristics or recording conditions. • Depending on the shape of the USB devices and connection ports, some USB devices may not be attached properly or the connection might be loose. • Connect one USB mass storage class device to the unit at a time.
Maintenance How to clean the connectors To keep discs clean Frequent detachment will deteriorate the connectors. To minimize this possibility, periodically wipe the connectors with a cotton swab or cloth moistened with alcohol, being careful not to damage the connectors. A dirty disc may not play correctly. If a disc does become dirty, wipe it with a soft cloth in a straight line from center to edge. • Do not use any solvents (for example, conventional record cleaner, spray, thinner, benzine, etc.
Troubleshooting Symptom Sound cannot be heard from the speakers. • Adjust the volume to the optimum level. • Make sure the unit is not muted/paused ( • Check the cords and connections. “PROTECT” appears on the display and no operations can be done. Check to be sure the terminals of the speaker leads are covered with insulating tape properly, then reset the unit ( 3). If “PROTECT” does not disappear, consult your JVC IN-CAR ENTERTAINMENT dealer or a company supplying kits. The unit does not work at all.
MP3/WMA playback Symptom 22 Remedy/Cause Disc cannot be played back. • Use a disc with MP3/WMA tracks recorded in a format compliant with ISO 9660 Level 1, Level 2, Romeo, or Joliet. • Add the extension code <.mp3> or <.wma> to the file names. Noise is generated. Skip to another track or change the disc. (Do not add the extension code <.mp3> or <.wma> to non-MP3 or WMA tracks.) A longer readout time is required (“READING” keeps flashing on the display).
USB device playback (for KD-R412/KD-R411/KD-R35) Symptom Remedy/Cause Noise is generated. The track played back is not an MP3/WMA track. Skip to another file. (Do not add the extension code <.mp3> or <.wma> to non-MP3 or WMA tracks.) “READING” keeps flashing on the display. • Readout time varies depending on the USB device. • Do not use too many hierarchy or folders. • Turn off the power then on again. • Reattach the USB device again. “NO FILE” appears on the display.
Specifications Maximum Power Output: Continuous Power Output (RMS): AUDIO AMPLIFIER SECTION Load Impedance: Tone Control Range: Bass: Middle: Treble: Frequency Response: Signal-to-Noise Ratio: Line-Out Level/Impedance: Subwoofer-Out Level/Impedance: Output Impedance: Other Terminal: Frequency Range: TUNER SECTION FM Tuner: MW Tuner: LW Tuner: 24 Front/ Rear: Front/ Rear: Except KD-R35: Except KD-R35: 50 W per channel 19 W per channel into 4 Ω, 40 Hz to 20 000 Hz at no more than 0.
GENERAL USB SECTION (for KD-R412/ KD-R411/KD-R35) CD PLAYER SECTION Type: Signal Detection System: Compact disc player Non-contact optical pickup (semiconductor laser) Number of Channels: 2 channels (stereo) Frequency Response: 5 Hz to 20 000 Hz Dynamic Range: 93 dB Signal-to-Noise Ratio: 98 dB Wow and Flutter: Less than measurable limit MP3 Decoding Format: (MPEG1/2 Audio Layer 3) Max. Bit Rate: 320 kbps WMA (Windows Media® Audio) Decoding Format: Max. Bit Rate: 192 kbps USB Standard: USB 1.1, USB 2.
Having TROUBLE with operation? ENGLISH Please reset your unit FRANÇAIS Refer to page of How to reset your unit Vous avez des PROBLÈMES de fonctionnement? Réinitialisez votre appareil Référez-vous à la page intitulée Comment réinitialiser votre appareil KD-R412 / KD-R411 / KD-R35 / KD-R312 / KD-R311 CD RECEIVER / RÉCEPTEUR CD Dear Customer, This apparatus is in conformance with the valid European directives and standards regarding electromagnetic compatibility and electrical safety.
INFORMATION (For U.S.A.) This equipment has been tested and found to comply with the limits for a Class B digital device, pursuant to Part 15 of the FCC Rules. These limits are designed to provide reasonable protection against harmful interference in a residential installation. This equipment generates, uses, and can radiate radio frequency energy and, if not installed and used in accordance with the instructions, may cause harmful interference to radio communications.
Listening to the radio ~ Ÿ ] “FM” or “AM” Listening to the disc ~ Ÿ ] Turn on the power. “ST” lights up when receiving an FM stereo broadcast with sufficient signal strength. Manual search “M” flashes, then press the button repeatedly. All tracks will be played repeatedly until you change the source or eject the disc. Selecting a preset station 1 Stopping playback and ejecting the disc Selecting the playback modes “NO DISC” appears. Press / SOURCE to listen to another playback source.
Selecting a preset sound mode You can select a preset sound mode suitable for the music genre. FLAT = NATURAL = DYNAMIC = VOCAL BOOST = BASS BOOST = USER = (back to the beginning) Storing your own sound mode Tone You can store your own adjustments in memory. 1 While listening, you can adjust the tone level of the selected sound mode. BASS [Hold] MIDDLE 2 TREBLE 1 [Hold] ] ] / / Frequency 60 Hz, 80 Hz, 100 Hz, 200 Hz 0.5 kHz, 1.0 kHz, 1.5 kHz, 2.5 kHz 10.
Electrical connections Installation This unit is designed to operate on 12 V DC, NEGATIVE ground electrical systems. If your vehicle does not have this system, a voltage inverter is required, which can be purchased at JVC car audio dealers. IMPORTANT: A custom wiring harness (separately purchased) which is suitable for your car is recommended for connection between the unit and your car. • Consult your JVC car audio dealer or a company supplying kits for details. Prepare these before installation....
More about this unit Troubleshooting Symptom General Sound cannot be heard from the speakers. “PROTECT” appears on the display and no operations can be done. This unit does not work at all. “AUX IN” cannot be selected. Disc playback FM/AM SSM automatic presetting does not work. Static noise while listening to the radio. Connect the antenna firmly. “AM” cannot be selected. Check the = setting. (See “Menu operations” on page 3.) Disc cannot be played back.
Specifications Maintenance How to clean the connectors To play new discs Wipe the connectors with a cotton swab or cloth moistened with alcohol. Remove any rough areas from the inner and outer edges of the disc. Connectors Moisture condensation Moisture may condense on the lens inside the unit. Eject the disc and leave the unit turned on for a few hours until the moisture has evaporated. To keep discs clean Wipe in a straight line from center of disc to edge.
IMPORTANT FOR LASER PRODUCTS 1. CLASS 1 LASER PRODUCT 2. CAUTION: Do not open the top cover. There are no user serviceable parts inside the unit; leave all servicing to qualified service personnel. 3. CAUTION: Visible and/or invisible class 1M laser radiation when open. Do not view directly with optical instruments. 4. REPRODUCTION OF LABEL: CAUTION LABEL, PLACED OUTSIDE THE UNIT. KD-R414/KD-R314 CD RECEIVER : INSTRUCTIONS/INSTALLATION Warning: Thank you for purchasing a JVC product.
Listening to the radio ~ Ÿ ] “FM” or “AM” Listening to the disc ~ Ÿ ] Turn on the power. “ST” lights up when receiving an FM stereo broadcast with sufficient signal strength. Manual search “M” flashes, then press the button repeatedly. All tracks will be played repeatedly until you change the source or eject the disc. Selecting a preset station 1 Stopping playback and ejecting the disc Selecting the playback modes “NO DISC” appears. Press / SOURCE to listen to another playback source.
Parts List Menu operations 1 [Hold] PRO EQ CLOCK DEMO Category 2 3 Menu item • DEMO ON CLOCK SET • DEMO OFF [ 1:00 ] — D Trim plate .................................................................................1 E Power cord..............................................................................1 F Handles .....................................................................................2 The following illustration shows a typical installation.
Troubleshooting More about this unit Installation/connection USB device playback (for KD-R414) MP3/WMA playback Disc playback FM/AM General Symptom General Remedy/Cause Sound cannot be heard from the speakers. • Adjust the volume to the optimum level. • Make sure the unit is not muted/paused. (See page 1.) • Check the cords and connections. “PROTECT” appears on the display and no operations can be done.
INFORMATION (For U.S.A.) This equipment has been tested and found to comply with the limits for a Class B digital device, pursuant to Part 15 of the FCC Rules. These limits are designed to provide reasonable protection against harmful interference in a residential installation. This equipment generates, uses, and can radiate radio frequency energy and, if not installed and used in accordance with the instructions, may cause harmful interference to radio communications.
Listening to the radio ~ Ÿ ] “FM” or “AM” Listening to the disc ~ Ÿ ] Turn on the power. “ST” lights up when receiving an FM stereo broadcast with sufficient signal strength. Manual search “M” flashes, then press the button repeatedly. All tracks will be played repeatedly until you change the source or eject the disc. Selecting a preset station 1 Stopping playback and ejecting the disc Selecting the playback modes “NO DISC” appears. Press / SOURCE to listen to another playback source.
Selecting a preset sound mode You can select a preset sound mode suitable for the music genre. FLAT = NATURAL = DYNAMIC = VOCAL BOOST = BASS BOOST = USER = (back to the beginning) Storing your own sound mode Tone You can store your own adjustments in memory. 1 While listening, you can adjust the tone level of the selected sound mode. BASS [Hold] MIDDLE 2 TREBLE 1 [Hold] ] ] / / Frequency 60 Hz, 80 Hz, 100 Hz, 200 Hz 0.5 kHz, 1.0 kHz, 1.5 kHz, 2.5 kHz 10.
More about this unit Troubleshooting Symptom General Sound cannot be heard from the speakers. “PROTECT” appears on the display and no operations can be done. This unit does not work at all. “AUX IN” cannot be selected. Disc playback FM/AM SSM automatic presetting does not work. Static noise while listening to the radio. Connect the antenna firmly. “AM” cannot be selected. Check the = setting. (See “Menu operations” on page 3.) Disc cannot be played back.
Preparation Maintenance How to clean the connectors To play new discs Wipe the connectors with a cotton swab or cloth moistened with alcohol. Remove any rough areas from the inner and outer edges of the disc. Connectors Moisture condensation Moisture may condense on the lens inside the unit. Eject the disc and leave the unit turned on for a few hours until the moisture has evaporated. To keep discs clean Wipe in a straight line from center of disc to edge.
The following illustration shows a typical installation. If you are not sure how to install this unit correctly, contact your JVC car audio dealer or a company supplying kits. In-dash mounting See “Electrical connections” below. When installing the unit without using the sleeve Removing the unit In a Toyota car for example, first remove the car radio and install the unit in its place. Release the rear section first...