Having TROUBLE with operation? ENGLISH Please reset your unit FRANÇAIS Refer to page of How to reset your unit Vous avez des PROBLÈMES de fonctionnement? Réinitialisez votre appareil Référez-vous à la page intitulée Comment réinitialiser votre appareil KD-R521/KD-R422/ KD-R421/KD-R45 CD RECEIVER / RÉCEPTEUR CD Dear Customer, This apparatus is in conformance with the valid European directives and standards regarding electromagnetic compatibility and electrical safety.
Thank you for purchasing a JVC product. Please read all instructions carefully before operation, to ensure your complete understanding and to obtain the best possible performance from the unit. IMPORTANT FOR LASER PRODUCTS 1. CLASS 1 LASER PRODUCT 2. CAUTION: Do not open the top cover. There are no user serviceable parts inside the unit; leave all servicing to qualified service personnel. 3. CAUTION: Visible and/or invisible class 1M laser radiation when open. Do not view directly with optical instruments.
How to attach/detach the control panel CONTENTS 3 How to attach/detach the control panel 3 How to reset your unit 3 How to forcibly eject a disc 3 Maintenance How to reset your unit Your preset adjustments will also be erased. How to forcibly eject a disc [Hold] • Be careful not to drop the disc when it ejects. • If this does not work, reset your unit.
Canceling the display demonstration Display demonstration will be activated automatically if no operation is done for about 20 seconds. 1 Turn on the power. 4 Select . [Hold] 2 5 [Hold] (Initial setting) 6 Finish the procedure. 3 (Initial setting) Setting the clock 1 Turn on the power. 6 Adjust the minute. [Hold] 2 [Hold] (Initial setting) 3 Select . 7 Select <24H/12H>. 4 Select . 8 Select <24 HOUR> or <12 HOUR>. 5 Adjust the hour. 9 Finish the procedure.
Basic operations Loading slot Control dial Display window Remote sensor (for KD-R521/KD-R422/KD-R421) You can control this unit with an optionally purchased remote control, RM-RK52 (page 15, 16). Detaches the panel Ejects the disc Front auxiliary input jack USB (Universal Serial Bus) input terminal When you press or hold the following button(s)... Button / SOURCE Control dial (turn) Control dial (press) EQ BRIGHTNESS T/P BACK DISP General operation • Turns on/off [Hold].
Listening to the radio • [Press] Searches for stations automatically. • [Hold] Searches for stations manually. “M” flashes, then press the button ] “FM” or “AM” repeatedly. “ST” lights up when receiving an FM stereo broadcast with sufficient signal strength. ~ Ÿ Improving the FM reception 1 [Hold] Manual presetting (FM/AM) You can preset up to 18 stations for FM and 6 stations for AM. 1 2 ] ] ] Reception improves, but stereo effect will be lost.
The following features are available only for FM Radio Data System stations. Searching for your favourite FM Radio Data System programme—PTY Search You can tune in to a station broadcasting your favourite programme by searching for a PTY code. 1 [Hold] • To activate the reception, tune in to another station providing Radio Data System signals required for TA Standby Reception. • To deactivate the reception, press T/P BACK again.
Listening to a disc Playback starts automatically. All tracks will be played repeatedly until you change the source or eject the disc. Stopping playback and ejecting the disc If the ejected disc is not removed within 15 seconds, it will automatically reload into the loading slot. Basic operations Selecting a track/folder from the list • If the MP3/WMA disc contains many tracks, you can fast search (±10, ±100) through the disc by turning the control dial quickly.
Connecting the other external components You can connect an external component to the auxiliary input jack on the control panel (F-AUX) and/or on the rear side of the unit (R-AUX). Summary of using the external components through the auxiliary input jacks: External component Portable audio player Bluetooth device Preparation Connecting Auxiliary Source cable/device Menu setting Subinput jack name Setting (not supplied) item item Front SRC SELECT F-AUX ON F-AUX See below.
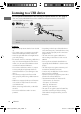
Listening to a USB device You can operate the USB device in the same way you operate the files on a disc. (page 8) • This unit can play MP3/WMA files stored in a USB mass storage class device (such as a USB memory, Digital Audio Player, etc.). ~ [Hold] Ÿ ] Turn on the power. USB input terminal USB cable (not supplied) All tracks will be played repeatedly until you change the source or disconnect the USB device. Cautions: • Make sure all important data has been backed up.
Listening to an iPod/iPhone Available for KD-R521 ~ [Hold] Ÿ USB input terminal ] Turn on the power. USB 2.0 cable (accessory of the iPod/iPhone) Apple iPod/iPhone All tracks will be played repeatedly until you change the source or disconnect the iPod/ iPhone. Cautions: Selecting a track from the menu • Avoid using the iPod/iPhone if it might hinder your safety driving. • Make sure all important data has been backed up to avoid losing the data. Not applicable under .
Selecting the playback modes • You can use only one of the following playback modes at a time. • Not applicable under .
Storing your own sound mode You can store your own adjustments in memory. 1 3 [Hold] 4 2 ] ] Adjust the sound elements (see table below) of the selected tone. Repeat steps 2 and 3 to adjust other tones. The adjustments made is automatically stored and changed to “USER.” Frequency / Level / Q [Initial: Underlined] 60/ 80/ 100/ 200 Hz –06 to +06 [ 00 ] Q1.0/ 1.25/ 1.5/ 2.0 BASS –06 to +06 [ 00 ] Q0.75/ 1.0/ 1.25 MIDDLE 0.5/ 1.0/ 1.5/ 2.
TUNER AUDIO Menu item PRO EQ FADER *4, *5 BALANCE *5 LOUD Selectable setting, [Initial: Underlined] For settings, see page 13. R06 — F06 [ 00 ] : Adjusts the front and rear speaker output balance. L06 — R06 [ 00 ] : Adjusts the left and right speaker output balance. ON : Boost low and high frequencies to produce a well-balanced sound at a low volume level. / OFF : Cancels. VOL ADJUST –05 — +05 [ 00 ] : Presets the volume adjustment level of each source (except “FM”), compared to the FM volume level.
Menu item Selectable setting, [Initial: Underlined] HEAD MODE : Controls iPod playback through the unit. / IPOD MODE : Controls iPod playback through the iPod/iPhone. / EXT MODE : The sound of any functions (musics, games, applications, etc.) running on the connected iPod/iPhone is emitted through the speakers connected to this unit. The display always show “EXT MODE.” AM *12 ON / OFF : Enable or disable “AM” in source selection. F-AUX *12 ON / OFF : Enable or disable “F-AUX” in source selection.
Warning (to prevent accidents and damage): • Do not install any battery other than CR2025 or its equivalent. • Do not leave the remote controller in a place (such as dashboards) exposed to direct sunlight for a long time. • Store the battery in a place where children cannot reach. • Do not recharge, short, disassemble, heat the battery, or dispose of it in a fire. • Do not leave the battery with other metallic materials. • Do not poke the battery with tweezers or similar tools.
MP3/WMA playback USB playback iPod/iPhone playback (For KD-R521) Symptom Tracks do not play back in the order you have intended them to play. The elapsed playing time is not correct. Remedy/Cause The playback order is determined when the files are recorded. This sometimes occurs during playback. This is caused by how the tracks are recorded on the disc. “READING” keeps flashing on the A longer readout time is required. Do not use too many hierarchical display. levels and folders.
Using Bluetooth ® devices For Bluetooth operations, it is required to connect the Bluetooth adapter, KS-BTA100 (not supplied) to the auxiliary input jack (R-AUX/BT ADAPTER) on the rear of the unit. (page 9) • For details, refer also to the instructions supplied with the Bluetooth adapter and the Bluetooth device. • Operations may be different according to the connected device. Preparation 1 Register (pair) a Bluetooth device with KS-BTA100. Refer to the instructions manual supplied with KS-BTA100.
Specifications AUDIO AMPLIFIER SECTION USB SECTION Maximum Power Output : Front/Rear : 50 W per channel Continuous Power Output (RMS) : Front/Rear : 20 W per channel into 4 Ω, 40 Hz to 20 000 Hz at no more than 1% total harmonic distortion. Load Impedance : 4 Ω (4 Ω to 8 Ω allowance) Frequency Response : 40 Hz to 20 000 Hz Signal-to-Noise Ratio : 70 dB Line-Out or Subwoofer-Out Level/Impedance (for KD-R521/KD-R422/KD-R421) : 2.
Merci pour avoir acheté un produit JVC. Veuillez lire attentivement toutes les instructions avant d’utiliser l’appareil afin de bien comprendre son fonctionnement et d’obtenir les meilleures performances possibles. IMPORTANT POUR PRODUITS LASER 1. PRODUIT LASER CLASSE 1 2. ATTENTION: N’ouvrez pas le couvercle supérieur. Il n’y a aucune pièce réparable par l’utilisateur à l’intérieur de l’appareil; confiez toute réparation à un personnel qualifié. 3.
Comment attacher/détacher le panneau de commande TABLE DES MATIERES 3 Comment attacher/détacher le panneau de commande 3 Comment réinitialiser votre appareil 3 Comment forcer l’éjection d’un disque 3 Entretien Comment réinitialiser votre appareil Vos ajustements préréglés sont aussi effacés. Comment forcer l’éjection d’un disque [Maintenez pressée] • Faites attention de ne pas faire tomber le disque quand il est éjecté. • Si cela ne fonctionne pas, essayez de réinitialiser l’autoradio.
Annulation des démonstrations des affichages La démonstration des affichages entre en service si aucune opération n’est réalisée pendant environ 20 secondes. 1 Mise sous tension de l’appareil. 4 Choisissez . [Maintenez pressée] 2 [Maintenez pressée] 5 (Réglage initial) 6 Terminez la procédure. 3 (Réglage initial) Réglage de l’horloge 1 Mise sous tension de l’appareil. 6 Ajustez les minutes. [Maintenez pressée] 2 [Maintenez pressée] (Réglage initial) 3 Choisissez .
Opérations de base Fente d’insertion Molette de commande Fenêtre d’affichage Éjection d’un disque Capteur de télécommande (pour le KD-R521/KD-R422/KD-R421) Vous pouvez commander cet autoradio avec la télécommande vendue en option, RM-RK52 (page 15, 16). Retrait du panneau Prise d’entrée auxiliaire avant Prise d’entrée USB (bus série universel) Quand vous appuyez ou maintenez pressées les touches suivantes...
Écoute de la radio • [Appuyez sur la touche] Recherche des stations automatiquement. • [Maintenez pressée] Recherche des ] “FM” ou “AM” stations manuellement. “M” clignote, puis appuyez sur la touche répétitivement. “ST” s’allume lors de la réception d’une émission FM stéréo avec un signal suffisamment fort. ~ Ÿ Amélioration de la réception FM 1 [Maintenez pressée] Préglage manuel (FM/AM) Vous pouvez prérégler un maximum de 18 stations pour FM et de 6 stations pour AM.
Les fonctionnalités suivantes sont accessibles uniquement pour les stations FM Radio Data System. Recherche de votre programme FM Radio Data System préféré— Recherche PTY Vous pouvez accorder une station diffusant votre programme préféré en effectuant une recherche par code PTY. 1 [Maintenez pressée] Les derniers codes PTY choisis apparaissent. 2 ] Choisissez un de vos types de programme favori ou un code PTY, et démarrez la recherche.
Écoute d’un disque La lecture démarre automatiquement. Toutes les plages sont reproduites répétitivement jusqu’à ce que vous changiez la source ou éjectiez le disque. Arrête de la lecture et éjection du disque Sélection d’une plage/dossier à partir de la liste Si le disque éjecté n’est pas retiré avant 15 secondes, il est réinséré automatiquement dans la fente d’insertion. Opérations de base Choisit un dossier d’un disque MP3/WMA.
Connexion d’autres appareils extérieurs Vous pouvez connecter un appareil extérieur à la prise d’entrée auxiliaire sur le panneau de commande (F-AUX) et/ou à l’arrière de l’appareil (R-AUX). Résumé de l’utilisation des appareils extérieurs par les prises d’entrée auxiliaire.
Écoute d’un périphérique USB Vous pouvez commander le périphérique USB de la même façon que les fichiers sur un disque. (page 8) • Cet appareil peut reproduire les fichiers MP3/WMA mémorisées dans un périphérique USB à mémoire de grande capacité (tel qu’une mémoire USB, un lecteur audio numérique, etc.). ~ [Maintenez pressée] Ÿ ] Mise sous tension de l’appareil.
Écoute d’un iPod/iPhone Disponible pour le KD-R521 ~ [Maintenez pressée] Ÿ Prise d’entrée USB ] Mise sous tension de l’appareil. Câble USB 2.0 (accessoire du iPod/iPhone) iPod/iPhone Apple Toutes les plages sont reproduites répétitivement jusqu’à ce que vous changiez la source ou déconnectiez le iPod/iPhone. Attention: • Évitez d’utiliser un iPod/iPhone s’il peut gêner une conduite en toute sécurité.
Sélection des modes de lecture • Vous pouvez utiliser un des modes de lecture suivants à la fois. • Ne s’applique pas au mode .
Mémorisation de votre propre mode sonore 3 Vous pouvez mémoriser vos propres ajustements en mémoire. 1 [Maintenez pressée] 2 4 Ajustez les éléments sonores (voir le tableau ci-dessous) de la tonalité choisie. Répétez les étapes 2 et 3 pour ajuster les autres tonalités. L’ajustement fait est mémorisé automatiquement et changé sur “USER”. ] ] Fréquence / Niveau / Q [Réglage initial: Souligné] BASS 60/ 80/ 100/ 200 Hz –06 à +06 [ 00 ] Q1.0/ 1.25/ 1.5/ 2.
Article de menu PRO EQ FADER *4, *5 BALANCE *5 LOUD TUNER AUDIO Réglages pouvant être choisis, [Réglage initial: Souligné] Pour les réglages, voir page 13. R06 — F06 [ 00 ] : Ajustez la balance de sortie avant-arrière des enceintes. L06 — R06 [ 00 ] : Ajustez la balance de sortie gauche-droite des enceintes. ON : Accentue les basses et hautes fréquences pour produire un son plus équilibré aux faibles niveaux de volume. / OFF : Annulation.
Article de menu Réglages pouvant être choisis, [Réglage initial: Souligné] HEAD MODE : Commande la lecture du iPod à travers cet appareil. / IPOD MODE : Commande la lecture du iPod à travers le iPod/iPhone. / EXT MODE : Le son de n’importe quelle fonction (musiques, jeux, applications, etc.) exécutée sur l’iPod/iPhone connecté est sortie par les enceintes connectées à cet appareil. L’affichage indique toujours “EXT MODE”. AM *12 ON / OFF : Met en ou hors service “AM” pour la sélection de source.
Avertissement (pour éviter tout accident et tout dommage): • N’installez pas une autre pile qu’une CR2025 ou son équivalent. • Ne laissez pas la télécommande dans un endroit (tel que le tableau de bord) exposé à la lumière directe du soleil pendant longtemps. • Rangez la pile dans un endroit hors d’atteinte des enfants. • Ne rechargez pas, ne court-circuitez pas, ne chauffez pas la pile ni ne la jeter dans un feu. • Ne laissez pas la pile avec d’autres objets métalliques.
Lecture MP3/WMA Lecture USB Lecture d’un iPod/iPhone (Pour KD-R521) Symptôme Les plages ne sont par reproduites dans l’ordre dans lequel vous vouliez les reproduire. La durée de lecture écoulée n’est pascorrecte. “READING” continue de clignoter sur l’affichage. Remède/Cause L’ordre de lecture est déterminé quand les fichiers sont enregistrés. “NO FILE” apparaît sur l’affichage. Du bruit est produit. “NOT SUPPORT” apparaît et la plage est sautée.
Utilisation de périphériques Bluetooth ® Pour les opérations Bluetooth, il faut connecter l’adaptateur Bluetooth, KS-BTA100 (non fournis) à la prise d’entrée auxiliaire (R-AUX/BT ADAPTER) à l’arrière de cet appareil. (page 9) • Pour en savoir plus, référez-vous aussi aux instructions fournies avec l’adaptateur Bluetooth et le périphérique Bluetooth. • L’opération peut différer en fonction du périphérique connecté. Préparation 1 Enregistrement (pairage) d’un appareil Bluetooth avec le KS-BTA100.
Spécifications SECTION DE L’AMPLIFICATEUR AUDIO Puissance de sortie maximum : Avant/Arrière : 50 W par canal Puissance de sortie en mode continu (RMS) : Avant/Arrière : 20 W par canal pour 4 Ω, 40 Hz à 20 000 Hz avec moins de 1% de distorsion harmonique totale.