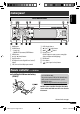
KD-S100 RECEPTOR CON CD KD-S100 ESPAÑOL RÉCEPTEUR CD KD-S100 FRANÇAIS ENGLISH CD RECEIVER INSTRUCTIONS MANUAL DE INSTRUCCIONES MANUEL D’INSTRUCTIONS For customer Use: Enter below the Model No. and Serial No. which are located on the top or bottom of the cabinet. Retain this information for future reference. Model No. Serial No. GET0395-001A [J] Cover_KD-S100[J]f.
ENGLISH INFORMATION (For U.S.A.) This equipment has been tested and found to comply with the limits for a Class B digital device, pursuant to Part 15 of the FCC Rules. These limits are designed to provide reasonable protection against harmful interference in a residential installation. This equipment generates, uses, and can radiate radio frequency energy and, if not installed and used in accordance with the instructions, may cause harmful interference to radio communications.
The following marks are used to indicate... : Built-in CD player operations. : External CD changer operations. : SD player operations. : External USB memory operations. How to reset your unit CONTENTS Control panel ................................. 5 Remote controller — RM-RK300 .......... 5 Getting started ............................... 7 ENGLISH Thank you for purchasing a JVC product.
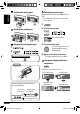
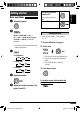
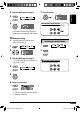
Detaching the control panel Entering the various menus ENGLISH The main menu contains four menus (MODE, PSM, SEL, TITLE). • If no operation is done for about 15 seconds, menu screen is canceled. 1 Attaching the control panel 2 Select a menu you want. Time countdown indicator Changing the control panel angle 3 • To go back to the previous screen or exit the MENU screen, press BACK repeatedly. 1 2 4 When using the remote controller Enter the selected menu. Operate as instructed on the screen.
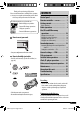
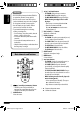
ENGLISH Control panel Parts identification 1 BAND button 2 SOURCE button 3 • Control dial • POWER/ATT (attenuator)/ENTER button MENU button 5 (up) / ∞ (down) buttons Display window B (Bongiovi Acoustics Digital Power Station™) button 8 USB (Universal Serial Bus) input terminal 4 5 6 7 9 p q w DISP (display) button 0 (eject) / (angle) button 4 /¢ buttons Remote sensor DO NOT expose the remote sensor to strong light (direct sunlight or artificial lighting).
ENGLISH Warning: • Do not install any battery other than CR2025 or its equivalent; otherwise, it may explode. • Do not leave the remote controller in a place (such as dashboards) exposed to direct sunlight for a long time; otherwise, it may explode. • Store the battery in a place where children cannot reach to avoid risk of accident. • To prevent the battery from over-heating, cracking, or starting a fire: – Do not recharge, short, disassemble, heat the battery, or dispose of it in a fire.
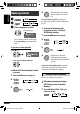
To drop the volume in a moment (ATT) Basic operations To restore the sound, press it again. ~ Turn on the power. ENGLISH Getting started To turn off the power Ÿ Setting the clock FM/AM = SIRIUS*/XM* = CD* = SD* = USB* = CD-CH*/iPod*/D. player* (or EXT-IN) = LINE-IN = (back to the beginning) * You cannot select these sources if they are not ready or not connected. • See also “General settings — PSM” on pages 15 – 17. 1 Enter the PSM menu (see page 4). 2 Set the clock.
ENGLISH Radio operations ~ Ÿ ! 4 MO indicator lights up. Reception improves, but stereo effect will be lost. To restore the stereo effect, repeat the same procedure and select “Off” in step 3. The MO indicator goes off. Start searching for a station. Tuning in to FM stations with strong signals only—LO (local)/ DX (Distance-Extreme) Selected band appears. 1 When a station is received, searching stops. To stop searching, press the same button again.
2 Enter the MODE menu (see page 4). 7 Store the station. ENGLISH 3 4 When using the remote controller After tuning in to a station you want to preset... Local FM stations with the strongest signals are searched and stored automatically in the FM band. Manual presetting Ex.: Storing FM station of 92.5 MHz into preset number 4 of the FM1 band. Listening to a preset station 1 1 2 2 3 Enter the MODE menu (see page 4). • If you hold down 5/∞, the Preset Station List appears (go to step 6).
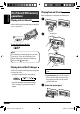
ENGLISH Disc/SD card/USB memory operations Playing a disc in the unit Playing from an SD card Before detaching the control panel, turn off the power. ~ All tracks will be played repeatedly until you change the source or eject the disc. Ÿ SD loading slot To stop play and eject the disc Note: If a USB memory is attached to the unit, you cannot eject the disc. “Please Eject USB” flashes on the display. If this happens, detach the USB memory, then, press 0 / button again.
The control panel goes back to the previous position. Playback starts automatically if tracks are recorded. Playing from a USB memory If an SD card or USB memory has been attached... Playback starts from where it has been stopped previously. • If a different SD card or USB memory is currently attached, playback starts from the beginning. This unit can play MP3/WMA tracks stored in a USB memory. All tracks in the USB memory will be played repeatedly until you change the source.
ENGLISH To go to the next or previous folders (only for MP3/WMA/SD/USB) 5 Select a disc/folder/file from the list. Current folder For MP3 tracks: For WMA tracks: Ex.: When “Folder” is selected in step 3 Only for MP3/WMA/SD/USB: If you select the current disc/folder (highlighted on the screen), its Folder/File List appears. • Holding the buttons can display the Disc List ( ) and Folder List ( / / see the following. ), 6 Starts playback.
1 2 After making sure “No Eject?” is selected... “No Eject” flashes, and the disc cannot be ejected. To cancel the prohibition, repeat the same procedure after making sure “Eject OK?” is selected. • “Eject OK” flashes on the display. Selecting the playback modes You can use only one of the following playback modes at a time. 1 Enter the MODE menu (see page 4). 2 Select one of the playback modes. 3 Select one of the items (see the following table). 4 Finish the procedure.
ENGLISH Sound adjustments Activating the Bongiovi Acoustics Digital Power Station™ The Bongiovi Acoustics Digital Power Station™ is a digital processing method that maximizes the frequency response of the speakers, the capability of the amplifier, and the acoustic properties of your vehicle’s passenger compartment. All vehicles have unique acoustic properties such as speaker placement and passenger compartment design.
To adjust the input level of each source—Vol Adj 2 Adjust the bass or treble. This setting is required for each source except for FM. Once an adjustment is made, it will be memorized. When you change the source, the volume level will automatically increase or decrease according to the adjusted level. ENGLISH To adjust bass and treble—Bass/Tre 1 Select “Bass” or “Treble.” 1 Select a source before entering the SEL menu. 2 Adjust to match the input level to the FM sound level.
ENGLISH Indications Items ( : Initial) Settings, [reference page] Anime Animation • On : An animation screen appears when you turn on or off the power, change the source, and when you select MENU. : Cancels. • Off Clock H Hour adjustment 1 – 12 (0 – 23) [Initial: 1 (1:00AM)] Clock M Minute adjustment 00 – 59 : See also page 7 for setting. [Initial: 00 (1:00AM)] 24H/12H Time display mode • 12Hours • 24Hours : See also page 7 for setting.
Items ( : Initial) Settings, [reference page] ID3 Tag Tag display • On • Off : Shows the Tag information while playing MP3/WMA tracks. : Cancels. Theme Display theme • Large : Select the display theme for large graphic display, [4]. See page 18 for setting. : Select the display theme for small graphic display, [4]. See page 18 for setting.
ENGLISH Selecting timer for the dimmer You can dim the display at night or as you set the timer. 1 Select “Dimmer” from the PSM menu. 2 Select “Time Set.” 3 Adjust the dimmer time. 1 Set the dimmer start time. Selecting the graphic theme You can select the graphic theme for large and small display sizes (see also page 4). 1 Select “Theme” from the PSM menu. 2 Select the size of the display. 3 Select the theme. 4 Repeat steps 2 and 3 to select the other display size and theme.
3 Move to the next (or previous) character Title assignment ENGLISH position. You can assign titles to station frequencies, CDs (both in this unit and in the CD changer) and the external components (LINE-IN and EXT-IN). 4 Repeat steps 1 to 3 until you finish entering Sources Maximum number of characters Station frequencies Up to 16 characters (up to 30 station frequencies including both FM and AM) the title. 4 Finish the procedure. • To cancel the title entry without registration, press MENU.
ENGLISH Satellite radio operations Activate your SIRIUS subscription after connection: This unit is satellite (SAT) Radio Ready—compatible with both SIRIUS Satellite radio and XM Satellite radio. 1 Before operating your satellite radio, refer also to the Instructions supplied with your SIRIUS Satellite radio or XM Satellite radio. 2 • “SIRIUS” and the SIRIUS dog logo are registered trademarks of SIRIUS Satellite Radio Inc.
4 Contact XM Satellite radio on the internet Listening to the SIRIUS Satellite radio Listening to the XM Satellite radio 1 2 3 2 Searching for category/channel Select a category. You can tune in to all the channels of every category by selecting “ALL.” Selecting a particular category (SPORTS, ENTERTAINMENT, etc.) allows you to enjoy only the channels from the selected category. • Holding either of the buttons can display the category list (see page 22). 4 Select a channel for listening.
ENGLISH Checking the XM Satellite radio ID 6 Select a user preset number. While selecting “XM1,” “XM2,” or “XM3,” select “Channel 0.” • You can move to the lists of the other SIRIUS bands by turning the control dial. The display alternately shows “RADIO ID” and the 8-digit (alphanumeric) ID number. 7 Store the channel. To cancel the ID number display, select any channel other than “Channel 0.
4 Finish the procedure. Select a category you want. To change the display information while listening to a channel • You can move to the other lists by turning the control dial. 5 Finish the procedure. The first channel of the selected category is tuned in. • If you select the current category (highlighted on the display), its channel list appears. Holding 5/∞ also shows the Category List while listening to a channel. Selecting a channel from the list 1 Enter the MODE menu (see page 4).
ENGLISH Preparations: Make sure “Changer” is selected for the external input setting, see page 17. Selecting a track from the menu 1 Enter the main menu. ~ Now the 5/∞/4 /¢ buttons work as the menu selecting buttons*. Ÿ * The menu selecting mode will be canceled: – If no operations are done for about 5 seconds. – When you confirm the selection of a track. Playback starts automatically from where it has been paused*1 or stopped*2 previously. ! 2 Select the desired menu. Adjust the volume.
Other external component operations 1 Enter the MODE menu (see page 4). 2 Select one of the playback modes. You can connect an external component to the LINE IN plugs on the rear or to the CD changer jack on the rear using the Line Input Adapter—KS-U57 (not supplied) or AUX Input Adapter—KS-U58 (not supplied). 3 Select an item (see table below). • For listening to the SD card/USB memory, see pages 10 – 13; For iPod, or D.player, see pages 23 – 25.
ENGLISH Maintenance How to clean the connectors Frequent detachment will deteriorate the connectors. To minimize this possibility, periodically wipe the connectors with a cotton swab or cloth moistened with alcohol, being careful not to damage the connectors. To keep discs clean A dirty disc may not play correctly. If a disc does become dirty, wipe it with a soft cloth in a straight line from center to edge. • Do not use any solvent (for example, conventional record cleaner, spray, thinner, benzine, etc.
Basic operations Turning on the power • By pressing SOURCE on the unit, you can also turn on the power. If the source is ready, playback also starts. Turning off the power • If you turn off the power while listening to a disc, disc play will start from where playback has been stopped previously, next time you turn on the power. Tuner operations Storing stations in memory • During SSM search... – All previously stored stations are erased and stations are stored newly. – Received stations are preset in No.
ENGLISH Playing an MP3/WMA discs • This unit can play back MP3/WMA files with the extension code <.mp3> or <.wma> (regardless of the letter case—upper/lower). • This unit can show the names of albums, artists (performer), and Tag (Version 1.0, 1.1, 2.2, 2.3, or 2.4) for MP3/WMA files. • This unit can display only one-byte characters. No other characters can be correctly displayed. • This unit can play back MP3/WMA files compliant to ISO 9660 Level 1/Level 2, Romeo, Joliet, Windows long file name.
Satellite radio operations • If you change the source, playback also stops. Next time you select the same source again, playback starts from where it has been stopped previously. • You can also connect the JVC SIRIUS radio PnP (Plug and Play), using the JVC SIRIUS radio adapter, KS-U100K (not supplied) to the CD changer jack on the rear. By turning on/off the power of the unit, you can turn on/off the JVC PnP. However, you cannot control it from this unit.
What appears to be trouble is not always serious. Check the following points before calling a service center. MP3/WMA playback Disc playback FM/AM General ENGLISH Troubleshooting Symptoms Remedies/Causes • Sound cannot be heard from the speakers. • Adjust the volume to the optimum level. • Check the cords and connections. • The unit does not work at all. Reset the unit (see page 3). • “Connect Error” appears on the display.
• Tracks do not play back in the order you have Playback order is determined when the files are recorded. intended them to play. • Elapsed playing time is not correct. This sometimes occurs while playing. This is caused by how the tracks are recorded on the disc. • “No Files” appears on the display. Insert a disc that contains MP3/WMA tracks. • “Not Support” appears on the display and track skips. • “No Music” appears on the display.
CD changer ENGLISH Symptoms Remedies/Causes • “No Disc” appears on the display. Insert a disc into the magazine. • “No Magazine” appears on the display. Insert the magazine. • “Reset 8” appears on the display. Connect this unit and the CD changer correctly and press the reset button of the CD changer. • “Reset 1” – “Reset 7” appears on the display. Press the reset button of the CD changer. • The CD changer does not work at all. Reset the unit (see page 3).
iPod/D. player playback Remedies/Causes • The iPod or D. player does not turn on or does not work. • Check the connecting cable and its connection. • Update the firmware version. • Charge the battery. • Buttons do not work as intended. The functions of the buttons have been changed. Press POWER/ATT/ENTER before performing the operation. • The sound is distorted. Deactivate the equalizer either on the unit or the iPod/ D. player. • “Disconnect” appears on the display.
ENGLISH Specifications 20 W RMS × 4 Channels at 4 Ω and ≤ 1% THD+N Signal to Noise Ratio: 80 dBA (reference: 1 W into 4 Ω) CD PLAYER SECTION TUNER SECTION AUDIO AMPLIFIER SECTION Power Output: Load Impedance: Tone Control Range: 4 Ω (4 Ω to 8 Ω allowance) +6 dB/–10 dB at 30 Hz +6 dB/–10 dB at 12 kHz Frequency Response: 40 Hz to 20 000 Hz Level/Impedance: Line-In: 1.5 V/20 kΩ load (full scale) Line-Out: 5.0 V/20 kΩ load (full scale) Output Impedance: 1 kΩ Subwoofer-Out Level/Impedance: 2.
USB MEMORY WMA: Format: Storage: Playable Audio Format: Max. Current: MP3: GENERAL WMA: Bit Rate: Sampling Frequency: Bit Rate: Sampling Frequency: Bit Rate: Sampling Frequency: Bit Rate: Sampling Frequency: Operating Voltage: Power Requirement: Grounding System: Allowable Operating Temperature: Dimensions (W × H × D): Installation Size (approx.): Panel Size (approx.): Mass (approx.): FAT 12/16 8 MB – 512 MB MP3/WMA 8 kbps – 320 kbps MPEG-1: 48 kHz, 44.1 kHz, 33 kHz MPEG-2: 24 kHz, 22.
Having TROUBLE with operation? Please reset your unit Refer to page of How to reset your unit Still having trouble?? USA ONLY Call 1-800-252-5722 http://www.jvc.com We can help you! EN, SP, FR © 2006 Victor Company of Japan, Limited Rear_KD-S100[J]2.