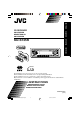
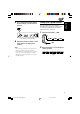
ENGLISH DEUTSCH CD RECEIVER CD-RECEIVER RECEPTEUR CD CD-RECEIVER NEDERLANDS FRANÇAIS KD-S735R 45Wx4 DISP MO RND 7 8 9 10 11 12 RDS TP PTY SCM COMPACT DIGITAL AUDIO For installation and connections, refer to the separate manual. Für den Einbau und die Anschlüsse siehe das eigenständige Handbuch. Pour l’installation et les raccordements, se référer au manuel séparé. Bijzonderheden over de installatie en aansluiting van het apparaat vindt u in de desbetreffende handleiding.
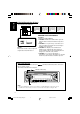
ENGLISH Position And Reproduction Of Labels Bottom panel of the main unit CAUTION: Invisible laser radiation when open and interlock failed or defeated. AVOID DIRECT EXPOSURE TO BEAM. (e) ADVARSEL:Usynlig laserstråling ved åbning, når sikkerhedsafbrydere erude af funktion. Undgåudsættelse for stråling. (d) VARNING:Osynlig laserstrålning när denna del är öppnadoch spärren är urkopplad. Betrakta ej strålen. (s) VARO: Avattaessa ja suojalukitus ohitettaessa olet alttiina näkymättömälle lasersäteilylle.
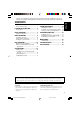
Thank you for purchasing a JVC product. Please read all instructions carefully before operation, to ensure your complete understanding and to obtain the best possible performance from the unit. 2 SOUND ADJUSTMENTS ................... 18 LOCATION OF THE BUTTONS ............ 4 Adjusting the sound .................................. 18 Using the sound control memory (SCM) ... 19 Storing your own sound adjustments ........ 20 How to reset your unit ............................... Control panel .............
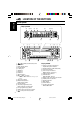
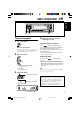
LOCATION OF THE BUTTONS ENGLISH Control panel Display window i o ; a s d h 1 f g j 2 3 4 k 5 l 6 78 9 p 45Wx4 DISP MO RND 7 8 10 9 11 12 RDS TP q 1 2 3 4 5 6 7 8 9 p q w e r t y u w e (standby/on/attenuator) button Control dial DISP (display) button Display window Loading slot AM button CD button FM button 0 (eject) button ¢ /4 buttons • Also functions as SSM buttons when pressed together.
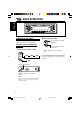
ENGLISH BASIC OPERATIONS DISP MO RND 7 8 9 10 12 11 RDS TP 1 SCM 2 3 Turning on the power 1 PTY 4 Adjust the sound as you want. (See pages 18 – 20.) Turn on the power. To drop the volume in a moment Note on One-Touch Operation: When you select a source in step 2 below, the power automatically comes on. You do not have to press this button to turn on the power. 2 Select the source. Press briefly while listening to any source.
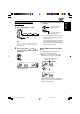
ENGLISH RADIO OPERATIONS DISP MO RND 7 8 9 10 11 12 RDS TP 2 Listening to the radio You can use either automatic searching or manual searching to tune in to a particular station. Searching a station automatically: Auto search 1 Select the band (FM1 – 3, AM). FM1 FM2 FM3 PTY SCM Start searching a station. To search stations of higher frequencies. To search stations of lower frequencies. When a station is received, searching stops.
1 To tune in to stations of higher frequencies. Select the band (FM1 – 3, AM). FM1 FM2 To tune in to stations of lower frequencies. FM3 AM Note: This receiver has three FM bands (FM1, FM2, FM3). You can use any one of them to listen to an FM broadcast. 2 Tune in to a station you want while “M” is flashing. ENGLISH 3 Searching a station manually: Manual search Press and hold ¢ or 4 until “M (manual)” starts flashing on the display.
ENGLISH Storing stations in memory You can use one of the following two methods to store broadcasting stations in memory. • Automatic preset of FM stations: SSM (Strongstation Sequential Memory) • Manual preset of both FM and AM stations Manual preset You can preset up to 6 stations in each band (FM1, FM2, FM3 and AM) manually. Ex.: Storing an FM station of 88.3 MHz into the preset number 1 of the FM1 band.
Press and hold the number button (in this example, 1) for more than 2 seconds. 7 Tuning in to a preset station You can easily tune in to a preset station. Remember that you must store stations first. If you have not stored them yet, see “Storing stations in memory” on page 8. 1 Select the band (FM1 – 3, AM). FM1 “P1” flashes for a few seconds. 4 Repeat the above procedure to store other stations into other preset numbers.
ENGLISH RDS OPERATIONS What you can do with RDS RDS (Radio Data System) allows FM stations to send an additional signal along with their regular programme signals. For example, the stations send their station names, as well as information about what type of programme they broadcast, such as sports or music, etc. Another advantage of RDS function is called “Enhanced Other Networks.” The EON indicator lights up while receiving an FM station with the Enhanced Other Networks data.
Programme 1 broadcasting on frequency A Programme 1 broadcasting on frequency E Programme 1 broadcasting Programme 1 on frequency B broadcasting on frequency C Programme 1 broadcasting on frequency D PTY Standby Reception PTY When you press PTY while listening to an FM station, the PTY indicator is lit during reception of a PTY station and the PTY standby mode is engaged. The selected PTY name stored on page 12 flashes for 5 seconds. ENGLISH The same programme can be received on different frequencies.
ENGLISH Selecting your favourite programme for PTY Standby Reception You can select your favourite programme for PTY Standby Reception to store in memory. When shipped from the factory, “NEWS” is stored as the programme type for PTY Standby Reception. 1 Press and hold SEL (select) for more than 2 seconds so that one of the PSM items appears on the display. (PSM: see page 22.) Searching your favourite programme You can search one of your 6 favourite programme types stored in memory.
Press and hold the number button for more than 2 seconds to store the PTY code selected into the preset number you want. 7 8 9 10 11 12 • If there is a station broadcasting a programme of the same PTY code as you selected, that station is tuned in. • If there is no station broadcasting a programme of the same PTY code as you selected, the station will not change. ENGLISH 4 Note: In some areas, the PTY search will not work correctly. The selected code name will flash on the display.
ENGLISH Changing the display mode while listening to an FM station You can change the initial indication on the display to station name (PS NAME), station frequency (FREQ) or clock time (CLOCK) while listening to an FM RDS station. • See also “Changing the general settings (PSM)” on page 21. 1 Press and hold SEL (select) for more than 2 seconds so that one of the PSM items appears on the display. 2 Press ¢ or 4 to select “DISPMODE (display mode).
NEWS: AFFAIRS: News Topical programmes expanding on current news or affairs INFO: Programmes which impart advice on a wide variety of topics SPORT: Sport events EDUCATE: Educational programmes DRAMA: Radio plays CULTURE: Programmes on national or regional culture SCIENCE: Programmes on natural science and technology VARIED: Other programmes like comedies or ceremonies POP M: Pop music ROCK M: Rock music EASY M: Easy-listening music LIGHT M: Light music CLASSICS: Classical music OTHER M: Other music WEATHER
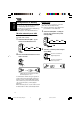
ENGLISH CD OPERATIONS DISP MO RND 7 8 9 10 11 12 RDS TP Playing a CD 1 PTY SCM All tracks will be played repeatedly until you stop playback. Insert a CD into the loading slot. The unit turns on, draws the CD and starts playback automatically. Note: When a CD is inserted upside down, the CD automatically ejects. To stop play and eject the CD Note on One-Touch Operation: When a CD is already in the loading slot, pressing the CD button turns on the unit and starts playback automatically.
Playing at Random You can play back all tracks on the CD at random. To fast-forward or reverse the track RND indicator Press and hold ¢ , while playing a CD, to fast-forward the track. Press and hold 4 , while playing a CD, to reverse the track. To go to the next tracks or the previous tracks Press ¢ briefly, while playing a CD, to go ahead to the beginning of the next track. Each time you press the button consecutively, the beginning of the next tracks is located and played back.
ENGLISH SOUND ADJUSTMENTS Adjusting the sound 2 You can adjust the sound characteristics to your preference. 1 Adjust the setting. To increase the level/ LOUD ON. Select the item you want to adjust. Each time you press the button, the adjustable items change as follows: BAS TRE (bass) VOL Equalization pattern changes as you adjust the bass or treble. (fader) BAL LOUD (volume) Indication FAD (treble) To decrease the level/ LOUD OFF.
Indication You can select and store a preset sound adjustment suitable for each playback source (Advanced SCM). Selecting and storing the sound modes Once you select a sound mode, it is stored in memory. It will be recalled every time you select the same source and will be shown on the display. A sound mode can be stored for each of the following sources—FM1, FM2, FM3, AM, and CD.
ENGLISH Storing your own sound adjustments 3 • See page 18 for details. You can adjust the sound modes (BEAT, SOFT, POP) to your preference and store your own adjustments in memory. • There is a time limit in doing the following procedure. If the setting is canceled before you finish, start from step 1 again. 1 Adjust the bass or treble level, or turn the loudness function on/off (LOUD ON/LOUD OFF). Call up the sound mode you want to adjust.
5 Setting the clock Finish the setting. You can also set the clock system to either 24 hours or 12 hours. 1 2 Press and hold SEL (select) for more than 2 seconds so that one of the PSM items appears on the display. (See page 22.) To check the current clock time while the unit is turned off, press DISP (display). The power turns on, the clock time is shown for 5 seconds, then the power turns off. Changing the general settings (PSM) Set the hour. 1 Select “CLOCK H (hour)” if not shown on the display.
ENGLISH 4 5 Repeat steps 2 and 3 to adjust the other PSM items if necessary. Finish the setting. Preferred Setting Mode (PSM) items 1 2 3 Set. Hold. Select.
To select the telephone muting—TEL You can cancel the Advanced SCM (Sound Control Memory), and unlink the sound modes and the playback sources. When shipped from the factory, a different sound mode can be stored in memory for each source so that you can change the sound modes simply by changing the sources. This mode is used when a cellular phone system is connected. Depending on the phone system used, select either “MUTING 1” or “MUTING 2,” whichever mutes the sounds from this unit.
ENGLISH Detaching the control panel You can detach the control panel when leaving the car. When detaching or attaching the control panel, be careful not to damage the connectors on the back of the control panel and on the panel holder. Attaching the control panel 1 Insert the left side of the control panel into the groove on the panel holder. Detaching the control panel Before detaching the control panel, be sure to turn off the power. 1 2 Unlock the control panel.
Handling CDs Moisture condensation This unit has been designed to reproduce CDs and CD-Rs. • Other discs cannot be played back. This unit is not compatible with MP3. How to handle CDs When removing a CD from its case, press down the center holder of the case and lift the CD out, holding it by the edges. • Always hold the CD by the edges. Do not touch its recording surface.
ENGLISH TROUBLESHOOTING What appears to be trouble is not always serious. Check the following points before calling a service center. Symptoms Causes Remedies • CD cannot be played back. CD is inserted upside down. Insert the CD correctly. • CD sound is sometimes interrupted. You are driving on rough roads. Stop playing CD while driving on rough roads. The disc is scratched. Change the disc. Connections are incorrect. Check the cords and connections. • Sound is sometimes interrupted.
AUDIO AMPLIFIER SECTION CD PLAYER SECTION Maximum Power Output: Front: 45 W per channel Rear: 45 W per channel Continuous Power Output (RMS): Front: 17 W per channel into 4 Ω, 40 Hz to 20 000 Hz at no more than 0.8% total harmonic distortion. Rear: 17 W per channel into 4 Ω, 40 Hz to 20 000 Hz at no more than 0.8% total harmonic distortion.
Having TROUBLE with operation? Please reset your unit Refer to page of How to reset your unit Haben Sie PROBLEME mit dem Betrieb? Bitte setzen Sie Ihr Gerät zurück Siehe Seite Zurücksetzen des Geräts Vous avez des PROBLÈMES de fonctionnement? Réinitialisez votre appareil Référez-vous à la page intitulée Comment réinitialiser votre appareil Hebt u PROBLEMEN met de bediening? Stel het apparaat terug Zie de pagina met de paragraaf Het apparaat terugstellen V EN, GE, FR, NL J C © 2002 VICTOR COMPANY OF
KD-S735R Installation/Connection Manual Einbau/Anschlußanleitung Manuel d’installation/raccordement Handleiding voor installatie/aansluiting V J GET0105-004A C 0902KKSMDTJEIN EN, GE, FR, NL [E/EX] ENGLISH DEUTSCH NEDERLANDS FRANÇAIS • This unit is designed to operate on 12 V DC, NEGATIVE ground electrical systems. • Dieses Gerät ist für einen Betrieb in elektrischen Anlagen mit 12 V Gleichstrom und (–) Erdung ausgelegt.
• When using the optional stay • Beim Verwenden der Anker-Option • Lors de l’utilisation du hauban en option • Wanneer u de steun gebruikt (facultatief) • When installing the unit without using the sleeve • Beim Einbau des Geräts ohne Halterung • Lors de l’installation de l’appareil scans utiliser de manchon • Wanneer u het apparaat zonder huis installeert In a Toyota for example, first remove the car radio and install the unit in its place.
ENGLISH DEUTSCH FRANÇAIS NEDERLANDS ELECTRICAL CONNECTIONS ELEKTRISCHE ANSCHLÜSSE RACCORDEMENTS ELECTRIQUES ELEKTRISCHE VERBINDINGEN To prevent short circuits, we recommend that you disconnect the battery’s negative terminal and make all electrical connections before installing the unit. If you are not sure how to install this unit correctly, have it installed by a qualified technician.
PRECAUTIONS on power supply and speaker connections: • DO NOT connect the speaker leads of the power cord to the car battery; otherwise, the unit will be seriously damaged. • Connect the black lead (ground), yellow lead (to car battery, constant 12 V), and red lead (to an accessory terminal) correctly. • BEFORE connecting the speaker leads of the power cord to the speakers, check the speaker wiring in your car. – If the speaker wiring in your car is as illustrated in Fig. 1 and Fig.