KD-S795 ENGLISH CD RECEIVER !" KD-S795 ‡§√◊ËÕ߇≈Ëπ CD KD-S795 ‰∑¬ CD COMPACT DIGITAL AUDIO For installation and connections, refer to the separate manual. !"#$%&'()*+,-./0 °√ÿ≥“¥Ÿ§ŸË¡◊Õ∑’Ë·¬°µË“ßÀ“° „π°“√µ‘¥µ—Èß·≈–°“√‡™◊ËÕ¡µËÕ INSTRUCTIONS !" §”·π–π” GET0144-001A [U] COVER.
ENGLISH IMPORTANT FOR LASER PRODUCTS Precautions: 1. CLASS 1 LASER PRODUCT 2. CAUTION: Invisible laser radiation when open and interlock failed or defeated. Avoid direct exposure to beam. 3. CAUTION: Do not open the top cover. There are no user-serviceable parts inside. Leave all servicing to qualified service personnel. 4. CAUTION: This CD player uses invisible laser radiation, however, is equipped with safety switches to prevent radiation emission when unloading CDs.
Thank you for purchasing a JVC product. Please read all instructions carefully before operation, to ensure your complete understanding and to obtain the best possible performance from the unit. How to reset your unit ............................... How to use the M (MODE) button ............. 2 3 LOCATION OF THE BUTTONS ............ 4 Control panel ............................................. Remote controller ...................................... Preparing the remote controller ................
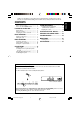
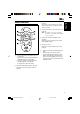
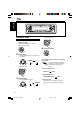
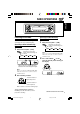
LOCATION OF THE BUTTONS ENGLISH Control panel Display window s ; a d f g j h l 1 9 1 2 3 4 5 6 7 8 9 p q w e r t y 2 3 / 5 67 4 p qw e Remote sensor (standby/on/attenuator) button Control dial Display window 5 (up) button +10 button FM/AM button 0 (eject) button 4 /¢ buttons (control panel release) button DISP (display) button • Also functions as SSM buttons when pressed together with M (MODE) button.
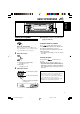
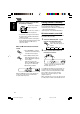
Remote controller SOUND ATT ENGLISH 3 Selects the preset stations while listening to the radio. Each time you press the button, the preset station number increases, and the selected station is tuned in. 4 Functions the same as the control dial on the main unit. Note: These buttons do not used for adjusting “CLOCK H,” “CLOCK M,” and “LEVEL” (see pages 8 and 17). U R SOURCE F 5 Selects the sound mode (C-EQ: custom equalizer). Each time you press the button, the sound mode (C-EQ) changes.
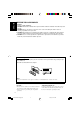
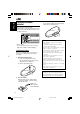
ENGLISH Preparing the remote controller Before using the remote controller: • Aim the remote controller directly at the remote sensor on the main unit. Make sure there is no obstacle in between. Remote sensor • Do not expose the remote sensor to strong light (direct sunlight or artificial lighting). Installing the battery When the controllable range or effectiveness of the remote controller decreases, replace the battery. 1. Remove the battery holder.
ENGLISH BASIC OPERATIONS 1 3 2 Turning on the power 1 4 Adjust the sound as you want. (See pages 15 and 16.) Turn on the power. To drop the volume in a moment Note on One-Touch Operation: When you select a source in step 2 below, the power automatically comes on. You do not have to press this button to turn on the power. 2 Select the source. Press briefly while listening to any source. “ATT” starts flashing on the display, and the volume level will drop in a moment.
ENGLISH Setting the clock 1 2 Adjust the minute. Press and hold SEL (select) for more than 2 seconds. “CLOCK H,” “CLOCK M,” or “LEVEL” appears on the display. 4 2 Finish the setting. Set the hour. 1 Select “CLOCK H” (hour) if not shown on the display. CLOCK H CLOCK M LEVEL 2 Adjust the hour. To check the current clock time or change the display mode Press DISP (display) repeatedly.
ENGLISH RADIO OPERATIONS Listening to the radio Searching a station manually: Manual search You can use either automatic searching or manual searching to tune in to a particular station. 1 Select the band (FM1 – 3, AM). Each time you press the button, the band changes as follows: Searching a station automatically: Auto search 1 FM1 Select the band (FM1 – 3, AM).
ENGLISH 3 Tune in to a station you want while “M” (manual) is flashing. To tune in to stations of higher frequencies To tune in to stations of lower frequencies Storing stations in memory You can use one of the following two methods to store broadcasting stations in memory.
You can preset up to 6 stations in each band (FM1, FM2, FM3, and AM) manually. Ex.: Storing FM station of 88.3 MHz into the preset number 1 of the FM1 band. 1 Select the band (FM1 – 3, AM) you want to store stations into (in this example, FM1). Each time you press the button, the band changes as follows: FM1 2 FM2 FM3 AM Tune in to a station (in this example, of 88.3 MHz). Notes: • A previously preset station is erased when a new station is stored in the same preset number.
ENGLISH CD OPERATIONS Playing a CD 1 The display changes to show the following: CD–in indicator Open the control panel. Note on One-Touch Operation: When a CD is already in the loading slot, pressing CD turns on the unit and starts playback automatically. 2 Total track number of the inserted disc Insert a CD into the loading slot. The unit turns on, draws the CD and starts playback automatically. 3 Total playing time of the inserted disc Close the control panel by hand.
To go to a particular track directly Press 0. CD play stops, and the control panel flips down. The CD automatically ejects from the loading slot. The source changes to the tuner (you will hear the last received station.) • If you change the source, CD play also stops (without ejecting the CD). Next time you select “CD” as the source, CD play starts from where playback has been stopped previously. Press the number button corresponding to the track number to start its playback.
ENGLISH How to use the +10 and –10 buttons To play back tracks repeatedly (Track Repeat Play) • Ex. 1: To select track number 32 while playing track number 6 You can play back the current track repeatedly. 1 Press M (MODE) to enter the functions mode while playing a CD. Track 6 (Three times) (Twice) \ 10 \ 20 \ 30 \ 31 \ 32 • Ex.
Selecting preset sound modes (C-EQ: custom equalizer) You can select a preset sound mode (C-EQ: custom equalizer) suitable to the music genre. Select the sound mode you want. When you press the button once, the last selected sound mode is recalled and applied to the current source. Ex.
ENGLISH Adjusting the sound 2 Adjust the setting. You can adjust the sound characteristics to your preference. To increase the level or turn on the loudness 1 To decrease the level or turn off the loudness Select the item you want to adjust. Each time you press the button, the adjustable items change as follows: BAS TRE (bass) (treble) BAS*1 FAD (fader) VOL LOUD BAL (volume) (loudness) (balance) Indication To do: Equalization pattern changes as you adjust the bass or treble. Ex.
You can select the level display according to your preference. When shipped from the factory, “AUDIO 2” is selected. 1 3 Select the desired mode. AUDIO 1 Press and hold SEL (select) for more than 2 seconds. AUDIO 2 ENGLISH SELECTING THE LEVEL DISPLAY OFF “CLOCK H,” “CLOCK M,” or “LEVEL” appears on the display. Ex.
ENGLISH DETACHING THE CONTROL PANEL You can detach the control panel when leaving the car. When detaching or attaching the control panel, be careful not to damage the connectors on the back of the control panel and on the panel holder. Attaching the control panel 1 Insert the right side of the control panel into the groove on the panel holder. Detaching the control panel Before detaching the control panel, be sure to turn off the power. 1 Unlock the control panel.
What appears to be trouble is not always serious. Check the following points before calling a service center. Symptoms Causes CD Playback FM/AM General • Sound cannot be heard from the speakers. Remedies The volume level is set to the minimum level. Adjust it to the optimum level. Connections are incorrect. Check the cords and connections. • This unit does not work at all. The built-in microcomputer may have functioned incorrectly due to noise, etc.
ENGLISH MAINTENANCE Handling discs When playing a CD-R or CD-RW This unit has been designed to reproduce CDs, CD-Rs (Recordable), and CD-RWs (Rewritable). • This unit is not compatible with MP3 discs. How to handle discs When removing a disc Center holder from its case, press down the center holder of the case and lift the disc out, holding it by the edges. • Always hold the disc by the edges. Do not touch its recording surface.
AUDIO AMPLIFIER SECTION CD PLAYER SECTION Maximum Power Output: Front: 50 W per channel Rear: 50 W per channel Continuous Power Output (RMS): Front: 19 W per channel into 4 Ω, 40 Hz to 20 000 Hz at no more than 0.8% total harmonic distortion. Rear: 19 W per channel into 4 Ω, 40 Hz to 20 000 Hz at no more than 0.8% total harmonic distortion.
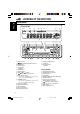
KD-S795 Installation/Connection Manual !"#$ °“√µ‘¥µ—Èß/§ŸË¡◊Õ°“√µ‘¥µ—Èß qO u² «ØVO d² « ULOKFð VÒO² V 0103KKSMDTJEIN GET0144-003A J C [U] ENGLISH EN, CH, TH, AR wÐdŽ ‰∑¬ • This unit is designed to operate on 12 V DC, NEGATIVE ground electrical systems. • !"#$% 12V !"#$%&'( • INSTALLATION (IN-DASH MOUNTING) uKÐUð ‡ qš«œ ® “UN'« VO dð ©…—UO9 « °“√µ‘¥µ—ßÈ (°“√ª√–°Õ∫·ºßÀπÈ“ª—∑¡Ï‡¢È“) • The following illustration shows a typical installation.
• When using the optional stay • !"# • ‡¡◊ËÕ„™Èµ—«¬÷¥·∫∫‡≈◊Õ°‰¥È (“¡“√∂‡≈◊Õ°‡ª‘¥§È“߉«È ‰¥È) XO³¦²K w U{« bM9( «bR²Ý« bMŽ • Washer • When installing the unit without using the sleeve • !"#$%&'($ • ‡¡◊ËÕµ‘¥µ—Èß™ÿ¥ª√–°Õ∫‚¥¬‰¡Ë „™Èª≈Õ°ÀÿÈ¡ wW«u « qJON « «bR²Ý« ÊËbÐ “UN'« V dð U(bMŽ • In a Toyota for example, first remove the car radio and install the unit in its place. !"TOYOTA !"#$%&' ()*+,-.
ENGLISH wÐdŽ ‰∑¬ ELECTRICAL CONNECTIONS ! To prevent short circuits, we recommend that you disconnect the battery’s negative terminal and make all electrical connections before installing the unit. If you are not sure how to install this unit correctly, have it installed by a qualified technician. !"#$%&'()*+,#-./012 !"#$%&'()*+,-./01+23 !"#$%&'()*+,-.
PRECAUTIONS on power supply and speaker connections: • DO NOT connect the speaker leads of the power cord to the car battery; otherwise, the unit will be seriously damaged. • Connect the black lead (ground), yellow lead (to car battery, constant 12 V), and red lead (to an accessory terminal) correctly. • BEFORE connecting the speaker leads of the power cord to the speakers, check the speaker wiring in your car. – If the speaker wiring in your car is as illustrated in Fig. 1 and Fig.