VCD/CD RECEIVER KD-SV3104 ATT SOURCE EQ BAND UP VOL. REV FWD DOWN VIDEO CD ENTER PBC RETURN 1 2 3 4 5 6 OSD 7 8 9 AUDIO 0 For canceling the display demonstration, see page 9. For installation and connections, refer to the separate manual. INSTRUCTIONS GET0304-001B [UI] Cover_KD-SV3104[UI]f.
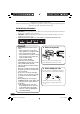
Thank you for purchasing a JVC product. Please read all instructions carefully before operation, to ensure your complete understanding and to obtain the best possible performance from the unit. IMPORTANT FOR LASER PRODUCTS 1. CLASS 1 LASER PRODUCT 2. CAUTION: Do not open the top cover. There are no user serviceable parts inside the unit; leave all servicing to qualified service personnel. 3. CAUTION: Visible and invisible laser radiation when open and interlock failed or defeated.
Contents 2 2 4 4 Sound adjustments ................ 21 Selecting preset sound modes (C-EQ: custom equalizer) .................. 21 KD-SV3104 ...... 5 Parts identification ................................. 5 General settings — PSM ......... 23 How to reset your unit ........................... How to forcibly eject a disc ................... How to read this manual ........................ How to use the MODE button ............... Control panel — Remote controller — RM-RK120 ...
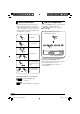
How to read this manual The following methods are used to make the explanations simple and easy-to-understand: • Some related tips and notes are explained in “More about this unit” (see pages 28 and 29). • Button operations are mainly explained with the illustrations as follows: How to use the MODE button If you press MODE, the unit goes into functions mode, then the number buttons and ¢/4 buttons work as different function buttons. Ex.: When number button 2 works as MO (monaural) button. Press briefly.
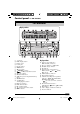
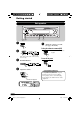
Control panel — KD-SV3104 Parts identification Display window 1 2 3 4 5 6 7 8 9 p q w e r t y u i o +/– buttons DISP (display) button Remote sensor Loading slot Display window MODE button 0 (eject) button ¢/4 buttons (standby/on/attenuator) button SEL (select) button MO (monaural) button SSM (Strong-station Sequential Memory) button SOURCE button • BAND button • 6 (play/pause) button RPT (repeat) button RND (random) button EQ (equalizer) button (control panel release) button Number buttons Display wind
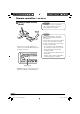
Remote controller — RM-RK120 Installing the lithium coin battery (CR2025) Caution: • Do not leave the remote controller in a place (such as dashboard) exposed to direct sunlight for a long time. Warning: • Aim the remote controller directly at the remote sensor on the unit. Make sure there is no obstacle in between. • Do not install any battery other than CR2025 or its equivalent; otherwise, it may explode. • Store the battery in a place where children cannot reach to avoid risk of accident.
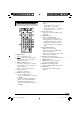
Main elements and features ATT SOURCE EQ BAND 6 UP VOL. REV FWD 7 DOWN VIDEO CD ENTER PBC RETURN 1 2 3 4 5 6 OSD 7 8 9 AUDIO 8 0 1 SOURCE button • Selects the playback source. 2 (standby/on attenuator) button • Turns on and off the power and also attenuates the sound. 3 2 REV / FWD 3 buttons • Searches for stations if pressed briefly. • Fast-forwards or reverses the track if pressed and held. • Changes the tracks/files of the disc. 4 VOL. + / – buttons • Adjusts the volume level.
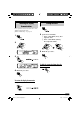
Getting started Basic operations ~ @ Adjust the sound as you want. (See pages 21 and 22.) To drop the volume in a moment (ATT) Ÿ To restore the sound, press it again. You cannot select some sources if they are not ready. ! For FM/AM tuner ⁄ Adjust the volume. Volume level appears. To turn off the power Caution on volume setting: Discs produce very little noise compared with other sources.
Canceling the display demonstrations Setting the clock 1 If no operations are done for about 20 seconds, display demonstration starts. [Initial: DEMO ON]—see page 24. 1 2 2 Set the hour and minute. 1 Select “CLOCK H” (hour), then adjust the hour. 2 Select “CLOCK M” (minute), then adjust the minute. 3 Finish the procedure. 3 To check the current clock time when the power is turned off 4 Finish the procedure. To activate the display demonstration In step 3 above... 9 EN06-11_KD-SV3104[UI]f.
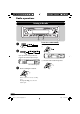
Radio operations Listening to the radio To tune in to a station manually ~ In step ! on the left... 1 Ÿ Lights up when receiving an FM stereo broadcast with sufficient signal strength. 2 Select the desired station frequencies. Selected band appears. ! Start searching for a station. When a station is received, searching stops. To stop searching, press the same button again. 10 EN06-11_KD-SV3104[UI]f.
When an FM stereo broadcast is hard to receive 1 Storing stations in memory You can preset six stations for each band. FM station automatic presetting— SSM (Strong-station Sequential Memory) 2 1 Lights up when monaural mode is activated. 2 Select the FM band (FM1 – FM3) you want to store into. Reception improves, but stereo effect will be lost. To restore the stereo effect, repeat the same procedure. “MONO OFF” appears and the MO indicator goes off.
Manual presetting Ex.: Storing FM station of 92.5 MHz into the preset number 4 of the FM1 band. Listening to a preset station 1 1 2 2 3 Select the preset station (1 – 6) you 3 want. To check the current clock time while listening to an FM or AM station 4 Preset number flashes for a while. 12 EN12-21_KD-SV3104[UI]f.
Disc operations Playing a disc in the unit The disc type is automatically detected, and playback starts automatically. All tracks will be played repeatedly until you change the source or eject the disc. • If a disc menu appears on the monitor while playing a VCD with PBC, see page 17. MP3 and WMA discs playback/search order Hierarchy Level 1 Level 2 Level 3 Level 4 01 03 04 Level 5 ROOT Before performing any operations, make sure the following....
• When inserting an MP3 or a WMA disc: To stop play temporarily • To resume playback, press the button again. To stop play and eject the disc Total folder number Total track number Prohibiting disc ejection Disc information appears automatically (see page 19). You can lock a disc in the loading slot.
Playing a disc in the CD changer About the CD changer ~ It is recommended to use the JVC MP3compatible CD changer with your unit. • You can also connect other CH-X series CD changers (except CH-X99 and CH-X100). However, they are not compatible with MP3 discs, so you cannot play back MP3 discs. • You cannot use the KD-MK series CD changers with this unit. • Disc text information recorded in the CD Text can be displayed when a JVC CD Text compatible CD changer is connected.
MP3 discs playback/search order in the CD changer • When the current disc is an audio CD or a CD Text disc: Hierarchy Level 1 Level 2 Level 3 Level 4 01 02 03 Level 5 ROOT CD Text: Disc title/performer = Track title appears automatically (see page 19).
To go to the next or previous folders (only for MP3 or WMA discs) Playback Control (PBC) operations For MP3 discs: For WMA discs: This operation is only possible when using the remote controller. 1 1 While playing a VCD.... PBC 2 To next folders. PBC ON : A menu appears on the monitor. To previous folders. To locate a particular track (for audio CD, CD Text, or VCD with PBC set to “PBC OFF”) or folder (for MP3 or WMA discs) directly To select a number from 01 – 06: PBC OFF : Cancels.
On-Screen (OSD) information This operation is only possible when using the remote controller. You can check the track number and elapsed playing time if the monitor is turned on. MP3/WMA control screen operations You can also control the playback of an MP3/ WMA disc by referring to the monitor. • The control screen automatically appears on the monitor when you insert an MP3/WMA disc. While playing a disc.... • To turn off the On-Screen Display, press the button again.
To select a folder While playing an MP3 ( ) or WMA ( UP / ) disc • Only for MP3 disc: When “TAG DISP” is set to “TAG ON” (see page 24) DOWN To select a track REV FWD • Pressing these buttons repeatedly can also select tracks from the previous/ next folders. • See also page 16 for using the buttons on the control panel to select a folder or track.
Selecting the playback modes You can use only one of the following playback modes at a time. • For VCD: While PBC (see page 17) is not in use. 1 2 Select your desired playback mode. Repeat play Mode Plays repeatedly TRK RPT : The current track. • RPT lights up. FLDR RPT*1 : All tracks of the current folder. • and RPT light up. DISC RPT*2 : All tracks of the current disc. • and RPT light up. RPT OFF : Cancels. Ex.
Sound adjustments Selecting preset sound modes (C-EQ: custom equalizer) You can select a preset sound mode suitable to the music genre. ~ Ex.
Adjusting the sound You can adjust the sound characteristics to your preference. 1 Ex.: When “TRE” is selected 2 Indication BAS*1 To do: Range Adjust the bass. –06 (min.) to +06 (max.) TRE*1 (treble) Adjust the treble. –06 (min.) to +06 (max.) FAD*2 (fader) Adjust the front and rear speaker balance. R06 (Rear only) to F06 (Front only) BAL (balance) Adjust the left and right speaker balance.
General settings — PSM Basic procedure 3 Adjust the PSM item selected. You can change PSM (Preferred Setting Mode) items listed in the table on page 24. 1 2 Select a PSM item. Ex.: If “TAG OFF” is selected 4 Repeat steps 2 and 3 to adjust the other PSM items if necessary. 5 Finish the procedure. Ex.: If “TAG DISP” is selected 23 EN22-27_KD-SV3104[UI]f.
Indications Selectable settings, [reference page] DEMO Display demonstration DEMO ON : [Initial]; Display demonstration will be activated automatically if no operation is done for about 20 seconds, [9]. DEMO OFF : Cancels. CLOCK H Hour adjustment 1 – 12, [9] [Initial: 1 (1:00)] CLOCK M Minute adjustment 00 – 59, [9] [Initial: 00 (1:00)] DIMMER Dimmer ON OFF TEL Telephone muting MUTING 1/ MUTING 2: Select either one which mutes the sounds while using the cellular phone. OFF : [Initial]; Cancels.
Detaching the control panel When detaching or attaching the control panel, be careful not to damage the connectors on the back of the control panel and on the panel holder. Attaching the control panel Detaching the control panel Before detaching the control panel, be sure to turn off the power. 25 EN22-27_KD-SV3104[UI]f.
External component operations Playing an external component You can connect an external component to the LINE IN plugs on the rear, and another to the CD changer jack on the rear using the Line Input Adapter KS-U57 (not supplied). • For connection, see Installation/Connection Manual (separate volume). Ÿ ! Turn on the connected component and start playing the source. Adjust the volume. ~ EXT IN : For selecting the external component connected to the CD changer jack on the rear using KS-U57.
Maintenance How to clean the connectors Frequent detachment will deteriorate the connectors. To minimize this possibility, periodically wipe the connectors with a cotton swab or cloth moistened with alcohol, being careful not to damage the connectors. To keep discs clean A dirty disc may not play correctly. If a disc does become dirty, wipe it with a soft cloth in a straight line from center to edge. • Do not use any solvent (for example, conventional record cleaner, spray, thinner, benzine, etc.
More about this unit Basic operations Inserting a disc Turning on the power • When a disc is inserted upside down, the disc automatically ejects. • Do not insert 8 cm discs (single CD) and unusual shape discs (heart, flower, etc.) into the loading slot. • By pressing SOURCE on the unit, you can also turn on the power. Turning off the power • If you turn off the power while listening to a disc, disc play will start from where playback has been stopped previously, next time you turn on the power.
• The On-Screen Display (OSD) will automatically canceled when you change the source or turn off the unit. Playing an MP3/WMA disc • While fast-forwarding or reversing on an MP3 or WMA disc, you can only hear intermittent sounds. • This unit can play back MP3/WMA files with the extension code <.mp3> or <.wma> (regardless of the letter case—upper/lower). • This unit can show the names of albums, artists (performer), and ID3 Tag (Version 1.0, 1.1, 2.2, 2.3, or 2.4) for MP3 files.
Troubleshooting What appears to be trouble is not always serious. Check the following points before calling a service center. Symptoms FM/AM Disc playback Remedies The volume level is set to the minimum level. Adjust it to the optimum level. Connections are incorrect. Check the cords and connections. • The unit does not work at all. The built-in microcomputer may have functioned incorrectly due to noise, etc. Reset the unit (see page 2). • SSM automatic presetting does not work.
Disc playback Symptoms Remedies • Track skips automatically • Tracks are not encoded in and no sound can be heard. an appropriate format. • Copy-protected WMA tracks cannot be played back. Skip to the next track. • No playback picture (VCD) appears on the monitor. Parking brake wire is not connected properly. See Installation/Connection Manual. The video cord is not connected correctly. Connect the video cord correctly. An incorrect input has been selected on the monitor.
MP3/WMA playback Symptoms Causes • Elapsed playing time is not This sometimes occurs correct. during play. This is caused by how the tracks are recorded on the disc. • “NO FILES” appears on the display. The current disc does not contain any MP3/WMA tracks. • Correct characters are not displayed (e.g. album name). This unit can only display alphabets (capital: A – Z), numbers, and a limited number of symbols. • “NO DISC” appears on the No disc is in the magazine. display. Disc is inserted upside down.
Specifications AUDIO AMPLIFIER SECTION Maximum Power Output: Front: 50 W per channel Rear: 50 W per channel Continuous Power Output (RMS): Front: 19 W per channel into 4 Ω, 40 Hz to 20 000 Hz at no more than 0.8% total harmonic distortion. Rear: 19 W per channel into 4 Ω, 40 Hz to 20 000 Hz at no more than 0.8% total harmonic distortion.
Having TROUBLE with operation? Please reset your unit Refer to page of How to reset your unit EN © 2005 Victor Company of Japan, Limited Rear_KD-SV3104[UI]f.
KD-SV3104 Installation/Connection Manual GET0304-002A 0405DTSMDTJEIN [UI] EN This unit is designed to operate on 12 V DC, NEGATIVE ground electrical systems. If your vehicle does not have this system, a voltage inverter is required, which can be purchased at JVC car audio dealers. WARNINGS • DO NOT install any unit in locations where; – it may obstruct the steering wheel and gearshift lever operations, as this may result in a traffic accident.
When using the optional stay When installing the unit without using the sleeve In a Toyota for example, first remove the car radio and install the unit in its place. Fire wall Stay (option) *2 Not included for this unit. Flat type screws (M5 x 8 mm)*2 Dashboard Bracket*2 Screw (option) Flat type screws (M5 x 8 mm)*2 Pocket Bracket*2 Install the unit at an angle of less than 30˚. Note : When installing the unit on the mounting bracket, make sure to use the 8 mm-long screws.
A Typical Connections Before connecting: Check the wiring in the vehicle carefully. Incorrect connection may cause serious damage to this unit. The leads of the power cord and those of the connector from the car body may be different in color. 1 2 3 Connect the colored leads of the power cord in the order specified in the illustration below. Connect the antenna cord. Finally connect the wiring harness to the unit.
D Connecting the monitor Before connecting the monitor, make sure the unit is turned off. Video cord (not supplied) VIDEO OUT AV1-IN Or AV2-INPUT Rear side KV-MR9010 9-INCH WIDESCREEN MONITOR (not supplied) E Connecting the external amplifier You can connect amplifier to upgrade your car stereo system. • Connect the remote lead (blue with white stripe) to the remote lead of the other equipment so that it can be controlled through this unit.