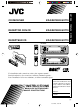
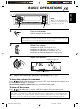
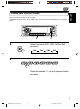
CD RECEIVER KD-SX870/KD-SX770 ENGLISH RECEPTOR CON CD KD-SX870/KD-SX770 ESPAÑOL RECEPTEUR CD KD-SX870/KD-SX770 FRANÇAIS KD-SX870 SCM DISP 4V OUT INT 7 8 9 10 11 12 SCAN MO 8 9 10 11 12 SCAN MO KD-SX770 SCM DISP INT 7 For installation and connections, refer to the separate manual. Para la instalación y las conexiones, refiérase al manual separado. Pour l’installation et les raccordements, se référer au manuel séparé.
ENGLISH INFORMATION (For USA) This equipment has been tested and found to comply with the limits for a Class B digital device, pursuant to Part 15 of the FCC Rules. These limits are designed to provide reasonable protection against harmful interference in a residential installation. This equipment generates, uses, and can radiate radio frequency energy and, if not installed and used in accordance with the instructions, may cause harmful interference to radio communications.
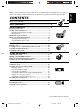
ENGLISH Thank you for purchasing a JVC product. Please read all instructions carefully before operation, to ensure your complete understanding and to obtain the best possible performance from the unit. CONTENTS How to reset your unit .................................................................... 2 BASIC OPERATIONS .................................................... 5 RADIO OPERATIONS ................................................... 6 Listening to the radio ......................................
ENGLISH CD CHANGER OPERATIONS ...................................... 29 Playing CDs ................................................................................... 29 Selecting CD playback modes ...................................................... 31 EXTERNAL COMPONENT OPERATIONS ..................... 32 Playing an external component ................................................... 32 MAINTENANCE ......................................................... 33 Handling CDs ............................
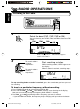
ENGLISH BASIC OPERATIONS 1 Note: When you use this unit for the first time, set the built-in clock correctly, see page 20. 3 2 1 Turn on the power. “HELLO” appears on the display. Note on One-Touch Operation: When you select a source in step 2 below, the power automatically comes on. You do not have to press this button to turn on the power. 2 Select the source. 3 Adjust the volume. To operate the tuner, see pages 6 – 10. To operate the CD player, see pages 11 – 14.
RADIO OPERATIONS ENGLISH Listening to the radio 1 1 2 Select the band (FM1, FM2, FM3 or AM). You can select any one of FM1, FM2, and FM3 to listen to an FM station. FM1 FM2 FM3 Audio (see page 23) or volume level indicator. 2 To search stations of higher frequencies. To search stations of lower frequencies. AM Selected band appears. Start searching a station. While searching stations, “SEEK” appears on the display. When a station is received, searching stops.
ENGLISH Storing stations in memory You can use one of the following two methods to store broadcasting stations in memory. • Automatic preset of FM stations: SSM (Strong-station Sequential Memory) • Manual preset of both FM and AM stations FM station automatic preset: SSM You can preset 6 local FM stations in each FM band (FM1, FM2 and FM3). 1 1 2 Select the FM band number (FM1, FM2 or FM3) you want to store FM stations into. FM1 2 FM2 FM3 AM Press and hold both buttons for more than 2 seconds.
ENGLISH Manual preset You can preset up to 6 stations in each band (FM1, FM2, FM3 and AM) manually. EXAMPLE: Storing an FM station of 88.3 MHz into the preset number 1 of the FM1 band 3 1 2 1 Select the FM1 band. 2 Tune into a station of 88.3 MHz. See page 6 to tune into a station. 3 Press and hold the number button (in this example, 1) for more than 2 seconds. Selected band and “MEMO” flash alternately for a while.
ENGLISH Tuning into a preset station You can easily tune into a preset station. Remember that you must store stations first. If you have not stored them yet, see pages 7 and 8. 2 1 1 Select the band (FM1, FM2, FM3 or AM) you want. FM1 FM2 FM3 AM 2 Select the number (1 – 6) for the preset station you want. 9 EN06-10.KD-SX870.
ENGLISH Other convenient tuner functions SCAN/RPT MO/RND Scanning broadcast stations When you press SCAN/RPT (Scan/Repeat) while listening to the radio, station scanning starts. Each time a broadcast is tuned in, scanning stops for about 5 seconds (“SCAN” flashes on the display), and you can check what program is now being broadcast. If you want to listen to that program, press the same button again to stop scanning.
CD OPERATIONS ENGLISH Playing a CD 1 1 Open the control panel. 2 1. Insert a disc into the loading slot. The unit turns on, draws a CD and starts playback automatically. 2. Close the control panel by hand. Total playing time of Total track number the inserted disc of the inserted disc Elapsed playing time Current track Notes: • When a CD is inserted up side down, “PLEASE” and “EJECT” appear on the display alternately. When you open the control panel by pressing 0, the CD automatically ejects.
ENGLISH Locating a track or a particular portion on a CD ¢ 4 Number buttons To fast-forward or reverse the track Press and hold ¢ Press and hold 4 , while playing a CD, to fast-forward the track. , while playing a CD, to reverse the track. To go to the next tracks or the previous tracks Press ¢ briefly, while playing a CD, to go ahead to the beginning of the next track. Each time you press the button consecutively, the beginning of the next tracks is located and played back.
ENGLISH Selecting CD playback modes SCAN/RPT MO/RND To play back tracks at random (Random Play) You can play back all tracks on the CD at random. MO Each time you press MO/RND (Mono/Random) while playing a CD, CD random play mode turns on and off alternately. When the random mode is turned on, the RND indicator lights up on the display and a track randomly selected starts playing. To play back tracks repeatedly (Repeat Play) You can play back the current track repeatedly.
ENGLISH INT To play back only intros (Intro Scan) INT Each time you press INT (Intro) briefly while playing a CD, CD intro scan mode turns on and off alternately. When the intro scan mode is turned on, “INT” appears on the display for 5 seconds and the track number flashes. The first 15 seconds of each track are played sequentially. Track number of the currently playing track Prohibiting CD ejection You can prohibit CD ejection and can lock a CD in the loading slot. for more than 2 seconds.
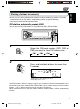
SOUND ADJUSTMENTS ENGLISH Adjusting the sound You can adjust the sound characteristics to your preference. 2 1 Equalization pattern indicator 1 Select the item you want to adjust. Indication To do: Range BAS (Bass) Adjust the bass –06 (min.) — +06 (max.) TRE (Treble) Adjust the treble –06 (min.) — +06 (max.
ENGLISH Turning on/off the BBEII function The BBEII* function restores the brilliance and clarity of the original live sound in recording, broadcasts, etc. When a speaker reproduces sound, it introduces frequency-dependent phase shifting, causing high-frequency sounds to take longer to reach the ear than low frequency sounds.
You can select and store a preset sound adjustment suitable to each playback source. (Advanced SCM) ENGLISH Using the Sound Control Memory (SCM) Selecting and storing the sound modes Once you select a sound mode, it is stored in memory, and will be recalled every time you select the same source. A sound mode can be stored for each of the following sources — FM1, FM2, FM3, AM, CD and external components.
ENGLISH Recalling the sound modes 1 1 Select the source while the “SCM” indicator is lit on the display. The “SCM” indicator starts flashing, and the sound mode stored in memory for the selected source is recalled. Sound mode indicator Notes: • You can adjust each sound mode to your preference, and store it in memory. If you want to adjust and store your original sound mode, see “Storing your own sound adjustments” on page 19.
You can adjust the sound modes (BEAT, SOFT, POP: see page 17) to your preference and store your own adjustments in memory. ENGLISH Storing your own sound adjustments 2 2 1 1,3 2 Call up the sound mode you want to adjust. SCM See page 18 for details. 2 Within 5 seconds 1 To adjust the bass or treble level 2 1 Select “BAS” or “TRE.” Within 5 seconds 2 Adjust the bass or treble level. To turn on or off the BBEII function See page 16.
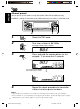
ENGLISH OTHER MAIN FUNCTIONS Setting the clock 2,3 1,4 1 2 2,3 DISP Press and hold SEL (Select) for more than 2 seconds so that one of the PSM items appears on the display. 1 2 Set the hour. 1 Select “CLOCK H (Hour)” if not shown on the display. 2 Adjust the hour. 3 1 2 Set the minute. 1 Select “CLOCK M (Minute).” 2 Adjust the minute. 4 20 Finish the setting. To check the current clock time while the unit is turned off, press DISP.
You can change the items listed on the next page by using the PSM (Preferred Setting Mode) control. ENGLISH Changing the general settings (PSM) Basic Procedure 3 2 1,4 1 Press and hold SEL (Select) for more than 2 seconds so that one of the PSM items appears on the display. 2 Select the PSM item you want to adjust. (See page 22.) 3 Select or adjust the PSM item selected above. 4 Finish the setting. 21 EN20-25.
ENGLISH 1 3 2 Factory-preset See settings page Select. Set.
You can cancel the Advanced SCM (Sound Control Memory), and unlink the sound modes and the playback sources. When shipped from the factory, a different sound mode can be stored in memory for each source so that you can change the sound modes simply by changing the sources. • LINK ON: Advanced SCM (different sound modes for different sources) • LINK OFF: Conventional SCM (one sound mode for all sources) ENGLISH Canceling Advanced SCM 1.
ENGLISH Selecting the dimmer mode (ONLY FOR KD-SX870) When you turn on the car head lights, the display automatically dims (Auto Dimmer). When shipped from the factory, Auto Dimmer mode is activated. • AUTO: Activates Auto Dimmer • OFF: Cancels Auto Dimmer • ON: Always dims the display 1. Press and hold SEL (Select) for more than 2 seconds so that one of the PSM items appears on the display. or 4 . 2. Select “DIMMER” with ¢ 3. Select the desired mode with the control dial.
You can connect the external component to the CD changer jack on the rear using the Line Input Adaptor KS-U57 (not supplied). To use the external component as the playback source through this unit, you need to select which component — CD changer or external component — to use. When shipped from the factory, CD changer is selected as the external component. • LINE IN: To use the external component other than CD changer • CHANGER: To use the CD changer ENGLISH Selecting the external component to use 1.
ENGLISH Detaching the control panel You can detach the control panel when leaving the car. When detaching or attaching the control panel, be careful not to damage the connectors on the back of the control panel and on the panel holder. How to detach the control panel Before detaching the control panel, be sure to turn off the power. 1 2 3 How to attach the control panel 1 Unlock the control panel. Pull the control panel out of the unit. Put the detached control panel into the provided case.
Remote sensor Before using the remote controller: • Aim the remote controller directly at the remote sensor on the main unit. Make sure there is no obstacle in between. • Do not expose the remote sensor to strong light (direct sunlight or artificial lighting). ENGLISH REMOTE OPERATIONS Installing the battery When the controllable range or effectiveness of the remote controller decreases, replace the battery. 1. Remove the battery holder.
ENGLISH Using the remote controller 1 1 Functions the same as the button on the main unit. 2 • Functions as the BAND button while listening to the radio. Each time you press the button, the band changes. • Functions as the DISC + button while listening to the CD changer. Each time you press the button, the disc number increases, and the selected disc starts playing. • Does not function as the PROG/DISC + button. 3 • Functions as the PRESET button while listening to the radio.
We recommend that you use one of the CH-X series (ex: CH-X1200) with your unit. If you have another CD automatic changer, consult your JVC car audio dealer for connections. • For example, if your CD automatic changer is one of the KD-MK series, you need a cord (KS-U15K) for connecting it to this unit. Before operating your CD automatic changer: • Refer also to the Instructions supplied with your CD changer.
ENGLISH To fast-forward or reverse the track Press and hold ¢ , while playing a CD, to fast-forward the track. Press and hold 4 , while playing a CD, to reverse the track. To go to the next tracks or the previous tracks Press ¢ briefly, while playing a CD, to go ahead to the beginning of the next track. Each time you press the button consecutively, the beginning of the next tracks is located and played back. briefly, while playing a CD, to go back to the beginning of Press 4 the current track.
To play back tracks at random (Random Play) Each time you press MO/RND (Mono/Random) while playing a CD, CD random play mode changes as follows: MO RND1 RND2 (Random1) (Random2) ENGLISH Selecting CD playback modes Canceled Mode RND Indicator Plays at random RND1 Lights All tracks of the current disc, then the tracks of the next disc, and so on. RND2 Flashes All tracks of all discs inserted in the magazine.
ENGLISH EXTERNAL COMPONENT OPERATIONS Playing an external component You can connect the external component to the CD changer jack on the rear using the Line Input Adaptor KS-U57 (not supplied). 3 1 Preparations: • For connecting the Line Input Adaptor KS-U57 and the external component, refer to the Installation/ Connection Manual (separate volume). • Before operating the external component using the following procedure, select the external input correctly.
MAINTENANCE ENGLISH Handling CDs COMPACT This unit has been designed only to reproduce the CDs bearing the Other discs cannot be played back. marks. DIGITAL AUDIO How to handle CDs When removing a CD from its case, press down the center holder of the case and lift the CD out, holding it by the edges. • Always hold the CD by the edges. Do not touch its recording surface. Center holder When storing a CD into its case, gently insert the CD around the center holder (with the printed surface facing up).
ENGLISH TROUBLESHOOTING What appears to be trouble is not always serious. Check the following points before calling a service centre. Symptoms Causes Remedies • CD cannot be played back. CD is inserted upside down. Insert the CD correctly. • CD sound is sometimes interrupted. You are driving on rough roads. Stop CD play while driving on rough roads. CD is scratched. Change the CD. Connections are incorrect. Check the cords and connections. The volume is set to the minimum level.
AUDIO AMPLIFIER SECTION CD PLAYER SECTION Maximum Power Output: Front: 45 W per channel Rear: 45 W per channel Continuous Power Output (RMS): Front: 17 W per channel into 4 Ω, 40 Hz to 20 000 Hz at no more than 0.8 % total harmonic distortion. Rear: 17 W per channel into 4 Ω, 40 Hz to 20 000 Hz at no more than 0.8 % total harmonic distortion.
ESPAÑOL IMPORTANTE (EE.UU.) Este equipo se ha sometido a todo tipo de pruebas y cumple con las normas establecidas para dispositivos de Clase B, de conformidad con la Parte 15 de las reglas de la FCC (Comisión Federal de Comunicaciones). Estas reglas están diseñadas para asegurar una protección razonable contra este tipo de interferencias en las instalaciones residenciales. Este equipo genera y utiliza energía de radiofrecuencia.
Muchas gracias por la compra de un producto JVC. Como primer paso, por favor lea detenidamente este manual para comprender a fondo todas las instrucciones y obtener un máximo disfrute de esta unidad. INDICE Cómo reposicionar su unidad ........................................................ 2 ESPAÑOL OPERACIONES BASICAS .............................................. 5 OPERACIONES DE LA RADIO ....................................... 6 Para escuchar la radio .................................................
OPERACION DEL CAMBIADOR DE CD ........................ 29 Reproducción de los discos compactos ....................................... 29 Selección de los modos de reproducción de CD ......................... 31 ESPAÑOL OPERACIONES DE LOS COMPONENTES EXTERIORES .. 32 Reproducción de un componente exterior ................................. 32 MANTENIMIENTO ..................................................... 33 Manipulación de los CD ...............................................................
OPERACIONES BASICAS 1 3 1 ESPAÑOL Nota: Cuando utilice esta unidad por primera vez, ponga el reloj incorporado en hora; consulte la página 20. 2 Encienda la unidad. Aparece “HELLO” en la pantalla. Nota sobre la operación con pulsación única: La unidad se enciende automáticamente cuando usted selecciona el siutouzador como fuente en el paso 2 de abajo. No necesitará presionar este botón para encender la unidad. 2 Reproduzca la fuente. Para operar el sintonizador, consulte las páginas 6 – 10.
OPERACIONES DE LA RADIO ESPAÑOL Para escuchar la radio 1 1 2 Seleccione la banda (FM1, FM2, FM3 o AM). Podrá seleccionar entre FM1, FM2 y FM3 para escuchar una emisora FM. FM1 FM2 FM3 Indicador de nivel de audio (consulte la página 23) o volumen. 2 Para buscar emisoras de frecuencias más altas. Para buscar emisoras de frecuencias más bajas. AM Aparece la banda seleccionada. Comience la búsqueda de la emisora. Mientras efectúa la búsqueda de las emisoras, “SEEK” aparece en el visor.
Cómo almacenar emisoras en la memoria ESPAÑOL Las emisoras podrán almacenarse en la memoria mediante uno de los dos métodos siguientes. • Preajuste automático de emisoras FM: SSM (Memoria secuencia de las emisoras más fuertes) • Preajuste manual de ambas emisoras FM y AM Preajuste automático de emisoras FM: SSM Pueden preajustarse 6 emisoras FM locales en cada banda FM (FM1, FM2 y FM3). 1 1 2 Seleccione el número de la banda FM (FM1, FM2 o FM3) en que desea almacenar las emisoras FM.
Preajuste manual Podrá preajustar manualmente hasta 6 emisoras en cada banda (FM1, FM2, FM3 y AM). ESPAÑOL EJEMPLO: Almacenamiento de una emisora FM de 88.3 MHz en el número de preajuste 1 de la banda FM1 3 1 2 1 Seleccione la banda FM1. 2 Sintonice la emisora de 88.3 MHz. Para sintonizar una emisora, consulte la página 6. 3 Pulse y mantenga pulsado el botón numérico (en este ejemplo, 1), durante más de 2 segundos. La banda seleccionada y “MEMO” aparecerán alternativamente durante unos momentos.
Cómo sintonizar una emisora preajustada ESPAÑOL Las emisoras preajustadas pueden sintonizarse fácilmente. Tenga presente que primero deberá almacenar las emisoras. Si todavía no lo ha hecho, consulte las páginas 7 y 8. 2 1 1 Seleccione la banda (FM1, FM2, FM3 o AM) deseada. FM1 FM2 FM3 AM 2 Seleccione el número (1 – 6) en que desea preajustar la emisora. 9 SP06-10.
ESPAÑOL Otras convenientes funciones del sintonizador SCAN/RPT MO/RND Exploración de emisoras Cuando pulsa SCAN/RPT (Scan/Repetición) mientras está escuchando la radio, se iniciará la exploración de las emisoras. Cada vez que se recibe una emisora, la exploración se interrumpe durante aproximadamente 5 segundos (“SCAN” destella en el visor) para que pueda verificar cuál es el programa que se está transmitiendo.
OPERACION DEL REPRODUCTOR DE CD Para reproducir un CD ESPAÑOL 1 1 Abra el panel de control. 2 1. Inserte un disco en la ranura de carga. Se conecta la alimentación de la unidad, entra el CD y comienza la reproducción automáticamente. 2. Cierre el panel de control con la mano.
ENGLISH ESPAÑOL Cómo encontrar una pista o un punto determinado de un CD Botones de número ¢ 4 Para efectuar la búsqueda progresiva o regresiva de las pistas Presione y mantenga pulsado ¢ mientras se está reproduciendo el CD para la búsqueda progresiva de las pistas. Presione y mantenga pulsado 4 mientras se está reproduciendo el CD para la búsqueda regresiva de las pistas.
SCAN/RPT MO/RND ESPAÑOL Cómo seleccionar los modos de reproducción del CD Para reproducir las pistas de forma aleatoria (Reproducción aleatoria) Podrá reproducir todas las pistas del CD de forma aleatoria. MO Cada vez que pulsa MO/RND (Mono/Aleatoria) mientras se está reproduciendo un CD, el modo de reproducción aleatoria del CD cambiará alternativamente entre activado y desactivado.
ENGLISH ESPAÑOL INT Reproducción de introducciones solamente (búsqueda de introducción musical) INT Cada vez que pulsa INT (Introducción) por un tiempo breve mientras se está reproduciendo un CD, se activará y desactivará alternadamente el modo de búsqueda de introducción de CD. Cuando se activa el modo de búsqueda de introducción, “INT” aparece en la indicación durante 5 segundos y el número de pista destella. Los primeros 15 segundos de cada pista son reproducidos secuencialmente.
AJUSTES DEL SONIDO Ajuste del sonido ESPAÑOL Usted puede ajustar las características de sonido a su preferencia. 2 1 Indicador del patrón de ecualización 1 Seleccione el ítem que desea ajustar. Indicación Para: Gama BAS (Graves) Ajustar los graves –06 (mín.) — +06 (máx.) TRE (Agudos) Ajustar los agudos –06 (mín.) — +06 (máx.
ESPAÑOL Activado/desactivado de la función BBEII La función BBEII* restablece la brillantez y la claridad del sonido original durante la grabación, radiodifusión, etc. Al reproducirse el sonido, el altavoz introduce el desplazamiento de fase dependiente de la frecuencia, haciendo que los sonidos de alta frecuencia tarden más que los sonidos de baja frecuencia en llegar al oído.
Utilización de la memoria de control de sonido (SCM) Selección y almacenamiento de los modos de sonido Una vez que seleccione un modo de sonido, será almacenado en la memoria y llamado cada vez que seleccione la misma fuente. El modo de sonido se puede almacenar para cada una de las siguientes fuentes — FM1, FM2, FM3, AM, CD y componentes exteriores.
ESPAÑOL Llamada de los modos de sonido 1 1 Seleccione la fuente mientras el indicador “SCM” se encuentre encendido en la pantalla. El indicador “SCM” comienza a destellar y se llama el modo de sonido almacenado en la memoria para la fuente que se ha seleccionado. Indicador de los modos de sonido Notas: • Podrá ajustar el sonido preajustado para adaptarlo a su gusto y almacenarlo en la memoria.
Cómo almacenar sus propios ajustes de sonido ESPAÑOL Usted podrá ajustar los modos de control de sonido (BEAT, SOFT, POP: consulte la página 17) a su gusto y almacenar sus propios ajustes en la memoria. 2 2 1 2 1,3 Llame el modo de control de sonido que desea ajustar. SCM Para los detalles, consulte la página 18. En menos de 5 segundos 1 2 Para ajustar el nivel de graves o agudos 2 1 Seleccione “BAS” o “TRE”. En menos de 5 segundos 2 Ajuste el nivel de graves o agudos.
OTRAS FUNCIONES PRINCIPALES Ajuste del reloj ESPAÑOL 2,3 1,4 1 2 2,3 DISP Pulse y mantenga pulsado SEL (Selección) durante más de 2 segundos para que aparezca uno de los ítemes de PSM en la indicación. 1 2 Ajuste la hora. 1 Seleccione “CLOCK H (Hora)” si no está visualizado en la indicación. 2 Ajuste la hora. 3 1 2 Ajuste los minutos. 1 Seleccione “CLOCK M (Minutos)”. 2 Ajuste los minutos. 4 Finalice el ajuste.
Cambio de los ajustes generales (PSM) Podrá cambiar los ítemes listados en la página siguiente utilizando el control PSM (Modo de ajuste preferido). ESPAÑOL Procedimiento básico 3 2 1,4 1 Pulse y mantenga pulsado SEL (Selección) durante más de 2 segundos para que aparezca uno de los ítemes de PSM en la indicación. 2 Seleccione el ítem de PSM que desea ajustar. (Consulte la página 22.) 3 Seleccione o ajuste el ítem PSM seleccionado arriba. 4 Finalice el ajuste. 21 SP20-25.
1 3 2 Ajustes de fabrica Selección. Ajuste.
Usted puede cancelar el SCM avanzado (memoria de control de sonido) y desenlazar los modos de sonido y las fuentes de reproducción. La unidad se expide de fábrica para que pueda almacenar en la memoria un modo de sonido diferente para cada fuente, de manera que sea posible cambiar los modos de sonido con sólo cambiar las fuentes. • LINK ON: SCM avanzado (modos de sonido diferentes para fuentes diferentes) • LINK OFF: SCM convencional (un modo de sonido para todas las fuentes) 1.
ESPAÑOL Selección del modo reductor de luz (SOLO PARA KD-SX870) Cuando usted enciende los faros del automóvil, se reduce el brillo de la indicación (Reductor automático de luz). La unidad se expide de fábrica con el modo reductor de luz ajustado a activado. • AUTO: Reductor automático de luz activado • OFF: Reductor automático de luz desactivado • ON: Siempre reduce el brillo de la indicación 1.
Utilizando el adaptador de entrada de línea KS-U57 (no suministrado) usted puede conectar el componente exterior a la toma del cambiador de CD en la parte posterior. Para utilizar el componente exterior como fuente de reproducción a través de este receptor, deberá seleccionar cuál dispositivo — combiador de CD o componente exterior — desea utilizar. La unidad se despacha de fábrica con el cambiador de CD seleccionado como componente exterior.
Desmontaje del panel de control ESPAÑOL Podrá desmontar el panel de control cuando salga de su automóvil. Al desmontar o instalar el panel de control, preste atención para no dañar los conectores provistos al dorso del panel de control y en el portapanel. Cómo desmontar el panel de control Antes de desmontar el panel de control, asegúrese de desconectar la alimentación. 1 2 3 Cómo instalar el panel de control 1 Desbloquee el panel de control. 2 Eleve y extraiga el panel de control de la unidad.
OPERACIONES A DISTANCIA Sensor remoto ESPAÑOL Antes de emplear el mando a distancia: • Apunte el mando a distancia directamente hacia el sensor remoto de la unidad principal. Asegúrese de que no haya obstáculos en el camino. • No exponga el sensor remoto a la luz intensa (luz solar directa o iluminación artificial). Instalación de la pila Cuando los límites de alcance o la efectividad del mando a distancia se reduce, reemplace la pila. 1. Retire el portapila.
Empleo del mando a distancia ESPAÑOL 1 1 Las funciones son las mismas que las del botón de la unidad principal. 2 • Funciona como el botón BAND mientras escucha la radio. Cada vez que pulsa este botón, la banda cambia. • Funciona como el botón DISC + mientras escucha el cambiador de CD. Cada vez que presiona el botón, el número de disco aumenta, y se inicia la reproducción del disco seleccionado. • No funciona como el botón PROG/DISC +. 3 • Funciona como el botón PRESET mientras está escuchando la radio.
OPERACION DEL CAMBIADOR DE CD Antes de operar su cambiador automático de CD: • Refiérase también a las instrucciones suministradas con su cambiador de CD. • Si no hay discos en el magazín del cambiador de CD o cuando los discos estén insertados boca abajo, aparecerá “NO DISC” en el visor. En este caso, saque el magazín y ponga los discos correctamente. • Si aparece “RESET 1 - RESET 8” en el visor, significa que hay algo anormal en la conexión entre esta unidad y el cambiador de CD.
Para efectuar la búsqueda progresiva o regresiva de las pistas ESPAÑOL Presione y mantenga pulsado ¢ mientras se está reproduciendo el CD para la búsqueda progresiva de las pistas. Presione y mantenga pulsado 4 mientras se está reproduciendo el CD para la búsqueda regresiva de las pistas. Para seleccionar las pistas siguientes o anteriores Pulse ¢ por un tiempo breve mientras se está reproduciendo un CD para saltar al comienzo de la pista siguiente.
Selección de los modos de reproducción de CD Para reproducir las pistas al azar (Reproducción aleatoria) Cada vez que pulsa MO/RND (Mono/Aleatoria) mientras reproduce un CD, el modo de reproducción aleatoria del CD cambiará de la siguiente manera: RND1 RND2 (Aleatoria (Random1) 1) ESPAÑOL MO (Aleatoria (Random2) 2) Cancelado Canceled Modo Indicador RND Reproducción aleatoria de RND1 Se ilumina Todas las pistas del disco actual, después, todas las pistas del disco siguiente y así sucesivamente.
OPERACIONES DE LOS COMPONENTES EXTERIORES Reproducción de un componente exterior ESPAÑOL Utilizando el adaptador de entrada de línea KS-U57 (no suministrado) podrá conectar el componente exterior a la toma del cambiador de CD en la parte posterior. 3 1 Preparativos: • Para conectar el adaptador de entrada de línea KS-U57 y el componente exterior, refiérase al manual de instalación/conexión (volumen separado).
MANTENIMIENTO Manipulación de los CD Esta unidad ha sido diseñada para reproducir únicamente discos compactos (CD) que lleven la marca . No es posible reproducir ningún otro disco. COMPACT DIGITAL AUDIO Cuando saque el CD de su caja, presione el sujetador central de la caja y extraiga Rondje in het midden el CD agarrándolo por los bordes. • Siempre sujete el CD por los bordes. No toque su superficie de grabación.
LOCALIZACION DE AVERIAS Lo que aparenta ser una avería podría resolverse fácilmente. Verifique los siguientes puntos antes de acudir al centro de servicio. ESPAÑOL Síntomas Causas Remedios • No se puede reproducir el CD. El CD está insertado boca abajo. Inserte el CD correctamente. • El sonido del CD se interrumpe algunas veces. Está conduciendo por caminos accidentados. Deje de reproducir el CD mientras conduce por caminos accidentados. El CD está rayado. Cambie el CD.
SECCION DEL AMPLIFICADOR DE AUDIO SECCION DEL REPRODUCTOR DE CD Máxima potencia de salida: Delantera: 45 W por canal Trasera: 45 W por canal Potencia de salida continua (RMS): Delantera: 17 W por canal en 4 Ω, 40 Hz a 20 000 Hz con una distorsión armónica total no mayor de 0,8 %. Trasera: 17 W por canal en 4 Ω, 40 Hz a 20 000 Hz con una distorsión armónica total no mayor de 0,8 %.
IMPORTANT POUR PRODUITS LASER FRANÇAIS Precautions 1. PRODUIT LASER CLASSE 1 2. DANGER: Radiation laser invisible quand l’appareil est ouvert ou que le verrouillage est en panne ou désactivé. Éviter une exposition directe au rayon. 3. ATTENTION: Ne pas ouvrir le volet supérieur. Il n’y a pas de pièce réparable par l’utilisateur à l’intérieur. Confier le service après-vente à un personnel qualifié. 4.
Merci pour avoir acheté un produit JVC. Veuillez lire attentivement toutes les instructions avant d’utiliser l’appareil afin de bien comprendre son fonctionnement et d’obtenir les meilleures performances possibles. CONTENTS Comment réinitialiser votre appareil ........................................... 2 OPERATIONS DE BASE ................................................ 5 FONCTIONNEMENT DE LA RADIO ............................... 6 Ecoute de la radio .....................................................
FONCTIONNEMENT DU CHANGEUR DE CD ................ 29 Lecture de CD ............................................................................... 29 Sélection des modes de lecture de CD ......................................... 31 UTILISATION D’UN APPAREIL EXTÉRIEUR ................... 32 Lecture d’une source extérieure .................................................. 32 ENTRETIEN ............................................................... 33 Manipulation des CD ......................................
OPERATIONS DE BASE 1 Remarque: Si vous utilisez cet appareil pour la première fois, réglez l’horloge intégrée en vous reportant à la page 20. 3 2 1 Mettez l’appareil sous tension. FRANÇAIS “HELLO” apparaît sur l’affichage. Remarque sur le fonctionnement monotouche: Quand vous choisissez tuner comme source à l’étape 2 ci-dessous, l’appareil se met automatiquement sous tension.Vous n’avez donc pas besoin d’appuyer d’aboard sur cette touche pour mettre l’appareil sous tension. 2 Choisissez la source.
FONCTIONNEMENT DE LA RADIO Ecoute de la radio FRANÇAIS 1 1 2 Choisissez la bande (FM1, FM2, FM3 ou AM). Vous pouvez choisir n’importe quelle bande FM1, FM2 ou FM3 pour écouter une station FM. FM1 FM2 FM3 Indicateur de niveau audio (voir la page 23) ou volume. 2 Pour rechercher des stations de fréquences supérieures. Pour rechercher des stations de fréquences inférieures. AM La bande choisie apparaît. Commencez la recherche d’une station.
Mémorisation des stations Vous pouvez utiliser l’une des deux méthodes suivantes pour mémoriser les stations reçues. • Présélection automatique des stations FM: SSM (Strong-station Sequential Memory). • Présélection manuelle des stations FM et AM. Présélection automatique des stations FM: SSM 1 1 FRANÇAIS Vous pouvez présélectionner 6 stations locales dans chaque bande FM (FM1, FM2, et FM3). 2 Choisissez le numéro de bande FM (FM1, FM2 ou FM3) où vous souhaitez mémoriser les stations.
Présélection manuelle Vous pouvez présélectionner manuellement un maximum de 6 stations pour chaque bande (FM1, FM2, FM3 et AM). FRANÇAIS EXEMPLE: Mémorisation de la station FM située à 88.3 MHz sur le numéro de présélection 1 de la bande FM1. 3 1 2 1 Choisissez la bande FM1. 2 Accordez une station à 88.3 MHz. Voir la page 6 pour accorder une station. 3 Maintenez pressée la touche numérique (dans cet exemple, 1) pendant plus de 2 secondes.
Accord d’une station présélectionnée 2 1 FRANÇAIS Vous pouvez accorder facilement une station présélectionnée. Rappelez-vous que vous devez d’abord mémoriser les stations. Si vous ne les avez pas encore mémorisées, reportez-vous aux pages 7 et 8. 1 Choisissez la bande (FM1, FM2, FM3 ou AM) souhaitée. FM1 FM2 FM3 AM 2 Choisissez le numéro (1 – 6) de la station présélectionnée souhaitée. 9 FR06-10.
Autres fonctions pratiques du tuner FRANÇAIS SCAN/RPT MO/RND Balayage des stations diffusées Si vous appuyez sur SCAN/RPT (Scan/Répétition) lors de l'écoute de la radio, le balayage des stations commence. Chaque fois qu'une émission est accordée, le balayage s'arrête pendant environ 5 secondes (“SCAN” clignote sur l'affichage), et vous pouvez vérifier quel programme est en train d'être diffusé. Si vous souhaitez écouter ce programme, appuyez de nouveau sur la même touche pour arrêter le balayage.
FONCTIONNEMENT DU LECTEUR CD Lecture d’un CD 1 1 2 FRANÇAIS Ouvrez le panneau de commande. 1. Insérez un disque dans la fente de chargement. L’appareil se met en marche, tire le CD et commence la lecture automatiquement. 2. Fermez le panneau de commande à la main. Nombre total de plages du disque inséré Durée de lecture totale du disque inséré Plage actuelle Durée de lecture écoulée Remarques: • Si un CD est inséré à l’envers, “PLEASE” et “EJECT” apparaissent alternativement sur l’affichage.
Localisation d’une plage ou d’un point particulier sur un CD ¢ 4 FRANÇAIS Touches numériques Pour avancer rapidement ou inverser une plage Maintenez ¢ pressé, pendant la reproduction d’un CD, pour avancer rapidement la plage. Maintenez 4 la plage. pressé, pendant la reproduction d’un CD, pour inverser Pour aller aux plages suivantes ou précédentes Appuyez brièvement sur ¢ lors de la reproduction d’un CD, pour avancer jusqu’au début de la plage suivante.
Sélection des modes de lecture de CD Pour reproduire les plages aléatoirement (Lecture aléatoire) Vous pouvez reproduire toutes les plages du CD dans un ordre aléatoire. MO Chaque fois que vous appuyez sur MO/RND (Mono/Aléatoire) pendant la reproduction d’un CD, le mode de lecture aléatoire se met alternativement en et hors service. Quand le mode de lecture aléatoire est en service, l’indicateur RND s’allume sur l’affichage et une plage choisie aléatoirement est reproduite.
FRANÇAIS INT Pour lire uniquement des introductions (Balayage d’introductions) INT Chaque fois que vous appyez brièvement sur INT (Introduction) pendant la reproduction d’un CD, le mode de balayage d’introductions est mis en et hors service alternativement. Quand le balayage d’introductions est en service, “INT” apparaît sur l’affichage pendant 5 secondes et le numéro de plage clignote. Les 15 premières secondes de chaque plage sont reproduites en séquence.
AJUSTEMENT DU SON Ajustement du son Vous pouvez ajuster les caractéristiques du son à votre préférence. 1 1 Indicateur de courbe d’égalisation Choisissez l’élément que vous souhaitez ajuster. Indication Pour: FRANÇAIS 2 Plage BAS (Graves) Ajuster les graves –06 (min.) — +06 (max.) TRE (Aigus) Ajuster les aigus –06 (min.) — +06 (max.
FRANÇAIS Mise en/hors service de la fonction BBEII La fonction BBEII* rétablit la brillance et la clarté du son original d’un enregistrement, d’une émission, etc. Quand une enceinte reproduit le son, elle introduit un décalage de phase en fonction de la fréquence, faisant que les sons haute fréquence prennent plus longtemps à atteindre l’oreille que les sons basse fréquence.
Utilisation de la mémoire de commande du son (SCM) Vous pouvez choisir et mémoriser un ajustement du son spécifique pour chaque source de lecture. (SCM avancé) Une fois que vous avez choisi un mode, il est mémorisé et est rappele chaque fois que vous choisissez la même source. Un mode sonore peut être mémorisé pour chacune des sources suivantes — FM1, FM2, FM3, AM, CD et les appareils extérieurs.
Rappel des modes sonores FRANÇAIS 1 1 Choisissez la source pendant que l’indicateur “SCM” est allumé sur l’affichage. L’indicateur “SCM” commence à clignoter et le mode sonore mémorisé pour la source choisie est rappelé. La courbe d’égalisation du mode sonore choisi apparaît. Remarques: • Vous pouvez ajuster le mode sonore préréglé comme vous le souhaitez et le mémoriser.
Mémorisation de votre propre ajustement sonore Vous pouvez ajuster les modes sonore (BEAT, SOFT, POP: voir page 17) comme vous le souhaitez et mémoriser votre propre ajustement. 2 1 1,3 2 Appelez le mode sonore que vous souhaitez ajuster. SCM FRANÇAIS 2 Voir la page 18 pour les détails. 2 En moins de 5 secondes 1 Pour ajuster le niveau des graves ou des aigus 2 1 Choisissez “BAS” ou “TRE”. En moins de 5 secondes 2 Ajustez le niveau des graves ou des aigus.
AUTRES FONCTIONS PRINCIPALES Réglage de l’horloge 2,3 FRANÇAIS 1,4 1 2 2,3 DISP Maintenez pressée la touche SEL (Sélection) pendant plus de 2 secondes de façon que l’un des éléments PSM apparaisse sur l’affichage. 1 2 Réglez les heures. 1 Choisissez “CLOCK H (Heure)” s’il n’apparaît pas sur l’affichage. 2 Ajustez les heures. 3 1 2 Réglez les minutes. 1 Choisissez “CLOCK M (Minute)”. 2 Ajustez les minutes. 4 20 Terminez le réglage.
Modification des réglages généraux (PSM) Vous pouvez modifier les éléments de la liste de la page suivante en utilisant la commande PSM (Preferred Setting Mode — Mode de réglage préféré) Procédure de base 2 1,4 1 FRANÇAIS 3 Maintenez pressée la touche SEL (Sélection) pendant plus de 2 secondes de façon que l’un des éléments PSM apparaisse sur l’affichage. 2 Choisissez l’élément PSM que vous souhaitez ajuster. (Voir page 22.) 3 Choisissez ou ajustez l’élément PSM choisi ci-dessus.
1 3 2 Choisissez. Préréglages d’usine Voir page Réglez.
Annulation de SCM avancé 1. Maintenez pressée la touche SEL (Sélection) pendant plus de 2 secondes de façon que l’un des éléments PSM apparaisse sur l’affichage. ou 4 . 2. Choisissez “SCM LINK” avec ¢ 3. Choisissez le mode souhaité avec la molette de commande. Le mode SCM LINK change comme suit: LINK ON LINK OFF FRANÇAIS Vous pouvez annuler les réglages SCM (mémoire de commande sonore) avancés et annuler les liaisons des modes sonores avec les sources de lecture.
Sélection du mode d’assombrissement (SEULEMENT PARA KD-SX870) FRANÇAIS Quand vous allumez les feux de votre voiture, l’affichage s’assombrit automatiquement (Assombrissement automatique). A l’expédition de l’usine, le mode d’assombrissement automatique est en service. • AUTO: Met en service l’assombrissement automatique • OFF: Annule l’assombrissement automatique • ON: Assombrit en permanence l’affichage 1.
Sélection de l’appareil extérieur 1. Change la source sur FM, AM ou CD avec FM/AM ou touche CD. 2. Maintenez pressé SEL (Sélection) pendant plus de 2 secondes de façon que l’un des éléments PSM apparaisse sur l’affichage. ou 4 . 3. Choisissez “EXT IN” avec ¢ 4. Choisissez le mode souhaité avec la molette de commande.
Détachement du panneau de commande Vous pouvez détacher le panneau de commande quand vous quittez la voiture. Lors du détachement ou de la remise en place du panneau de commande, faites attention de ne pas endommager les connecteurs situés à l’arrière du panneau et sur le porte-panneau. Comment détacher le panneau de commande FRANÇAIS Avant de détacher le panneau de commande, assurez-vous de mettre l’appareil hors tension.
FONCTIONNEMENT DE LA TELECOMMANDE Capteur de télécommande Mise en place de la pile Lorsque la portée ou l’efficacité de la télécommande diminue, remplacez la pile. FRANÇAIS Avant d’utiliser la télécommande: • Pointez la télécommande directement sur le capteur de télécommande de l’appareil principal. Assurez-vous qu’il n’y a pas d’obstacle entre les deux. • Ne pas exposer la télécommande à un éclairage puissant (en plein soleil ou un éclairage artificiel). 1. Retirez le porte-pile.
Utilisation de la télécommande 1 1 Fonctionne comme la touche sur l’appareil principal. 2 • Fonctionne comme la touche BAND en écoutant la radio. Chaque fois que vous appuyez sur cette touche, la bande change. • Fonctionne comme la touche DISC + en écoutant le changeur de CD. Chaque fois que vous appuyez sur la touche, le numéro de disque augmente et le disque sélectionné commence la lecture. • Ne fonctionne pas comme la touche PROG/DISC +.
FONCTIONNEMENT DU CHANGEUR DE CD Avant d’utiliser votre changeur automatique de CD: • Référez-vous aussi aux instructions fournies avec votre changeur de CD. • Si aucun disque ne se trouve dans le magasin du changeur de CD ou si les disques ont été insérés à l’envers, “NO DISC” apparaît sur l’affichage. Si cela se produit, retirez le magasin et placez les disques correctement.
Pour avancer rapidement ou inverser une plage Maintenez ¢ pressé, pendant la reproduction d’un CD, pour avancer rapidement la plage. Maintenez 4 la plage. pressé, pendant la reproduction d’un CD, pour inverser FRANÇAIS Pour aller aux plages suivantes ou précédentes Appuyez brièvement sur ¢ lors de la reproduction d’un CD, pour avancer jusqu’au début de la plage suivante. Chaque fois que vous appuyez répétitivement sur la touche, le début des plages suivantes est localisé et celle-ci est reproduite.
Sélection des modes de lecture de CD Pour reproduire les plages aléatoirement (Lecture aléatoire) Chaque fois que vous appuyez sur MO/RND (Mono/Aléatoire) pendant la reproduction d’un CD, le mode de lecture aléatoire change comme suit: MO RND1 RND2 (Aléatoire1) (Random1) (Random2) (Aléatoire2) Annulé Canceled Mode Indicateur RND Reproduit aléatoirement RND1 Allumé Toutes les plages du disque actuel, puis celles du disque suivant, etc.
UTILISATION D’UN APPAREIL EXTÉRIEUR Lecture d’une source extérieure FRANÇAIS Vous pouvez connecter un appareil extérieur à la prise extérieure du changeur de CD à l’arrière de l’appareil en utilisant un adaptateur d’entrée de ligne KS-U57 (non fourni). 3 1 Préparations: • Pour connecter l’adaptateur d’entrée de ligne KS-U57 et l’appareil extérieur, référez-vous au manuel d’installation/connexion (document séparé).
ENTRETIEN Manipulation des CD COMPACT Cet appareil a été conçu pour reproduire les CD portant la marque Les autres disques ne peuvent pas être reproduits. DIGITAL AUDIO . Manipulation des CD Pour retirer un CD de son boîtier, faites pression sur le support central du boîtier et retirez le CD en le tenant par ses arêtes. • Tenez toujours le CD par ses arêtes. Ne touchez pas la surface enregistrée.
DEPANNAGE Ce qui apparaît comme un problème n’est pas toujours très sérieux. Vérifier les points suivants avant d’appeler un centre de réparation. FRANÇAIS Symptômes Causes Remèdes • Le CD ne peut pas être reproduit. Le CD est inséré à l’envers. Insérez-le correctement. • Le son du CD est interrompu par moment. Vous conduisez sur une route accidentée. Arrêtez la lecture du CD quand vous conduisez sur une route accidentée. Le CD est rayé. Changez le CD. Les connexions sont incorrectes.
SPECIFICATIONS Puissance de sortie maximum: Avant: 45 W par canal Arrière: 45 W par canal Puissance de sortie en mode continu (efficace): Avant: 17 W par canal pour 4 Ω, 40 Hz à 20 000 Hz à moins de 0,8% de distorsion harmonique totale. Arrière: 17 W par canal pour 4 Ω, 40 Hz à 20 000 Hz à moins de 0,8% de distorsion harmonique totale.
http://www.jvcmobile.com Visit us on-line for Technical Support & Customer Satisfaction Survey. US RESIDENTS ONLY Having TROUBLE with operation? Please reset your unit Refer to page of How to Reset Still having trouble?? USA ONLY Call 1-800-252-5722 http://www.jvcservice.