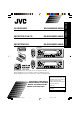
KD-SX9350/KD-SX990 RECEPTEUR CD KD-SX9350/KD-SX990 ENGLISH RECEPTOR CON CD ESPAÑOL KD-SX9350/KD-SX990 FRANÇAIS CD RECEIVER KD-SX9350 SOUND ATT U R SOURCE F D VOL VOL KD-SX990 SOUND ATT U R SOURCE F D VOL VOL For installation and connections, refer to the separate manual. Para la instalación y las conexiones, refiérase al manual separado. Pour l’installation et les raccordements, se référer au manuel séparé.
ENGLISH INFORMATION (For USA) This equipment has been tested and found to comply with the limits for a Class B digital device, pursuant to Part 15 of the FCC Rules. These limits are designed to provide reasonable protection against harmful interference in a residential installation. This equipment generates, uses, and can radiate radio frequency energy and, if not installed and used in accordance with the instructions, may cause harmful interference to radio communications.
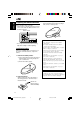
Thank you for purchasing a JVC product. Please read all instructions carefully before operation, to ensure your complete understanding and to obtain the best possible performance from the unit. How to reset your unit ............................... How to use the MODE button ................... 2 3 LOCATION OF THE BUTTONS ............ 4 Control panel ............................................. Remote controller ...................................... Preparing the remote controller ................
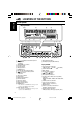
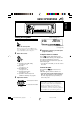
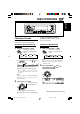
LOCATION OF THE BUTTONS ENGLISH Control panel Display window sd 1 f j k 2 34 9p q l g / h z x 6 7 5 w e 1 (standby/on/attenuator) button 2 5 (up) button +10 button 3 4 /¢ buttons 4 Remote sensor 5 Display window 6 0 (eject) button 7 FM/AM button 8 CD (CD-CH: CD changer) button 9 (control panel release) button p ∞ (down) button –10 button q SEL (select) button w Control dial e MO (monaural) button r Number buttons t INT (intro) button y RPT (repeat) button u RND (random) button i MODE butt
Remote controller SOUND ATT U R SOURCE F D VOL VOL ENGLISH 3 • Selects the preset stations while listening to the radio. Each time you press the button, the preset station number increases, and the selected station is tuned in. • Skips to the first file of the previous folder while listening to an MP3 disc. Each time you press the button, you can move to the previous folder and start playing the first file.
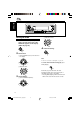
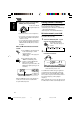
ENGLISH Preparing the remote controller Before using the remote controller: • Aim the remote controller directly at the remote sensor on the main unit. Make sure there is no obstacle in between. Remote sensor 3. Return the battery holder. Insert again the battery holder by pushing it until you hear a clicking sound. (back side) • Do not expose the remote sensor to strong light (direct sunlight or artificial lighting).
ENGLISH BASIC OPERATIONS 1 3 2 Turning on the power 1 Turn on the power. Note on One-Touch Operation: When you select a source in step 2 below, the power automatically comes on. You do not have to press this button to turn on the power. 2 Select the source. Volume (or audio) level indicator (see page 27) 4 Adjust the sound as you want. (See pages 23 and 24.) To drop the volume in a moment To operate the tuner (FM or AM), see pages 9 – 11. To play a CD, see pages 12 – 15.
ENGLISH Setting the clock 1 2 Adjust the minute. Press and hold SEL (select) for more than 2 seconds so that one of the PSM items appears on the display. (PSM: see page 26.) 4 2 Finish the setting. Set the hour. 1 Select “CLOCK H” (hour) if not shown on the display. Note: To show the clock time on the display, see page 27. To check other information during play, press DISP (display). 2 Adjust the hour.
ENGLISH RADIO OPERATIONS Listening to the radio You can use either automatic searching or manual searching to tune in to a particular station. To stop searching before a station is received, press the same button you have pressed for searching. Searching a station automatically: Auto search Searching a station manually: Manual search 1 1 Select the band (FM1 – 3, AM). Select the band (FM1 – 3, AM).
ENGLISH 3 Tune in to a station you want while “MANU” (manual) is flashing. To tune in to stations of higher frequencies To tune in to stations of lower frequencies • If you release your finger from the button, the manual mode will automatically turns off after 5 seconds. • If you hold down the button, the frequency keeps changing (in 200 kHz intervals for FM and 10 kHz for AM) until you release the button.
You can preset up to 6 stations in each band (FM1, FM2, FM3, and AM) manually. Ex.: Storing an FM station of 88.3 MHz into the preset number 1 of the FM1 band. 1 Select the band (FM1 – 3, AM) you want to store stations into (in this example, FM1). Each time you press the button, the band changes as follows: FM 1 (F1) 2 FM 2 (F2) FM 3 (F3) AM Tune in to a station (in this example, of 88.3 MHz).
ENGLISH CD OPERATIONS Refer “MP3 OPERATIONS” on pages 18 to 22 for operating MP3 discs. CD–in indicator Playing a CD 1 The display changes to show the following: Current source indication* Open the control panel. Total playing time of the inserted disc Total track number of the inserted disc Note on One-Touch Operation: When a CD is already in the loading slot, pressing CD (CD-CH) turns on the unit and starts playback automatically.
To go to a particular track directly Press 0. CD play stops and the control panel flips down. The CD automatically ejects from the loading slot. The source changes to the previously selected source. • If you change the source, CD play also stops (without ejecting the CD). Next time you select “CD” as the source, CD play starts from where playback has been stopped previously. Press the number button corresponding to the track number to start its playback.
ENGLISH How to use the +10 and –10 buttons To play back tracks repeatedly (Track Repeat Play) • Ex. 1: To select track number 32 while playing track number 6 You can play back the current track repeatedly. 1 Press MODE to enter the functions mode while playing a CD. “MODE” flashes on the upper part of the display. (Three times) \ 10 \ 20 \ 30 Track 6 (Twice) \ 31 \ 32 • Ex.
Prohibiting disc ejection In a CD Text, some information about the disc (its disc title, performer, and track title) is recorded. This CD Text information will be shown automatically when you play a CD Text. You can prohibit disc ejection and can lock a disc in the loading slot. ENGLISH Playing a CD Text While pressing CD (CD-CH), press and hold for more than 2 seconds. To change the CD Text information manually, select text display mode while playing a CD Text.
ENGLISH MP3 INTRODUCTION What is MP3? Precautions when recording MP3 files on a CD-R or CD-RW MP3 is an abbreviation of Motion Picture Experts Group (or MPEG) Audio Layer 3. MP3 is simply a file format with a data compression ratio of 1:10 (128 Kbps*). That means, by using MP3 format, one CD-R or CD-RW can contain 10 times as much data volume as a regular CD can. * Bit rate is the average number of bits that one second of audio data will consume. The unit used is Kbps (1024 bits/second).
01 02 04 03 05 10 5 6 09 11 20 06 7 Level 6 01 08 1 2 3 4 Level 4 Level 3 Level 2 ROOT Level 5 Hierarchy ROOT ENGLISH Level 1 MP3 folder/file configuration 8 9 12 21 07 22 13 14 15 16 17 23 24 18 19 : Root : Folders : MP3 files Note: There is no limit on the number of the hierarchy levels (nested folders). However, up to 8 hierarchy levels is recommanded for stable operations.
ENGLISH MP3 OPERATIONS Refer also to “CD OPERATIONS” on pages 12 to 15. Playing an MP3 disc 1 Open the control panel. Note on One-Touch Operation: When a disc is already in the loading slot, pressing CD (CD-CH) turns on the unit and starts playback automatically. 2 Total folder number Total file number Insert an MP3 disc into the loading slot. The unit turns on, draws the disc and starts playback automatically.
Press 0. Playback stops and the control panel flips down. The disc automatically ejects from the loading slot. To change the display information While playing back an MP3 file, you can change MP3 disc information shown on the display.
ENGLISH To go to a particular file quickly within the current folder (+10 and –10 buttons) 1 Press MODE to enter the functions mode while playing an MP3 disc. “MODE” flashes on the upper part of the display. 2 Press +10 or –10. To skip 10 files* forwards to the last file To go to a particular folder directly IMPORTANT: To directly select the folders using the number button(s), it is required that folders are assigned 2 digit numbers at the beginning of their folder names.
Press 5 (up) while playing an MP3 disc to skip to the next folder. Each time you press the button consecutively, the next folder is located (and the first file in the folder starts playing, if recorded). Selecting MP3 playback modes To play back files at random (Folder Random/Disc Random Play) You can play back all files of the current folder or all files on the MP3 disc at random. ENGLISH To skip to the next or previous folder 1 Press MODE to enter the functions mode while playing an MP3 disc.
ENGLISH To play back files repeatedly (Track Repeat/Folder Repeat Play) To play back only intros (Track Intro Scan/Folder Intro Scan) You can play back the current file or all the files in the current folder repeatedly. You can play back the first 15 seconds of each file sequentially. 1 Press MODE to enter the functions 1 Press MODE to enter the functions mode while playing an MP3 disc. “MODE” flashes on the upper part of the display. mode while playing an MP3 disc.
Selecting preset sound modes (C-EQ: custom equalizer) You can select a preset sound mode (C-EQ: custom equalizer) suitable to the music genre. Select the sound mode you want. When you press the button once, the last selected sound mode is recalled and applied to the current source. Sound mode indicator flashes.
ENGLISH Adjusting the sound You can adjust the sound characteristics to your preference. 1 Select the item you want to adjust. Each time you press the button, the adjustable items change as follows: For KD-SX9350: BAS TRE (bass) (treble) VOL FAD (fader) 2 (balance) (subwoofer) (loudness) To decrease the level or turn off the loudness For KD-SX990: BAS TRE (bass) (treble) FAD (fader) VOL LOUD BAL (volume) (loudness) (balance) Indication BAS*1 To do: Range Adjust the bass.
Changing the general settings (PSM) 3 Adjust the PSM item selected. You can change the items listed on the next page by using the PSM (Preferred Setting Mode) control. Basic Procedure 1 2 4 Press and hold SEL (select) for more than 2 seconds so that one of the PSM items appears on the display. (See page 26.) 5 ENGLISH OTHER MAIN FUNCTIONS Repeat steps 2 and 3 to adjust the other PSM items if necessary. Finish the setting. Select the PSM item you want to adjust. (See page 26.) Ex.
ENGLISH Preferred Setting Mode (PSM) items 1 2 3 Factory-preset See settings page Set... Hold... Select... Counterclockwise Clockwise CLOCK H Hour adjustment Back Advance CLOCK M Minute adjustment Back Advance CLOCK Clock display OFF ON LEVEL Level display AUDIO 1 AUDIO 2 OFF DIMMER Dimmer mode AUTO 1:00 8 ON 27 AUDIO 2 27 AUTO 27 ON 27 ONCE 28 CHANGER 28 A.
To select the level meter—LEVEL You can set the clock to be shown on the display when the unit is turned on. When shipped from the factory, the clock is set to be shown on the display. You can select the level display according to your preference. When shipped from the factory, “AUDIO 2” is selected. • ON: • OFF: • AUDIO 1: Shows the audio level indicator. • AUDIO 2: Alternates “AUDIO 1” setting and illumination display. • OFF: Erases the audio level indicator. Clock display is turned on.
ENGLISH To select the scroll mode—SCROLL You can select the scroll mode for the disc information (when the entire text cannot be shown all at once). When shipped from the factory, scroll mode is set to “ONCE.” • ONCE: • AUTO: • OFF: Scrolls only once. Repeats the scroll (5-second intervals in between). Cancels Auto Scroll. Note: Even if the scroll mode is set to “OFF,” you can scroll the display by pressing DISP (display) for more than one second.
3 Select a character. • See below for available characters. You can assign names to station frequencies and CDs (both in this unit and in the CD changer). After assigning a name, it will appear on the display when you select the source. Maximum number of characters Sources Station frequencies Up to 8 characters (up to 30 station frequencies including both FM and AM) CDs* Up to 32 characters (up to 40 discs) * You cannot assign a name to a CD Text or an MP3 disc.
ENGLISH Detaching the control panel You can detach the control panel when leaving the car. When detaching or attaching the control panel, be careful not to damage the connectors on the back of the control panel and on the panel holder. Attaching the control panel 1 Insert the right side of the control panel into the groove on the panel holder. Detaching the control panel Before detaching the control panel, be sure to turn off the power. 1 Unlock the control panel.
ENGLISH CD CHANGER OPERATIONS We recommend that you use the JVC MP3compatible CD changer with your unit. * If you have changed “EXT IN” setting to “LINE IN” (see page 36), you cannot select the CD changer. By using this CD changer, you can play back your original CD-Rs (Recordable) and CD-RWs (Rewritable) recorded either in audio CD format or in MP3 format. • You can also connect other CH-X series CD changers (except CH-X99 and CH-X100).
ENGLISH • When the current disc is a CD: Playback starts from the first track of the current disc. Selected disc number* To go to a particular disc directly Press the number button corresponding to the disc number to start its playback (while the CD changer is playing). • To select a disc number from 1 – 6: Press 1 (7) – 6 (12) briefly. • To select a disc number from 7 – 12: Press and hold 1 (7) – 6 (12) for more than one second.
To go to a track/file quickly (+10 and –10 buttons) 1 Press MODE to enter the functions mode while playing a disc. “MODE” flashes on the upper part of the display. 2 Press +10 or –10. To skip 10 tracks/files* forwards to the last track/file To skip 10 tracks/files* backwards to the first track/file * The first time you press +10 or –10 button, the track/file skips to the nearest higher or lower track/file with a track/file number of multiple ten (ex. 10th, 20th, 30th).
ENGLISH Selecting the playback modes To play back tracks/files at random (Folder Random/Disc Random/Magazine Random Play) Active indicator Mode FLDR RND* and RND All files of the indicators current folder, then light up. files of the next folder and so on. DISC RND and RND All tracks/files of the indicators current (or specified) light up. disc. MAG RND RND indicator All tracks/files of the lights up. inserted discs. 1 Press MODE to enter the functions mode during play.
Active indicator Plays repeatedly TRK RPT RPT indicator The current (or lights up. specified) track/file. FLDR RPT* and RPT All files of the indicators current (or specified) light up. folder of the current disc. DISC RPT and RPT All tracks/files of the indicators current (or specified) light up. disc. * “FLDR RPT” is only applicable for MP3 disc. To play back only intros (Track Intro Scan/Folder Intro Scan/Disc Intro Scan) ENGLISH Mode INT indicator Ex.
ENGLISH EXTERNAL COMPONENT OPERATIONS * Not compatible with digital signals. Portable MP3 player, etc. Auxiliary input (MP3 INPUT)* Playing an external component You can connect two external components to this unit. Connect one to the CD changer jack on the rear using the Line Input Adapter KS-U57 (not supplied), and the other to the MP3 INPUT jack on the control panel.
What appears to be trouble is not always serious. Check the following points before calling a service center. Symptoms Disc Playback FM/AM General • Sound cannot be heard from the speakers. Causes Remedies The volume level is set to the minimum level. Adjust it to the optimum level. Connections are incorrect. Check the cords and connections. • This unit does not work at all. The built-in microcomputer may have functioned incorrectly due to noise, etc.
ENGLISH Symptoms Causes MP3 Playback • Disc cannot be played back. Remedies No MP3 files are recorded on the disc. Change the disc. MP3 files do not have the extension code—mp3 in their file names. Add the extension code —mp3 to their file names. MP3 files are not recorded in the format compliant with ISO 9660 Level 1, Level 2, or Joliet. Change the disc. (Record MP3 files using a compliant application.) • Noise is generated.
Remedies No disc is in the magazine. Insert discs into the magazine. Discs are inserted upside down. Insert discs correctly. • “NO MAG” appears on the display. No magazine is loaded in the CD changer. Insert the magazine. • “RESET 8” appears on the display. This unit is not connected to the CD changer correctly. Connect this unit and the CD changer correctly and press the reset button of the CD changer. • “RESET 1” – “RESET 7” appears on the display. • The CD changer does not work at all.
ENGLISH MAINTENANCE Handling discs When playing a CD-R or CD-RW This unit has been designed to reproduce CDs, CD-Rs (Recordable), CD-RWs (Rewritable), and CD Texts. • This unit is also compatible with MP3 discs. How to handle discs When removing a disc Center holder from its case, press down the center holder of the case and lift the disc out, holding it by the edges. • Always hold the disc by the edges. Do not touch its recording surface.
AUDIO AMPLIFIER SECTION CD PLAYER SECTION Maximum Power Output: Front: 50 W per channel Rear: 50 W per channel Continuous Power Output (RMS): Front: 19 W per channel into 4 Ω, 40 Hz to 20 000 Hz at no more than 0.8% total harmonic distortion. Rear: 19 W per channel into 4 Ω, 40 Hz to 20 000 Hz at no more than 0.8% total harmonic distortion.
KD-SX9350/KD-SX8350/KD-SX990 Installation/Connection Manual Manual de instalación/conexión Manuel d’installation/raccordement V J GET0123-002A C 1102KKSFLEJEIN EN, SP, FR [J] ENGLISH ESPAÑOL FRANÇAIS • This unit is designed to operate on 12 V DC, NEGATIVE ground electrical systems. • Esta unidad está diseñada para funcionar con 12 V de CC, con sistemas eléctricos de masa NEGATIVA. • Cet appareil est conçu pour fonctionner sur des sources de courant continu de 12 V à masse NEGATIVE.
• When installing the unit without using the sleeve • Instalación de la unidad sin utilizar la cubierta • Lors de l’installation de l’appareil sans utiliser de manchon • When using the optional stay • Cuando emplea un soporte opcional • Lors de l’utilisation du hauban en option Washer Arandela Rondelle Fire wall Tabique a prueba de incendios Cloison In a Toyota for example, first remove the car radio and install the unit in its place.
ENGLISH ESPAÑOL FRANÇAIS A Typical Connections / Conexiones típicas / Raccordements typiques Before connecting: Check the wiring in the vehicle carefully not to fail in connecting this unit. Incorrect connection may cause a serious damage to this unit. The leads of the power cord and those of the connector from the car body may be different in color. 1 Connect the colored leads of the power cord to the car battery, speakers and automatic antenna (if any) in the following sequence.
Connecting the leads / Conexión de los conductores / Raccordement des fils Twist the core wires when connecting. Retuerza los alambres de alma para conectarlos. Torsader les âmes des fils en les raccordant. CAUTION / PRECAUCION / PRECAUTION: • To prevent short-circuit, cover the terminals of the UNUSED leads with insulating tape. • Para evitar cortocircuitos, cubra los cables NO UTILIZADOS con cinta aislante.