-
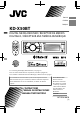
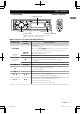
ENGLISH ESPAÑOL FRANÇAIS KD-X50BT DIGITAL MEDIA RECEIVER / RECEPTOR DE MEDIOS DIGITALES / RÉCEPTEUR MULTIMÉDIA NUMÉRIQUE For canceling the display demonstration, see page 4. / Para cancelar la demostración en pantalla, consulte la página 4. / Pour annuler la démonstration des affichages, référez-vous à la page 4. For installation and connections, refer to the separate manual. Para la instalación y las conexiones, refiérase al manual separado.
-
Thank you for purchasing a JVC product. Please read all instructions carefully before operation, to ensure your complete understanding and to obtain the best possible performance from the unit. For U.S.A. This equipment has been tested and found to comply with the limits for a Class B digital device, pursuant to Part 15 of the FCC Rules. These limits are designed to provide reasonable protection against harmful interference in a residential installation.
-
Contents Warning: Stop the car before operating the unit. Preparation ............................................................ 4 Caution: Adjust the volume so that you can hear sounds outside the car. Driving with the volume too high may cause an accident. Avoid using the USB device or iPod/iPhone if it might hinder driving safety. Caution on volume setting: Digital devices (USB) produce very little noise compared with other sources.
-
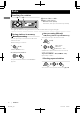
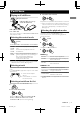
Preparation Preparation Canceling the display demonstration The display demonstration is always turned on unless you cancel it. 1 Setting the clock 1 (Hold) 2 Select . (Hold) 2 3 Select . (Initial setting) 3 Select . 4 Adjust the hour. 4 Press MENU to exit. 5 Adjust the minute. 6 Press MENU to exit. Basic operations Display information Changes the display information. (Press) Scrolls the current display information.
-
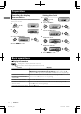
Basic operations Control panel Remote controller Display window AUX input jack Control dial USB input terminal Remote sensor Aim the remote controller directly at the sensor. DO NOT expose to bright sunlight. When you press or hold the following button(s)... Control panel /SOURCE Control dial (turn) Control dial (press) EQ Remote controller — SOURCE VOL - / + — ) — SOUND — — / / / / General function Turns on. Turns off.
-
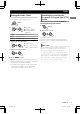
Radio Radio Searching for a station A B Select or . Auto search. (Press) Manual search. (Hold) “M” flashes, then press the button repeatedly. “ST” lights up when receiving an FM stereo broadcast with sufficient signal strength. Auto presetting (FM only) Storing stations in memory Manual presetting You can preset up to 18 stations for FM and 6 stations for AM. SSM (Strong-station Sequential Memory) You can preset up to 18 stations for FM. 1 (Hold) While listening to a station...
-
Radio Setting the Radio Timer Searching for your favorite Programs—Program Type (PTY) Search You can tune in to a preset station at a specific time regardless of the current source. 1 This feature is only available for FM Radio Broadcast Data System stations. (Hold) 1 2 [OFF] - - -// Cancels Radio Timer. ONCE Activates once. DAILY Activates daily. 3 Select the preset station. -/ -<01> ... <18> for FM/ <01> ...
-
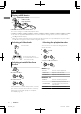
USB USB Playing a USB device USB input terminal USB 2.0 cable (not supplied) or USB cable from the rear of the unit The source changes to “USB” and playback starts. This unit can play MP3/WMA/WAV files stored in USB mass storage device (such as a USB memory and Digital Audio Player). Make sure all important data has been backed up. We shall bear no responsibility for any loss of data in USB mass storage class device while using this system. Selecting a folder/track Selects folder.
-
iPod/iPhone Playing an iPod/iPhone 3 Select the desired track. USB input terminal USB 2.0 cable (accessory of the iPod/iPhone) or Repeat this step until the desired track is selected. If the selected menu contains many tracks, you can fast search for the desired track by turning the control dial quickly, or use Quick Search (' page 11). USB cable from the rear of the unit The source changes to “IPOD-FRONT/IPOD-REAR” and playback starts.
-
iPod/iPhone iPod/iPhone application You can operate JVC original application with this unit in . For more details, visit JVC website: (English website only). Pandora姞 internet radio Preparation 1 Search for “Pandora” in the Apple iTunes App Store to find and install the most current version of the Pandora姞 application onto your device. 2 In the application on your device, log in and create an account with Pandora姞.
-
Quick Search Quick Search If you have many folders/tracks/contacts, you can search through them quickly according to the first character (A to Z, 0 to 9 and OTHERS). 1 Enter list menu or “Hands-Free” menu. USB (MP3/WMA/WAV) iPod/iPhone Bluetooth phonebook Select the desired list. Select . 2 Select the desired character (A to Z, 0 to 9 and OTHERS). 3 Select your desired folder/track/contact. For USB and iPod/iPhone, repeat step 3 until the desired track is selected.
-
Bluetooth姞 connection iPod/iPhone By connecting the supplied KS-UBT1 USB Bluetooth Adapter and microphone to this unit, you can operate a Bluetooth device using this unit. Refer to the “Installation/Connection Manual” for details on connecting the microphone. Once the USB Bluetooth Adapter is attached, this unit is always available for pairing. Refer also to the instructions supplied with the Bluetooth device.
-
Bluetooth姞 connection 3 Perform (A) or (B) depending on what scrolls on the display. For some Bluetooth devices, pairing sequence may vary from the steps described below (A) If “[Device Name]”#“XXXXXX”# (B) If “[Device Name]”#“VOL – YES”# “BACK – NO” scrolls on the display, “VOL – YES”#“BACK – NO” scrolls on the display, Select “YES” to start the pairing. “XXXXXX” is a 6-digit passkey randomly generated during each pairing.
-
Bluetooth姞 connection Connecting to JVC original application JVC original application is designed to view JVC car receiver status and perform simple control operations on Android smart phones. For JVC original application operations, visit JVC website: (English website only). 1 (Hold) Deleting a registered device 1 (Hold) 2 Select . - - - [Device name] - “DELETED” appears when the device is deleted.
-
Bluetooth mobile phone Adjustments during a call Phone volume (00 — 50) [VOLUME 15]: Volume adjustments made during a call will not affect the other sources. Microphone level (01— 03) [02]: As the number increases, the microphone becomes more sensitive. Text message notification When a text message is received, the unit rings and “RCV MESSAGE”#“[Device name]” appears. must be set to . (' page 17) You cannot read, edit, or send a message through the unit.
-
Bluetooth mobile phone Using voice recognition You can use the voice recognition features of the connected phone through this unit. “NOT SUPPORT” appears if the connected phone does not support this feature. Deleting a contact (name/ phone number) Only when is set to . (' page 17) 1 Enter the “Hands-Free” menu. 1 Enter voice recognition mode.
-
Bluetooth mobile phone Using the SETTINGS menu 1 Enter the “Hands-Free” menu. 3 Repeat this step to perform the necessary settings. 2 Select . To return to the previous menu, press . To exit from the menu, press MENU. The following settings are applicable to the paired device. If another device is paired, perform the settings again. Menu item Selectable setting (Initial: [XX]) P.BOOK SEL * [PB IN PHONE]: The unit browses the phonebook of the connected phone.
-
Bluetooth Bluetooth audioaudio player player Playing a Bluetooth audio player A Select or depending on the location of the USB Bluetooth adapter KS-UBT1. Operate the Bluetooth audio player to start playback. Operations and display indications may differ according to their availability on the connected device. . RANDOM Basic operations RND OFF Cancels random playback. Starts or resumes playback. ALL RND Randomly plays all tracks. GROUP RND Mutes the sound.
-
Illumination color adjustments All zone Button zone All zone: Includes both Button zone and Display zone. Display zone Selecting the preset color Storing your own adjustments You can select a preset color for
-
Brightness adjustments Brightness adjustments You can select your preferred brightness for
-
Menu operations 1 Menu operations 3 Repeat step 2 if necessary. (Hold) If no operation is done for about 60 seconds, the operation will be canceled. To return to the previous menu, press . To exit from the menu, press DISP or MENU.
-
Menu operations Menu item VOL ADJUST (Volume adjust) AUDIO L/O MODE (Line output mode) SUB. W *6 (Subwoofer) SUB.W LPF *7 (Subwoofer lowpass filter) SUB.
-
Menu operations Menu item USB *8 IPOD SWITCH *9 (iPod/iPhone control) AUDIOBOOKS *9 PHONE *11 AUDIO APPLICATION BLUETOOTH *10 BT AUDIO SW *12 DELETE PAIR P. BOOK WAIT SET PINCODE AUTO CNNCT INITIALIZE SRC SELECT INFORMATION AM *14 AUX IN *14 BT AUDIO *15 SOFT VER Selectable setting (Initial: [XX]) DRIVECHANGE: Selects to change the drive when a device with multiple drives is connected to the USB input terminal (front/rear). [HEAD MODE]/IPOD MODE/APP MODE: For settings, ' page 9.
-
Remote controller Remote controller Caution: Preparing When you use the remote controller for the first time, pull out the insulation sheet. Insulation sheet Warning: For USA-California Only: This product contains a CR Coin Cell Lithium Battery which contains Perchlorate Material— special handling may apply. See www.dtsc.ca.gov/hazardouswaste/perchlorate Replacing the lithium coin battery Danger of explosion if battery is incorrectly replaced. Replace only with the same or equivalent type.
-
Additional information Additional information About audio files Playable files File extensions: MP3(.mp3), WMA(.wma), WAV(.wav) Bit rate: MP3 (MPEG-1): 32 kbps - 320 kbps MP3 (MPEG-2): 8 kbps - 160 kbps WMA: 5 kbps - 320 kbps WAV: Linear PCM at 705 kbps and 1 411 kbps Sampling frequency: MP3 (MPEG-1): 32 kHz, 44.1 kHz, 48 kHz MP3 (MPEG-2): 16 kHz, 22.05 kHz, 24 kHz WMA: 8 kHz - 48 kHz WAV: 44.1 kHz Channel: WMA/WAV: 1 ch/2 ch Variable bit rate (VBR) files.
-
Additional information About iPod/iPhone iPod/iPhone that can be connected to this unit: - iPod touch (4th generation) - iPod touch (3rd generation) - iPod touch (2nd generation) - iPod touch (1st generation) - iPod classic - iPod with video (5th generation)* - iPod nano (6th generation) - iPod nano (5th generation) - iPod nano (4th generation) - iPod nano (3rd generation) - iPod nano (2nd generation) - iPod nano (1st generation)* - iPhone 4S - iPhone 4 - iPhone 3GS - iPhone 3G - iPhone *
-
Troubleshooting Symptom 4 General No sound, sound interrupted or static noise. “MISWIRING CHK WIRING THEN RESET UNIT”/“WARNING CHK WIRING THEN RESET UNIT” appears on the display and no operations can be done. The unit does not work at all. Source cannot be selected. The correct characters are not displayed (e.g. album name). 4 FM/AM SSM automatic presetting does not work. 4 USB/iPod/iPhone “READING” keeps flashing on the display. Tracks/folders are not played back in the order you have intended.
-
Troubleshooting Symptom 4 Bluetooth “BT FRONT”/“BT REAR” cannot be selected. No Bluetooth device is detected. Pairing cannot be made. “PAIRING FULL” scrolls on the display when trying to perform pairing. Echo or noise occurs. Phone sound quality is poor. The unit does not respond when you try to copy the phonebook to the unit. Sound is being interrupted or skipped during playback of a Bluetooth audio player. The connected Bluetooth audio player cannot be controlled.
-
Specifications Specifications AUDIO AMPLIFIER SECTION Power Output Load Impedance 20 W RMS x 4 Channels at 4Ω and ≤ 1% THD+N 4Ω (4Ω to 8Ω allowance) Frequency Response Signal-to-Noise Ratio Line-Out, Subwoofer-Out Level/Impedance Output Impedance 40 Hz to 20 000 Hz 80 dBA (reference: 1 W into 4Ω) 2.
-
Muchas gracias por la compra de un producto JVC. Como primer paso, por favor lea detenidamente este manual para comprender a fondo todas las instrucciones y obtener un máximo disfrute de esta unidad. Para EE.UU. Este equipo se ha sometido a todo tipo de pruebas y cumple con las normas establecidas para dispositivos de Clase B, de conformidad con la Parte 15 de las reglas de la FCC (Comisión Federal de Comunicaciones).
-
Advertencia: Detenga el automóvil antes de operar la unidad. Precaución: Ajuste el volumen a un nivel que permita escuchar el ruido del tráfico y otros sonidos ambientales. La conducción con el volumen demasiado alto puede causar un accidente. Evite usar el dispositivo USB o iPod/iPhone si puede amenazar la seguridad de la conducción. Índice Preparativos ...........................................................
-
Preparativos Preparativos Cancelación de las demostraciones en pantalla La demostración en pantalla siempre se activa a menos que la cancele. 1 (Sostener) 2 Puesta en hora del reloj 1 (Sostener) 2 Seleccione . 3 Seleccione . (Configuración inicial) 3 Seleccione . 4 Ajuste la hora. 4 Pulse MENU para salir. 5 Ajuste los minutos. 6 Pulse MENU para salir. Operaciones básicas Información de pantalla Cambia la información en pantalla.
-
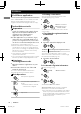
Operaciones básicas Panel de control Control remoto Ventanilla de visualización Toma de entrada AUX Disco de control Terminal de entrada USB Sensor remoto Apunte el control remoto directamente al sensor. NO exponga el sensor remoto a la luz solar directa. Si pulsa o mantiene pulsado(s) el(los) siguiente(s) botón(es)... Panel de control /SOURCE Disco de control (girar) Disco de control (pulse) EQ Control remoto — SOURCE VOL - / + — ) — SOUND — — / / / / Función general Se enciende.
-
Radio Radio Búsqueda de una emisora A B Seleccione o . Búsqueda automática. (Pulse) Búsqueda manual. (Sostener) “M” parpadea, a continuación, pulse el botón repetidamente. “ST” se enciende cuando se recibe una radiodifusión FM estéreo con una intensidad de señal suficiente. Almacenamiento de emisoras en la memoria Preajuste manual Preajuste automático (sólo FM) SSM (Memoria secuencial de las emisoras más fuertes) Se pueden preajustar hasta 18 emisoras para FM.
-
Radio Ajuste del temporizador de la radio Puede sintonizar una emisora preajustada en un momento concreto independientemente de la fuente actual. 1 (Sostener) 2 [OFF] ONCE DAILY - - -// Cancela el temporizador de la radio. Lo activa una vez. Lo activa diariamente. 3 Selecciona la emisora preajustada. -/ -<01> ... <18> para FM/ <01> ... <06> para AM 4 Ajusta la hora de activación.. 5 Pulse MENU para salir.
-
USB USB Reproducción de un dispositivo USB Terminal de entrada USB Cable USB 2.0 (no suministrado) o Cable USB desde la parte trasera de la unidad La fuente cambia a “USB” y se inicia la reproducción. Esta unidad puede reproducir archivos MP3/WMA/WAV guardados en un dispositivo de almacenamiento masivo USB (como una memoria USB y un reproductor de audio digital). Asegúrese de tener una copia de respaldo de todos los datos importantes.
-
iPod/iPhone Reproducción de un iPod/iPhone 3 Seleccione la pista que desea. Terminal de entrada USB Cable USB 2.0 (accesorio del iPod/iPhone) o Cable USB desde la parte trasera de la unidad Repita este paso hasta que se seleccione la pista que desee. Si el menú seleccionado contiene numerosas pistas, puede realizar una búsqueda rápida de la pista que desea girando rápidamente el disco de control o utilizando la Búsqueda Rápida (' página 11).
-
iPod/iPhone Aplicación de iPod/iPhone Puedes utilizar la aplicación original de JVC de esta unidad en . Para obtener más información, visite la página web de JVC: (sitio web solo en inglés). Pandora姞 internet radio Preparativos 1 Busque “Pandora” en el Apple iTunes App Store para encontrar e instalar la última versión de la aplicación Pandora姞 en su dispositivo. 2 En al aplicación de su dispositivo, inicie sesión y cree una cuenta de Pandora姞.
-
Búsqueda rápida Búsqueda rápida Si tiene muchas carpetas/pistas/contactos, puede buscarlos de forma rápida conforme al primer carácter (de la A a la Z, del 0 al 9 y OTHERS). 1 Entre en el menú de la lista o en el menú de “Manos libres”. USB (MP3/WMA/WAV) iPod/iPhone Guía telefónica Bluetooth Seleccione la lista deseada. Seleccione . 2 Seleccione el carácter deseado (de la A a la Z, del 0 al 9 y OTHERS).
-
Conexión Bluetooth姞 iPod/iPhone Conectando a esta unidad el adaptador USB Bluetooth KS-UBT1 y el micrófono que se suministran, el dispositivo Bluetooth puede funcionar utilizando esta unidad. Consulte el “Manual de instalación/ conexión” para obtener más detalles sobre cómo conectar el micrófono. Una vez conectado el adaptador USB Bluetooth, esta unidad siempre estará disponible para el emparejamiento. Consulte también las instrucciones suministradas con el dispositivo Bluetooth.
-
Conexión Bluetooth姞 3 Realice (A) o (B), dependiendo de lo que se desplace en la pantalla. Con algunos dispositivos Bluetooth, la secuencia de emparejamiento puede variar en algunos pasos que se describen a continuación.
-
Conexión Bluetooth姞 Conexión a una aplicación original de JVC La aplicación original de JVC está diseñado para visualizar el estado del receptor para automóviles de JVC y para efectuar operaciones sencillas de control en los smart phones de Android. Para operaciones de aplicaciones originales de JVC, visite el sitio web de JVC: (Sitio web sólo en inglés). 1 (Sostener) 2 Seleccione .
-
Teléfono móvil Bluetooth Ajustes durante una llamada Volumen del teléfono (00 — 50) [VOLUME 15]: los ajustes de volumen que se realicen durante una llamada no afectar a las demás fuentes. Nivel del micrófono (01— 03) [02]: conforme aumenta el número, el micrófono se vuelve más sensible. Notificación de mensaje de texto Cuando se recibe un mensaje de texto, la unidad emite un sonido y aparece “RCV MESSAGE”# “[Nombre del dispositivo]”. se debe configuar en .
-
Teléfono móvil Bluetooth Uso del reconocimiento de voz Esta unidad le permite utilizar las prestaciones de reconocimiento de voz del teléfono conectado. Aparece “NOT SUPPORT” si el teléfono conectado no es compatible con esta función. Borrar un contacto (nombre/ número de teléfono) Sólo cuando se configura a . (' página 17) 1 Entre en el menú de “Manos libres”. 1 Introducir el modo de reconocimiento de voz.
-
Teléfono móvil Bluetooth Uso del menú SETTINGS 1 Entre en el menú de “Manos libres”. 3 Repita este paso para realizar los ajustes necesarios. 2 Seleccione . Para volver al menú anterior, pulse . Para salir de un menú, pulse MENU. Los siguientes ajustes son aplicables al dispositivo emparejado. Si hay otro dispositivo emparejado, vuelva a realizar los ajustes. Opción del menú Ajuste seleccionable (Inicial: [XX]) P.
-
Reproductor deBluetooth audio Bluetooth Reproductor de audio Puesta en marcha del reproductor de audio Bluetooth A Seleccione o , dependiendo de la ubicación del adaptador USB Bluetooth KS-UBT1. Haga funcionar el reproductor de audio Bluetooth para que comience la reproducción. Las operaciones y las indicaciones en pantalla pueden variar según la disponibilidad del dispositivo conectado. .
-
Ajustes de color de la iluminación Zona Todo Zona Botones Zona Todo: incluye la zona Botones y la zona Pantalla. Zona Pantalla Almacenamiento de sus propios ajustes Selección del color preajustado Puede seleccionar un color preajustado para
-
Ajustes de brillo Ajustes de brillo Puede seleccionar el brillo que prefiera para
-
Operaciones de los menús 1 Operaciones de los menús 3 Repita el paso 2, si es necesario. (Sostener) La operación se cancela si no se efectúa ninguna operación durante aproximadamente 60 segundos. Para volver al menú anterior, pulse . Para salir del menú, pulse DISP o MENU.
-
Operaciones de los menús Opción del menú VOL ADJUST (Ajuste del volumen) AUDIO L/O MODE (Modo de salida de línea) SUB. W *6 (Subwoofer) SUB.W LPF *7 (Filtro de paso bajo de subwoofer) SUB.W LEVEL *7 (Nivel del subwoofer) HPF *7 (Filtro de paso alto) BEEP (Tono de pulsación de tecla) AMP GAIN (Factor de amplificación) Ajuste seleccionable (Inicial: [XX]) -05 — +05 [00]: preajuste el nivel de volumen de cada fuente, en comparación con el nivel de volumen de FM.
-
Operaciones de los menús Opción del menú USB *8 IPOD SWITCH *9 (Control del iPod/ iPhone) AUDIOBOOKS *9 PHONE *11 AUDIO APPLICATION BLUETOOTH *10 BT AUDIO SW *12 DELETE PAIR P. BOOK WAIT SET PINCODE AUTO CNNCT INITIALIZE SRC SELECT INFORMATION AM *14 AUX IN *14 BT AUDIO *15 Ajuste seleccionable (Inicial: [XX]) DRIVECHANGE: selecciona para cambiar la unidad cuando se conecta un dispositivo de múltiples unidades al terminal de entrada USB (delantero/ trasero).
-
Control remoto Control remoto Precaución: Preparación Cuando utilice el control remoto por primera vez, quite la lámina de aislamiento. Lámina de aislamiento Advertencia: Sólo para EE.UU.-California: Este producto contiene una batería de litio CR de tipo botón que contiene perclorato (puede requerirse una manipulación especial). Visite www.dtsc.ca.gov/hazardouswaste/perchlorate Sustitución de la pila botón de litio Peligro de explosión si se instala la pila de manera incorrecta.
-
Información adicional Información adicional Acerca de los archivos de audio Archivos reproducibles Extensiones de archivo: MP3(.mp3), WMA(.wma), WAV(.
-
Información adicional Nota sobre marcas comerciales y licencias Acerca del iPod/iPhone iPod/iPhone que se pueden conectar a esta unidad: - iPod touch (4ta. generación) - iPod touch (3ra. generación) - iPod touch (2da. generación) - iPod touch (1ra. generación) - iPod classic - iPod con Vídeo (5ta. generación)* - iPod nano (6ta. generación) - iPod nano (5ta. generación) - iPod nano (4ta. generación) - iPod nano (3ra. generación) - iPod nano (2da. generación) - iPod nano (1ra.
-
Localización de averías Síntoma 4 General No hay sonido, el sonido se interrumpe o se oye ruido estático. “MISWIRING CHK WIRING THEN RESET UNIT”/“WARNING CHK WIRING THEN RESET UNIT” en la pantalla y no se puede realizar ninguna operación. El receptor no funciona en absoluto. La fuente no se puede seleccionar. No se visualizan los caracteres correctos (por ej.: nombre del álbum). 4 FM/AM El preajuste automático SSM no funciona. 4 USB/iPod/iPhone “READING” permanece parpadeando en la pantalla.
-
Localización de averías Síntoma 4 Bluetooth “BT FRONT”/“BT REAR” no se puede seleccionar. No se detectó ningún dispositivo Bluetooth. No se puede realizar el emparejamiento. “PAIRING FULL” se desplaza por la pantalla cuando intenta realizar un emparejamiento. Hay eco o ruidos. La calidad del sonido telefónico es mala. La unidad no responde cuando intenta copiar la guía telefónica a la unidad. El sonido se interrumpe o salta durante la reproducción de un reproductor de audio Bluetooth.
-
Especificaciones Especificaciones SECCIÓN DEL AMPLIFICADOR DE AUDIO Potencia de salida Impedancia de carga Respuesta de frecuencias Relación señal a ruido Nivel/impedancia de salida de línea o salida del subwoofer Impedancia de salida 20 W RMS x 4 canales a 4Ω y ≤ 1% THD+N 4Ω (tolerancia de 4Ω a 8Ω) 40 Hz a 20 000 Hz 80 dBA (referencia: 1 W en 4Ω) 2,5 V/20 kΩ de carga (plena escala) ≤ 600Ω SECCIÓN DEL SINTONIZADOR FM Gama de frecuencias AM Sensibilidad útil 50 dB sensibilidad de silenciamiento Select
-
Merci pour avoir acheté un produit JVC. Veuillez lire attentivement toutes les instructions avant d’utiliser l’appareil afin de bien comprendre son fonctionnement et d’obtenir les meilleures performances possibles. Précautions : Los cambios o modificaciones no aprobados por la parte responsable del funcionamiento pueden anular la autoridad del usuario para utilizar el equipo.
-
Avertissement : Arrêtez la voiture avant de manipuler l’appareil. Attention : Ajustez le volume de façon à pouvoir entendre les sons extérieurs à la voiture. Conduire avec le volume trop haut peut être la cause d’un accident. Évitez d’utiliser un périphérique USB ou un iPod/ iPhone s’il peut gêner une conduite en toute sécurité. Précautions sur le réglage du volume : Les appareils numériques (USB) produisent très peut de bruit par rapport aux autres sources.
-
Préparation Préparation Annulation des démonstrations des affichages Les démonstrations d’affichage sont toujours activées sauf si vous les annulez. 1 (Maintenez pressée) 2 Réglage de l’horloge 1 (Maintenez pressée) 2 Choisissez . 3 Choisissez . (Réglage initial) 3 Choisissez . 4 Ajustez les heures. 4 Appuyez sur MENU pour quitter. 5 Ajustez les minutes. 6 Appuyez sur MENU pour quitter. Opérations de base Informations à l’écran Change l’information sur l’affichage.
-
Opérations de base Panneau de commande Télécommande Fenêtre d’affichage Prise d’entrée AUX Molette de commande Prise d’entrée USB Capteur de télécommande Visez la télécommande directement en direction du capteur. N’EXPOSEZ PAS à la lumière directe du soleil. Quand vous appuyez ou maintenez pressées les touches suivantes...
-
Radio Radio Recherche d’une station A B Choisissez ou . Recherche automatique. (Appuyez sur la touche) Recherche manuelle. (Maintenez pressée) “M” clignote, puis appuyez sur la touche répétitivement. “ST” s’allume lors de la réception d’une émission FM stéréo avec un signal suffisamment fort. Préréglage automatique (FM automatique) Mémorisation de stations Préréglage manuel Vous pouvez prérégler un maximum de 18 stations pour FM et de 6 stations pour AM. Pendant l’écoute d’une station...
-
Radio Réglage du temporisateur de la radio Vous pouvez accorder une station préréglée à un moment donné indépendamment de la source actuelle. 1 (Maintenez pressée) 2 [OFF] ONCE DAILY - - -// Annule le temporisateur de la radio. S’active une seule fois. S’active tous les jours. 3 Sélectionnez la station préréglée. -/ -<01> ... <18> pour FM/ <01> ... <06> pour AM 4 Réglez l’heure d’activation.. 5 Appuyez sur MENU pour quitter.
-
USB USB Lecture d’un périphérique USB Prise d’entrée USB Câble USB 2.0 (non fourni) ou Câble USB à partir de l’arrière de l’appareil La source change en “USB” et la lecture démarre. Cet appareil peut reproduire les fichiers MP3/WMA/WAV mémorisées dans un périphérique USB à mémoire de grande capacité (tel qu’une mémoire USB ou un lecteur audio numérique). Assurez-vous que toutes les données importantes ont été sauvegardées.
-
iPod/iPhone Lecture d’un iPod/iPhone 3 Choisissez la plage souhaitée. Prise d’entrée USB Câble USB 2.0 (accessoire du iPod/iPhone) ou Câble USB à partir de l’arrière de l’appareil La source change en “IPOD-FRONT/IPOD-REAR” et la lecture démarre. Sélection du mode de contrôle (Maintenez pressée) #
// HEAD Commande la lecture du iPod à travers cet MODE appareil. IPOD Commande la lecture du iPod provenant MODE du iPod/iPhone.
-
iPod/iPhone Application iPod/iPhone Vous pouvez exécuter une application originale de JVC avec cet appareil dans . Pour plus de détails, veuillez vous rendre sur le site Web de JVC : (Site web en anglais uniquement). Radio Internet Pandora姞 Préparation 1 Cherchez “Pandora” dans l’App Store iTunes d’Apple pour trouver et installer la version la plus récente de l’application Pandora姞 dans votre appareil.
-
Recherche rapide Recherche rapide Si vous avez beaucoup de dossiers/plages/contacts, vous pouvez les parcourir rapidement en saisissant le caractère initial (A à Z, 0 à 9 et OTHERS). 1 Accédez au menu de la liste ou au menu “Mains libres”. USB (MP3/WMA/WAV) iPod/iPhone Répertoire d’adresses Bluetooth Choisissez la liste souhaitée. Choisissez . 2 Sélectionnez le caractère de votre choix (A à Z, 0 à 9 et OTHERS). 3 Sélectionnez le dossier/la plage/le contact de votre choix.
-
Connexion Bluetooth姞 iPod/iPhone En connectant l’adaptateur USB Bluetooth KS-UBT1 fourni et le microphone à cet appareil, vous pouvez utiliser un périphérique Bluetooth sur cet appareil. Consultez le “Manuel d’installation/raccordement” pour plus de détails sur comment connecter le microphone. Une fois que l’adaptateur USB Bluetooth est attaché, cet appareil est toujours disponible pour le pairage. Référez-vous aussi aux instructions fournies avec le périphérique Bluetooth.
-
Connexion Bluetooth姞 3 Suivez les instructions (A) ou (B) en fonction de ce qui apparaît à l’affichage. Pour les périphériques Bluetooth, la séquence de pairage peut différer des étapes décrites ci-dessous. (A) Si “[Nom du périphérique]”#“XXXXXX” (B) Si “[Nom du périphérique]”#“VOL – YES” #“VOL – YES”#“BACK – NO” défile sur #“BACK – NO” défile sur l’affichage, l’affichage, Sélectionnez “YES” pour commencer le “XXXXXX” est un mot de passe à 6 chiffres créé pairage. au hasard au cours de chaque pairage.
-
Connexion Bluetooth姞 Conexión a una aplicación original de JVC La aplicación original de JVC está diseñado para visualizar el estado del receptor para automóviles de JVC y para efectuar operaciones sencillas de control en los smart phones de Android. Para operaciones de aplicaciones originales de JVC, visite el sitio web de JVC : (Sitio web sólo en inglés). 1 (Maintenez pressée) 2 Choisissez .
-
Téléphone portable Bluetooth Réglages pendant un appel Volume du téléphone (00 — 50) [VOLUME 15] : les ajustements de volume réalisés pendant un appel n’auront pas d’incidence sur les autres sources. Niveau du microphone (01— 03) [02] : plus le numéro augmente, plus le microphone devient sensible. Notification de message textuel Lorsqu’un message textuel est reçu, l’appareil sonne et “RCV MESSAGE”#“[Nom du périphérique]” s’affiche. doit être réglé sur .
-
Téléphone portable Bluetooth Utilisation du système de reconnaissance vocale Vous pouvez utiliser le système de reconnaissance vocale du téléphone connecté à cet appareil. “NOT SUPPORT” apparaît si le téléphone connecté ne prend pas en charge cette fonction. 1 Accéder au mode de reconnaissance vocale. . Si un seul téléphone est connecté, Suppression d’un contact (nom/ numéro de téléphone) Uniquement quand est réglé sur . (' page 17) 1 Accédez au menu “Mains libres”.
-
Téléphone portable Bluetooth Utilisation du menu SETTINGS 1 Accédez au menu “Mains libres”. 3 Répétez cette étape pour effectuer les réglages nécessaires. 2 Choisissez . Pour revenir au menu précédent, appuyez sur . Pour quitter le menu, appuyez sur MENU. Les réglages suivants sont applicables aux périphériques appariés. Si un autre périphérique est apparié, réalisez de nouveau les réglages. Article de menu Réglages pouvant être choisis (Réglage initial : [XX]) P.
-
Lecteur audio Bluetooth Lecteur audio Bluetooth Reproduction d’un lecteur audio Bluetooth A Sélectionnez ou en fonction de l’emplacement de l’adaptateur USB Bluetooth KS-UBT1. Utilisez le lecteur audio Bluetooth pour démarrer la lecture. Les opérations et les indications de l’affichage peuvent différer en fonction de leur disponibilité sur le périphérique connecté. . RANDOM Opérations de base RND OFF Annule la lecture aléatoire. Démarre ou reprend la lecture.
-
Réglages de la couleur d’éclairage Toutes les zones Zone des touches Zone d’affichage Sélection de la couleur préréglée Vous pouvez choisir une couleur prédéfinie pour
-
Réglages la luminosité Réglages de lade luminosité Vous pouvez sélectionner la luminosité de votre choix pour
-
Utilisation des menus 1 (Maintenez pressée) Si aucune opération n’est effectuée pendant environ 60 secondes, l’opération est annulée. Utilisation des menus 3 Répéter l’étape 2 si nécessaire. Pour revenir au menu précédent, appuyez sur . Pour quitter le menu, appuyez sur DISP ou MENU.
-
Utilisation des menus Article de menu VOL ADJUST (Réglage du volume) AUDIO L/O MODE (Mode de sortie de ligne) SUB. W *6 (Caisson de grave) SUB.W LPF *7 (Filtre passe bas de caisson de grave) SUB.W LEVEL *7 (Niveau de caisson de grave) HPF *7 (Filtre passe haut) BEEP (Tonalité de touche) AMP GAIN (Gain d’amplificateur) Réglages pouvant être choisis (Réglage initial : [XX]) -05 — +05 [00] : prérègle le niveau d’ajustement du volume de chaque source, en comparaison avec le niveau de volume FM.
-
Utilisation des menus Article de menu USB *8 IPOD SWITCH *9 (Commande d’un iPod/iPhone) AUDIOBOOKS *9 PHONE *11 AUDIO APPLICATION BLUETOOTH *10 BT AUDIO SW *12 DELETE PAIR P. BOOK WAIT SET PINCODE AUTO CNNCT INITIALIZE SRC SELECT INFORMATION AM *14 AUX IN *14 BT AUDIO *15 SOFT VER Réglages pouvant être choisis (Réglage initial : [XX]) DRIVECHANGE : choisissez ce réglage pour changer le périphérique quand plusieurs périphériques sont connectés à la prise d’entrée USB (avant/arrière).
-
Télécommande Télécommande Attention : Préparation Lorsque vous utilisez la télécommande pour la première fois, retirez la feuille d’isolation. Feuille d’isolation Pour les États-Unis/la Californie uniquement : Ce produit comprend une pile bouton CR au lithium contenant du perchlorate : une manipulation spéciale peut s’avérer nécessaire. Veuillez consulter : www.dtsc.ca.
-
Informations complémentairesInformations complémentaires À propos des fichiers audio Fichiers compatibles Extensions de fichiers : MP3(.mp3), WMA(.wma), WAV(.wav) Débit binaire : MP3 (MPEG-1) : 32 kbps à 320 kbps MP3 (MPEG-2) : 8 kbps à 160 kbps WMA : 5 kbps à 320 kbps WAV : Linear PCM à 705 kbps et 1 411 kbps Fréquence d’échantillonnage : MP3 (MPEG-1) : 32 kHz, 44,1 kHz, 48 kHz MP3 (MPEG-2) : 16 kHz, 22,05 kHz, 24 kHz WMA : 8 kHz à 48 kHz WAV : 44,1 kHz Canal : WMA/WAV : 1 ca./2 ca.
-
Informations complémentaires Notification de marque de commerce et de licence À propos d’iPod/iPhone iPod/iPhone qui peuvent être raccordés à cet appareil : - iPod touch (4e Génération) - iPod touch (3e Génération) - iPod touch (2e Génération) - iPod touch (1e Génération) - iPod classic - iPod avec vidéo (5e Génération)* - iPod nano (6e Génération) - iPod nano (5e Génération) - iPod nano (4e Génération) - iPod nano (3e Génération) - iPod nano (2e Génération) - iPod nano (1e Génération)* - iPho
-
Guide de dépannage Symptôme 4 Généralités Pas de son, son coupé ou bruit statique. “MISWIRING CHK WIRING THEN RESET UNIT”/“WARNING CHK WIRING THEN RESET UNIT” apparaît sur l’affichage et aucune opération ne peut être réalisée. Cet appareil ne fonctionne pas du tout. Impossible de sélectionner la source. Les caractères corrects ne sont pas affichés (ex. : nom de l’album). 4 FM/AM Le préréglage automatique SSM ne fonctionne pas. 4 USB/iPod/iPhone “READING” continue de clignoter sur l’affichage.
-
Guide de dépannage Symptôme 4 Bluetooth Vous ne pouvez pas choisir “BT FRONT”/“BT REAR”. Aucun périphérique Bluetooth n’est détecté. Le pairage ne peut pas être réalisé. “PAIRING FULL” défile sur l’affichage lorsque l’on tente de faire le pairage. Il y a un écho ou du bruit. Le son du téléphone est de mauvaise qualité. L’appareil ne répond pas quand vous essayez de copier le répertoire d’adresses. Le son est interrompu ou saute pendant la lecture d’un lecteur audio Bluetooth.
-
Spécifications Spécifications SECTION DE L’AMPLIFICATEUR AUDIO Puissance de sortie Impédance de charge Réponse en fréquence Rapport signal sur bruit Niveau de sortie de ligne, niveau de sortie du caisson de grave/Impédance Impédance de sortie 20 W RMS x 4 canaux à 4Ω et ≤ 1% THD+N 4Ω (4Ω à 8Ω admissible) 40 Hz à 20 000 Hz 80 dBA (référence : 1 W en 4Ω) 2,5 V/20 kΩ en charge (pleine échelle) ≤ 600Ω SECTION DU TUNER FM Plage de fréquences AM Sensibilité utile Sensibilité utile à 50 dB Sélectivité de ca
-
Having TROUBLE with operation? Please reset your unit Refer to page of How to reset your unit Still having trouble?? USA ONLY Call 1-800-252-5722 http://www.jvc.