KD-X561DBT KD-X560BT DIGITAL MEDIA RECEIVER INSTRUCTION MANUAL • Updated information (the latest Instruction Manual, etc.) is available from . © 2019 JVC KENWOOD Corporation KD-X561DBT_E_1En.
Contents Before use................................................................................. 2 Precautions................................................................................................................2 How to read this manual...................................................................................2 Getting Started....................................................................... 3 Initial settings......................................................................
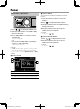
Getting Started Initial settings Clock settings ÑÑSynchronizing the clock time with FM RDS Activate [RDS Clock Sync]. See “Tuner function settings” (P.9). ÑÑAdjusting the clock manually 1 Turn the ignition key of your car to ACC. The unit is turned on. 2 Turn the volume knob to select the item to set (see the table below), then press the knob to make a selection. ✎✎NOTE • Deactivate [RDS Clock Sync] before adjusting the clock. See “Tuner function settings” (P.9).
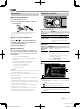
Basics Basics Volume knob (turn/press) Detach button Common operations Select a source 1 Press < > to display the HOME screen. HOME screen appears. ÑÑTurning on the power 1 Press < >. 2 Turn the volume knob to select the source, then ÑÑTurning off the power 1 Press and hold < Remote sensor Monitor press the knob. 1 >. ÑÑAdjusting the volume 2 3 4 5 6 7 1 Turn the volume knob. ÑÑMutes the sound 1 Press and hold the volume knob. appears when the mute function is active.
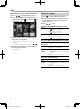
USB USB Preparation Playback operations ÑÑConnecting a USB device 1 Open the front port cover. 2 Connect the USB device with the USB cable (sold separately). Audio files/Video files The unit reads the device and playback starts. • USB maximum power supply current : DC 5 V = 1 A ÑÑTo disconnect the USB device: 1 Press < > to display the HOME screen. 2 Turn the volume knob to select other than [USB], then press the knob. 3 Detach the USB device.
USB ÑÑSelecting a track in a list (Searches file) 1 Press < > to display the LIST screen. 2 Press / to select whether you search by audio files [ picture files [ ]. ], video files [ ] or Function settings 1 Press < > to display the function menu. 2 Turn the volume knob to select the item to set (see the table below), then press the knob to make a selection. 3 Press < 3 Turn the volume knob to select the desired folder, then press the knob. • When you select a folder its contents are displayed.
iPod/iPhone iPod/iPhone Preparation ÑÑSource screen ÑÑConnecting iPod/iPhone 1 Open the front port cover. 2 Connect the iPod/iPhone using the KS-U62 2 (optional accessory). 1 The unit reads the device and playback starts. • USB maximum power supply current : DC 5 V = 1 A ÑÑTo disconnect the iPod/iPhone 1 Press < > to display the HOME screen. 2 Turn the volume knob to select other than [iPod], then press the knob. 3 Detach the iPod/iPhone.
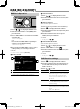
Tuner Tuner ÑÑStore a station Tuner basic operations You can preset 15 stations for FM and 15 stations for AM. 1 Select the station you wish to store in the memory. 2 Press < > to display the function menu. 3 Turn the volume knob to select [Manual Store], then press the knob. 1 Press < > to display the HOME screen. 2 Turn the volume knob to select [FM] or [AM], then press the knob. 4 Turn the volume knob to select a preset number, then press the knob.
Tuner Tuner function settings 1 Press < > to display the function menu. 2 Turn the volume knob to select the item to set (see the table below), then press the knob to make a selection. 3 Press < Manual Store Auto Store Local Seek Area Mono *1 RDS *1 PTY *1 AF *1 TA *1 RDS Clock Sync *1 >. Stores a station manually. While listening to a station you want to store, turn the volume knob to select a preset number, then press the knob.
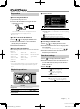
DAB (KD-X561DBT) DAB (KD-X561DBT) ÑÑSelect a service DAB Basic Operation 1 Press < > to display the LIST screen. 2 Turn the volume knob to select a service, then press the knob. ÑÑStore a services You can store up to 15 services 1 Press < > to display the HOME screen. 2 Turn the volume knob to select [DAB], then press the knob. 3 Press / to search for an ensemble automatically. “Auto Seek” appears. (or) Press and hold / repeatedly to search for an ensemble manually. “Manual Seek” appears.
DAB (KD-X561DBT) Setup Priority Related Service Antenna Power PTY Search Zoom DLS SERVICE If the same service is provided by Radio Data System when reception of the service being provided by Digital Radio becomes poor, automatically switches to Radio Data System. “ON”, “OFF” (Default) When you select ON, the unit switches to a related service (if exists) when a DAB service network is not available. “ON”, “OFF” (Default) Sets power supply to the Digital Radio antenna.
Bluetooth® smartphone Bluetooth® smartphone ÑÑAbout the Bluetooth smartphone and Bluetooth audio player Receive a call This unit conforms to the following Bluetooth specifications: Version Bluetooth Ver.4.
Bluetooth® smartphone Make a phone call Playing Bluetooth Audio Device 1 Press < 1 Press < > to display the HOME screen. 2 Turn the volume knob to select [BT Audio], then > to enter Bluetooth mode. press the knob. To Do this Play/pause Press the volume knob. Select a file Press / repeatedly. Fast-backward/ Press and hold /. Fast-forward 2 Press / to select a method to make a call ([ ]: from the calls history/[ the phone book).
Bluetooth smartphone Setup Function settings Settings 1 Press < > to display the function menu. 2 Turn the volume knob to select the item to set (see the table below), then press the knob to make a selection. 3 Press < Repeat Random > to exit. All: Repeats all files. ( indicator lights up.) One: Repeats current file. ( indicator lights up.) OFF: Repeat off. OFF: Normal playback. All: Randomly plays all files. ( indicator lights up.) 1 Press and hold < > to display the settings.
Setup Bluetooth Settings X’over Sync ON/OFF: Activates or deactivates the Phonebook synchronization of the phonebook in the connected smartphone with the unit. BT Displays the information about the Information connected Bluetooth device (device name, phone name, and mac address). Sound settings 1 Press < Delay You can set the crossover frequency of speakers. 1) Press / to select the speaker. 2) Press the volume knob to select the item. 3) Turn the volume knob to adjust the value. 4) Press < >.
Remote control This unit can be operated using the remote control. The remote control RM-RK258 (optional accessory) can be used. Functions of the remote control buttons • Aim the remote control directly at the remote sensor on the faceplate. • DO NOT expose the remote sensor to bright light (direct sunlight or artificial lighting). SRC VOL + – ATT DISP FM/R AM/S E 2 F 3 ANGLE Û DIRECT ASPECT Numeric Keypad CLR ENT Switches to the source to be played. Adjusts the volume.
Installation Installation Before installation Before installation of this unit, please note the following precautions. #WARNINGS • If you connect the ignition wire (red) and the battery wire (yellow) to the car chassis (ground), you may cause a short circuit, that in turn may start a fire. Always connect those wires to the power source running through the fuse box. • Do not cut out the fuse from the ignition wire (red) and the battery wire (yellow).
Installation ÑÑInstallation procedure ÑÑTrim plate 1) To prevent a short circuit, remove the key from the ignition and disconnect the ¤ terminal of the battery. 2) Make the proper input and output wire connections for each unit. 3) Connect the wire on the wiring harness. 4) Take Connector B on the wiring harness and connect it to the speaker connector in your vehicle. 5) Take Connector A on the wiring harness and connect it to the external power connector on your vehicle.
Installation ÑÑRemoving the trim plate ÑÑWiring harness connector function guide 1) Use the extraction key (accessory 4) to lever out the four tabs (two on the top part, two on the bottom part).
Installation ÑÑConnecting wires to terminals Connect to the vehicle’s parking brake detection switch harness. PRK SW Light Green (Parking sensor wire) For best safety, be sure to connect the parking sensor. REVERSE Purple/White (Reverse sensor wire) STEERING WHEEL REMOTE INPUT Connect to vehicle’s reverse lamp harness when using the optional rear view camera.
About this Unit About this Unit Maintenance More information ÑÑCleaning the Unit ÑÑPlayable Audio files If the front panel of this unit is stained, wipe it with a dry soft cloth such as a silicon cloth. If the front panel is stained badly, wipe the stain off with a cloth moistened with neutral cleaner, then wipe it again with a clean soft dry cloth. Audio format Bit rate/ Bit count MP3 (.mp3) 32 – 320kbps, VBR WMA (.wma) 16 – 384kbps AAC-LC (.m4a) 16 – 448kbps WAV (.wav) 16/24 bit FLAC (.
About this Unit Troubleshooting What appears to be trouble is not always serious. Check the following points before calling a service center. • For operations with the external components, refer also to the instructions supplied with the adapters used for the connections (as well as the instructions supplied with the external components). ÑÑGeneral No sound comes out of the speakers. • Adjust the volume to the optimum level. • Check the cords and connections. The unit does not work at all.
About this Unit Specifications ÑÑMonitor section Picture Size : 3.0 inch display Drive System : TFT active matrix system Number of Pixels : 320H x 240V Aspect Ratio : 16:9 (wide) Back Lighting : LED ÑÑUSB interface section USB Standard : USB 2.0 High Speed File System : FAT 16/ 32, NTFS Maximum Power Supply Current : DC 5 V 1.0 A Frequency Response : 20 – 20,000 Hz Audio Decoder : MP3/ WMA/ AAC/ WAV/ FLAC/ OGG Video Decoder : MPEG1/ MPEG2/ MPEG4/ H.
About this Unit ÑÑVideo section Video Input Level : 1.0 Vp-p/ 75 Ω ÑÑAUX section External Audio Max input Level : 1.5 V/ 25 kΩ ÑÑAudio section Maximum Power (Front & Rear) : 45 W × 4 Full Bandwidth Power (1% THD) : 16 W × 4 Preout Impedance : 10 kΩ Preout Level/Load : 2.0 V/10 kΩ Speaker Impedance :4–8Ω ÑÑGeneral Operating Voltage : 12 V DC car battery Installation Dimensions (W × H × D) : 182 × 52 × 117 mm (with sleeve) Weight : 0.
About this Unit • libFLAC Copyright (C) 2000-2009 Josh Coalson Copyright (C) 2011-2013 Xiph.Org Foundation ––Redistribution and use in source and binary forms, with or without modification, are permitted provided that the following conditions are met: ––Redistributions of source code must retain the above copyright notice, this list of conditions and the following disclaimer.
ÑÑInformation on Disposal of Old Electrical and Electronic Equipment and Batteries (applicable for EU countries that have adopted separate waste collection systems) Products and batteries with the symbol (crossed-out wheeled bin) cannot be disposed as household waste. Old electrical and electronic equipment and batteries should be recycled at a facility capable of handling these items and their waste byproducts. Contact your local authority for details in locating a recycle facility nearest to you.
Magyar JVC KENWOOD ezennel kijelenti, hogy a KD-X561DBT/ KD-X560BT rádióberendezés megfelel a 2014/53/EU irányelvnek. Az EU konformitási nyilatkozat teljes szövege az alábbi weboldalon érhető el: Hrvatski JVC KENWOOD ovim izjavljuje da je radio oprema KD-X561DBT/ KD-X560BT u skladu s Direktivom 2014/53/EU.
KD-X561DBT_E_1En.