
Instruction Manual (Europe)
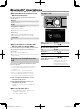


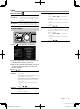


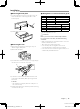
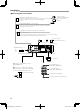
Table Of Contents

19
English |
Installation
Continued on the next page...
Ñ Removing the trim plate
1) Use the extraction key (accessory 4) to lever out
the four tabs (two on the top part, two on the
bottom part).
4
2) Pull the trim plate forward.
Ñ Removing the unit
1) Remove the trim plate by referring to step 1 in
“Removing the trim plate”.
2) Detach the faceplate.
1
2
3) Insert the two extraction key (accessory 3) deeply
into the slots on each side, as shown.
3
4) Lower the removal tool toward the bottom, and
pull out the unit halfway while pressing towards
the inside.
✎ NOTE
• Be careful to avoid injury from the catch pins on
the extraction key.
5) Pull the unit all the way out with your hands, being
careful not to drop it.
Ñ Wiring harness connector function guide
Pin Color and function
A-4 Yellow Battery
A-5 Blue/White
[1]
Power Control
A-7 Red Ignition (ACC)
A-8 Black Earth (Ground) Connection
B-1/ B-2 Purple (+) / Purple/Black (–) Rear Right
B-3/ B-4 Gray (+) / Gray/Black (–) Front Right
B-5/ B-6 White (+) / White/Black (–) Front Left
B-7/ B-8 Green (+) / Green/Black (–) Rear Left
[1]
Max. 150mA, 12V
• Speaker Impedance: 4-8 Ω
! CAUTION
Before you connect the commercially available
ISO connectors to the unit, check the following
condition:
• Make sure that the pin assignment of the connector
matches with the JVC unit.
• Take extra notice of the power wire.
• In case battery wire and ignition wire are not
corresponding then change them accordingly.
• In case the car does not have an ignition wire, use a
commercially available interface.
KD-X561DBT_E_1En.indd 19 2021/06/11 14:35