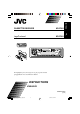
«‘∑¬ÿ‡§√◊ËÕ߇≈Ëπ‡∑ª KS-F185 ENGLISH KS-F185 ‰∑¬ CASSETTE RECEIVER For installation and connections, refer to the separate manual. °√ÿ≥“¥Ÿ§ŸË¡◊Õ∑’Ë·¬°µË“ßÀ“° „π°“√µ‘¥µ—Èß·≈–°“√‡™◊ËÕ¡µËÕ INSTRUCTIONS §”·π–π” GET0225-001A [U/UH] THCover_KS-F185[U_UH]f.
ENGLISH Thank you for purchasing a JVC product. Please read all instructions carefully before operation, to ensure your complete understanding and to obtain the best possible performance from the unit. CONTENTS How to reset your unit ............................... 2 TAPE OPERATIONS ........................ 9 LOCATION OF THE BUTTONS ............ 3 Listening to a cassette .............................. Control panel ............................................. SOUND ADJUSTMENTS ...................
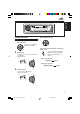
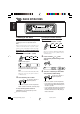
LOCATION OF THE BUTTONS ENGLISH Control panel Display window 1 2 3 4 5 6 7 8 9 p q w (standby/on/attenuator) button S BASS (super bass) button 0 (eject) button Display window Cassette compartment 1/¡ PROG (program) button SCM (sound control memory) button FM AM button +/– buttons SEL (select) button Number buttons MO (monaural) button • Also functions as SSM buttons when pressed together with DISP (display) button.
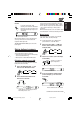
ENGLISH BASIC OPERATIONS 1 3 2 Turning on the power 1 3 Adjust the volume. Turn on the power. To increase the volume Note on One-Touch Operation: When you select a source in step 2 below, the power automatically comes on. You do not have to press this button to turn on the power. 2 To decrease the volume Select the source. Volume level appears. 4 To operate the tuner (FM or AM), see pages 6 – 8. To operate the EX (extra) button, see page 8. To play a tape, see page 9.
ENGLISH 4 Setting the clock 1 Finish the setting. Press and hold SEL (select) for more than 2 seconds. “CLOCK H” or “CLOCK M” appears on the display. To check the current clock time or change the display mode 2 Set the hour. 1 Select “CLOCK H” (hour) if not shown on the display. 2 Adjust the hour. 1 Press DISP (display) repeatedly.
ENGLISH RADIO OPERATIONS Listening to the radio Searching for a station manually: Manual search You can use either automatic searching or manual searching to tune in to a particular station. 1 FM1 Note: When a cassette is in the cassette compartment, you cannot select the tuner. Be sure to eject the cassette from the cassette compartment to listen to the radio. FM2 FM3 FM3 Note: This receiver has three FM bands (FM1, FM2, FM3). You can use any one of them to listen to an FM broadcast.
Press MO (monaural), while listening to an FM stereo broadcast. Each time you press the button, the MO indicator lights up and goes off alternately. Local FM stations with the strongest signals are searched and stored automatically in the band number you have selected (FM1, FM2, or FM3). These stations are preset in the number buttons —No.1 (lowest frequency) to No.6 (highest frequency). When automatic preset is over, the station stored in number button 1 will be automatically tuned in.
ENGLISH 4 Repeat the above procedure to store other stations into other preset numbers. Notes: • A previously preset station is erased when a new station is stored in the same preset number. • Preset stations are erased when the power supply to the memory circuit is interrupted (for example, during battery replacement). If this occurs, preset the stations again. 1 Select the band (FM1 – 3, AM) you want to store stations into (in this example, FM1).
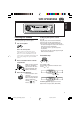
ENGLISH TAPE OPERATIONS Listening to a cassette You can play back type I (normal) tapes. 1 Turn on the power. Note on One-Touch Operation: When a cassette is already in the cassette compartment, tape play starts automatically. However, it is not recommended to leave the cassette in the compartment when turning off the power. It may damage the tape head and the cassette. 2 Press 0. Tape play stops, the cassette automatically ejects from the cassette compartment.
ENGLISH SOUND ADJUSTMENTS 2 Adjusting the sound You can adjust the sound characteristics to your preference. 1 Adjust the level. To increase the level Select the item you want to adjust. Each time you press the button, the adjustable items change as follows: Indication BAS TRE (bass) (treble) Ex.: When you select “TRE” (treble) FAD (fader) VOL BAL (volume) (balance) To do: To decrease the level 3 Repeat steps 1 and 2 to adjust the other items. Range BAS (Bass) Adjust the bass.
1 You can select a preset sound adjustment suitable to the music genre. Call up the sound mode you want to adjust. • See on the left column for details. ENGLISH Selecting preset sound modes Select the sound mode you want. Each time you press the button, the sound mode changes as follows: SCM OFF BEAT SOFT 2 To adjust the bass or treble level. 1 Select “BAS” (bass) or “TRE” (treble). POP 2 Adjust the level. Ex.: When you select “BEAT” Indication For: Preset values BAS TRE S.
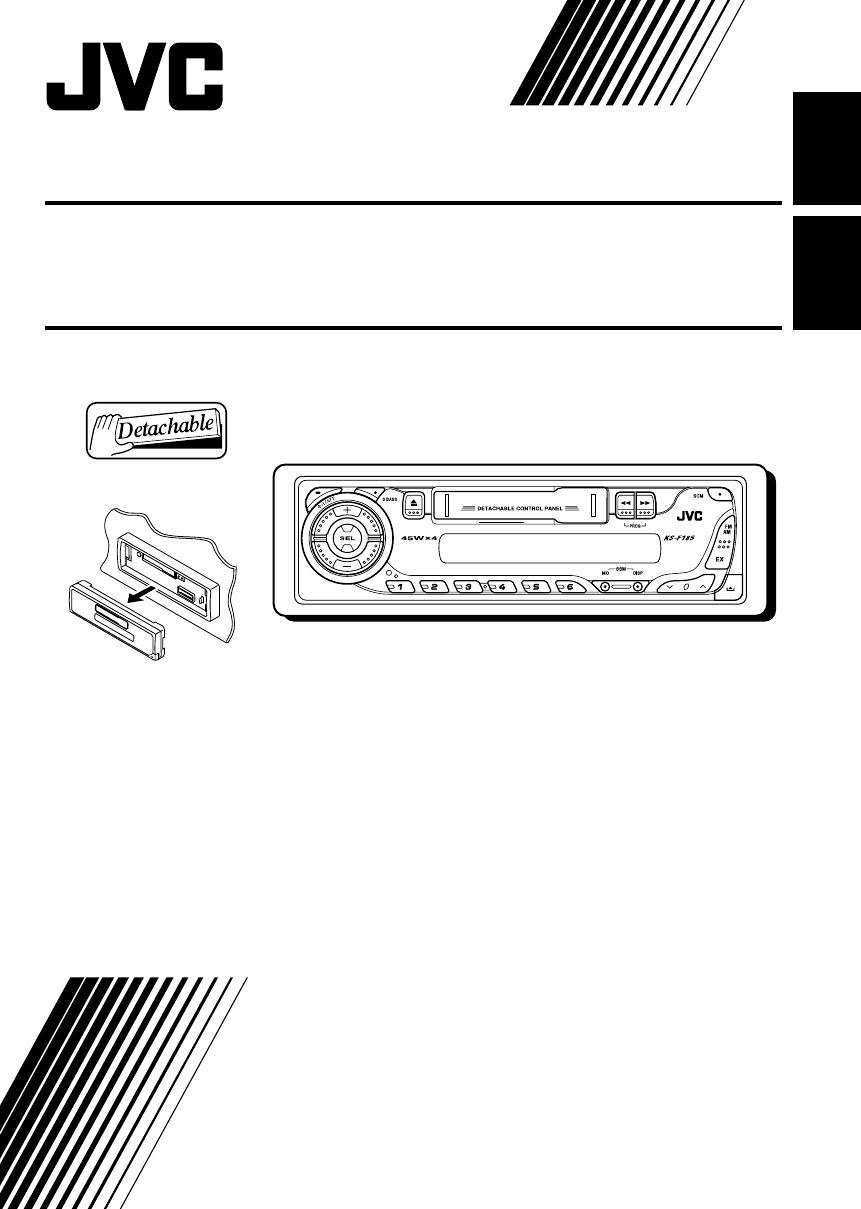
ENGLISH DETACHING THE C0NTROL PANEL You can detach the control panel when leaving the car. When detaching or attaching the control panel, be careful not to damage the connectors on the back of the control panel and on the panel holder. Attaching the control panel 1 Insert the left side of the control panel into the groove on the panel holder. Detaching the control panel Before detaching the control panel, be sure to turn off the power. 1 Unlock the control panel.
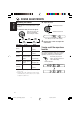
What appears to be trouble is not always serious. Check the following points before calling a service center. Symptoms Causes Tape Playback FM/AM General • Sound cannot be heard from the speakers. Remedies The volume level is set to the minimum level. Adjust it to the optimum level. Connections are incorrect. Check the cords and connections. • This unit does not work at all. The built-in microcomputer may have functioned incorrectly due to noise, etc.
ENGLISH MAINTENANCE This unit requires very little attention, but you will be able to extend the life of the unit if you follow the instructions below. To keep the tape clean To clean the head • Always store the cassettes in their storage cases after use. • Do not store cassettes in the following places: – Subject to direct sunlight – With high humidity – At extremely hot temperatures • Clean the heads after every 10 hours of use using a wet-type head cleaning tape (available at an audio store).
AUDIO AMPLIFIER SECTION CASSETTE DECK SECTION Maximum Power Output: Front: 45 W per channel Rear: 45 W per channel Continuous Power Output (RMS): Front: 17 W per channel into 4 Ω, 40 Hz to 20 000 Hz at no more than 0.8% total harmonic distortion. Rear: 17 W per channel into 4 Ω, 40 Hz to 20 000 Hz at no more than 0.8% total harmonic distortion.
EN, TH 0604DTSMDTJEIN © 2004 VICTOR COMPANY OF JAPAN, LIMITED THCover_KS-F185[U_UH]f.
KS-F185/KS-F185S/KS-F185G ENGLISH RADIO KASET KS-F185/KS-F185S/KS-F185G INDONESIA FRANÇAIS CASSETTE RECEIVER For installation and connections, refer to the separate manual. Untuk instalasi dan penyambungan, lihat buku pedoman terpisah. INSTRUCTIONS BUKU PETUNJUK GET0225-003A [UN] Cover003_KS-F185_S_G[UN]f.
ENGLISH Thank you for purchasing a JVC product. Please read all instructions carefully before operation, to ensure your complete understanding and to obtain the best possible performance from the unit. CONTENTS How to reset your unit ............................... 2 TAPE OPERATIONS ........................ 9 LOCATION OF THE BUTTONS ............ 3 Listening to a cassette .............................. Control panel ............................................. SOUND ADJUSTMENTS ...................
LOCATION OF THE BUTTONS ENGLISH Control panel Display window 1 2 3 4 5 6 7 8 9 p q w (standby/on/attenuator) button S BASS (super bass) button 0 (eject) button Display window Cassette compartment 1/¡ PROG (program) button SCM (sound control memory) button FM AM button +/– buttons SEL (select) button Number buttons MO (monaural) button • Also functions as SSM buttons when pressed together with DISP (display) button.
ENGLISH BASIC OPERATIONS 1 3 2 Turning on the power 1 3 Adjust the volume. Turn on the power. To increase the volume Note on One-Touch Operation: When you select a source in step 2 below, the power automatically comes on. You do not have to press this button to turn on the power. 2 To decrease the volume Select the source. Volume level appears. 4 To operate the tuner (FM or AM), see pages 6 – 8. To operate the EX (extra) button, see page 8. To play a tape, see page 9.
ENGLISH 4 Setting the clock 1 Finish the setting. Press and hold SEL (select) for more than 2 seconds. “CLOCK H” or “CLOCK M” appears on the display. To check the current clock time or change the display mode 2 Set the hour. 1 Select “CLOCK H” (hour) if not shown on the display. 2 Adjust the hour. 1 Press DISP (display) repeatedly.
ENGLISH RADIO OPERATIONS Listening to the radio Searching for a station manually: Manual search You can use either automatic searching or manual searching to tune in to a particular station. 1 FM1 Note: When a cassette is in the cassette compartment, you cannot select the tuner. Be sure to eject the cassette from the cassette compartment to listen to the radio. FM2 FM3 FM3 Note: This receiver has three FM bands (FM1, FM2, FM3). You can use any one of them to listen to an FM broadcast.
Press MO (monaural), while listening to an FM stereo broadcast. Each time you press the button, the MO indicator lights up and goes off alternately. Local FM stations with the strongest signals are searched and stored automatically in the band number you have selected (FM1, FM2, or FM3). These stations are preset in the number buttons —No.1 (lowest frequency) to No.6 (highest frequency). When automatic preset is over, the station stored in number button 1 will be automatically tuned in.
ENGLISH 4 Repeat the above procedure to store other stations into other preset numbers. Notes: • A previously preset station is erased when a new station is stored in the same preset number. • Preset stations are erased when the power supply to the memory circuit is interrupted (for example, during battery replacement). If this occurs, preset the stations again. 1 Select the band (FM1 – 3, AM) you want to store stations into (in this example, FM1).
ENGLISH TAPE OPERATIONS Listening to a cassette You can play back type I (normal) tapes. 1 Turn on the power. Note on One-Touch Operation: When a cassette is already in the cassette compartment, tape play starts automatically. However, it is not recommended to leave the cassette in the compartment when turning off the power. It may damage the tape head and the cassette. 2 Press 0. Tape play stops, the cassette automatically ejects from the cassette compartment.
ENGLISH SOUND ADJUSTMENTS 2 Adjusting the sound You can adjust the sound characteristics to your preference. 1 Adjust the level. To increase the level Select the item you want to adjust. Each time you press the button, the adjustable items change as follows: Indication BAS TRE (bass) (treble) Ex.: When you select “TRE” (treble) FAD (fader) VOL BAL (volume) (balance) To do: To decrease the level 3 Repeat steps 1 and 2 to adjust the other items. Range BAS (Bass) Adjust the bass.
1 You can select a preset sound adjustment suitable to the music genre. Call up the sound mode you want to adjust. • See on the left column for details. ENGLISH Selecting preset sound modes Select the sound mode you want. Each time you press the button, the sound mode changes as follows: SCM OFF BEAT SOFT 2 To adjust the bass or treble level. 1 Select “BAS” (bass) or “TRE” (treble). POP 2 Adjust the level. Ex.: When you select “BEAT” Indication For: Preset values BAS TRE S.
ENGLISH DETACHING THE C0NTROL PANEL You can detach the control panel when leaving the car. When detaching or attaching the control panel, be careful not to damage the connectors on the back of the control panel and on the panel holder. Attaching the control panel 1 Insert the left side of the control panel into the groove on the panel holder. Detaching the control panel Before detaching the control panel, be sure to turn off the power. 1 Unlock the control panel.
What appears to be trouble is not always serious. Check the following points before calling a service center. Symptoms Causes Tape Playback FM/AM General • Sound cannot be heard from the speakers. Remedies The volume level is set to the minimum level. Adjust it to the optimum level. Connections are incorrect. Check the cords and connections. • This unit does not work at all. The built-in microcomputer may have functioned incorrectly due to noise, etc.
ENGLISH MAINTENANCE This unit requires very little attention, but you will be able to extend the life of the unit if you follow the instructions below. To keep the tape clean To clean the head • Always store the cassettes in their storage cases after use. • Do not store cassettes in the following places: – Subject to direct sunlight – With high humidity – At extremely hot temperatures • Clean the heads after every 10 hours of use using a wet-type head cleaning tape (available at an audio store).
AUDIO AMPLIFIER SECTION CASSETTE DECK SECTION Maximum Power Output: Front: 45 W per channel Rear: 45 W per channel Continuous Power Output (RMS): Front: 17 W per channel into 4 Ω, 40 Hz to 20 000 Hz at no more than 0.8% total harmonic distortion. Rear: 17 W per channel into 4 Ω, 40 Hz to 20 000 Hz at no more than 0.8% total harmonic distortion.
EN, IN 0604DTSMDTJEIN © 2004 VICTOR COMPANY OF JAPAN, LIMITED Cover003_KS-F185_S_G[UN]f.
KS-FX385/KS-F185 Installation/Connection Manual °“√µ‘¥µ—Èß/§ŸË¡◊Õ°“√µ‘¥µ—Èß GET0225-004A 0604DTSMDTJEIN EN, TH [U/UH] ENGLISH ‰∑¬™ÿ¥ª√–°Õ∫π’ȉ¥È√—∫°“√ÕÕ°·∫∫¡“‡æ◊ËÕ„™Èß“π°—∫√–∫∫ This unit is designed to operate on 12 V DC, NEGATIVE ground electrical systems. If your vehicle does not have this system, a voltage inverter is required, which can be purchased at JVC car audio dealers.
Removing the unit °“√∂Õ¥™ÿ¥ª√–°Õ∫ Before removing the unit, release the rear section. 1 °ËÕπ®–∂Õ¥™ÿ¥ª√–°Õ∫ „ÀȪ≈¥ÀπÈ“µ—¥ Ë«π∑È“¬°ËÕπ 2 B 3 Insert the two handles, then pull them as illustrated so that the unit can be removed.
ENGLISH ‰∑¬ ELECTRICAL CONNECTIONS °“√‡™◊ËÕ¡‚¥¬„™È ‰øøÈ“ To prevent short circuits, we recommend that you disconnect the battery’s negative terminal and make all electrical connections before installing the unit. • Be sure to ground this unit to the car’s chassis again after installation.
B Connections Adding Other Equipment / °“√µËÕ‡æ‘Ë¡‡µ‘¡‡¢È“°—∫Õÿª°√≥ÏÕ◊Ëπ Ê Amplifier / ‡§√◊ËÕߢ¬“¬ You can connect an amplifier to upgrade your car stereo system. • Connect the remote lead (blue with white stripe) to the remote lead of the other equipment so that it can be controlled through this unit. • Disconnect the speakers from this unit, connect them to the amplifier. Leave the speaker leads of this unit unused.
KS-FX385/KS-FX385S/KS-FX385G/ KS-F185/KS-F185S/KS-F185G GET0225-006A Installation/Connection Manual Buku Panduan Instalasi/Penyambungan 0604DTSMDTJEIN EN, IN [UN] ENGLISH INDONESIA Unit ini dirancang untuk dipakai pada tegangan 12 V DC, dengan sistem negatif yang di-ground-kan. Jika peralatan anda tidak memiliki system ini, maka dibutuhkan sebuah perubah tegangan, yang dapat dibeli di agen audio mobil JVC. This unit is designed to operate on 12 V DC, NEGATIVE ground electrical systems.
Removing the unit Melepaskan unit Before removing the unit, release the rear section. Sebelum melepaskan unit, lepaskan terlebih dahulu bagian belakangnya. 1 2 B 3 Insert the two handles, then pull them as illustrated so that the unit can be removed. Masukkan kedua handle, kemudian tarik seperti diilustrasikan sehingga unit tersebut dapat dikeluarkan.
INDONESIA ENGLISH ELECTRICAL CONNECTIONS PENYAMBUNGAN LISTRIK To prevent short circuits, we recommend that you disconnect the battery’s negative terminal and make all electrical connections before installing the unit. • Be sure to ground this unit to the car’s chassis again after installation. Untuk mencegah terjadinya korsleting, sangat dianjurkan apabila anda mencabut terminal baterai negatif dan memasang semua sambungan listrik sebelum memasang unit.
B Connections Adding Other Equipment/Sambungan pada peralatan lain Amplifier/Amplifier You can connect an amplifier to upgrade your car stereo system. • Connect the remote lead (blue with white stripe) to the remote lead of the other equipment so that it can be controlled through this unit. • Disconnect the speakers from this unit, connect them to the amplifier. Leave the speaker leads of this unit unused. Anda dapat menghubungkan sebuah penguat suara untuk meningkatkan sistem stereo mobil anda.