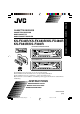
ENGLISH CASSETTEN-RECEIVER RADIOCASSETTE RADIO/CASSETTESPELER KS-FX43R/KS-FX483R/KS-FX480R KS-F383R/KS-F380R CD CHANGER CONTROL NEDERLANDS KS-FX43R/KS-FX483R/KS-FX480R FM TP/PTY AM SEL SSM CDCH DISP 7 8 9 10 11 12 MO/RND SCM KS-F383R/KS-F380R FM LOUD AM SEL SSM TP PTY DISP MO SCM For installation and connections, refer to the separate manual. Für den Einbau und die Anschlüsse siehe das eigenständige Handbuch. Pour l’installation et les raccordements, se référer au manuel séparé.
ENGLISH Thank you for purchasing a JVC product. Please read all instructions carefully before operation, to ensure your complete understanding and to obtain the best possible performance from the unit. CONTENTS 2 SOUND ADJUSTMENTS ................... 19 LOCATION OF THE BUTTONS ............ 3 Adjusting the sound .................................. 19 Selecting preset sound modes .................. 20 Storing your own sound adjustments ........ 20 How to reset your unit ...............................
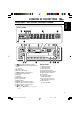
LOCATION OF THE BUTTONS ENGLISH Control panel—KS-FX43R/KS-FX483R/KS-FX480R Display window CD CHANGER CONTROL FM TP/PTY AM SEL SSM CDCH DISP 7 8 9 10 1 (standby/on/attenuator) button 2 TP/PTY (traffic programme/programme type) button 3 +/– buttons 4 0 (eject) button 5 Cassette compartment 6 1/¡ (PROG: program) buttons 7 CD-CH (CD changer) button 8 AM button 9 FM button p DISP (display) button q SEL (select) button w Number buttons e MO/RND (monaural/random) button r SCM (sound control memory) bu
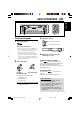
ENGLISH Control panel—KS-F383R/KS-F380R Display window DETACHABLE CONTROL PANEL FM LOUD AM SEL SSM TP PTY DISP MO 1 2 3 4 5 6 7 8 9 p q w e r t y (standby/on/attenuator) button LOUD (loudness) button +/– buttons 0 (eject) button Cassette compartment 1/¡ (PROG: program) buttons TP/PTY (traffic programme/programme type) button AM button FM button DISP (display) button SEL (select) button Number buttons MO (monaural) button SCM (sound control memory) button (control panel release) button / buttons •
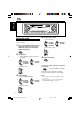
BASIC OPERATIONS KS-FX43R/KS-FX483R/KS-FX480R 1 3 3 Turn on the power. ENGLISH 2 2 Turning on the power 1 KS-F383R/KS-F380R Adjust the volume. To increase the volume To decrease the volume Notes on One-Touch Operation: • When you select a source in step 2 below, the power automatically comes on. You do not have to press this button to turn on the power. • If the cassette is already in the cassette compartment, tape play starts automatically.
ENGLISH 4 Setting the clock Set the clock system. 1 Select “24H/12H.” You can also set the clock system to either 24 hours or 12 hours. 1 KS-FX43R KS-FX483R KS-FX480R Press and hold SEL (select) for more than 2 seconds so that one of the PSM items appears on the display. (PSM: see page 22.) KS-F383R KS-F380R 2 Select “24H” or “12H.” SEL 2 Set the hour. 1 Select “CLOCK H” (hour) if not shown on the display. 5 Finish the setting.
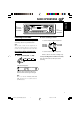
ENGLISH RADIO OPERATIONS For KS-FX43R KS-FX483R KS-FX480R For KS-F383R KS-F380R 2 Listening to the radio Start searching a station. You can use either automatic searching or manual searching to tune in to a particular station. To search stations of higher frequencies Note: When a cassette is in the cassette compartment, you cannot select the tuner. Be sure to eject the cassette from the cassette compartment to listen to the radio.
ENGLISH Searching a station manually: Manual search When an FM stereo broadcast is hard to receive: 1 Press MO/RND (for KS-FX43R/KS-FX483R/ KS-FX480R) or MO (for KS-F383R/KS-F380R) while listening to an FM stereo broadcast. • Each time you press the button, the MO indicator lights up and goes off alternately. Select the band (FM1 – 3, AM). FM1 FM FM2 FM3 AM AM MO/RND Note: This receiver has three FM bands (FM1, FM2, FM3). You can use any one of them to listen to an FM broadcast.
You can use one of the following two methods to store broadcasting stations in memory. • Automatic preset of FM stations: SSM (Strongstation Sequential Memory) • Manual preset of both FM and AM stations FM station automatic preset: SSM Manual preset You can preset up to 6 stations in each band (FM1, FM2, FM3, and AM) manually. Ex.: Storing FM station of 88.3 MHz into the preset number 1 of the FM1 band. 1 You can preset 6 local FM stations in each FM band (FM1, FM2, and FM3).
ENGLISH 3 Press and hold the number button (in this example, 1) for more than 2 seconds. Tuning in to a preset station You can easily tune in to a preset station. Remember that you must store stations first. If you have not stored them yet, see “Storing stations in memory” on pages 9 and 10. 1 Select the band (FM1 – 3, AM). FM “P1” flashes for a few seconds. 4 FM1 FM2 FM3 AM Repeat the above procedure to store other stations into other preset numbers.
What you can do with RDS RDS (Radio Data System) allows FM stations to send an additional signal along with their regular programme signals. For example, the stations send their station names, as well as information about what type of programme they broadcast, such as sports or music, etc. Another advantage of RDS function is called “Enhanced Other Networks.
ENGLISH 1 Press and hold SEL (select) for more than 2 seconds so that one of the PSM items appears on the display. (PSM: see page 22.) SEL 2 Select “AF-REG” (alternative frequency/regionalization reception) if not shown on the display. Using TA Standby Reception TA Standby Reception allows the unit to switch temporarily to Traffic Announcement (TA) from the current source—another FM station, tape, or other connected components (for KS-FX43R/ KS-FX483R/KS-FX480R).
PTY Standby Reception allows the unit to switch temporarily to your favorite programme (PTY: Programme Type) from the current source— another FM station, tape, or other connected components (for KS-FX43R/KS-FX483R/ KS-FX480R). • PTY Standby Reception will not work if you are listening to an AM station. You can select your favorite programme type for PTY Standby Reception. When shipped from the factory, PTY Standby Reception is turned off. (“OFF” is selected for PTY Standby Reception.
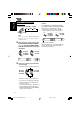
ENGLISH Searching your favorite programme 3 You can search any one of the PTY codes. In addition, you can store your 6 favorite programme types in the number buttons. When shipped from the factory, the following 6 programme types have been stored in the number buttons (1 to 6). To store your favorite programme types, see below. To search your favorite programme type, see page 15.
1 Press and hold TP/PTY for more than 2 seconds while listening to an FM station. TP/PTY KS-FX43R KS-FX483R KS-FX480R KS-F383R KS-F380R TP PTY The last selected PTY code appears. 2 To select one of your favorite programme type or To select any one of the twenty-nine PTY-codes • If there is a station broadcasting a programme of the same PTY code as you selected, that station is tuned in.
ENGLISH Changing the display mode while listening to an FM station You can change the initial indication on the display to station name (PS NAME), station frequency (FREQ), or clock time (CLOCK) while listening to an FM RDS station. 1 Press and hold SEL (select) for more than 2 seconds so that one of the PSM items appears on the display. (See page 22.) 2 Press ¢/4 (for KS-FX43R/ KS-FX483R/KS-FX480R) or / (for KS-F383R/KS-F380R) to select “DISPMODE” (display mode).
News Topical programmes expanding on current news or affairs INFO: Programmes which impart advice on a wide variety of topics SPORT: Sport events EDUCATE: Educational programmes DRAMA: Radio plays CULTURE: Programmes on national or regional culture SCIENCE: Programmes on natural science and technology VARIED: Other programmes like comedies or ceremonies POP M: Pop music ROCK M: Rock music EASY M: Easy-listening music LIGHT M: Light music CLASSICS: Classical music OTHER M: Other music WEATHER: Weather inform
ENGLISH TAPE OPERATIONS Listening to a cassette You can play back type I (normal) tapes. 1 Turn on the power. Note on One-Touch Operation: If a cassette is already in the cassette compartment, tape play starts automatically. However, it is not recommended to leave the cassette in the compartment when turning off the power or ignition key. It may damage the tape head and the cassette. 2 Insert a cassette into the cassette compartment.
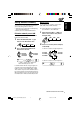
2 Adjusting the sound Adjust the setting. You can adjust the sound characteristics to your preference. To increase the level or turn on the loudness 1 To decrease the level or turn off the loudness Select the item you want to adjust. ENGLISH SOUND ADJUSTMENTS Each time you press the button, the adjustable items change as follows: SEL Ex.
ENGLISH Selecting preset sound modes You can select a preset sound adjustment suitable to the music genre. You can adjust the sound modes (BEAT, SOFT, POP) to your preference and store your own adjustments in memory. Select the sound mode you want. SCM Each time you press the button, the sound mode changes as follows: SCM OFF (BEAT) (SOFT) Storing your own sound adjustments (POP) • There is a time limit in doing the following procedure.
Selecting the telephone muting This mode is used when a cellular phone system is connected. Depending on the phone system used, select either “MUTING 1” or “MUTING 2,” whichever mutes the sounds from this unit. When shipped from the factory, this mode is deactivated. 1 Press and hold SEL (select) for more than 2 seconds so that one of the PSM items appears on the display. (See page 22.) Selecting the CD changer display Only for KS-FX43R/KS-FX483R/KS-FX480R.
ENGLISH Preferred Setting Mode (PSM) items • For detailed operations of each PSM item, refer to the pages listed in the table. 1 3 2 SEL Hold. Select. Set.
You can detach the control panel when leaving the car. When detaching or attaching the control panel, be careful not to damage the connectors on the back of the control panel and on the panel holder. Attaching the control panel 1 Insert the left side of the control panel into the groove on the panel holder. ENGLISH Detaching the control panel Detaching the control panel Before detaching the control panel, be sure to turn off the power. 1 2 Unlock the control panel.
ENGLISH CD CHANGER OPERATIONS This section is only for KS-FX43R/KS-FX483R/ KS-FX480R. We recommend that you use one of the CH-X series with your unit (except for JVC MP3compatible CD changer). If you have another CD changer, consult your JVC IN-CAR ENTERTAINMENT dealer for connections. • For example, if your CD changer is one of the KDMK series, you need a cord (KS-U15K) for connecting it to this unit. Before operating your CD changer: • Refer also to the Instructions supplied with your CD changer.
Press and hold ¢, while playing a CD, to fast-forward the track. To go to a particular disc directly Press the number button corresponding to the disc number to start its playback (while the CD changer is playing). 7 8 9 10 11 12 ENGLISH To fast-forward or reverse the track Press and hold 4 , while playing a CD, to reverse the track. To go to the next or previous tracks Press ¢ briefly, while playing a CD, to go ahead to the beginning of the next track.
ENGLISH MAINTENANCE This unit requires very little attention, but you will be able to extend the life of the unit if you follow the instructions below. To keep the tape clean To clean the head • Always store the cassettes to their storage cases after use. • Do not store cassettes in the following places: – Subject to direct sunlight – With high humidity – At extremely hot temperatures • Clean the head after every 10 hours of use using a wet-type head cleaning tape (available at an audio store).
What appears to be trouble is not always serious. Check the following points before calling a service center. Causes Symptoms • Sound is sometimes interrupted. Connections are incorrect. Check the cords and connections. • Sound cannot be heard from the speakers. The volume is set to the minimum level. Adjust it to the optimum level. Connections are incorrect. Check the cords and connections. • The unit does not work at all. The built-in microcomputer may function incorrectly due to noise, etc.
Symptoms Causes • “NO CD” appears on the display. CD Changer ENGLISH Only for KS-FX43R/KS-FX483R/KS-FX480R Remedies No CD is in the magazine. Insert CDs into the magazine. CDs are inserted incorrectly. Insert them correctly. • “NO MAG” appears on the display. No magazine is loaded in the CD changer. Insert the magazine. • “RESET 8” appears on the display. This unit is not connected to a CD changer correctly.
AUDIO AMPLIFIER SECTION CASSETTE DECK SECTION Maximum Power Output: Front: 45 W per channel Rear: 45 W per channel Continuous Power Output (RMS): Front: 17 W per channel into 4 Ω, 40 Hz to 20 000 Hz at no more than 0.8% total harmonic distortion. Rear: 17 W per channel into 4 Ω, 40 Hz to 20 000 Hz at no more than 0.8% total harmonic distortion.
Having TROUBLE with operation? Please reset your unit Refer to page of How to reset your unit Haben Sie PROBLEME mit dem Betrieb? Bitte setzen Sie Ihr Gerät zurück Siehe Seite Zurücksetzen des Geräts Vous avez des PROBLÈMES de fonctionnement? Réinitialisez votre appareil Référez-vous à la page intitulée Comment réinitialiser votre appareil Hebt u PROBLEMEN met de bediening? Stel het apparaat terug Zie de pagina met de paragraaf Het apparaat terugstellen V EN, GE, FR, NL J C © 2002 VICTOR COMPANY OF
KS-FX43R/KS-FX483R/KS-FX480R KS-F383R/KS-F380R Installation/Connection Manual Einbau/Anschlußanleitung Manuel d’installation/raccordement Handleiding voor installatie/aansluiting GET0110-003A V J [E/EX] ENGLISH DEUTSCH C 1202KKSMDTJEIN EN, GE, FR, NL NEDERLANDS FRANÇAIS • This unit is designed to operate on 12 V DC, NEGATIVE ground electrical systems. • Dieses Gerät ist für einen Betrieb in elektrischen Anlagen mit 12 V Gleichstrom und (–) Erdung ausgelegt.
• When using the optional stay • Beim Verwenden der Anker-Option • Lors de l’utilisation du hauban en option • Wanneer u de steun gebruikt (facultatief) Washer Unterlegscheibe Rondelle Sluitring Fire wall Feuerwand Cloison Brandscherm • When installing the unit without using the sleeve • Beim Einbau des Geräts ohne Halterung • Lors de l’installation de l’appareil scans utiliser de manchon • Wanneer u het apparaat zonder huis installeert In a Toyota for example, first remove the car radio and install the u
ENGLISH DEUTSCH FRANÇAIS NEDERLANDS Typical Connections / Typische Anschlüsse / Raccordements typiques / Normale verbindingen Before connecting: Check the wiring in the vehicle carefully. Incorrect connection may cause serious damage to this unit. The leads of the power cord and those of the connector from the car body may be different in color. 1 Connect the colored leads of the power cord to the car battery, speakers and power aerial (if any) in the following sequence.
PRECAUTIONS sur l’alimentation et la connexion des enceintes: PRECAUTIONS on power supply and VORSICHTSMASSREGELN beim speaker connections: Anschließen der Stromversorgung • DO NOT connect the speaker leads of the power und Lautsprecher: cord to the car battery; otherwise, the unit will be seriously damaged. • Connect the black lead (ground), yellow lead (to car battery, constant 12 V), and red lead (to an accessory terminal) correctly.