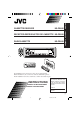
RECEPTOR-REPRODUCTOR DE CASSETTE KS-FX480 RADIOCASSETTE KS-FX480 ENGLISH ESPAÑOL KS-FX480 FRANÇAIS CASSETTE RECEIVER SOUND ATT 200W KS-FX480 U Multi Music Scan R SOURCE F D VOL TAPE VOL For installation and connections, refer to the separate manual. Para la instalación y las conexiones, refiérase al manual separado. Pour l’installation et les raccordements, se référer au manuel séparé. For customer Use: INSTRUCTIONS MANUAL DE INSTRUCCIONES MANUEL D’INSTRUCTIONS Enter below the Model No.
ENGLISH Thank you for purchasing a JVC product. Please read all instructions carefully before operation, to ensure your complete understanding and to obtain the best possible performance from the unit. CONTENTS SOUND ADJUSTMENTS .................. 13 How to reset your unit ............................... How to use the number buttons ................ 2 2 LOCATION OF THE BUTTONS ............ 3 Control panel ........................................... Preparing the remote controller ................
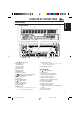
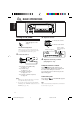
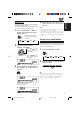
LOCATION OF THE BUTTONS ENGLISH Control panel Display window s a f g h 1 2 k j 3 4 d l / z 5 6 7 8 200W KS-FX480 Multi Music Scan 9 p q e w 1 4 /¢ buttons 2 5 (up) button Tape ` button 3 ∞ (down) button 4 Remote sensor 5 Display window 6 0 (eject) button 7 FM AM button 8 TAPE CD-CH button 9 (standby/on/attenuator) button p (control panel release) button q SEL (select) button w Control dial e MO (monaural) button r (Dolby B) button t RPT (repeat) button y RND (random) button u Number button
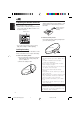
ENGLISH Preparing the remote controller Before using the remote controller: • Aim the remote controller directly at the remote sensor on the main unit. Make sure there is no obstacle in between. 2. Place the battery. Slide the battery into the holder with the + side facing upwards so that the battery is fixed in the holder. Lithium coin battery (product number: CR2025) Remote sensor 3. Return the battery holder. Insert again the battery holder pushing it until you hear a clicking sound.
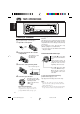
RM–RK50 SOUND ATT 1 5 2 U 6 R SOURCE F 3 7 D 3 • Selects the preset stations while listening to the radio. Each time you press the button, the preset station number increases, and the selected station is tuned in. • Skips to the previous disc while listening to the CD changer. Each time you press the button, the disc number decreases, and the selected disc starts playing. ENGLISH Remote controller 4 Functions the same as the control dial on the main unit.
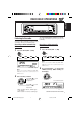
ENGLISH BASIC OPERATIONS 200W KS-FX480 Multi Music Scan 3 1 1 2 3 Turning on the power Adjust the volume. To increase the volume. Turn on the power. “HELLO” appears on the display. To decrease the volume. Note on One-Touch Operation: When you select a source in step 2 below, the power automatically comes on. You do not have to press this button to turn on the power. 2 TAPE Volume level appears. Volume or audio level (see page 18) indicator Select the source.
ENGLISH RADIO BASIC OPERATIONS 200W KS-FX480 Multi Music Scan TAPE To stop searching before a station is received, press the same button you have pressed for searching. Listening to the radio You can use either automatic searching or manual searching to tune in to a particular station. Searching a station automatically: Auto search 1 1 Select the band (FM1 – 3, AM). FM1 FM2 FM3 (F1) (F2) (F3) Searching a station manually: Manual search AM Select the band (FM1 – 3, AM).
ENGLISH 3 Tune in to a station you want while “MANU (manual)” is flashing. Press ¢ to tune in to stations of higher frequencies. to tune Press 4 in to stations of lower frequencies. • If you release your finger from the button, the manual mode will automatically turn off after 5 seconds. • If you hold down the button, the frequency keeps changing. (in 200 kHz intervals for FM and 10 kHz for AM) until you release the button.
You can preset up to 6 stations in each band (FM1, FM2, FM3 and AM) manually. Ex.: Storing an FM station of 88.3 MHz into the preset number 1 of the FM1 band 1 Select the band (FM1 – 3, AM) you want to store stations into (in this example, FM1). Each time you press the button, the band changes as follows: 2 FM1 FM2 FM3 (F1) (F2) (F3) AM Tune in to a station (in this example, of 88.3 MHz). Press ¢ to tune in to stations of higher frequencies.
ENGLISH TAPE OPERATIONS 200W KS-FX480 Multi Music Scan Listening to a cassette You can play back type 1 (normal) tapes. 1 2 Open the control panel. Insert a cassette into the cassette compartment. The unit turns on and tape play starts automatically. 3 Close the control panel by hand. Tape–in indicator appears. 4 Select the tape direction. Each time you press `, the tape direction changes alternately forward (TAPE ) and reverse (TAPE ).
1 Press MODE to enter the functions mode while listening to a tape. “MODE” appears on the lower part of the display, and the number buttons work as different function buttons. 2 Press (Dolby B), while “MODE” is still on (Dolby B) indicator the display so that the lights up. “DOLBY B” also appears on the display for several seconds. To cancel the Dolby B NR, repeat steps 1 and 2 above again. * Manufactured under license from Dolby Laboratories.
ENGLISH Other convenient tape functions Playing the current tune repeatedly Skipping the blank portions on the tape You can play the current tune repeatedly (Repeat Play). You can skip blank portions between the tunes (Blank Skip). When this function is on, the unit skips blank portions of 15 seconds or more, fast-forwards to the next tune, then starts playing it. • See also “Changing the general settings (PSM)” on pages 16 and 17.
Adjusting the sound 2 Adjust the level. You can adjust the sound characteristics to your preference. To increase the level. 1 To decrease the level. Select the item you want to adjust. Each time you press the button, the adjustable items change as follows: BAS (bass) VOL (volume) TRE (fader) BAL LOUD (balance) (loudness) Range BAS Adjust the bass. –06 (min.) | +06 (max.) TRE Adjust the treble. –06 (min.) | +06 (max.) FAD* Adjust the front and rear speaker balance.
ENGLISH Selecting preset sound modes (C-EQ: Custom Equalizer) You can select a preset sound mode (C-EQ: Custom Equalizer) suitable to the music genre. 1 Press EQ. The last selected sound mode is recalled and applied to the current sound. Sound mode indicator flashes Ex.: If you have selected “USER” previously 2 Select the sound mode you want.
4 Adjust the level. To increase the level. To decrease the level. ENGLISH • When “C-EQ LINK” is set to “LINK ON,” The selected sound mode can be stored in memory for the current source. Each time you change to the same source, the same sound mode is also recalled and shown on the display. The C-EQ indicator also flashes. • When “C-EQ LINK” is set to “LINK OFF” The selected sound mode effect applies to any source. Equalization pattern changes as you adjust the bass or treble.
ENGLISH OTHER MAIN FUNCTIONS Setting the clock 1 Press and hold SEL (select) for more than 2 seconds so that one of the PSM items appears on the display. (See page 17.) To check other information during play, press DISP (display). Each time you press the button, the other information (either the clock or the source name) will be shown on the lower part of the display for a while.
4 Adjust the PSM item selected. 5 Repeat steps 2 and 3 to adjust the other PSM items if necessary. Finish the setting. ENGLISH 3 Preferred Setting Mode (PSM) items 1 2 3 Factory-preset See page settings Set. Hold. Select. Counterclockwise Clockwise CLOCK H Hour adjustment Back Advance CLOCK M Minute adjustment Back Advance C-EQ LINK Custom equalizer linkage LINK OFF LINK ON LEVEL Level display AUDIO 1 AUDIO 2 OFF DIMMER Dimmer mode AUTO OFF ON B.
ENGLISH To set Custom Equalizer Link – C-EQ LINK A different sound mode (C-EQ) can be stored in memory for each source so that you can change the sound modes simply by changing the sources. When shipped from the factory, this mode is deactivated. • LINK ON: Different sound modes for different sources. • LINK OFF: One sound mode for all sources. To select the level meter – LEVEL You can select the level display according to your preference. When shipped from the factory, “AUDIO 2” is selected.
You can detach the control panel when leaving the car. When detaching or attaching the control panel, be careful not to damage the connectors on the back of the control panel and on the panel holder. Attaching the control panel 1 Insert the right side of the control panel into the groove on the panel holder. ENGLISH Detaching the control panel Detaching the control panel Before detaching the control panel, be sure to turn off the power. 1 Unlock the control panel.
ENGLISH CD CHANGER OPERATIONS 200W KS-FX480 Multi Music Scan We recommend that you use one of the CH-X series with your unit. If you have another CD automatic changer, consult your JVC car audio dealer for connections. • For example, if your CD automatic changer is one of the KD-MK series, you need a cord (KS-U15K) for connecting it to this unit.
Press 5, while playing a disc, to go to the next disc. Each time you press the button consecutively, the first track of the next disc is located and played back. Selecting CD playback modes To play back tracks at random (Random Play) 1 Press MODE to enter the functions mode while playing a disc. “MODE” appears on the lower part of the display, and the number buttons work as different function buttons. 2 Press RND (random), while “MODE” Press ∞, while playing a disc, to go to the previous disc.
ENGLISH EXTERNAL COMPONENT OPERATIONS 200W KS-FX480 Multi Music Scan Playing an external component 2 You can connect the external component to the CD changer jack on the rear using the Line Input Adaptor KS-U57 (not supplied). 3 Preparations: • For connecting the Line Input Adaptor KS-U57 and the external component, refer to the Installation/ Connection Manual (separate volume). • Before operating the external component using the following procedure, select the external input correctly.
This unit requires very little attention, but you will be able to extend the life of the unit if you follow the instructions below. To clean the head CAUTION: • Do not play the cassettes with peeling labels; otherwise, they can damage the unit. • Tighten tapes to remove slack since loose tape may become entangled with the mechanism. • Do not leave a cassette in the cassette compartment after use, as the tape may become slack.
ENGLISH TROUBLESHOOTING What appears to be trouble is not always serious. Check the following points before calling a service center. Causes Symptoms Remedies • A cassette tape cannot be inserted. You have tried to insert a cassette in the wrong way. Insert the cassette with the exposed tape facing to the right. • A cassette tape cannot be ejected. Cassette ejection is prohibited. Press and hold TAPE CD-CH for more than two and seconds. • Cassette tapes become hot. This is not a malfunction.
AUDIO AMPLIFIER SECTION CASSETTE DECK SECTION Maximum Power Output: Front: 50 W per channel Rear: 50 W per channel Continuous Power Output (RMS): Front: 19 W per channel into 4 Ω, 40 Hz to 20 000 Hz at no more than 0.8 % total harmonic distortion. Rear: 19 W per channel into 4 Ω, 40 Hz to 20 000 Hz at no more than 0.8 % total harmonic distortion.
http://www.jvcmobile.com Visit us on-line for Technical Support & Customer Satisfaction Survey. US RESIDENTS ONLY Having TROUBLE with operation? Please reset your unit Refer to page of How to Reset Still having trouble?? USA ONLY Call 1-800-252-5722 http://www.jvc.com We can help you! VICTOR COMPANY OF JAPAN, LIMITED V EN, SP, FR COVER.
KS-FX480 Installation/Connection Manual Manual de instalación/conexión Manuel d’installation/raccordement V GET0068-002A [J] J ENGLISH ESPAÑOL C 0102KKSMDTJEIN EN, SP, FR FRANÇAIS • This unit is designed to operate on 12 V DC, NEGATIVE ground electrical systems. • Esta unidad está diseñada para funcionar con 12 V de CC, con sistemas eléctricos de masa NEGATIVA. • Cet appareil est conçu pour fonctionner sur des sources de courant continu de 12 V à masse NEGATIVE.
• When installing the unit without using the sleeve • Instalación de la unidad sin utilizar la cubierta • Lors de l’installation de l’appareil sans utiliser de manchon • When using the optional stay • Cuando emplea un soporte opcional • Lors de l’utilisation du hauban en option Washer Arandela Rondelle In a Toyota for example, first remove the car radio and install the unit in its place. En un Toyota por ejemplo, primero extraiga la radio del automóvil y luego instale la unidad en su lugar.
ENGLISH ESPAÑOL FRANÇAIS A Typical Connections / Conexiones típicas / Raccordements typiques Before connecting: Check the wiring in the vehicle carefully not to fail in connecting this unit. Incorrect connection may cause a serious damage to this unit. The leads of the power cord and those of the connector from the car body may be different in colour. 1 Connect the colored leads of the power cord to the car battery, speakers and automatic antenna (if any) in the following sequence.
Connecting the leads / Conexión de los conductores / Raccordement des fils Twist the core wires when connecting. Retuerza los alambres de alma para conectarlos. Torsader les âmes des fils en les raccordant. Solder the core wires to connect them securely. Suelde los alambres de alma para conectarlos con firmeza. Souder les âmes desfils pour les raccorder entre eux de façon sûre. CAUTION / PRECAUCION / PRECAUTION: • To prevent short-circuit, cover the terminals of the UNUSED leads with insulating tape.