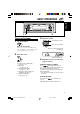
ENGLISH РУCCKИЙ CASSETTE RECEIVER РЕСИВЕР С КАССЕТНЫМ ПРОИГРЫВАТЕЛЕМ KS-FX845R KS-FX845R For installation and connections, refer to the separate manual. Указания по установке и выполнению соединений приводятся в отдельной инструкции.
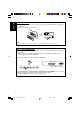
ENGLISH How to reset your unit After detaching the control panel, press the reset button on the panel holder using a ball-point pen or a similar tool. This will reset the built-in microcomputer. Note: Your preset adjustments—such as preset channels or sound adjustments—will also be erased. How to use the M (MODE) button If you press M (MODE), the unit goes into functions mode, then the number buttons work as different function buttons.
ENGLISH Thank you for purchasing a JVC product. Please read all instructions carefully before operation, to ensure your complete understanding and to obtain the best possible performance from the unit. CONTENTS How to reset your unit ............................... How to use the M (MODE) button ............. 2 2 LOCATION OF THE BUTTONS ............ 4 OTHER MAIN FUNCTIONS ................ 23 Changing the general settings (PSM) ....... 23 Detaching the control panel ......................
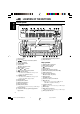
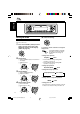
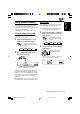
LOCATION OF THE BUTTONS ENGLISH Control panel Display window KS-FX845R 1 2 3 4 5 6 7 8 9 p q w e r t y u i Remote sensor Control dial (standby/on/attenuator) button SEL (select) button FM/AM (DAB) button 5 (up) button 23 (tape direction) button 0 (eject) button 4 /¢ buttons (control panel release) button DISP (display) button • Also functions as SSM buttons when pressed together with M (MODE) button. M (MODE) button • Also functions as SSM buttons when pressed together with DISP (display) button.
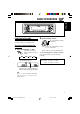
ENGLISH BASIC OPERATIONS 1 3 2 Turning on the power 1 3 Adjust the volume. To increase the volume Turn on the power. To decrease the volume Note on One-Touch Operation: When you select a source in step 2 below, the power automatically comes on. You do not have to press this button to turn on the power. 2 Volume (or audio) level indicator (see page 25) Select the source. Volume level appears. 4 To operate the tuner (FM or AM), see pages 7 – 17. To play a tape, see pages 18 – 20.
ENGLISH 5 Setting the clock Finish the setting. You can also set the clock system to either 24 hours or 12 hours. 1 Press and hold SEL (select) for more than 2 seconds so that one of the PSM items appears on the display. (PSM: see page 24.) To check the current clock time or change the display mode Press DISP (display) repeatedly. Each time you press the button, the display mode changes as follows: • During tuner operation: 2 Frequency Set the hour.
ENGLISH RADIO OPERATIONS 2 Listening to the radio You can use either automatic searching or manual searching to tune in to a particular station. Searching a station automatically: Auto search 1 Start searching a station. To search stations of higher frequencies To search stations of lower frequencies Select the band (FM1 – 3, AM). Each time you press the button, the band changes as follows: FM1 FM2 FM3 AM Selected band appears. When a station is received, searching stops.
ENGLISH Searching a station manually: Manual search 1 When an FM stereo broadcast is hard to receive: Select the band (FM1 – 3, AM). Each time you press the button, the band changes as follows: FM1 FM2 FM3 AM Note: This receiver has three FM bands (FM1, FM2, FM3). You can use any one of them to listen to an FM broadcast. 2 1 Press M (MODE) to enter the functions mode while listening to an FM stereo broadcast.
You can use one of the following two methods to store broadcasting stations in memory. • Automatic preset of FM stations: SSM (Strongstation Sequential Memory) • Manual preset of both FM and AM stations FM station automatic preset: SSM Manual preset You can preset up to 6 stations in each band (FM1, FM2, FM3, and AM) manually. Ex.: Storing FM station of 92.5 MHz into the preset number 1 of the FM1 band. 1 You can preset 6 local FM stations in each FM band (FM1, FM2, and FM3).
ENGLISH 3 Press and hold the number button (in this example, 1) for more than 2 seconds. Tuning in to a preset station You can easily tune in to a preset station. Remember that you must store stations first. If you have not stored them yet, see “Storing stations in memory” on pages 9 and 10. 1 Select the band (FM1 – 3, AM). Each time you press the button, the band changes as follows: FM1 “P1” flashes for a few seconds. 4 Repeat the above procedure to store other stations into other preset numbers.
What you can do with RDS RDS (Radio Data System) allows FM stations to send an additional signal along with their regular programme signals. For example, the stations send their station names, as well as information about what type of programme they broadcast, such as sports or music, etc. Another advantage of RDS function is called “Enhanced Other Networks.
ENGLISH 1 Press and hold SEL (select) for more than 2 seconds so that one of the PSM items appears on the display. (PSM: see page 24.) Using TA Standby Reception TA Standby Reception allows the unit to switch temporarily to Traffic Announcement (TA) from the current source (another FM station, tape, or other connected components). • TA Standby Reception will not work if you are listening to an AM station.
PTY Standby Reception allows the unit to switch temporarily to your favorite programme (PTY: Programme Type) from the current source (another FM station, tape, or other connected components). • PTY Standby Reception will not work if you are listening to an AM station. You can select your favorite programme type for PTY Standby Reception. When shipped from the factory, PTY Standby Reception is turned off. (“OFF” is selected for PTY Standby Reception.
ENGLISH Searching your favorite programme 2 You can search any one of the PTY codes. In addition, you can store your 6 favorite programme types in the number buttons. When shipped from the factory, the following 6 programme types have been stored in the number buttons (1 to 6). To store your favorite programme types, see below. To search your favorite programme type, see page 15. 1 POP M 2 ROCK M 3 EASY M 4 CLASSICS 5 AFFAIRS 6 VARIED Selected code name appears on the display.
1 Press and hold T (TP/PTY) for more than 2 seconds while listening to an FM station. • If there is a station broadcasting a programme of the same PTY code as you have selected, that station is tuned in. • If there is no station broadcasting a programme of the same PTY code as you have selected, the station will not change. ENGLISH To search your favorite programme type Note: In some areas, the PTY search will not work correctly. The last selected PTY code appears.
ENGLISH Changing the display mode while listening to an FM station You can change the initial indication on the display to station name (PS NAME) or station frequency (FREQ) while listening to an FM RDS station. • See also “Changing the general settings (PSM)” on page 23. 1 Press and hold SEL (select) for more than 2 seconds so that one of the PSM items appears on the display. 2 Press ¢ or 4 to select “DISPMODE” (display mode).
News Topical programmes expanding on current news or affairs INFO: Programmes which impart advice on a wide variety of topics SPORT: Sport events EDUCATE: Educational programmes DRAMA: Radio plays CULTURE: Programmes on national or regional culture SCIENCE: Programmes on natural science and technology VARIED: Other programmes like comedies or ceremonies POP M: Pop music ROCK M: Rock music EASY M: Easy-listening music LIGHT M: Light music CLASSICS: Classical music OTHER M: Other music WEATHER: Weather inform
ENGLISH TAPE OPERATIONS Listening to a cassette You can play back type I (normal) tapes. 1 Open the control panel. Note on One-Touch Operation: When a cassette is already in the cassette compartment, pressing TAPE (CD-CH) turns on the unit and starts tape play automatically. 2 Insert a cassette into the cassette compartment. The unit turns on and tape play starts automatically. 3 Close the control panel by hand. To stop play and eject the cassette Press 0.
Other convenient tape functions Multi Music Scan (MMS) allows you to automatically start playback from the beginning of a specified tune. You can specify up to 9 tunes ahead of or before the current tune. Skipping the blank portions on the tape During playback Specify the tune you want to locate (how many tunes ahead of or before the current tune). You can skip blank portions between the tunes (Blank Skip).
ENGLISH Playing the current tune repeatedly You can play the current tune repeatedly (Repeat Play). 1 Press M (MODE) to enter the functions mode while playing a tune you want to hear over again on a cassette. Prohibiting cassette ejection You can prohibit cassette ejection and lock a cassette in the cassette compartment. While pressing TAPE (CD-CH), press and hold for more than 2 seconds. 2 Press RPT (repeat), while still in the functions mode, so that “REPEAT” appears on the display.
Selecting preset sound modes (C-EQ: custom equalizer) You can select a preset sound mode (C-EQ: custom equalizer) suitable to the music genre. • There is a time limit in doing the following procedure. If the setting is canceled before you finish, start from step 1 again. 1 2 Press M (MODE) to enter the functions mode. Press EQ (equalizer), while still in the functions mode.
ENGLISH Adjusting the sound 2 You can adjust the sound characteristics to your preference. 1 To increase the level or turn on the loudness To decrease the level or turn off the loudness Select the item you want to adjust. Each time you press the button, the adjustable items change as follows: TRE (treble) FAD VOL LOUD BAL (loudness) (balance) To do: Equalization pattern changes as you adjust the bass or treble. (fader) (volume) Indication BAS*1 BAS (bass) Adjust the setting. Ex.
Changing the general settings (PSM) 3 Adjust the PSM item selected. You can change the items listed in the table on page 24 by using the PSM (Preferred Setting Mode) control. ENGLISH OTHER MAIN FUNCTIONS Basic Procedure 1 Press and hold SEL (select) for more than 2 seconds so that one of the PSM items appears on the display. (See page 24.) Ex.: When you select “AUDIO 2” 4 5 Repeat steps 2 and 3 to adjust the other PSM items if necessary. Finish the setting. Ex.
ENGLISH Preferred Setting Mode (PSM) items • For detailed operations of each PSM items, refer to the pages listed in the table.
This mode is used to check the display information of the CD changer. When shipped from the factory, “DISC” is selected. • DISC: Disc number and track number (or folder number if the current playing disc is an MP3 disc) appear. • TIME: Elapsed playing time and track number appear. To select the level meter—LEVEL You can select the level meter display according to your preference. When shipped from the factory, “AUDIO 2” is selected. • AUDIO 1: Shows the audio level indicator.
ENGLISH Detaching the control panel You can detach the control panel when leaving the car. When detaching or attaching the control panel, be careful not to damage the connectors on the back of the control panel and on the panel holder. Attaching the control panel 1 Insert the right side of the control panel into the groove on the panel holder. Detaching the control panel Before detaching the control panel, be sure to turn off the power. 1 Unlock the control panel.
ENGLISH CD CHANGER OPERATIONS We recommend that you use the JVC MP3compatible CD changer with your unit. By using this CD changer, you can play back your original CD-Rs (Recordable) and CD-RWs (Rewritable) recorded either in audio CD format or in MP3 format. • You can also connect other CH-X series CD changers (except CH-X99 and CH-X100). However, they are not compatible with MP3 discs, so you cannot play back MP3 discs. • You cannot use the KD-MK series CD changers with this unit.
ENGLISH • When the current disc is a CD: Playback starts from the first track of the current disc. Disc number Track number If you have selected “TIME” for “CH DISP” (see page 25), the display changes as follows: To go to the next or previous tracks/files Press ¢ briefly during play, to skip ahead to the beginning of the next track/ file. Each time you press the button consecutively, the beginning of the next tracks/files is located and played back.
How to go to the desired track/file quickly • Ex. 1: To select track/file number 32 while playing track/file number 6 To go to a track/file quickly ENGLISH This operation is only possible when using JVC MP3-compatible CD changer (CH-X1500). 1 Press M (MODE) to enter the functions mode while playing a disc. Track/file 6 2 Press 5 (up) or ∞ (down) while still in the (Three times) \ 10 \ 20 \ 30 (Twice) \ 31 \ 32 • Ex.
ENGLISH Selecting the playback modes To play back tracks/files repeatedly (Track Repeat/Disc Repeat Play) To play back tracks/files at random (Disc Random/Magazine Random Play) 1 Press M (MODE) to enter the functions mode during play. 1 Press M (MODE) to enter the functions mode during play. 2 Press RPT (repeat), while still in the functions mode, so that “TRK RPT” or “DISC RPT” appears on the display.
ENGLISH EXTERNAL COMPONENT OPERATIONS Playing an external component 2 You can connect the external component to the CD changer jack on the rear using the Line Input Adapter KS-U57 (not supplied). 3 Preparations: • For connecting the Line Input Adapter KS-U57 and the external component, refer to the Installation/ Connection Manual (separate volume). • Before operating the external component using the following procedure, select the external input correctly.
ENGLISH DAB TUNER OPERATIONS We recommend that you use DAB (Digital Audio Broadcasting) tuner KT-DB1500 or KT-DB1000 with your unit. If you have another DAB tuner, consult your JVC IN-CAR ENTERTAINMENT dealer. • Refer also to the Instructions supplied with your DAB tuner. What is DAB system? DAB is one of the digital radio broadcasting systems available today. It can deliver CD quality sound without any annoying interference and signal distortion. Furthermore, it can carry text, pictures, and data.
Start searching for an ensemble. To search for ensembles of higher frequency To search for ensembles of lower frequency To tune in to a particular ensemble without searching Before you start.... Press FM/AM (DAB) briefly if tape, CD changer, or external component is the current source. ENGLISH 3 1 Press and hold FM/AM (DAB) to select DAB tuner as the source. 2 Press FM/AM (DAB) repeatedly to select the When an ensemble is received, searching stops.
ENGLISH 3 4 Tune in to an ensemble you want. Select a service of the ensemble you want to listen to. To select the next service To select the previous service 5 Press and hold the number button (in this example, 1) you want to store the selected service into for more than 2 seconds. Tuning in to a preset DAB service You can easily tune in to a preset DAB service. Remember that you must store services first. If you have not stored them yet, see “Storing DAB services in memory” on pages 33 and 34.
Tracing the same program automatically (Alternative Reception) You can keep listening to the same program. • While receiving a DAB service: When driving in an area where a service cannot be received, this unit automatically tunes in to another ensemble or FM RDS station, broadcasting the same program. • While receiving an FM RDS station: When driving in an area where a DAB service is broadcasting the same program as the FM RDS station is broadcasting, this unit automatically tunes in to the DAB service.
ENGLISH PREPARING THE REMOTE CONTROLLER This unit can be remotely controlled as instructed here (with an optionally purchased remote controller). We recommend that you use remote controller RM-RK50 or RM-RK60 with your unit. (Ex.: When you are using RM-RK50) Before using the remote controller: • Aim the remote controller directly at the remote sensor on the main unit. Make sure there is no obstacle in between. 3. Return the battery holder.
RM-RK50 SOUND ATT U R SOURCE F 4 Functions the same as the control dial on the main unit. Note: These buttons do not function for the preferred setting mode adjustment. D VOL ENGLISH 3 • Selects the preset stations while listening to the radio (or the DAB tuner). Each time you press the button, the preset station (or service) number increases, and the selected station (or service) is tuned in. • While playing an MP3 disc on an MP3compatible CD changer; – Skips to the previous disc if pressed briefly.
What appears to be trouble is not always serious. Check the following points before calling a service center. Symptoms Causes • Sound cannot be heard from the speakers. Tape Playback FM/AM General ENGLISH TROUBLESHOOTING Remedies The volume level is set to the minimum level. Adjust it to the optimum level. Connections are incorrect. Check the cords and connections. • This unit does not work at all. The built-in microcomputer may have functioned incorrectly due to noise, etc.
Remedies No disc is in the magazine. Insert discs into the magazine. Discs are inserted upside down. Insert discs correctly. Discs are unplayable. Insert playable discs. The current disc does not contain any MP3 files. Insert a disc that contains MP3 files. • “NO MAG” appears on the display. No magazine is loaded in the CD changer. Insert the magazine. • MP3 disc is skipped or cannot be played back. MP3 files do not have the extension code—mp3 in their file names.
ENGLISH MAINTENANCE This unit requires very little attention, but you will be able to extend the life of the unit if you follow the instructions below. To clean the head CAUTION: • Do not play the cassettes with peeling labels; otherwise, they can damage the unit. • Tighten tapes to remove slack since loose tape may become entangled with the mechanism. • Do not leave a cassette in the cassette compartment after use, as the tape may become slack.
AUDIO AMPLIFIER SECTION CASSETTE DECK SECTION Maximum Power Output: Front: 45 W per channel Rear: 45 W per channel Continuous Power Output (RMS): Front: 17 W per channel into 4 Ω, 40 Hz to 20 000 Hz at no more than 0.8% total harmonic distortion. Rear: 17 W per channel into 4 Ω, 40 Hz to 20 000 Hz at no more than 0.8% total harmonic distortion.
Having TROUBLE with operation? Please reset your unit Refer to page of How to reset your unit Затруднения при эксплуатации? Пожалуйста, перезагрузите Ваше устройство Для получения информации о перезагрузке Вашего устройства обратитесь на соответствующую страницу V EN, RU J C © 2003 VICTOR COMPANY OF JAPAN, LIMITED Cover_001A_KS-FX845R[EE]f.
KS-FX845R Installation/Connection Manual Руководство по установке/подключению GET0141-002A V J [EE] C 0403KKSMDTJEIN EN, RU РУССКИЙ ENGLISH • This unit is designed to operate on 12 V DC, NEGATIVE ground electrical systems. • Это устройство разработано для эксплуатации на 12 В постоянного напряжения с минусом на массе. INSTALLATION (IN-DASH MOUNTING) УСТАНОВКА (УСТАНОВКА В ПРИБОРНУЮ ПАНЕЛЬ) • The following illustration shows a typical installation.
• When using the optional stay • При использовании дополнительной стойки • When installing the unit without using the sleeve • При установке устройства без использования муфты Stay (option) Стойка (дополнительно) Washer Шайба In a Toyota for example, first remove the car radio and install the unit in its place. В автомобилях “Toyota”, например, сначала удалите автомобильную магнитолу, затем установите на ее место это устройство. Fire wall Стена * Not included with this unit. * Не входят в комплект.
РУССКИЙ ENGLISH ELECTRICAL CONNECTIONS ЭЛЕКТРИЧЕСКИЕ ПОДКЛЮЧЕНИЯ To prevent short circuits, we recommend that you disconnect the battery’s negative terminal and make all electrical connections before installing the unit. If you are not sure how to install this unit correctly, have it installed by a qualified technician. Для предотвращения коротких замыканий мы рекомендуем Вам отсоединить отрицательный разъем аккумулятора и осуществить все подключения перед установкой устройства.
PRECAUTIONS on power supply and speaker connections: ПРЕДОСТЕРЕЖЕНИЯ по питанию и подключению громкоговорителей: • DO NOT connect the speaker leads of the power cord to the car battery; otherwise, the unit will be seriously damaged. • Connect the black lead (ground), yellow lead (to car battery, constant 12 V), and red lead (to an accessory terminal) correctly. • BEFORE connecting the speaker leads of the power cord to the speakers, check the speaker wiring in your car.