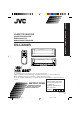
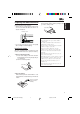
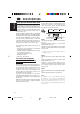
ENGLISH DEUTSCH CASSETTE RECEIVER FRANÇAIS CASSETTEN-RECEIVER RADIOCASSETTE RADIO/CASSETTESPELER NEDERLANDS KS-LX200R BAND SCM SEL 7 MONO 8 LOCAL 9 MODE ATT S S M DISP SOURCE TP RDS PTY INT 10 RPT 11 RND 12 OFF KS-LX200R For installation and connections, refer to the separate manual. Angaben zu Einbau und Verkabelung entnehmen Sie bitte der gesonderten Anleitung. Pour l’installation et les raccordements, se référer au manuel séparé.
ENGLISH Thank you for purchasing a JVC product. Please read all instructions carefully before operation, to ensure your complete understanding and to obtain the best possible performance from the unit. CONTENTS EXTERNAL COMPONENT OPERATIONS29 LOCATION OF THE BUTTONS ............ 3 Front panel ............................................ Remote controller .................................. Preparing the remote controller ............. 3 4 5 BASIC OPERATIONS ......................
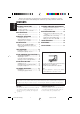
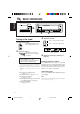
LOCATION OF THE BUTTONS Cassette compartment ENGLISH Front panel Display window 2 1 Control panel* y 0 / 3 4 5 6 7 8 9 p q w e r t *The control panel slides out when you press ON/CLOSE . 1 +/– button 2 ¢/4 button • ¢/4 also functions as ON or CLOSE button. 3 SEL (select) button 4 SCM (sound control memory) button 5 MO/ (mono/Dolby) button 6 LOCAL button 7 MODE ATT (attenuator) button • Also functions as SSM buttons when pressed together with the DISP button.
ENGLISH Remote controller 5 6 1 2 7 3 4 1 • Turns on the unit if pressed when the unit is turned off. • Turns off the unit if pressed and held until “SEE YOU” appears on the display. • Drops the volume level for a moment if pressed briefly. Press again to resume the volume. 2 • Functions as the BAND button while listening to the FM broadcast (or the DAB tuner). Each time you press the button, the band changes. • Functions as the DISC + button while listening to the CD changer.
3. Return the battery holder. Before using the remote controller: • Aim the remote controller directly at the remote sensor on the main unit. Make sure there is no obstacle in between. (back side) ENGLISH Preparing the remote controller Insert again the battery holder pushing it until you hear a clicking sound. Remote sensor B • Do not expose the remote sensor to strong light (direct sunlight or artificial lighting).
ENGLISH BASIC OPERATIONS 1 Turning on the power 1 3 3 Adjust the volume. Press + to increase the volume. Turn on the power. The display illuminates and the control panel comes out. 2 2 Press – to decrease the volume. Select the source. Each time you press the button, the source changes as follows: = FM = DAB tuner** = Tape* = CD changer** = External component = AM = (back to the beginning) * If a cassette is not in the cassette compartment, you cannot select tape as the source to play.
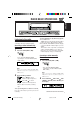
ENGLISH RADIO BASIC OPERATIONS BAND SCM SEL 7 MONO 8 LOCAL 9 MODE ATT S S M DISP SOURCE TP RDS PTY INT 10 RPT 11 RND 12 OFF 0 / R Listening to the radio You can use either automatic searching or manual searching to tune into a particular station. Searching a station automatically: Auto search 1 Select the band (FM1–3, AM). • Press and hold SOURCE (BAND) repeatedly to select the FM band (FM1, FM2 or FM3.) To tune in FM stations only with strong signals 1 Press MODE ATT.
ENGLISH 3 Tune into a station you want while “MANU” is flashing. ¢ to tune into Press stations of higher frequencies. Press 4 to tune into stations of lower frequencies. Storing stations in memory You can use one of the following two methods to store broadcasting stations in memory.
Manual preset Ex: Storing an FM station of 88.3 MHz into the preset number 1 of the FM1 band You can easily tune into a preset station. Remember that you must store stations first. If you have not stored them yet, see “Storing stations in memory” on page 8. 1 1 Select the band (FM1). 1 Press SOURCE (BAND) to select FM as the source. Select the band (FM1–3, AM). 1 Press SOURCE (BAND) to select FM or AM as the source. 2 Press and hold SOURCE (BAND) repeatedly to select the FM1 band.
ENGLISH RDS OPERATIONS What you can do with RDS EON RDS (Radio Data System) allows FM stations to send an additional signal along with their regular programme signals. For example, the stations send their station names, as well as information about what type of programme they broadcast, such as sports or music, etc. Another advantage of RDS function is called “EON (Enhanced Other Networks).” The EON indicator lights up while receiving an FM station with the EON data.
Programme 1 broadcasting on frequency A Programme 1 broadcasting on frequency B Programme 1 broadcasting on frequency E Programme 1 broadcasting on frequency C Programme 1 broadcasting on frequency D Using Standby Reception Standby Reception allows the unit to switch temporarily to your favorite programme (PTY: Programme Type) and Traffic Announcement (TA) from the current source (another FM station, tape and other connected components.
ENGLISH Selecting your favorite programme for PTY Standby Reception You can select your favorite programme for PTY Standby Reception to store in memory. When shipped from the factory, “NEWS” is stored as the programme type for PTY Standby Reception. 1 2 Press and hold SEL (select) for more than 2 seconds so that one of the PSM items appears on the display. (PSM: see page 22.) 4 Press SEL (select) to finish the setting.
Press and hold the number button for more than 2 seconds to store the PTY code selected into the preset number you want. / PTY preset number appears, and selected code name and “MEMORY” alternate on the display. 5 Press SEL (select) to finish the setting. To search your favorite programme type 1 Press and hold PTY (programme type) for more than 1 second while listening to an FM station. The last selected PTY code and preset number appear.
ENGLISH Changing the display mode while listening to an FM station Automatic clock adjustment You can change the initial indication on the display to either station name (PS NAME) or to station frequency (FREQ), while listening to an FM RDS station. • See also “Changing the general settings (PSM)” on page 21. When shipped from the factory, the clock built in this unit is set to be readjusted automatically using the CT (Clock Time) data in the RDS signal.
ENGLISH TAPE OPERATIONS BAND SCM SEL 7 MONO 8 LOCAL 9 MODE ATT S S M DISP SOURCE TP RDS PTY INT 10 RPT 11 RND 12 OFF 0 / R Listening to a tape 1 To stop play and eject the cassette Open the cassette compartment. 0 2 Insert a cassette into the cassette compartment. ON CLOSE The unit draws the cassette, and tape play starts automatically after the display panel moves up. Press 0 OFF briefly. Tape play stops and the cassette automatically ejects from the cassette compartment.
ENGLISH To play back tapes recorded with the Dolby B NR 1 Press MODE ATT. “MODE” appears on the display. 2 Press MO/ while “MODE” is still on the display so that the indicator lights up, and “DOLBY B” appears on the display for several seconds. To cancel the Dolby B NR, repeat the above procedure again so that the indicator goes off. * Dolby noise reduction is manufactured under license from Dolby Laboratories Licensing Corporation.
Skipping the blank portions on the tape You can skip blank portions between the tunes (Blank Skip). When this function is on, the unit skips blank portions of 15 seconds or more, fast-forwards to the next tune, then starts playing it. • See also “Changing the general settings (PSM)” on page 21. 1 2 3 Press and hold SEL (select) for more than 2 seconds so that one of the PSM items appears on the display. (PSM: see page 22.) Press ¢ or 4 to select “B. SKIP” (blank skip). . Press + to select “ON.
ENGLISH SOUND ADJUSTMENTS 2 Adjusting the sound Adjust the level. Press + to increase the level. You can adjust the sound characteristics to your preference. 1 Press – to decrease the level. Select the item you want to adjust. BAS (bass) VOL (volume) Indication Each time you press the button, the adjustable items change as follows: FAD TRE BAL (treble) (fader) WOOFER To do: (balance) BBE Equalization pattern changes as you adjust the bass or treble. Range BAS Adjust the bass. –06 (min.
The BBEII* function restores the brilliance and clarity of the original live sound in recording, broadcasts, etc. When a speaker reproduces sound, it introduces frequency-dependent phase shifting, causing highfrequency sounds to take longer to reach the ear than low frequency sounds.
ENGLISH Indication For: Preset values Bass Treble BBEII BEAT Rock or disco +02 00 2 music SOFT Quiet +01 –03 OFF background music POP Light music +04 +01 OFF SCM OFF (Flat sound) 00 00 2 Notes: • You can adjust each sound mode to your preference, and store it in memory. If you want to adjust and store your original sound mode, see “Storing your own sound adjustments” below. • To adjust the bass and treble reinforcement levels or to turn on/off the BBEII function temporarily, see pages 18 and 19.
Setting the clock You can also set the clock system either 24 hours or 12 hours. 1 2 Press and hold SEL (select) for more than 2 seconds so that one of the PSM items appears on the display. (See page 22.) 2 Adjust the hour. 1 1 Press and hold SEL (select) for more than 2 seconds so that one of the PSM items appears on the display. (See page 22.) 2 Select the PSM item you want to adjust. (See page 22.) Set the minute. 3 2 Adjust the minute. 1 Adjust the PSM item selected above.
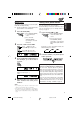
ENGLISH Preferred Setting Mode (PSM) items 1 3 2 Set. Factory-preset settings See page 0:00 21 Hold. Select.
To select the dimmer mode – DIMMER You can cancel the Advanced SCM (Sound Control Memory), and unlink the sound modes and the playback sources. When shipped from the factory, a different sound mode can be stored in memory for each source so that you can change the sound modes simply by changing the sources.
ENGLISH To turn on/off the key-touch tone – BEEP To change the FM tuner selectivity – FILTER You can deactivate the key-touch tone if you do not want it to beep each time you press a button. When shipped from the factory, the key-touch tone is activated. • BEEP ON: Activates the key-touch tone. • BEEP OFF: Deactivates the key-touch tone. In some areas, adjacent stations may interfere with each other. If this interference occurs, noise may be heard.
2 Each time you press the button, character changes as follows: You can prohibit the unauthorized use of this unit by the others. To use the security lock, you need to set the password first. Once you set the password, the unit will ask you to enter the password when you turn on the unit for the first time after re-installation (or after recovering the car battery exhaustion.) CAUTION: Be careful not to forget the password you have entered; otherwise, you cannot use this unit.
ENGLISH When Security Lock works? To change the password Once you register the password, “ ” appears on the display, and the unit will ask you to enter the password in the following cases: • When you turn on the unit for the first time after re-installing the unit. • When you turn on the unit for the first time after replacing the car battery. If you want to change the password after you have registered it, follow the procedure below. 1 Press + and ¢ at the same time for more than 2 seconds.
ENGLISH CD CHANGER OPERATIONS BAND SCM SEL 7 MONO 8 LOCAL 9 MODE ATT S S M DISP TP RDS SOURCE PTY INT 10 RPT 11 RND 12 OFF 0 / R We recommend that you use one of the CH-X series with your unit. If you have another CD automatic changer, consult your JVC IN-CAR ENTERTAINMENT dealer for connections. • For example, if your CD automatic changer is one of the KD-MK series, you need a cord (KS-U15K) for connecting it to this unit.
ENGLISH To go to a particular disc directly To play back tracks repeatedly (Repeat Play) Press the number button corresponding to the disc number to start its playback (while the CD changer is playing.) 1 Press MODE ATT while playing a CD. “MODE” appears on the display. / 2 Press RPT (repeat), while “MODE” is still on the • To select a disc number from 1 – 6: Press 1 (7) – 6 (12) briefly. • To select a disc number from 7 – 12: Press and hold 1 (7) – 6 (12) for more than 1 second.
Playing an external component Using a subwoofer When connecting an external component to the LINE IN plugs on the rear, you can select the component as the sound source. By connecting a subwoofer to the SUBWOOFER OUT plugs on the rear, you can enjoy enhanced bass sounds and a more realistic theater atmosphere in your car. • Refer also to the instructions supplied with your subwoofer. 1 Select the external component (EXT– LINE IN).
ENGLISH DAB TUNER OPERATIONS BAND SCM SEL 7 MONO 8 LOCAL 9 MODE ATT S S M DISP SOURCE TP RDS PTY INT 10 RPT 11 RND 12 OFF 0 / R We recommend that you use DAB (Digital Audio Broadcasting) tuner KT-DB1500 with your unit. If you have another DAB tuner, consult your JVC IN-CAR ENTERTAINMENT dealer. • Refer also to the Instructions supplied with your DAB tuner. What is DAB system? DAB is one of the digital radio broadcasting systems available today.
Normally service name is shown on the display. If you want to check the ensemble name or its frequency, press DISP. Each time you press the button, the following information appears for a while on the display. Storing DAB services in memory You can preset up to 6 DAB services in each DAB band (DAB1, DAB2 and DAB3) manually. 1 ENGLISH To change the display information while tuning into an ensemble Select the DAB tuner (DAB1–3). 1 Press SOURCE (BAND) to select DAB tuner as the source.
ENGLISH 4 Press and hold the number button (in this example, 1) you want to store the selected service into for more than 2 seconds. Tuning into a preset DAB service You can easily tune into a preset DAB service. Remember that you must store services first. If you have not stored them yet, see page 31. 1 Select the DAB tuner (DAB1–3). 1 Press SOURCE (BAND) to select DAB tuner as the source. Band/preset number and “MEMO” flash alternately for a while.
Tracing the same program automatically (Alternative Reception) You can keep listening to the same program • While receiving a DAB service: When driving in an area where a service cannot be received, this unit automatically tunes in another ensemble or FM RDS station, broadcasting the same program. • While receiving an FM RDS station: When driving in an area where a DAB service is broadcasting the same program as the FM RDS station is broadcasting, this unit automatically tunes into the DAB service.
ENGLISH TROUBLESHOOTING What appears to be trouble is not always serious. Check the following points before calling a service center. Causes Symptoms Remedies • A cassette tape cannot be inserted. You have tried to insert a cassette in the wrong way. Insert the cassette with the exposed tape facing right. • A cassette tape cannot be ejected. Cassette ejection is prohibited. Press and hold 0 OFF for more than two seconds while pressing SOURCE (23). • Cassette tapes become hot.
Remedies • “RESET 1” - “RESET 7” appears on the display. Press the reset button of the CD changer. • This unit does not work at all. • The CD changer does not work at all. The built-in microcomputer may function incorrectly due to noise, etc. Press the reset button on the front panel. (The clock setting and preset stations stored in memory are erased.) (See page 2.) •“ ” appears on the display. Security lock is in use. Enter the password. (See page 25.
ENGLISH MAINTENANCE This unit requires very little attention, but you will be able to extend the life of the unit if you follow the instructions below. To clean the heads CAUTION: • Do not play the tapes with peeling labels; otherwise, they can damage the unit. • Tighten tapes to remove slack since loose tape may become entangled with the mechanism. • Do not leave a cassette in the cassette compartment after use, as the tape may become slack.
AUDIO AMPLIFIER SECTION CASSETTE DECK SECTION Maximum Power Output: Front: 45 W per channel Rear: 45 W per channel Continuous Power Output (RMS): Front: 17 W per channel into 4 Ω, 40 Hz to 20 000 Hz at no more than 0.8% total harmonic distortion. Rear: 17 W per channel into 4 Ω, 40 Hz to 20 000 Hz at no more than 0.8% total harmonic distortion.
Having TROUBLE with operation? Please reset your unit Refer to page of How to reset your unit Haben Sie PROBLEME mit dem Betrieb? Bitte setzen Sie Ihr Gerät zurück Siehe Seite Zurücksetzen des Geräts Vous avez des PROBLÈMES de fonctionnement? Réinitialisez votre appareil Référez-vous à la page intitulée Comment réinitialiser votre appareil Hebt u PROBLEMEN met de bediening? Stel het apparaat terug Zie de pagina met de paragraaf Het apparaat terugstellen VICTOR COMPANY OF JAPAN, LIMITED EN, GE, FR, NL
KS-LX200R Installation/Connection Manual Einbau/Anschlußanleitung Manuel d’installation/raccordement V FSUN3148-T211 [E] J ENGLISH DEUTSCH C 0800MNMMDWJES EN, GE, FR FRANÇAIS • This unit is designed to operate on 12 volts DC, NEGATIVE ground electrical systems. • Dieses Gerät ist für einen Betrieb in elektrischen Anlagen mit 12 V Gleichstrom und (–) Erdung ausgelegt. • Cet appareil est conçu pour fonctionner sur des sources de courant continu de 12 volts à masse NEGATIVE.
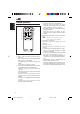
• When using the optional stay • Beim Verwenden der Anker-Option • Lors de l'utilisation du hauban en option Dashboard Armaturenbrett Tableau de bord • When installing the unit without using the sleeve • Beim Einbau des Geräts ohne Halterung • Lors de l'installation de l’appareil sans utiliser de manchon Fire wall Feuerwand Cloison In a Toyota for example, first remove the car radio and install the unit in its place.
ENGLISH DEUTSCH FRANÇAIS B Connections without using the ISO connectors / Anschlüsse ohne ISO-Stecker / Connexions sans l’utilisation des connecteurs ISO Before connecting: Check the wiring in the vehicle carefully. Incorrect connection may cause serious damage to this unit. 1 Cut the ISO connector. 2 Connect the colored leads of the power cord to the car battery, speakers and power aerial (if any) in the following sequence.
C Connections Adding Other Equipment / Anschlüsse zum Hinzufügen von anderer Ausrüstung / Raccordement pour ajouter d’autres appareils Amplifier / Verstärker / Amplificateur You can connect an amplifier and other equipment to upgrade your car stereo system. • Connect the remote lead (blue with white stripe) to the remote lead of the other equipment so that it can be controlled through this unit. • For amplifier only: – Connect this unit’s line-out terminals to the amplifier’s line-in terminals.
CAUTION / ACHTUNG / ATTENTION / LET OP DEUTSCH Um dieses Gerät zu installieren, bringen Sie zunächst den Zierrahmen am Gerät an. Schieben Sie anschließend das Gerät in die Schutzhülle, indem Sie auf die vier Ecken des Zierrahmens drücken. Drücken Sie NICHT auf die Blende (die in der Abbildung dunkelgetönt dargestellt ist); anderenfalls läßt sich die Blende weder öffnen noch schließen.