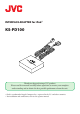
INTERFACE ADAPTER for iPodR KS-PD100 Thank you for purchasing a JVC product. Please read this manual carefully before operation, to ensure your complete understanding and to obtain the best possible performance from the unit. • iPod is a trademark of Apple Computer, Inc., registered in the U.S. and other countries. • For installation and connections, refer to the separate manual.
INFORMATION (For U.S.A.) This equipment has been tested and found to comply with the limits for a Class B digital device, pursuant to Part 15 of the FCC Rules. These limits are designed to provide reasonable protection against harmful interference in a residential installation. This equipment generates, uses, and can radiate radio frequency energy and, if not installed and used in accordance with the instructions, may cause harmful interference to radio communications.
Getting started General information • This adapter supports only JVC’s car receivers which meet the following conditions: – An MP3-compatible CD changer control is equipped – CD Text, MP3 folder/file names, or ID3 Tag is displayed • By using this adapter, you can operate the iPod with your receiver as follows: – Playing tracks stored in the iPod – Selecting and playing tracks from “Playlists/Artists/Albums/Songs/Genres/Composers” – Changing playback modes • If your receiver shows “CD-CH (CD-Changer)” when t
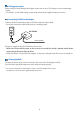
Setting your receiver Before using the iPod through this adapter, make sure to select CD changer as the external input setting. • For details, see the PSM setting section in the instructions supplied with your receiver. Connecting the iPod to the adapter Connect the iPod connection cable to the dock connector on the iPod. • Insert the connection cable until you hear a clicking sound. KS-PD100 To the receiver The power supply to the iPod is linked to the receiver.
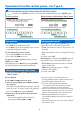
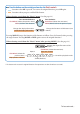
Checking the type of your receiver Operating procedures on the control panel and from the remote controller are different according to the type of the receiver. Check the type of your receiver by referring to the chart below. • If you are not sure about the type of your receiver, see the JVC web site or consult your JVC car audio (IN-CAR ENTERTAINMENT) dealer.
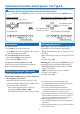
Operations from the control panel—For Type A How the buttons on the control panel work as the iPod’s controls • : functions after MODE is pressed. To restore the original function, press MODE again.
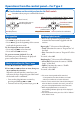
Operations from the control panel—For Type B How the buttons on the control panel work as the iPod’s controls • : functions after MODE is pressed. To restore the original function, press MODE again.
Operations from the control panel—For Type C How the buttons on the control panel work as the iPod’s controls • : functions when you press and hold the button.
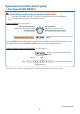
Operations from the control panel —For Type D (KD-NX901) How the buttons on the control panel work as the iPod’s controls • • : functions after OK is pressed. To restore the original function, press OK again. : functions when you press and hold the button. During playback (See also page 11.
How the buttons on the control panel work as the iPod’s controls • • : functions after OK is pressed. To restore the original function, press OK again. : functions when you press and hold the button. When selecting a track from the “Music” menu (See also page 11.
Selecting playback modes*2 Basic operation To select a track: • Turn the control dial clockwise to go to the next tracks. • Turn the control dial counterclockwise to go to the beginning of the current track and the previous tracks. To fast-forward or reverse a track: • After pressing MODE, press and hold 4 to fast-forward. • After pressing MODE, press and hold 1 to reverse. To pause or resume playback: After pressing OK, turn the control dial counterclockwise to select pause or resume.
Operations from the remote controller • From the remote controller, playback mode selection is not available. Perform the operation on the control panel to select a playback mode. You can control the iPod using the remote controller supplied with your receiver. Examples: RM-RK50 RM-RK300 RM-RK230 How the buttons on the remote controller work as the iPod’s controls • The illustrations of RM-RK300 are used as examples.
Troubleshooting What appears to be trouble is not always serious. Check the following points before calling a service center. Symptoms Causes Remedies • The iPod is not turned on. Connections are incorrect. Check the connecting cable and its connection. • Buttons do not work as intended. The functions of the buttons have been changed. Press MODE (or OK) before performing the operation. • The sound is distorted. The equalizer is activated on both the receiver and the iPod.
Specifications GENERAL Power Requirement: Operating Voltage: DC 14.4 V (11 V to 16 V allowance) Grounding System: Negative ground Current consumption: 18 mA (200 mA while charging the iPod) Allowable Operating Temperature: 0°C to +40°C (32°F to 104°F) Dimensions (W × H × D): 87 mm × 25 mm × 68 mm (3-7/16" × 1" × 2-11/16") Mass (approx.): 320 g (0.71 lbs) (excluding accessories) Design and specifications are subject to change without notice.
EN © 2005 Victor Company of Japan, Limited
D. PLAYER INTERFACE ADAPTER KS-PD500 Thank you for purchasing a JVC product. Please read this manual carefully before operation, to ensure your complete understanding and to obtain the best possible performance from the unit. • For installation and connections, refer to the separate manual.
INFORMATION (For U.S.A.) This equipment has been tested and found to comply with the limits for a Class B digital device, pursuant to Part 15 of the FCC Rules. These limits are designed to provide reasonable protection against harmful interference in a residential installation. This equipment generates, uses, and can radiate radio frequency energy and, if not installed and used in accordance with the instructions, may cause harmful interference to radio communications.
Getting started General information • This adapter supports only JVC’s car receivers which meet the following conditions: – An MP3-compatible CD changer control is equipped – CD Text, MP3 folder/file names, or ID3 Tag is displayed • By using this adapter, you can operate the D. player with your receiver as follows: – Playing tracks stored in the D.
Connectable D. player • You can control the D. player with the cradle connector through this adapter. For XA-HD500 (firmware version 1.00.0947) users: Before connecting the D. player to this adapter, update the firmware version of your D. player. Refer to “Update manual” for details about updating. Setting your receiver Before using the D. player through this adapter, make sure to select CD changer as the external input setting.
Checking the type of your receiver Operating procedures on the control panel and from the remote controller are different according to the type of the receiver. Check the type of your receiver by referring to the chart below. • If you are not sure about the type of your receiver, see the JVC web site or consult your JVC car audio (IN-CAR ENTERTAINMENT) dealer.
Operations from the control panel—For Type A How the buttons on the control panel work as the D. player’s controls • : functions after MODE is pressed. To restore the original function, press MODE again.
Operations from the control panel—For Type B How the buttons on the control panel work as the D. player’s controls • : functions after MODE is pressed. To restore the original function, press MODE again.
Operations from the control panel—For Type C How the buttons on the control panel work as the D. player’s controls • : functions when you press and hold the button.
Operations from the control panel —For Type D (KD-NX901) How the buttons on the control panel work as the D. player’s controls • • : functions after OK is pressed. To restore the original function, press OK again. : functions when you press and hold the button. During playback (See also page 11.
How the buttons on the control panel work as the D. player’s controls • • : functions after OK is pressed. To restore the original function, press OK again. : functions when you press and hold the button. When selecting a track from the Top Menu (See also page 11.
Selecting playback modes*2 Basic operation To select a track: • Turn the control dial clockwise to go to the next tracks. • Turn the control dial counterclockwise to go to the beginning of the current track and the previous tracks. To fast-forward or reverse a track: • After pressing MODE, press and hold 4 to fast-forward. • After pressing MODE, press and hold 1 to reverse. To stop or start playback: After pressing OK, turn the control dial counterclockwise to select stop or resume.
Operations from the touch panel—For Type E How the key icons on the touch panel work as the D. player’s controls • There are different types of the touch panel displays. Select the example similar to your receiver from the following. • : functions when you press and hold the key icon.
Selecting playback modes*2 Basic operation To select a track: • Press ¢ to go to the next tracks. • Press 4 to go to the beginning of the current track and the previous tracks. To fast-forward or reverse a track: • Press and hold ¢ to fast-forward. • Press and hold 4 to reverse. To stop or start playback: Press DISC –/ or FOLDER –/ . Each time you press the key icon, the playback stops and resumes alternately.
Operations from the remote controller • From the remote controller, playback mode selection is not available. Perform the operation on the control panel to select a playback mode. You can control the D. player using the remote controller supplied with your receiver. Examples: RM-RK50 RM-RK300 RM-RK230 How the buttons on the remote controller work as the D. player’s controls • The illustrations of RM-RK300 are used as examples.
Troubleshooting What appears to be trouble is not always serious. Check the following points before calling a service center. Symptoms Causes Remedies • The D. player does not turn on, or does not work. Firmware version needs to be updated. • The D. player does not turn on. The battery of the D. player has Charge the battery of the D. run out. player. • Buttons do not work as intended. The functions of the buttons have been changed. Press MODE (or OK) before performing the operation.
Specifications GENERAL Power Requirement: Operating Voltage: DC 14.4 V (11 V to 16 V allowance) Grounding System: Negative ground Current consumption: 18 mA (400 mA while charging the D. player) Allowable Operating Temperature: 0°C to +40°C (32°F to 104°F) Dimensions (W × H × D): 87 mm × 25 mm × 68 mm (3-7/16" × 1" × 2-11/16") Mass (approx.): 300 g (0.67 lbs) (excluding accessories) Design and specifications are subject to change without notice.
EN © 2005 Victor Company of Japan, Limited