ENGLISH MONITOR WITH DVD RECEIVER INSTRUCTION MANUAL KW-V250BT KW-V25BT KW-V350BT KW-V350BT (Region 1 – DVD Region Code 1 Area) (Region 1 – DVD Region Code 1 Area) (Region 1 – DVD Region Code 1 Area) (Region 4 – DVD Region Code 4 Area) This instruction manual is used to describe the models listed above. Model availability and features (functions) may differ depending on the country and sales area. 01_KWV_2019ST_KR_COVER.
Important Notice To ensure proper use, please read through this manual before using this product. It is especially important that you read and observe WARNINGS and CAUTIONS in this manual. Please keep the manual in a safe and accessible place for future reference. WARNINGS To prevent accidents and damages • DO NOT install any unit or wire any cable in a location where; – it may obstruct the steering wheel and gearshift lever operations. – it may obstruct the operation of safety devices such as air bags.
Important Notice For KW-V250BT/KW-V25BT/KW-V350BT Region 1: CAUTION This equipment complies with FCC/IC radiation exposure limits set forth for an uncontrolled environment and meets the FCC radio frequency (RF) Exposure Guidelines and RSS-102 of the IC radio frequency (RF) Exposure rules. This equipment has very low levels of RF energy that is deemed to comply without maximum permissive exposure evaluation (MPE).
About this manual The displays and panels shown in this manual are examples used to provide clear explanations of the operations. For this reason, they may be different from the actual displays or panels. Illustrations of KW-V250BT/KW-V25BT are mainly used for explanation. The region code of a particular model will only be stated if only one of the regions supports the particular feature with the same model name.
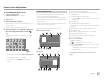
Component Names and Operations KW-V250BT/KW-V25BT KW-V350BT Basic Operations How to reset your unit If the unit fails to operate properly, press the reset button. KW-V250BT/KW-V25BT KW-V350BT 1 1 2 3 4 5 6 7 8 9 Reset button Loading slot Screen (touch panel) Monitor panel Illumination bar The brightness of the illumination changes according to the music level. (Page 44) Volume +/– buttons FNC button • FNC (Press, blink once): Pops up the short-cut menu.
Basic Operations Turning off the power KW-V250BT/KW-V25BT Turning off the screen and button illumination On the monitor panel Adjusting the volume KW-V250BT KW-V25BT KW-V350BT (only for KW-V350BT) KW-V350BT (Hold) (Hold) To turn on the screen and button illumination: Press on the monitor panel or touch the screen. Turning off the AV source 1 Display the source/option selection screen. On the pop-up short-cut menu (only for KW-V250BT/KW-V25BT) 1 Turn off the AV source.
Getting Started Initial settings When you power on the unit for the first time or reset the unit, the screen appears. Perform the initial settings. Initial Settings Demonstration Language ON Enter User Customize Enter Viewing Angle Enter 2 (Page 46) Make the settings to display the picture from the connected rear view camera. Finish E.g.
Various Screens and Operations You can display or change to other screens at any time to show information, change the AV source, change the settings, etc. Home screen • You can customize the Home screen. (Pages 7 and 45) • To display the Home screen from other screens, press - or HOME/ . KW-V250BT/KW-V25BT Touching the operation keys performs the following actions: 1 2 3 4 5 Selects or changes the playback source. Displays all playback sources and options. Displays the screen.
Various Screens and Operations Customizing the Home screen For KW-V250BT/KW-V25BT See on page 45. For KW-V350BT 1 Select an item to replace. On the Home screen, touch and hold the icon you want to replace. The item selection screen is displayed. 2 Select an item (1) you want to display in the selected position, then touch [ ] (2). Source control screen You can perform the playback operation from the source control screen during playback.
Various Screens and Operations Common operation keys on source control screen • The following explanations state the operation keys for KW-V250BT/KW-V25BT, unless stated otherwise. • The appearance of the operation keys may differ, however the similar operation keys have the same operations. • Available operation keys differ depends on the selected source or connected device. Touching the operation keys performs the following actions: 6 [I] Displays other available operation keys besides those shown on 7.
Various Screens and Operations For KW-V350BT: [K] To close the pop-up menu [ ] Displays the phone control screen. [ ]* Displays the screen. (Page 40) [ ]* Displays the screen. (Page 42) [ ]* Displays the screen. (Page 46) [ ]* Displays the screen. (Page 40) To close the pop-up menu • KW-V250BT/KW-V25BT: Press FNC on the monitor panel. • KW-V350BT: Touch [ K ] or touch the screen anywhere other than the pop-up short-cut menu.
Disc • If a disc does not have a disc menu, all tracks on it will be played repeatedly until you change the source or eject the disc. • For playable disc types, file types and other information, see pages 56 and 57. • If “ ” appears on the screen, the unit cannot accept the operation you have tried to do. – In some cases, without showing “ ”, operations will not be accepted. • When playing back a multi-channel encoded disc, the multi-channel signals are downmixed.
Video Disc 2 Make the settings. DISC Mode Menu Language English SET Subtitle Language English SET Audio Language English SET Dynamic Range Control Down Mix Dialog Dolby Surround Screen Ratio Stereo 16:9
Video Video menu control operations You can display the video menu control during video playback. • Available operation keys differ depend on the selected disc type and file type. Touching the operation keys performs the following actions: ] Displays the picture adjustment screen. 1 Touch [DIM ON] or [DIM OFF] to turn on or off the dimmer. 2 Touch [+]/[–] to adjust the other items. • : Adjusts the brightness (−15 to +15). • : Adjusts the contrast (−10 to +10).
USB Video 2 [ MENU] [T MENU] [ ] [ ] Displays the disc menu (DVD). Displays the disc menu (DVD). Switches to the direct disc menu mode. Touch the target item to select. Displays the menu/scene selection screen. • [J] [K] [H] [I]: Selects an item. • [Enter]: Confirms the selection. • [Return]: Returns to the previous screen. Video playback for VCD Touching the operation keys performs the following actions: 1 [ ] [ ] [ ] Connecting a USB device 2 [ MENU] [ ] [ ]* Menu Control E.g.
USB Playback operations Playback information and key operation • For playback information, see “Source control screen” on page 7. • For key operations on the touch panel, see “Common operation keys on source control screen” on page 8. Selecting a folder/track on the list 1 2 Enter the alphabet to search. Touch the first letter you want to search for, then touch [OK]. Display the folder/track list.
Android Connecting an Android device This unit supports Android OS 4.1 and above. Android (commercially available) iPod/iPhone Playback operations Connecting an iPod/iPhone Playback information and key operation Android • For playable iPod/iPhone types and other information, see page 58. • You cannot watch video.
Tuner iPod/iPhone Bluetooth connection Pair the iPod/iPhone with this unit via Bluetooth. (Page 34) 2 Select a category (1), then select a desired item (2). The unit switches to FM alarm scene automatically when receiving an alarm signal from FM broadcast. iPod Selecting the playback device via the connection method See on page 47 for more information.
Tuner 1 Selects the band (AM/FM1/FM2/FM3) 2 Text information • Touching [ H ] scrolls the text if not all of the text is shown. • Touching [Radio Text] switches the information between Radio Text, Radio Text Plus and PTY code. 3 Current station frequency 4 Displays the preset stations window (Page 18) • To hide the window, touch [ I ]/[ ]. 5 [P1] – [P5] • (Touch) Selects a preset station. • (Hold) Presets the current station.
SiriusXM® Satellite Radio Tuner Presetting stations in the memory (Only for KW-V250BT/KW-V25BT/KW-V350BT Region 1) Selecting a preset station You can preset five stations for each band. 1 Automatic presetting — SSM (Strongstation Sequential Memory) (for FM only) Select the band, then display the preset station window.
SiriusXM® Satellite Radio Activating subscription 1 Check your Radio ID. The SiriusXM Satellite Radio ID is required for activation and can be found by tuning to Channel 0 as well as on the label found on the SiriusXM Connect Vehicle Tuner and its packaging. • The Radio ID does not include the letters I, O, S or F. 2 Playback information on the source control screen SiriusXM 5 6 7 KW-V350BT Confirm the activation. A confirmation message appears. Touch [Return].
SiriusXM® Satellite Radio Operation keys on source control screen • The following explanations state the operation keys for KW-V250BT/KW-V25BT, unless stated otherwise. • The appearance of the operation keys may differ, however the similar operation keys have the same operations. • See also “Common operation keys on source control screen” on page 8. q [ ] • To list all the channels, touch [All Channels].
SiriusXM® Satellite Radio Replaying content Selecting a preset channel 1 Select the band, then display the preset channel window. On the source control screen, touch as follows: 2 You can pause, rewind and replay the contents from the currently tuned channel. • The SiriusXM Connect Vehicle Tuner continually buffers up to 60 minutes of audio. • If you change to another channel during playback, the buffered contents will be lost. • The time code is updated every second. 1 Select a preset channel.
SiriusXM® Satellite Radio When you select a SmartFavorites channel, you can listen to the current song from the beginning. 1 Display the screen. For teams Content Alert TuneStart™ The unit informs you when receiving the content you are interested in, such as music, information about a sports team, weather and traffic information. 1 Display the screen.
SiriusXM® Satellite Radio Selecting items for Content Alert You can select items (artists/songs/teams) from the registered items on the list to inform you once the unit receives the information. For artists/songs/teams 1 Display the screen. On the source control screen, touch as follows: To delete the registered items: Touch and hold the item you want to delete in step 2. The [ ] icon and a check mark appear beside the selected item. Touch the [ ] icon to delete.
SiriusXM® Satellite Radio Then, on the screen, touch as follows: : [Change] Switching to registered content When an artist/song/team registered for Content Alert is being broadcasted, an alert appears on the screen. Touch [Jump], then select the item to jump to on the screen. 2 2 Enter the initial four-digit code (0000) (1), and then touch [Enter] (2) to confirm. Parental Code Check Content Alerts Select the desired mode for .
Pandora® SiriusXM® Satellite Radio 3 Select a category (1), then a channel (2). 2 A check mark appears beside the selected channel. A check mark appears beside the selected channel.
Pandora® Install the latest version of the Pandora application on your smartphone. • For Android devices: Search for “Pandora” in Google Play to find and install the most recent version. • For iPhone/iPod touch: Search for “Pandora” in the Apple iTunes App Store to find and install the most recent version. Playback operations Playback information and key operation KW-V250BT/KW-V25BT Pandora Connecting the device For Android devices Pair the Android device with this unit via Bluetooth.
Pandora® iHeartRadio 4 (Only for KW-V250BT/KW-V25BT/KW-V350BT Region 1) 3 [ ] Displays the list selection screen. [ ] Thumbs down to the current track and skips to the next track. [ ] Registers the current track as a favorite. Starts/pauses playback. [T] Skips the current track. • Not available when the Pandora skip reaches its limit. Selecting a station from the list Display the list selection screen.
iHeartRadio Install the latest version of the iHeartRadio application on your smartphone. • For Android devices: Search for “iHeartRadio for Auto” in Google Play to find and install the most recent version. • For iPhone/iPod touch: Search for “iHeartRadio for Auto” in the Apple iTunes App Store to find and install the most recent version.
iHeartRadio 4 [ ] Displays the screen or the station list. [ ] Dislikes the currently playing content. [ ] Likes the currently playing content. [Io]*2 Starts/stops playback. [IW]*1 Starts/pauses playback. [SCAN]*2 Scans stations randomly. [T]*1 Skips the current track. [Familiar] Distributes well-known tracks. [Mixed] Distributes a mix of artists and track names. 1 Display the variety level selection screen.
Spotify With Spotify, your music is everywhere. Working out, partying or relaxing, the right music is always at your fingertips. There are millions of songs on Spotify—from old favorites to the latest hits. Just choose the music you love, or let Spotify surprise you. You can stream Spotify from iPhone/iPod touch or Android devices. • Because Spotify is a third-party service, the specifications are subject to change without prior notice.
Spotify 1 Displays/hides other available operation keys*2 2 Picture data 3 Track information • Touching [ H ] scrolls the text if not all of the text is shown. • Touching [ ]/[ ] changes the displayed information between artist ( ) and album ( ). 4 Operation keys*2 5 Playing time/playback status 6 Progress bar 7 Only for KW-V350BT: Playback source items shown on the Home screen. • Touching the playback source item changes the playback source.
Spotify Selecting a track 1 Other External Components AV-IN Connecting an external component Display the Spotify menu screen. On the source control screen, touch as follows: Rear view camera See page 54 for more information. Starting playback 2 Select the list type, then select a desired item. 1 2 • The list types displayed differ depending on the information sent from Spotify. Browse Radio Connecting a rear view camera Select “AV-IN” as the source.
Other External Components Operations while the camera screen is displayed To adjust the picture Touch the area shown below. Video menu control is shown. For details, see “Video menu control operations” on page 12. • To exit video menu control, touch the same area again. To display parking guide line Set to [ON] (page 46) or touch the area shown below.
Bluetooth® Information Bluetooth is a short-range wireless radio communication technology for mobile devices such as mobile phones, portable PCs and other devices. Bluetooth devices can be connected without cables and communicate with each other. Note • While driving, do not perform complicated operations such as dialing numbers, using the phone book, etc. When you perform these operations, stop your car in a safe place.
Bluetooth® Pairing a Bluetooth device using a PIN code (for Bluetooth 2.0) 1 4 Display the screen. Change the PIN code. If you wish to skip changing the PIN code, go to step 3. Device Name 1 Device Name 2 3 Connecting/disconnecting a registered Bluetooth device 1 Select the device (1) you want to connect, then select [Connection] (2). Paired Device List Note • The PIN code is initially set to “0000”. • The maximum number of digits in the PIN code is 15.
Bluetooth® • The status is shown as follows: : Connection is in progress. : A connection has been established. : A connection can be established. : Disconnection is in progress. : No connection is established. • When a Bluetooth mobile phone is connected, the signal strength and battery level are displayed when the information is acquired from the device.
Bluetooth® 3 Select a contact (1), then make a call (2). When item 1, 2 or 3 is selected in step 2: 1 Device Name 1 2 Device Name 2 Name 1 1234XXXXXX Name 2 2345XXXXXX Name 3 3456XXXXXX Name 4 4567XXXXXX Name 5 8901XXXXXX When item 4 is selected in step 2: Enter the phone number (1), then make a call (2). 1 Device Name 1 2 Device Name 2 To use alphabet search in the phone book 1 Touch [ A-Z]. 2 Touch the first letter you want to search for on the keypad. To search for a number, touch [1,2,3...].
Bluetooth® 2 Select call history or phone book calling method (1), then select a contact (2) to preset. 1 Device Name 1 2 Device Name 2 JVC Streaming DJ A-Z Select a preset number to store into. 1 Device Name 1 2 Device Name 2 1234XXXXXX 2345XXXXXX 3456XXXXXX No preset No preset KW-V350BT When “BT Audio” is selected as the source, you can connect up to five Bluetooth audio devices at the same time. You can easily switch between these five devices by playing music from the device.
Bluetooth® Selecting an audio file from the menu 1 Display the audio menu. On the source control screen, touch as follows: Bluetooth settings You can change various settings for using Bluetooth devices on the screen. 1 Display the screen. On the Home screen, touch as follows: 2 Select a category (1), then select a desired item (2).
Settings Audio settings Display the
Settings Adjust the sound effect. Adjusts loudness. • OFF (Initial)/Low/High Selects the bass boost level. • OFF (Initial)/Level 1/Level 2/Level 3/Level 4/ Level 5 Moves the center of the sound to the lower or higher point. Select the height. • OFF (Initial)/Low/Middle/High *1 You cannot change the setting when “Tuner” is selected as the source. *2 This function works only when “DISC”/ “USB”/ “iPod”/ “Android™” is selected as the source.
Settings Setting the speakers and crossover frequency 1 Select a car type (1), select the location of the speakers (2)*, then display the screen (3). Car Setting 3 Adjust the crossover frequency of the selected speaker. • Adjustable items vary depending on the selected speaker type/speaker size/crossover settings. / Adjusts the output volume of the tweeter (left/ right). Adjusts the crossover frequency for the tweeter.
Settings Determining the value for adjustment If you specify the distance from the center of the currently set listening position to every speaker, the delay time will be automatically computed and set. 1 Determines the center of the currently set listening position as the reference point. 2 Measures the distances from the reference point to the speakers. 3 Calculates the differences between the distance of the furthest speaker and other speakers.
Settings For KW-V250BT/KW-V25BT 1 Change the background design Display the background design selection screen (1), select the dimmer setting (2) ([ ]: dimmer on or [ ]: dimmer off), then select the background design (3). • You can also adjust the color yourself. Touch [Adjust] to display the color adjustment screen, then adjust the color. The adjustment is saved on [User].
Settings • Skip step (2) if you select [Scan] or [User] in step (3). • Selecting [Scan] changes the illumination color gradually. • Selecting [Music Synchronize] changes the illumination color according to music level. • Selecting [Car Color] changes the illumination color by following the setting made for [Illumination] using ADS adapter. • You can also adjust the color yourself if [User] is selected. Touch [Edit] to display the color adjustment screen, then adjust the color.
Settings Adjust the brightness and blackness of the screen. Select [DIM ON] (dimmer on) or [DIM OFF] (dimmer off), then change the following settings: Adjusts brightness. • –15 to +15 (Initial: 0 for dimmer on, +15 for dimmer off) Adjusts blackness. • –10 to +10 (Initial: 0) Input settings Display the screen. On the Home screen, touch as follows: Then, on the screen, touch [Input].
Settings Select where information about obstacles is displayed on the screen. • Left/Right (Initial) System settings Display the screen. On the Home screen, touch as follows: [USB 1 Wire] Select this when the device is connected via the USB input terminal (on the monitor panel or cable from the rear panel). [Bluetooth] Select this when the device is connected via Bluetooth. (Go to step 3.) Set the clock.
Settings Configure settings for using a Bluetooth device, such as connection and other general operations. For details, see “Bluetooth settings” on page 39. (Only for KW-V350BT Region 4) (Only for KW-V350BT Region 1) Get information, and change the settings for using the ADS adapter. This setting is available only when 2-way speaker system is selected. (Page 41) • ON (Initial): Activates the key-touch tone. • OFF: Deactivates the key-touch tone.
Settings 4 5 Repeat steps 2 and 3 to register other buttons. Connect a USB device with the update file to the unit. System Information Touch [Done] to finish procedure. • The unit can register/change all of the buttons’ functions at the same time. To do this, press all buttons in turn and after pressing all of them, touch [Done] on the screen. However, new functions cannot be learned after this operation.
Remote Controller Settings 2 Select an item (1) you want to display in the selected menu, then touch [ × ] to set (2). Key Customize FNC Key1 Customize Key1 Settings Settings Equalizer Sound Effect - Fader / Balance Car Setting 3 Repeat steps 1 and 2 to replace the other menus. Remote controller RM-RK258 is supplied for KW-V350BT Region 4. • For KW-V250BT/KW-V25BT/KW-V350BT Region 1: To use the remote controller, purchase optional remote controller, RM-RK258.
Remote Controller WARNINGS • Do not ingest the battery, as it presents a chemical burn hazard The remote controller supplied with this product contains a coin/button cell battery. If the coin/button cell battery is swallowed, it can cause severe internal burns in just 2 hours and can lead to death. Keep new and used batteries away from children. If the battery compartment does not close securely, stop using the product and keep it away from children.
Remote Controller JVC Remote APP JVC Remote is an application that connects and controls compatible JVC car receivers via Bluetooth® like a wireless remote control. You can also operate this unit from a Smartphone using JVC Remote APP. This application can display the source information of this unit on the smartphone’s screen, and enables the user to make an audio setting using the graphic user interface of this application.
Installation and Connection • If your car’s ignition does not have an ACC position, connect the ignition wires to a power source that can be turned on and off with the ignition key. If you connect the ignition wire to a power source with a constant voltage supply, such as with battery wires, the battery may be drained. • If the fuse blows, first make sure the wires are not touching to cause a short circuit, then replace the old fuse with one with the same rating.
Installation and Connection Installing the unit Connecting external components Installing the unit using the mounting bracket removed from the car 7 Rear view camera input (R-CAM) 8 Output terminals*4 • Left output (White) • Right output (Red) REAR: Rear speaker preouts FRONT: Front speaker preouts SW: Subwoofer preouts π/[ π/[ For 3-way crossover: REAR: Tweeter preouts FRONT: Mid range speaker preouts SW: Woofer preouts Car bracket Note: Select the appropriate screws (supplied) for the mounting bra
Installation and Connection Wiring connection *1 Only for KW-V250BT/KW-V25BT/KW-V350BT Region 1. *2 Only for KW-V350BT Region 1. *3 Only for KW-V350BT Region 4. *4 Only for KW-V350BT Region 1/KW-V350BT Region 4.
References Maintenance Cleaning the unit • Do not use any solvent (for example, thinner, benzine, etc.), detergent, or insecticide. This may damage the monitor or the unit. • Gently wipe the panel with a soft, dry cloth. Handling discs • Do not touch the recording surface of the disc. • Do not stick tape etc. on the disc, or use a disc with tape stuck on it. • Do not use any accessories for the disc. • Clean from the center of the disc and move outward. • Clean the disc with a dry silicone or soft cloth.
References Picture files • This unit can play back the following files with following codec and extension code: – JPEG (.jpg, .jpeg) • Other playable conditions: – Resolution: 32 × 32 to 8 192 × 7 680 (It may take time to display the file depending on its resolution.
References LV MG MI MK ML MN MO MR MS MT MY NA NE NO OC OM OR PA PL PS QU RM RN RO RW SA SD SG SH SI SK SL 58 Latvian, Lettish Malagasy Maori Macedonian Malayalam Mongolian Moldavian Marathi Malay (MAY) Maltese Burmese Nauru Nepali Norwegian Occitan (Afan) Oromo Oriya Panjabi Polish Pashto, Pushto Quechua Rhaeto-Romance Kirundi Rumanian Kinyarwanda Sanskrit Sindhi Sangho Serbo-Croatian Singhalese Slovak Slovenian SM SN SO SQ SR SS ST SU SW TA TE TG TH TI TK TL TN TO TR TS TT TW UK UR UZ VI VO WO XH YO ZU
References Troubleshooting iPod/iPhone that can be connected • Via the USB terminal: Made for – iPod nano (7th Generation) – iPod touch (5th and 6th Generation) – iPhone 4S, 5, 5C, 5S, 6, 6 Plus, 6S, 6S Plus, SE, 7, 7 Plus, 8, 8 Plus, X • Via Bluetooth: Made for – iPod touch (5th and 6th Generation) – iPhone 4S, 5, 5C, 5S, 6, 6 Plus, 6S, 6S Plus, SE, 7, 7 Plus, 8, 8 Plus, X What appears to be trouble is not always serious. Check the following points before calling a service center.
Troubleshooting DivX*/MPEG1/MPEG2/MP3/WMA/WAV/AAC discs cannot be played back. o Record the tracks using a compatible application on the appropriate discs. (Page 57) o Add appropriate extension codes to the file names. * Only for KW-V350BT Region 4. Tracks on the recordable/rewritable discs are not played back as you have intended them to play. o Playback order may differ from the one played back using other players. “Region Code Error” appears.
Troubleshooting AV-IN No picture appears on the screen. o Turn on the video component if it is not on. o Connect the video component correctly. Pandora*/iHeartRadio*/Spotify The application does not work. o The application on your iPod touch/iPhone/ Android is not the latest version. Update the application. “Please update Pandora App” appears. o The Pandora application on your iPod touch/ iPhone/Android is not the latest version. Update the application. “Please check device.” appears.
Troubleshooting “SXM Channel Locked” appears. o The selected channel has been locked by the parental controls. Enter the unlock code when you are asked. “SXM Incorrect Lock Code” appears. o The selected channel is a mature or parental lock channel, and locked by the parental lock or user lock code. Enter the correct lock code. * Only for KW-V250BT/KW-V25BT/KW-V350BT Region 1. Bluetooth Phone sound quality is poor. o Reduce the distance between the unit and the Bluetooth mobile phone.
Specifications Monitor section Picture Size (W × H) 6.2 inches (diagonal) wide 137.5 mm × 77.2 mm (5-7/16" × 3-1/16") Total Harmonic Distortion 0.01% (1 kHz) Signal to Noise Ratio 90 dB Dynamic Range 90 dB Bluetooth section Technology Bluetooth V3.0 Frequency 2.402 GHz to 2.480 GHz RF Output Power (E.I.R.P.) +4 dBm (MAX), Power Class 2 Maximum Communication Range Line of sight approx. 10 m (32.
Specifications DSP section FM tuner section Equalizer 13 Band Band Frequency (Hz) (BAND1 – 13): 62.5/100/160/250/400/630/ 1k/1.6k/2.5k/4k/6.3k/10k/ 16k Level: −09 to +09 (−9 dB to +9 dB) Q: 1.35/1.5/2.0 HPF (High Pass Filter) LPF (Low Pass Filter) Frequency (Hz): Through/30/40/50/60/70/ 80/90/100/120/150/180/ 220/250 Slope (dB/Oct.): –6/–12/–18/–24 Gain (dB): –8/–7/–6/–5/–4/–3/–2/–1/0 Frequency (Hz): 30/40/50/60/70/80/90/100/ 120/150/180/220/250/ Through Slope (dB/Oct.
Specifications Trademarks and licenses • Dolby, Dolby Audio and the double-D symbol are trademarks of Dolby Laboratories. • “DVD Logo” is a trademark of DVD Format/Logo Licensing Corporation registered in the US, Japan and other countries. • The “AAC” logo is a trademark of Dolby Laboratories. • Microsoft and Windows Media are either registered trademarks or trademarks of Microsoft Corporation in the United States and/or other countries.
For updated information (the latest Instruction Manual, system updates, new functions, etc.), please visit the following website: © 2018 JVC KENWOOD Corporation 00_KWV_2019ST_KR.
CANADA .JVC JVCKENWOOD CANADA INC. PRo!c~~s~i!~~~Canada Warranty applies only to by JVCKENWOOD CANADA INC. JVCKENWOOD CANADA INC. (hereafter called "JVC") gives the following express warranty for each new JVC pro duct distributed in Canada by JVC and sold by an authorized JVC dealer. JVC warrants that this JVC product is free, under normal use and maintenance, from any defects in material and workmanship subject to the fo llowing terms and cond itions: 1. To Obtain Warranty Service: 3.
U.S.A. JVCKENWOOD USA Cor oration TO OUR VALUED CUSTOMER THANK YOU FOR PURCHASING THIS JVC PRODUCT. WE WANT TO HELP YOU ACHIEVE A PERFECT EXPERIENCE. NEED HELP ON HOW TO HOOK UP? NEED ASSISTANCE ON HOW TO OPERATE? NEED TO LOCATE A JVC SERVICE CENTER? LIKE TO PURCHASE ACCESSORIES? JVC IS HERE TO HELP! TOLL FREE: 1 (800)252-5722 http://www.us.jvckenwood.com Remember to retain your Bill of Sale for Warranty Service.