
Additional manual

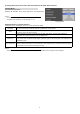


Stage
Set the stage area that is between the left and right edges and the auto tracking is performed only when the
tar
g
et
p
erson is in the sta
g
e area.
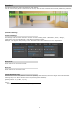
【Stage setting】
【Left Edge】, 【Right Edge】 and 【Tracking Start Position】
Register the range to track the target (【Left Edge】 and
【Right Edge】) and the angle of view for the 【Tracking
Start Position】 with the 【Set】 button.
The image and PTZ position when the button is pressed
are saved as a preset.
Presets 192 【Left Edge】, 193 【Right Edge】, and
191【Tracking Start Position】 are used.
The 【Delete】 button allows you to delete a registered
p
reset.
Common Settin
g
s
You can set 【Target Retention Time】 and 【Horizontal
Postion】.
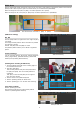
【Starting Auto Tracking in Stage】
1. Click the 【Stage】 tab on the tracking page of the
View Remote Screen.
2. Set 【Left Edge】, 【Right Edge】 and 【Tracking Start
Position】.
・Set the PTZ position and press the 【Set】 button
for 【Left Edge】, 【Right Edge】 and 【Tracking Start
Position】. The current PTZ position is registered.
・Do not reverse the settings for 【Left Edge】,
【Right Edge】.
・Auto Tracking may not work depending on the
【Left Edge】, 【Right Edge】 and 【Tracking Start
Position】.
・Do not turn on 【Tracking】 before setting 【Left
Edge】, 【Right Edge】 and 【Tracking Start Position】.
3.
Set 【Target Retention Time】 and 【Horizontal
Postion】.
4.Set the 【Tracking Mode】 to "Stage".
5.Set the 【Tracking】 to "on" to start Auto Tracking.
Auto trackin
g
starts after the camera PTZ
p
osition
is moved to 【Tracking Start Postion】.
【Stop Auto Tracking】
Set the 【Tracking】 to "off".
Auto Trackin
g
sto
p
s and the camera PTZ
p
osition
returns to 【Tracking Start Position】.
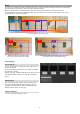
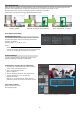
Left edge
Right edge
Follow Target
At this angle, it doesn't follow.
At this angle, it doesn't follow.
Starting Auto Tracking in Stage
4
5
3
1
2
Stage Setting
Example Stage
8