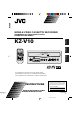
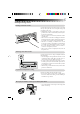
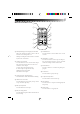
KZ-V10 MOBILE VIDEO CASSETTE RECORDER ENGLISH GRABADORA DE VIDEOCASSETTE MÓVIL MAGNETOSCOPE MOBILE AUDIO AUTO CONTROL SP/EP UNIT POWER |TRACKING DISPLAY { STEREO INDEX KZ-V10 REW PLAY FF REC STOP PAUSE POWER MOBILE VIDEO SP/EP REMOTE POWER SP CASSETTE PAUSE RECORDER REC REC SQPB PLAY STOP # & REW 1 FRANÇAIS RM-RK20 REMOTE ESPAÑOL KZ-V10 FF ¡ For installation and connections, refer to the separate manual.
1 KZ-V10* 1 98.12.
2 Dear Customer, Thank you for purchasing the JVC VHS video cassette recorder. Before use, please read the safety information and precautions contained in the following pages to ensure safe use of your new VCR. CAUTIONS CAUTION RISK OF ELECTRIC SHOCK DO NOT OPEN CAUTION: TO REDUCE THE RISK OF ELECTRIC SHOCK. DO NOT REMOVE COVER (OR BACK). NO USER-SERVICEABLE PARTS INSIDE. REFER SERVICING TO QUALIFIED SERVICE PERSONNEL.
3 CAUTION: Change or modifications not approved by JVC could void user's authority to operate the equipment. This equipment has been tested and found to comply with the limits for a Class B digital device, pursuant to Part 15 of the FCC Rules. These limits are designed to provide reasonable protection against harmful interference in a residential installation.
4 Features 5 4-heads stereo Hi-Fi video cassette recorder 5 Cassette door with danger preventive dustproof cover 5 Mountable in either vertical or horizontal posture thanks to the highly reliable vibration-resistant design 5 Remote sensor unit extends the range to install the video cassette recorder.
5 Inserting/removing cassette Inserting cassette into recorder Open the dust-proof cover and insert a video cassette with the tape side up into the cassette compartment by gently pressing the center part. •With insertion of a video cassette into the cassette compartment, the recorder is automatically turned on. (Automatic power on function) •The tape counter is reset to 0:00:00.
6 For playing back pictures clearly all the time (Use of head cleaning cassette) 5 If this video cassette recorder is used for a longtime, it makes playback pictures rough. In such a case, clean the video heads with an optional head cleaning cassette. 5 When the following symptom is observed: • Playback picture is rough. • Playback picture is unclear or no picture is reproduced on the screen.
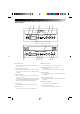
7 FRONT VIEW 1 2 3 4 KZ-V10 MOBILE VIDEO CASSETTE RECORDER 5 STEREO POWER SP/EP REMOTE POWER SP PAUSE REC REC SQPB PLAY STOP # & REW 1 FF ¡ Dustproof cover (cassette door) Pull the dustproof cover to open it. 0 POWER SP/EP REMOTE 6 POWER SP PAUSE REC REC PLAY STOP # & 7 8 9 1 POWER button Press this button to turn on or off this video cassette recorder.
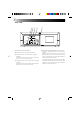
8 REAR VIEW 12 3 4 INPUT 5 OUTPUT 1 2 VIDEO AUDIO L DC INPUT DC 12V R AUDIO MONO (L+R) REMOTE CONTROL SENSOR INPUT 1 POWER CORD CONNECTOR 2 INPUT (video and audio input) terminals 3 OUTPUT-1 (video and audio [stereo] output) terminals Connect the video and stereo audio input terminals of a TV set to these terminals. 4 OUTPUT-2 (video and audio [monaural] output) terminals Connect the video and monaural audio output terminals of a TV set to these terminals.
9 REMOTE CONTROL UNIT 1 7 2 8 RM-RK20 REMOTE CONTROL UNIT AUDIO 3 SP/EP POWER AUTO – TRACKING + DISPLAY INDEX 4 5 REW PLAY FF REC STOP PAUSE When the standard play (SP) is selected, the SP indicator on the front panel is on. Through recording SP and EP cannot be switched by the remote control unit. 2 AUDIO selector button Press this button to select a desired audio output. Selected audio output is shown on the screen.
10 How to set batteries in the battery compartment •Set two AA-size (SUM-3, R6P) batteries in the battery compartment following the indications. 5 Cautions on batteries • Since batteries supplied with the Remote control unit are just for operation check, they don’t work for a long time. • If the Remote controller won’t be used for a considerably long time, remove batteries from it. 5 Batteries need replacement in the following condition.
11 Indications on the screen Operation and status of the video cassette recorder can be checked by indications appearing on the screen. Each time an operation button is pressed, operation of the video cassette recorder is shown for about 5 seconds.
12 Playback Playing back Preparation: Turn on a Monitor set or TV set connected with the video cassette recorder and set it to an external input mode (VIDEO 1, VIDEO 2, etc.). 1 Press the POWER button of the video cassette recorder to turn it on. 2 Insert a video cassette into the video cassette recorder. When a video cassette whose recording protection tab is broken is inserted, the video cassette recorder automatically starts playback. 3 Press the PLAY button. • Playback starts.
13 Search playback Playing back from the beginning of each program – Search playback To start playback from the beginning of a program, search the index recorded at the beginning point of each program. Video cassette tapes recorded by JVC machine have automatically recorded the index marks. 1 Choose a desired address (index) with the INDEX button on the remote control unit. TV screen INDEX INDEX - 2 Rewind direction Choose an address (index) two before the present program.
14 Connection to other apparatus Connection to Mobile Color Monitor System KV-M65 Example of connection Connect the KV-M65 to the controller unit of the Mobile Color Monitor System KV-M65. 1 Connect the video-audio output terminals (VIDEO OUTPUT-1) of the KV-M65 and the video-audio input terminals (VIDEO INPUT-1) of the tuner unit of the KV-M65 with the AV cord supplied as an accessory. 2 When the JVC TV tuner system KV-C1 is used, the same applies to it.
15 Connection to a video camera If a video camera is connected to this video cassette recorder, picture and sound can be recorded by the machine. However, there are some video cameras that cannot be connected to this video cassette recorder. For details, refer to the instructions of the video camera. Example of connection Signal flow Video camera 1 Connect the audio-video output terminals of the camera to the audio-video output terminals of this video cassette recorder.
16 Troubleshooting When you doubt if there is something wrong in the machine, check the symptom and cause referring to the following table. No power supply Power cord is disconnected. Tightly plug the power cord into the jack. Machine does not work though power is normally supplied. (POWER indicator lamp is blinking.) Machine is dewed inside, or high temperature sensor circuit is in operation. When the machine is dewed, wait for several hours until the inside becomes dry.
KZ-V10 MOBILE GRABADORA MAGNETOSC KZ-V RM-RK20 REMOTE AUDIO AUTO CONTROL SP/EP |TRACKING DISPLAY VICTOR COMPANY OF JAPAN, LIMITED UNIT POWER { INDEX REW PLAY FF REC STOP PAUSE For installation and Para la instalación Pour I' installation Printed in Japan 0998YSV OZ OZ * * KZ-V10* 2 98.12.