TV/VCR COMBO USER'S GUIDE For Model TV-20241 IMPORTANT NOTE TO THE CUSTOMER In the space below, enter the serial number for your television (located at the rear of the television cabinet). Staple your sales receipt or invoice to the inside cover of this guide. Keep this user's guide in a convenient place for future reference. Keep the carton and original packaging for future use.
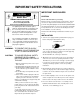
IMPORTANT SAFETY PRECAUTIONS IMPORTANT SAFEGUARDS CAUTION RISK OF ELECTRIC SHOCK DO NOT OPEN CAUTION:To reduce the risk of electric shock. Do not remove cover (or back). No user serviceable parts inside. Refer servicing to qualified service personnel.
6 If an outside antenna is connected to the TV set, be sure the antenna system is grounded so as to provide some protection against voltage surges and built-up static charges. Section 810 of the National Electrical Code provides information with respect to proper grounding of the mast and supporting structure, grounding of the lead-in wire to an antenna discharge unit, size of grounding conductors, location of antenna discharge unit, connection requirements for the grounding electrode.
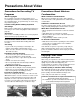
Precautions About Video Precautions for Recording TV Programs Precautions About Moisture Condensation About Copyright What is Moisture Condensation? The recordings you make from TV programs or prerecorded tapes cannot be used without permission from the copyright holders, except when they are used solely for personal enjoyment. When you put cold water into a glass, water droplets form on its surface. This phenomenon is called moisture condensation.
Table of Contents CONNECTIONS VCR FUNCTIONS - continued Connections Checklist . . . . . Front Panel Diagram . . . . . . Cable or Antenna Connection s. Connecting to a Camcorder . . Connecting to Headphones. . . . . . . . . . . . . . . . . . . . . . . . . . . . . . . . . . . . . . . . . . . 6 6 7 8 8 GETTING STARTED Remote Control . . . . . . . . . . . . . . . . . 9 Power . . . . . . . . . . . . . . . . . . . . . 10 Adjusting Volume . . . . . . . . . . . . . . . 10 Changing Channels . . . . . . .
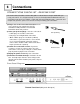
Connections CONNECTIONS CHECKLIST - READ ME FIRST The Connections Checklist section of this guide is a list of ideas to keep in mind while you setup your new TV. It is designed to help us not-so-technically-minded individuals make our connections properly. If you read this section and still can’t identify the plugs, connectors and components you have, please ask someone for help in making your connections. 1) Always refer to the connection instructions in the user’s guide for your components first.
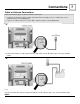
Connections Cable or Antenna Connections There are two basic types of cable or antenna connections: • If you have an antenna or have a cable system that does not require you use a cable box to select channels, please refer to Diagram #1. • If you use a cable box to access any or all the channels, please refer to Diagram #2. #1 1) Connect the antenna or cable TV wire from the wall outlet, in to the RF Input at the rear of your TV/VCR combo.
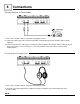
Connections Connecting to a Camcorder 1) Press on the TV/VCR combo’s front panel door lightly to open it. 2) Connect the white audio cable from the Camcorder’s Audio Output jack to the TV/VCR combo’s Audio Input jack. 3) Connect a yellow video cable from the Camcorder’s Video Output to the TV/VCR combo’s Video Input jack. • If your camcorder is a stereo model, use a stereo-to-monaural conversion cable to connect to the TV/VCR Combo.
Getting Started 9 Remote Control RM-C389 RM-C389 TV-20241 Changing the Batteries Be sure to use only size AA batteries. 1 Push down on the remote's back cover and slide towards the bottom to remove it. 2 Insert two AA batteries (supplied), carefully noting the "+" and "-" markings on the batteries and on the remote control. To avoid a potential short circuit, insert the "-" end first. 3 When batteries are installed, snap the back cover into place.
Getting Started POWER • Press the POWER button on the remote control or the front panel of the TV. The On Timer will glow red. • Make sure the TV/CATV switch on the remote is set to TV. Move the switch to CATV only if you plan to operate a cable box. On the CATV setting the remote will only operate the cable box functions. • To turn the power off, press the POWER button again. The On Timer will go out.
Getting Started 11 Setting the CATV & Satellite Codes You can program your remote to operate your cable box or satellite receiver by using the instructions and codes listed below. If the equipment does not respond to any of the codes listed below or to the code search function, use the remote control supplied by the manufacturer. Cable Box or Satellite setup The remote control is programmed with CATV and/or Satellite codes for power on, power off, channel up, channel down, and 10 key operation.
Using the Menu Using this Guide 1 Initial Setup Items Certain symbols are used throughout this guide to help you learn about the features of your new television. The ones you will see most frequently are: Up and Down arrows mean press the CHANNEL UP or CHANNEL DOWN buttons.
Plug In Menu 13 Introduction Auto Tuner Setup The Plug In Menu comes up automatically when you first turn on the TV/VCR Combo after plugging it in. The Plug In Menu helps you to get your Combo ready to use by letting you set your preferences for: In Auto Tuner Setup, the TV automatically scans through all available channels, memorizing the active ones and skipping over blank ones or channels with weak signals.
Plug In Menu VCR Plus+ Guide Setup VCR PLUS+ Guide Setup (continued) Using VCR Plus+ codes to program your VCR, recording your favorite TV programs is now simple. Whenever you want to record a program, all you need to do is find its VCR PLUS+ code. After entering the VCR PLUS+ code, the TV/VCR Combo will automatically record the program at the correct date, time, and channel.
Plug In Menu 15 Set Clock Set Clock - Manual Before you use any of your TV’s timer functions, you must first set the clock. You may precisely set your clock using the XDS time signal broadcast by most Public Broadcasting stations. To set the clock using the XDS signal: To set your clock manually (without using the XDS signal), choose MANUAL from the Set Clock menu and follow the steps below. Enter the channel number of your local PBS station.
Channel Summary Channel Summary Channel Summary - Lock Channel Summary allows you to customize the line-up of channels received by your TV. You can add or delete channels from the line-up or prevent any unauthorized viewers from watching any or all 181 channels.
V-Chip V-Chip Your TV is equipped with V-Chip technology which enables TV Parental Guideline and Movie (MPAA) Guideline controls. V-Chip technology allows you to program your TV to receive, or not to receive, programs based on content according to the guidelines. Programs which exceed the ratings limits you set will be blocked. When a viewer attempts to watch a blocked channel, this message appears: THIS PROGRAMMING EXCEEDS YOUR RATINGS LIMITS. PLEASE ENTER LOCK CODE BY 10 KEY PAD TO UNLOCK IT. NO.
V-Chip Directions to Block Viewing: Directions to set up Movie Ratings: Line up the cursor in the column (TV PG, TV G, etc.) with the content row (V/FV, S, etc.) and press the or to move the cursor to the correct location. Press or to turn the locking feature on or off. An item is locked if the icon appears instead of a “—”. For example. To block viewing of all TV 14 shows: Move the cursor to the top row of that column and add a lock icon.
V-Chip ❒ R Restricted. These films contain material that is explicit in nature and is not recommended for unsupervised children under the age of 17. ❒ NC-17 No One Under 17. These movies contain content which most parents would feel is too adult for their children to view. Content can consist of strong language, nudity, violence, and suggestive or explicit subject matter. ❒ X No One under 18. Inappropriate material for anyone under 18.
V-Chip Accessing V-Chip Information: To access Rating information about a certain program, press the V-CHIP button while viewing that program. A display like this will appear: PROGRAM IS RATED : TV-PG - V • For Children's programming you can block TV-Y and Y programs by Pressing “0” when Y is displayed during a program. Programming for audiences other than children’s audiences will not be affected.
Picture Settings Tint Bright Tint allows you to adjust the levels of red and green in your TV picture. You can adjust the overall brightness of the TV picture with the Bright control. 21 To BRIGHT To lighten the picture To TINT to increase the levels of green To darken the picture To move to the next setting To increase the levels of red To move to the next setting Color Detail The color function lets you make all the colors in the TV picture appear either more vivid or subtle.
Sound Settings Bass MTS (Multi-Channel Television Sound) You can increase or decrease the level of low-frequency sound in the TV’s audio with the Bass adjustment. MTS technology allows several audio signals to be broadcast at once, giving you a choice in what you wish to hear with a TV program. In addition to mono or stereo sound, an MTS broadcast may also include a Second Audio Program (SAP).
General Items 23 On/Off Timer Closed Caption The On/Off timer lets you program your television to turn itself on or off. You can use it as an alarm to wake up, to help you remember important programs, or as a decoy when you're not home. Use this function to display the Closed Captioning text onscreen (when included in a broadcast).
VCR Basics VCR Basics Stop Playback This section of the guide will explain the many functions of the VCR portion of your new TV/VCR combo. We will begin with a basic explanation of how to load, watch and eject a video cassette To end the playback of a video cassette, press the STOP button on the remote or the STOP /EJECT button on the TV/VCR combo front panel.
VCR Basics VCR Menu To STOP (Recording Stop time) The VCR Menu screen gives you a number of options for operating your VCR. For an explanation of how to use onscreen menus, see page 12. Access the VCR menus by pressing Menu. To set the time you wish the recording to end Regular VCR Programming This function lets you manually input the time, date and channel information for a program you wish to record. (To program your VCR using the VCR Plus+ codes, see page 27).
VCR Menu Recording Speed Repeat Play Lets you choose between the two recording speeds, SP - Standard Play, or EP - Extended Play Once playback of a video cassette has finished, this function automatically rewinds the tape and begins playback again. Playback may be repeated up to 50 times. Press MENU To RECORDING SPEED Press MENU To set to SP or EP To REPEAT PLAY Press EXIT to finish Auto SP EP This function is used with timer-recording (page 25) and with the SP tape speed.
VCR Plus+ VCR Plus+ Your TV/VCR combo comes equipped with VCR Plus+ technology. This function lets you program your VCR by simply entering the VCR Plus+ code number associated with the program you wish to record. • Before VCR Plus+ can be used, the VCR Plus+ guide channels must be programmed. See VCR Plus+ Guide Setup in “Initial Setup” page 15 if you have not yet programmed these guide channels. Timer Recording with VCR Plus+ Press VCR PLUS+ on the remote control The VCR Plus+ code screen appears.
General VCR Items Timer Recording Troubleshooting Instant Timer Recording (ITR) The following are some common problems that may arise when using Timer Recording and some possible solutions. Instant Timer Recording lets you set the VCR timer after the videotaping of a program has begun. The ITR timer can be programmed to stop recording up to four hours after it has begun. REC lamp starts flashing when you press TIMER on the remote control. No cassette is loaded into the VCR.
Button Functions - TV Display Video Status The Display screen shows the current status of timers and inputs. The VIDEO STATUS button gives you a choice of three TV picture display settings, including “Standard”, “Cinema”, and “Game”. Press the DISPLAY button 07 NOW SPEED REMAIN SLEEP TIMER ON/OFF TIMER 29 Standard - Resets the picture display to the factory settings. 12:20 PM SEPT/01/00 EP --:-OFF OFF Cinema - Settings designed to give a “film-like” look to television and video tape programs.
Button Functions - TV Number Buttons - 10 Key Pad Return+ To move directly to a specific channel, enter the channel number with the number buttons on the remote. For example, to move to Channel 7: The RETURN + button has two functions: 0 (zero) 7 (seven) 100+ Button Return - Returns to the channel viewed just before the channel currently onscreen. Return+ - Lets you program a specific channel to return to while scanning through the channels.
Button Functions - VCR 31 VCR Functions - Basic Index Search The following remote control buttons control the basic functions of the VCR. Most JVC-brand VCR’s automatically insert an index mark at the start of a recording. The INDEX SEARCH +/- buttons can be used to scan a video cassette for these marks. To quickly find the beginning of a taped program, press INDEX SEARCH. PLAY • Begins playback of a video cassette. REW • Rewinds tape.
Button Functions - VCR Skip Search Shuttle Plus +/- Each time you press the SKIP SEARCH button while a tape is playing, the unit will fast-forward ahead 30 seconds on the tape. You may press the button up to four times in a row to move 120 seconds (two minutes) ahead. Lets you gradually increase or decrease the playback speed of a video cassette. With a videotape playing, choose either the SHUTTLE PLUS + or SHUTTLE PLUS - button.
Button Functions - VCR 33 Program Check Program Check - continued The Program Check button allows you to confirm the settings programmed into your TV/VCR. You can make changes if you find any errors. Use the Menu buttons to select which items you wish to change. (For more information on Regular VCR Programming, see page 20.) Confirm Timer Settings Cancelling Timer Programs Press the Program Check button to display the timer information.
Troubleshooting - TV
Troubleshooting - VCR 35
Limited Warranty For Canadian model televisions, see separate sheets for Warranty/Garantie and JVC Authorized Service Centers in Canada. JVC COMPANYOF AMERICAwarrants this product and all parts thereof, except as set forth below ONLYTO THE ORIGINALPURCHASER AT RETAIL to be FREE FROM DEFECTIVE MATERIALS AND WORKMANSHIPfrom the date of original retail purchase for the period shown below (the “Warranty Period”) (PICTURE TUBE is covered for Two (2) years.
Authorized Service Centers 37 QUALITY SERVICE HOW TO LOCATE YOUR JVC SERVICE CENTER TOLL FREE: 1 (800) 537-5722 http://www.jvcservice.com Dear Customer; In order to receive the most satisfaction from your purchase, read the instruction booklet before operating the unit. In the event that repair is necessary, or for the address nearest your location, please refer to the factory service center list below or within the Continental United States, call 1-800-537-5722 for your authorized servicer.
Specifications Specifications subject to change without notice.
Notes 39 Set Clock Notes for Canadian customers regarding the clock feature of the TV-20241 The XDS and EDS signals are carried only by certain broadcast television stations (for example, the signal is carried by most Public Broadcasting Service stations). You must be able to receive a station carrying the XDS or EDS signal to use the Semi-Auto feature to set your TV/VCR's internal clock. If you live in an area that does not broadcast XDS or EDS signals, you must set the clock manually.
JVC COMPANY OF AMERICA Division of JVC Americas Corp. 1700 Valley Road Wayne, New Jersey, 07470 JVC CANADA, INC.