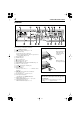
HDD RECORDER/DVD PLAYER Parts Identification 6 XV-DDV1SL Remote Control Settings 9 TV tuner is built in this product. Installing the Unit 11 Initial Settings 13 Watching TV 21 H HDD Recording/Playback 23 D D Editing HDD Navigation 34 D V D Timer Recording 40 Basic DVD Operations 47 Advanced DVD Operations 51 TOP MENU / HDD NAVI PROGRESSIVE - CHANNEL + ENTER MENU / HDD PROG.
WARNINGS, CAUTIONS AND OTHERS IMPORTANT for the U.K. DO NOT cut off the mains plug from this equipment. If the plug fitted is not suitable for the power points in your home or the cable is too short to reach a power point, then obtain an appropriate safety approved extension lead or consult your dealer. BE SURE to replace the fuse only with an identical approved type, as originally fitted.
Failure to heed the following precautions may result in damage to the discs, the built-in hard disc drive (HDD), and the remote control. 1. DO NOT place the equipment... • in an environment prone to extreme temperatures or humidity. (Select a place which is level, dry and neither too hot nor too cold between 5˚C and 35˚C.) • in direct sunlight. • in a dusty environment. • in an environment where strong magnetic fields are generated. • on a surface that is unstable or subject to vibration. 2.
WARNINGS, CAUTIONS AND OTHERS (cont.) Precautions on the built-in DVD player Unplayable discs Playable disc types The unit does not play back discs listed below. If you try to play back these discs, noise may generate causing damage to the speakers. Discs with the following marks can be played back on the unit. DVD Video SVCD Video CD (VCD) Audio CD (CD) VIDEO The DVD Logo is a trademark.
CONTENTS PARTS IDENTIFICATION 6 Front view ............................................................ 6 Rear view ............................................................. 7 Display window ................................................... 7 Remote control .................................................... 8 REMOTE CONTROL SETTINGS 9 Using the remote control...................................... 9 INSTALLING THE UNIT 11 Basic connections ..............................................
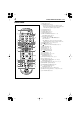
PARTS IDENTIFICATION Front view Refer to the page indicated in parenthesis. 1 STANDBY/ON button 2 ¶ (record) button and lamp (22 – 24) 3 Illumination lamp •Lights when the unit is turned on. •Flashes after plugging in the unit (no operations are accepted during this period).
Rear view DVD DIGITAL OUT PCM / STREAM COAXIAL OPTICAL DVD/HDD VIDEO AUDIO OUT OUT LEFT VIDEO DVD VIDEO SIGNAL SELECTOR L-1 IN/OUT L-2 IN IN SAT CONTROL COMP.
PARTS IDENTIFICATION (cont.) Remote control 1 $ % 2 ^ 3 & * ( 4 5 6 7 8 9 0 ) ENTER _ + = ~ ! @ # ¡ ™ £ ¢ ∞ 1 DVD/TV/HDD operation mode selector 2 EJECT button (48) 3 VPS/PDC button (41, 43) • This button only works as the PDC (Program Delivery Control) button, but cannot work as the VPS (Video Programme System) button.
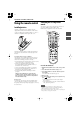
REMOTE CONTROL SETTINGS Using the remote control Controlling the TV using remote control Installing batteries Your remote control can operate the basic functions of your TV. In addition to JVC products, other manufacturer’s equipment can also be controlled. Open the compartment cover, and place the two supplied R6P (SUM-3)/AA(15F) batteries in the remote control according to the polarity markings (“+” and “–”) inside the compartment. Then replace the cover.
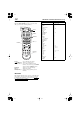
REMOTE CONTROL SETTINGS (cont.) Usable buttons for operating the TV When the DVD/TV/HDD selector is set to the centre (TV), you can use the following buttons: TV AV Number MUTING VOL + / – ENTER HDD/TV PR + / – TV AV: Selects the input (AV) mode. (standby/on): Turns on or off the power. Number buttons: Selects the programme position numbers. (For some TVs, press ENTER after pressing the number buttons.) MUTING: Turns on or off sound muting. VOL +/–: Adjusts the volume.
INSTALLING THE UNIT the RF cable (supplied) between the 3 Connect ANTENNA OUT conncetor on the rear and the Basic connections Before using the unit, connect the unit to a TV. TV’s aerial conncetor. Precautions for connections • Do not connect the AC power cord until all connections are complete. • Do not connect a VCR in between this unit and TV; otherwise, picture will be distorted while playing back a copy-protected disc.
INSTALLING THE UNIT (cont.) Connecting a TV with the audio/video jacks 1 Disconnect the TV aerial cable from the TV. the TV aerial cable to the ANTENNA 2 Connect IN conncetor on the rear. the RF cable (supplied) between the 3 Connect ANTENNA OUT conncetor on the rear and the TV aerial cable (not supplied) TV or monitor TV’s aerial conncetor.
INITIAL SETTINGS Easy & simple setup Presetting the built-in TV tuner automatically—Auto Setup Before starting, make sure of the following: • The TV aerial cable is connected firmly to the unit. • The AC power cord is plugged in. • An appropriate input (AV) mode is selected on the TV. First time you turn on the power, the unit automatically shows the Auto Setup screen. Store the TV stations (programme positions), clock time and Guide Program numbers using this screen first.
INITIAL SETTINGS (cont.) Downloading the preset information from your TV—TV-linked Setup If you have connected the unit to a TV offering T-V Link, etc.* (see page 11), perform TV-linked Setup instead of Auto Setup. • After downloading TV station information from the TV, the unit sets the clock time and Guide Program numbers automatically. NOTE * T-V Link, EasyLink, Megalogic, SMARTLINK, Q-Link or DATA LOGIC. 1 2 1 1 Turn on the power. Press STANDBY/ON on the unit or on the remote control.
If the following indications appear after Auto Setup or TV-linked Setup is over: Auto Setup or TV-linked Setup has been successfully performed. Turn on the TV and select an appropriate input (AV) mode, then make sure that all necessary stations have been stored in memory by pressing HDD/TV PR +/– with the DVD/TV/HDD selector set to the right (HDD). TV stations have been successfully stored, but clock time setting has been failed.
Selecting the playback source This unit consists of two main components—the HDD deck and the DVD player. • For detailed operations about the HDD, see pages 21 to 46. • For detailed operations about the DVD player, see page 47 to 65. Before performing any operations: • Turn on the TV and select an appropriate input (AV) mode. • During the following periods, the unit will not accept any button operation: - If the unit is plugged in: For about 30 seconds.
The following procedure is required if you receive satellite programmes through a satellite receiver. Approximately 20 seconds before a timer recording starts, the unit sets its input mode to “L-2” (or “SAT”) and automatically changes the programme position numbers on the satellite receiver by sending a signal to your satellite receiver. Setting the satellite controller Satellite receiver Installing satellite controller Remote sensor 1 Situate the satellite controller.
INITIAL SETTINGS (cont.) Setting satellite receiver’s brand and programme positions After installation, set the satellite receiver’s brand correctly; otherwise, the satellite controller cannot work correctly. T 1 Turn on the satellite receiver. 2 Show the Main Setup screen on the unit. Press SET UP. • The HDD SET UP screen appears. NOTE If the built-in clock has not been set, the INTIAL SET UP screen appears. If this happens, set the clock first (see page 69). 3 Select the Initial Set screen.
what happened on the satellite 7 Check receiver. If the satellite receiver’s programme position number has changed to the same one as you set in step 6... Press 5 or ∞ to move to “CHANGED TO...,” then press ENTER or 3 to finish the setting. [ENTER] [SET UP] If the satellite receiver’s programme position number has not changed correctly... to “NOT CHANGED,” then Press 5 or ∞ to move press ENTER or 3. Then perform the procedure again from step 5.
DVD Initial Setup INITIAL SETTINGS (cont.) 3 Show the DVD PLAYER SET UP screen. Before using the built-in DVD player, activating DVD Initial Setup allows you to set up the most fundamental functions easily. • You can set the TV monitor type and digital output signal format. • Turn on the TV and select an appropriate input (AV) mode. • If the unit is turned on with the HDD deck selected, it takes about 20 seconds until the broadcast picture appears on the TV.
WATCHING TV Watching TV Programmes You can watch TV programmes using the TV tuner built in the unit. One of the advantages of this behaviour so called “Live Memory.“ What is Live Memory 1 Turn on the power. On the remote control Press . On the unit Press STANDBY/ON. • The lamp corresponding to the previously selected deck (either DVD or HDD) lights on the unit.
To go back to and watch from a particular scene again—Live Memory: Playback (Replay) 1. Press 1 (see page 26) or 4 (see page 27) to search for the previous scene of the current programme you are watching. 2. Press 3 (SELECT) to start replay. To stop playback, press 7 (CLEAR) or LIVE. The actual on-air picture resumes. WATCHING TV (cont.) Receiving stereo and bilingual programmes The unit is equipped with a digital stereo sound decoder (NICAM) which enables reception of NICAM broadcasts.
HDD RECORDING/PLAYBACK 1 Turn on the power. Basic recording You can store up to 100 programmes in the HDD. Once recording (including timer recordings: see pages 40 and 42) is made through the built-in TV tuner, the following information about the programme is automatically memorized in the HDD.
HDD RECORDING/PLAYBACK (cont.) To stop recording Press 7 (CLEAR) once so that the confirmation message appears on the TV. Then press 7 (CLEAR) again. • The lamp next to the ¶ (record) button goes off. NOTES • In the middle of a recording, you can start playing back the same programme (just currently being recorded) from the beginning or pause the picture shown on the TV at a particular scene. (Recording continues although you start playback or pause the TV screen picture).
1 Turn on the power. Basic playback • Turn on the TV and select an appropriate input (AV) mode. • If the unit is turned on with the HDD deck selected, it takes about 20 seconds until the broadcast picture appears on the TV. During this period, no operations are permitted. 1 3 2 On the remote control Press . On the unit Press STANDBY/ON. • The lamp corresponding to the previously selected deck (either DVD or HDD) lights on the unit. 2 Select the HDD deck.
Special effect playback While playing back a recorded programme, you can use the following special effect playback. • When using the buttons on the unit, make sure that the HDD lamp on the unit is lit. If not, press DVD/ HDD so that the HDD lamp lights. • When using the remote control, slide the DVD/TV/ HDD selector to the right (HDD), then press ENTER. 4/¢ HDD RECORDING/PLAYBACK (cont.) Searching for a particular scene—Variable Speed Search You can change search speed.
Skipping forward or backward at certain time intervals—Jump Search Freezing the picture and advance it frame by frame —Still Picture/Frame-by-Frame Playback You can locate a scene ahead or behind the current one by jumping to a selected time interval (see page 67). • This feature is also available during recording. While playing (or recording), press ¢ (cursor 3) or 4 (or cursor 2).
HDD RECORDING/PLAYBACK (cont.) Confirming various information on the TV With “O.S.D.” set to “ON” (see page 67), various operational information automatically appears on the TV for a while when you operate the HDD deck. When watching (or recording) a TV programme through this unit 11:00 12:00 1:00 11:35 PR. 1 2 You can also show the operational information manually without respect to the “O.S.D.” setting. Press ON SCREEN.
Playing with HDD Navigation Main List screen (ex. REC LIST) NAVIGATION Each time a recording is made, the information (for example, thumbnail picture—index) about the recording is also memorized in the HDD. You can confirm the information about the recordings memorized in the HDD using HDD Navigation. Moreover, you can select and start playing one of the recordings stored in the HDD.
HDD RECORDING/PLAYBACK (cont.) Selecting programmes on the NAVIGATION screen • On the PLAY LIST, you can register your own play lists. For details about how to make a play list, see page 37. 1 Show the NAVIGATION screen. This HDD can store up to 100 recordings. You can show the beginnings of these recorded programmes on the HDD Navigation screen, and select one to play or select some to play in your intended order. Press HDD NAVIGATION.
Playing back two or more programmes in your desired order 1 Show the NAVIGATION screen. You can select up to eight programmes for continuously. This is convenient when you want to watch a series of dramas. Press HDD NAVIGATION. • When using the buttons on the unit, make sure that the HDD lamp on the unit is lit. If not, press DVD/ HDD so that the HDD lamp lights. • When using the remote control, slide the DVD/TV/ HDD selector to the right (HDD), then press ENTER.
HDD RECORDING/PLAYBACK (cont.) Searching for a programme in your favourite category—CATEGORY 1 Show the NAVIGATION screen. You can easily search for a programme or a play list if it is grouped into a particular category. There are two types of categories: “Genre” and “Family.” as sub-categories, “Genre” includes 16 groups while “Family” can include the maximum of 8 family members. • To categorize a programme or a play list into a particular group, see page 35.
Searching for a programme by its title—TITLE You can easily search for a programme or a play list if it has its own title. • To assign a title to a programme or a play list, see pages 36 and 39. You can also assign a title while setting the recording timers (see pages 41 and 43). • When using the buttons on the unit, make sure that the HDD lamp on the unit is lit. If not, press DVD/ HDD so that the HDD lamp lights.
Editing HDD Navigation In the previous section you have learned how to search for the beginning of each recorded programme or of each play list using HDD Navigation. EDITING HDD NAVIGATION Modifying recorded programmes HDD Navigation does not work during Automatic Satellite Recording (see page 46). In this section you will learn how to edit the programme and how to make a play list. You can edit HDD Navigation using the following screen. .
2 Enter the REC LIST/MODIFY screen. 1 Make sure that is pointing at “MODIFY” under “REC LIST.” 2 Press ENTER. • The REC LIST/MODIFY screen appears. 1 Show the main modification screen. 1 Press EDIT. 2 Press ENTER after making sure that is pointing at “MODIFY” under “REC LIST.” 3 Press 3 / 2 / ∞ / 5 to move to a thumbnail you want, then press ENTER. 3 Select a programme. 2 Enter the category selection screen Press 3 / 2 / ∞ / 5 to move to a thumbnail you want, then press ENTER.
EDITING HDD NAVIGATION (cont.) To change (or newly assign) the title To delete an unnecessary programme 1 Show the main modification screen. 1 Show the EDIT screen. 1 Press EDIT. 2 Press ENTER after making sure that Press EDIT. is pointing at “MODIFY” under “REC LIST.” 3 Press 3 / 2 / ∞ / 5 to move to a thumbnail you want, then press ENTER. 2 Enter the title entry screen. Press 3 / 2 / ∞ / 5 to move to “TITLE,” then press ENTER. • The EDIT>TITLE screen appears. 3 Enter a new title.
To divide a programme Making play lists 1 Show the EDIT screen. A play list is a collection of the scenes selected from recorded programmes. A play list can be freely edited and played back without changing original programmes recorded. A play list includes information such as the beginning and ending time of the scenes, thumbnails for checking the contents, category information, and more. Press EDIT. HDD Navigation does not work during Automatic Satellite Recording (see page 46).
To create a play list 1 Show the EDIT screen. Press EDIT. 2 Enter the PLAY LIST/CREATE screen. Press 3 / 2 / ∞ / 5 to move to “CREATE” under “PLAY LIST,” then press ENTER. • The PLAY LIST/CREATE screen appears. a programme which includes a scene 3 Select you want to list up in a play list. Press 3 / 2 / ∞ / 5 to move to a thumbnail you want, then press ENTER. • The play list screen appears, and selected programme starts playing in the viewing window.
6 Finish making (or modifying) a play list Press 3 / 2 / ∞ / 5 to move to “OK,” then press ENTER. • The play list screen disappears, and the confirmation screen appears. 7 Finish the procedure. Press ENTER after making sure that is pointing at “EXIT.” • To modify the play list, press 2 to move to “MODIFY,” then press ENTER. (Then follow step 2 of “To modify a play list” below.) To modify a play list 1 Show the main modification screen. 1 Press EDIT.
TIMER RECORDING This unit allows you to preset up to 16 recording timer settings using either one of the following: • VIDEO PLUS+ Timer programming • Express Timer programming ® 1 Show the PROGRAM screen. Press HDD PROGRAMME. VIDEO PLUS+ Timer programming ® ® With the VIDEO PLUS+ system, timer programming is greatly simplified because each TV programme has a respective code number which this unit is able to recognize. • Make sure that the clock built in this unit is set properly.
the contents of the new timer 5 Check programming. To modify a title of the TV programme: To erase this setting, press HDD PROGRAMME. 1 Press ∞ or 5 to move IMPORTANT Make sure the programme position number you wish to record is displayed; if not, set the Guide Program number correctly (see page 69). 9 Select and set other options as required. to “TITLE,” then press ENTER. 2 Enter the title by referring to “To change (or newly assign) the title” on page 36. 6 Select the recording speed.
TIMER RECORDING (cont.) Express Timer programming 1 Show the PROGRAM screen. If you do not know the PLUSCODE number for a TV programme you want to record, use the following procedure to set the timer programmings. • Make sure that the clock built in this unit is set properly. • Turn on the TV and select an appropriate input (AV) mode. • When using the buttons on the unit, make sure that the HDD lamp on the unit is lit. If not, press DVD/ HDD so that the HDD lamp lights.
7 Set the Weekly/Daily Timer. p Finish the timer programming. 1 Press ∞ or 5 to move 1 Press ∞ to move to “WEEKLY/DAILY,” then press ENTER. 2 Press∞ or 5 to select the desire mode, then press ENTER. NOTE For details on each mode, see page 44. 8 Set the PDC mode. 1 Press ∞ or 5 to move to “VPS/PDC,” then press ENTER. 2 Press ∞ or 5 to select “ON” or “OFF.” NOTES • You can also use VPS/PDC button to turn the PDC setting “ON and “OFF.
TIMER RECORDING (cont.) Weekly/Daily Timer You can select the following modes for Weekly/Daily Timer—ONCE, WEEKLY (OVERWRITE) or (a) certain day(s). • ONCE (Once Timer recording) Select to perform the timer recording only once with this setting. • WEEKLY (OVERWRITE) (Weekly Timer recording/ Weekly overwrite) Select to record a weekly programme. A recorded programme is automatically overwritten by the same series of the programme of the next week.
Modifying timer programmings You can confirm, erase, or modify the preset timer programmings easily. • Make sure that the clock built in this unit is set properly. • Turn on the TV and select an appropriate input (AV) mode. • When using the buttons on the unit, make sure that the HDD lamp on the unit is lit. If not, press DVD/ HDD so that the HDD lamp lights. • When using the remote control, slide the DVD/TV/ HDD selector to the right (HDD), then press ENTER.
Automatic Satellite Recording This function allows you to automatically record a satellite programme using the timer equipped for the satellite receiver connected to the L-2 IN connector on the rear. When the signals come into the unit from the satellite receiver, the unit automatically turns on and starts recording. • When the satellite receiver is turned off by its timer, this unit also turns off automatically (into standby mode). 3 TIMER RECORDING (cont.
BASIC DVD OPERATIONS 1 Insert a disc in the disc slot. Playing back discs In the DVD operation sections, the following marks are used to indicate disc availability: 1 With the label side up 2 To insert an 8-cm disc, insert it into the centre of the disc slot. • When the disc is detected, the respective disc type indicator lights in the display window (and playback starts automatically for some discs).
BASIC DVD OPERATIONS (cont.) About PBC (Playback Control) Some SVCDs/VCDs are equipped with PBC. PBC allows you to enjoy menu-driven operations and high-resolution still pictures which have a resolution four times greater than moving pictures. • To play an SVCD/VCD without activating PBC, press 7 (CLEAR) to stop playback, then press the number button(s). Playback starts with the selected track. • To activate PBC again, press TOP MENU or MENU.
Resuming playback The unit can memorize the position on a disc where you have stopped playback, and resume playback from that position later. You can select either “ON” or “DISC RESUME” for resume function. • You can select your desired option using the menu (see page 79). When “RESUME” is set to “ON” (initial setting) When you press 7 (CLEAR) (“RESUME STOP” appears on the TV) or try to operate the HDD deck, the unit stops playback and memorizes the interrupted position.
BASIC DVD OPERATIONS (cont.) Advancing a still picture frame by frame—Frameby-Frame Playback Locating the beginning of a scene or song JPEG 1. Press 8 during play. Still picture appears. 2. Press ¡ repeatedly. • Each time you press the button, the still picture advances to the next frame. • For DVD Video: • For SVCD/VCD: • For CD/MP3: • For JPEG: To return to the normal playback, press 3 (SELECT). NOTE You cannot reverse a still picture frame by frame (if you press 1). To skip forward, press ¢.
ADVANCED DVD OPERATIONS Playing from a specific point Locating a desired scene (item) from the disc menu For DVD video: TOP MENU ENTER MENU DVD Video discs generally have their own menus which show the disc contents. These menus contain various items such as titles of movies, names of songs, or artist information, and display them on the TV. You can locate a desired scene using the DVD menu. • See the instructions of each disc for its particular menus.
ADVANCED DVD OPERATIONS (cont.) Specifying a desired title • Example (for Audio CD): To play back from 23(M):40(S) Press 2, 3, then 4. TIME 1 During playback, press GROUP/TITLE. The number below the TITLE indicator changes “– –.” 2 Press the number button(s) to specify a title to play. The unit starts playback from the specified title. • Examples:To select 5: press 5. To select 23: press 2, then 3. To select 40: press 4, then 0.
4 Changing the playback order Press the number buttons to specify tracks in the desired order. • Examples:To select 5: press 5. To select 10: press 1, then 0. To select 23: press 2, then 3. The total program time Total Program Time PROGRAM No. 1 2 3 4 5 6 7 8 9 10 CANCEL ENTER 2 3 7 4 3 5 6 00:25:12 TrackDisc 1 5 4 2 3 4 6 USE NUMERIC KEYS TO PROGRAM TRACKS. CANCEL DELETES THE LAST STEP. 7 DELETES ALL.
ADVANCED DVD OPERATIONS (cont.) Playing at random—Random Play To start Repeat Play, press 3 (SELECT) if necessary. To stop repeat playback 1 Before starting playback, press ON SCREEN twice. The menu bar appears on the TV. 2 Press 3 or 2 to move to RND. , then press ENTER. To cancel Repeat Play Screen example for Audio CD Select “OFF” in step 3 above. TRACK 1 OFF PROG. Press 7 (CLEAR). • When a DVD Video disc is loaded, the unit stops playback and cancels Repeat Play.
To repeat a desired part (A-B repeat playback) For DVD Video/CD: During playback For SVCD/VCD: During playback without PBC 1 Press ON SCREEN twice. The menu bar appears on the TV screen. 2 Press 3 or 2 to move to OFF , then press ENTER. The pull-down menu for repeat mode selection appears. 3 4 Press ∞ or 5 to select “A-B.” 5 Press ENTER at the beginning of the repeat part (point A). The pull down menu disappears. AThe repeat icon shows . Press ENTER at the end of the repeat part (point B).
ADVANCED DVD OPERATIONS (cont.) Selecting the subtitle language Changing the audio language or sound Some DVD Video and SVCD discs contain more than one subtitle language. You can choose a desired one from them. • At the beginning of the part if the subtitles are recorded, will appear on the TV (except when the “ON SCREEN GUIDE” is set to “OFF”—see page 79). The audio selection setting allows you to change the audio language of a movie, or to listen to karaoke with or without the vocal.
Using sound effects and special picture playback Simulating surround sound (3D PHONIC) Using the 3D PHONIC function, you can get a simulated surround effect from your stereo system. 1 During playback, press 3D PHONIC. The 3D PHONIC window appears on the TV. 2 Press 3 or 2 to select the desired mode.
ADVANCED DVD OPERATIONS (cont.) Adjusting the picture Video Fine Processor (VFP) allows you to adjust the picture according to the type of software, picture tone or personal preferences. Set the video type most suitable to the current software or the room conditions. 1 During playback, press VFP. The VFP mode selection window appears on the TV screen. 2 Press 3 or 2 to select the desired preset. • Each time you press the button, the VFP mode changes as follows.
Menu bar operations 1 Show the status bar. Press ON SCREEN. • A status bar for the inserted disc appears on the TV (see page 48). • See page 60 for details about the status bar. 2 Show the menu bar Press ON SCREEN again. • A menu bar for the inserted disc appears under the status bar. (for DVD Video) TITLE 33 CHAP 33 8.5Mbps OFF ENTER ON SCREEN CHAP. 1/3 TOTAL 1:25:58 1/5 1/3 (for SVCD) TRACK 33 OFF PROG. RND. OFF PROG. RND. OFF PROG. RND.
ADVANCED DVD OPERATIONS (cont.) Menu bar functions for DVD Video Time information Menu bar functions for SVCD/VCD/CD Time information During playback, selects the time information shown in the display window and in the status bar. Selects the time information shown in the display window and in the status bar. Press ENTER to select the time information from the following. • TIME: Current chapter elapsed time • REM: Current chapter remaining time • TOTAL: Current title elapsed time • T.
MP3/JPEG OPERATIONS Playing an MP3 disc Basic operations The unit can play back MP3 files on a personally recorded CD-R/RW disc or commercially available disc. A disc that contains MP3 files is referred to as an “MP3 disc” in this manual. Notice that if a disc contains both of MP3 and JPEG files, you can only play back files of the type selected by the “MP3/JPEG” setting in the “PICTURE” menu (see page 77). ENTER: Starts playback while stopped. 3 (SELECT):Starts playback while stopped or paused.
MP3/JPEG OPERATIONS (cont.) You can specify the desired group/file from the MP3 CONTROL screen using the following procedure. 4/¢ 3 ENTER Number To select (highlight) a “Group” column or “Track” column on the screen, press 3 or 2. To select a group, press cursor ∞ or 5 when the cursor (highlighted bar) is in the “Group” column. If there are unshown groups, they will appear in this column as you selecting groups.
To repeat an MP3 file(s) 1 Press ON SCREEN once. The pull-down menu for Repeat Play appears. OFF 2 Press ∞ or 5 to select an option you want, then press ENTER. • TRACK: Current file repeat • GROUP:Current group repeat • ALL: All file repeat • OFF: Repeat Play is cancelled Selected repeat mode also appears on the MP3 CONTROL screen. To start Repeat Play, press 3 (SELECT) if necessary. To stop repeat playback Press 7 (CLEAR). • The unit stops playback but does not cancel Repeat Play.
MP3/JPEG OPERATIONS (cont.) Basic operations 4/¢ Use the following buttons to operate a JPEG disc. 3 MENU 3 (SELECT): Starts slide show while stopped or paused. 7 (CLEAR) or MENU: Stops slide show. 8 or ENTER: Keep showing the same picture. 4/¢: Skips back or forward a file during slide show. ENTER NOTES • The unit supports the baseline JPEG format. • The unit does not support “packet writing (UDF format)” discs. • The unit supports discs recorded with multiple sessions.
To select (highlight) a “Group” column or “Track” column on the screen, press 3 or 2. To select a group, press cursor ∞ or 5 to move the cursor (highlighted bar) to a group you want when the cursor is in the “Group” column. If there are unshown groups, they will appear in this column as you selecting groups. • After pressing GROUP/TITLE, you can select the group number (up to 99) without respect to the cursor (highlighted bar) position. Examples:To select 5: press 5. To select 23: press 2, then 3.
Changing the HDD/TV tuner settings Without changing the HDD settings (which includes the built-in TV tuner setting), you can use the HDD deck. However, it is recommended to change them as you prefer so that the operation of this unit become easier and convenient. The unit provides the three main setting items—HDD SET UP, FUNCTION SET UP, and INITIAL SET UP.
HDD SET UP • The initial setting is bold in the table below. You can change the temporary memory time length for Live Memory (see page 21). LIVE MEMORY AUDIO REC Setting options • NICAM • MONO Setting options OFF, 30 MIN, 1 HR, and 3 HR When this function is set to “NICAM,” the NICAM audio programmes will be received (or recorded). (See page 22.) When this function is set to “MONO,” the standard (monaural) audio programmes will be received (or recorded).
CHANGING THE INITIAL SETTINGS (cont.) INPUT/OUTPUT Set this correctly according to the external component connected to the L-1 IN/OUT connector. This setting affects only the output through the HDD and the build-in TV tuner. L-1 OUTPUT Setting options • VIDEO • S-VIDEO • VIDEO: Select when the external component accepts composite video signals. • S-VIDEO: Select when the external component accepts S-video (Y/C) signals. You can obtain the better picture quality.
Setting the clock time If you have performed Auto Setup (see page 13) or TVLinked Setup (see page 14), the clock is set automatically. Set the clock manually in the following cases. • When the clock time has not been set correctly by Auto Setup, TV-Linked Setup, or Auto Channel Set. • When the backup memory is expired. • When you want to change Just Clock* setting yourself.
6 7 CHANGING THE INITIAL SETTINGS (cont.) Press the number button “0” to select “TV PROG” or “SAT.” • In this example, select “TV PROG.” • Select “SAT” to enter a programme position number of the satellite receiver. Press ∞ or 5 to enter the programme position number for the station of the selected Guide Program number, then press ENTER. This is the number you select [ENTER] on this unit or on the satellite [SET UP] (Example) If CH4 is received receiver to tune into the on channel position station. 4.
To set the built-in TV tuner manually—Manual Channel Setup You can store the station which cannot be stored using Auto Setup (see page 13), TV-Linked Setup (see page 14) or Auto Channel Setup (see page 70). 1 2 to “INITIAL SET UP,” then 3 Press 3 or 2 to move ENTER. to “TUNER SET,” then press 4 Press ∞ or 5 to move to “MANUAL CH SET,” then 26 BBC1 33 BBC2 press ENTER. 23 ITV 30 CH4 The confirmation screen 37 CH5 appears.
CHANGING THE INITIAL SETTINGS (cont.) To change the programme position number assigned to a station To fine-tune the station channel 1 1 Show the confirmation screen for Manual Channel Setup. 1 Press SET UP. 2 Press 3 or 2 to move to “INITIAL SET UP,” then press ∞. 3 Press 3 or 2 to move to “TUNER SET,” then press ENTER. 4 Press ∞ or 5 to move to “MANUAL CH SET,” then press ENTER. Show the confirmation screen for Manual Channel Setup. 1 Press SET UP.
6 Press ENTER. The confirmation screen appears 7 8 Repeat steps 2 to 6 to change other station names. Press SET UP three times to finish the setting. To assign your own station names 1 Show the confirmation screen for Manual Channel Setup. 1 Press SET UP. 2 Press 3 or 2 to move to “INITIAL SET UP,” then press ∞. 3 Press 3 or 2 to move to “TUNER SET,” then press ENTER. 4 Press ∞ or 5 to move to “MANUAL CH SET,” then press ENTER.
CHANGING THE INITIAL SETTINGS (cont.) Station Name South-West Beacon Hill ..........................57 Caradon Hill ........................22 Huntshaw Cross ...................55 Redruth ................................51 Stockland Hill ......................33 Channel Islands Fremont Point.......................
Changing the DVD settings Without changing the DVD settings, you can use the DVD player. However, it is recommended to change them as you prefer so that the operation of this unit become easier and convenient. The unit provides the four main setting items— LANGUAGE, PICTURE, AUDIO, and OTHERS. The table below shows the DVD setting items.
CHANGING THE INITIAL SETTING (cont.) 4 Select an option for the setting. 5 Finish the setting. Press ∞ or 5 to select “JPEG” (in this, example), then press ENTER. Press SET UP. • The initial setting is bold in the table below. LANGUAGE You cannot select and change the language settings during playback. MENU LANGUAGE You can select the default menu language to be displayed if it is contained in a DVD Video disc.
PICTURE You can select the monitor type to match your TV when you play back a DVD Video recorded for wide-screen televisions. • 16:9 NORMAL (Wide television screen): Select when you connect the unit to a wide-screen (16:9) TV whose aspect ratio is fixed to 16:9 (the unit automatically adjusts the screen width of the output signal correctly when playing back 4:3 software). If you play 4:3 software, the picture quality changes slightly due to the process for converting the picture width.
CHANGING THE INITIAL SETTING (cont.) AUDIO DIGITAL AUDIO OUTPUT Setting options • PCM ONLY • DOLBY DIGITAL/ PCM • STREAM/PCM Set this correctly according to the external component connected to the DIGITAL OUT connectors on the rear. • See “Digital output signal chart” on page 92 for details about the relation between the setting and output signals. • PCM ONLY: Select when connecting to the linear PCM digital input connector of other audio equipment such as an MD recorder.
OTHERS RESUME Setting options • ON • OFF • DISC RESUME ON SCREEN GUIDE Setting options • ON • OFF AV CMOPULINK MODE You can select the resume playback mode. See page 49 for details about the resume playback function. The unit can display “on-screen guide” icons. See page 48. This function is provided for the future use. Set this to “DVD1.” Setting options • DVD 1 • DVD 2 • DVD 3 PARENTAL LOCK When this option is selected, pressing ENTER on the remote control brings up the PARENTAL LOCK screen.
Limiting playback by children CHANGING THE INITIAL SETTING (cont.) 4 Select the level. 1 Press ENTER again. This function restricts playback of DVD Video discs which contain violent (and other) scenes according to the level set by the user. For example, if a movie which includes violent scenes supports the parental lock feature, such scenes which you do not want to let children view can be cut or replaced with other scenes (this depends on how the disc is programmed).
To change the settings To temporarily release Parental Lock You can change the parental lock settings later. If the parental level is set to a strict value, some discs may not play at all. When you insert such a disc and try to play it, the following Parental Lock screen appears on the TV, asking you whether you want Parental Lock to be temporarily released or not. 1 2 3 4 Press SET UP. Press 3 or 2 to move to “OTHERS.” Press ∞ or 5 to move to “PARENTAL LOCK,” then press ENTER.
Setting the remote control code EXTERNAL COMPONENT OPERATIONS On the remote control 1 Change the remote control code. When you use more than two JVC video products, a product which you have not intended to operate may correspond to the signals sent from this remote control. This occurs since the other JVC products accept the signals sent from this remote control. To avoid this interference, you can change the remote control code both for the remote control and the unit.
Editing from a camcorder You can use a camcorder as the playback component and the HDD as the recording deck. 1 Make connections. Connection using the VIDEO connector • See the connection diagrams to the left. VIDEO input XV-DDV1SL NOTE When using a monaural camcorder, connect its audio output connector to the INPUT F-1 AUDIO L(MONO) connector on the front panel. 2 Select the HDD deck.
EXTERNAL COMPONENT OPERATIONS (cont.) Editing to or from a VCR You can use the HDD deck as the playback component or as the recording deck. To use the HDD deck for the playback component: Connection only with the SCART cables TV XV-DDV1SL DVD DIGITAL OUT PCM / STREAM COAXIAL OPTICAL DVD/HDD VIDEO AUDIO OUT OUT LEFT VIDEO DVD VIDEO SIGNAL SELECTOR L-1 IN/OUT L-2 IN IN SAT CONTROL COMP.
Connection to the L-2 IN connector with the SCART cables XV-DDV1SL DVD DIGITAL OUT PCM / STREAM COAXIAL OPTICAL DVD/HDD VIDEO AUDIO OUT OUT LEFT VIDEO DVD VIDEO SIGNAL SELECTOR TV L-1 IN/OUT L-2 IN Y/ C OUT S-VIDEO AV COMPU LINK RIGHT 1 Make connections Connect the VCR through the L-2 IN (or L-1 IN/OUT) connector on the rear using the 21-pin SCART cable (not supplied). • When using the L-2 IN connector, set “L-2 SELECT” to “A/V” (see page 68). IN SAT CONTROL COMP.
EXTERNAL COMPONENT OPERATIONS (cont.) Connecting to a satellite receiver NOTES • Be sure to use a 21-pin SCART cable (not an S-Video cable) for the satellite receiver connection. • Set “L-2 SELECT” to “A/V” (see page 68). • You can use Automatic Satellite Recording (see page 46) with this connection. • To record a programme via the satellite receiver, select “L-2” by pressing AUX (number button “0”) and/or HDD/TV PR +/–. “L-2” appears in the display window.
These instructions enable you to connect the unit to your Hi-if stereo system (if you have one) and listen to the sound through the Stereo System.
Troubleshooting Before requesting service for a problem, use this chart and see if you can repair the trouble yourself. General Power does not come on. ] Power plug is not inserted securely. Plug it in securely. You cannot insert a disc. ] The unit does not accept any operation for about 30 seconds after it is plugged in (during this period, the illumination lamp on the unit flashes). ] Another disc has been already loaded. The HDD deck does not accept any operations.
Picture: Audio The picture is not displayed properly. ] Set the DVD VIDEO SIGNAL SELECTOR to the appropriate position (see page 12). Picture is noisy. ] A VCR is connected in between the unit and the TV. Connect the unit so that the picture signal flows directly to the TV. ] With some discs, the picture may be blurred when “PICTURE SOURCE” is set to “FILM” or “AUTO.” Set “PICTURE SOURCE” to “VIDEO (NORMAL)” or “VIDEO (ACTIVE)” (see page 77).
ADDITIONAL INFORMATION (cont.) MESSAGE DESCRIPTION DO YOU WANT TO DELETE SELECTED INDEX PICTURE? Appears when you have tried to delete a programme from the HDD. Make sure you really want to delete the programme. (See page 36.) GUIDE PROGRAM IS NOT SET SET GUIDE PROGRAM THEN RETRY To use the VIDEO PLUS+ system for timer recording, set Guide Program number in advance. (See page 69.) PROGRAMME COMPLETED CHECK PROGRAMME LIST TO CONFIRM Timer programming is completed properly.
Country/Area code list for Parental Lock AD AE AF AG AI AL AM AN AO AQ AR AS AT AU AW AZ BA BB BD BE BF BG BH BI BJ BM BN BO BR BS BT BV BW BY BZ CA CC CF CG CH CI CK CL CM CN CO CR CU CV CX CY CZ DE DJ DK DM DO DZ EC EE EG EH ER ES ET FI FJ FK Andorra United Arab Emirates Afghanistan Antigua and Barbuda Anguilla Albania Armenia Netherlands Antilles Angola Antarctica Argentina American Samoa Austria Australia Aruba Azerbaijan Bosnia and Herzegovina Barbados Bangladesh Belgium Burkina Faso Bulgaria Bahra
ADDITIONAL INFORMATION (cont.
Glossary Aspect ratio A ratio which defines the shape of the rectangular picture on a TV. It is the width of the picture relative to the height. A conventional TV picture is 4:3 in aspect ratio. Bitstream The digital format of multichannel audio data (e.g., 5.1channel) before it is decoded into its various channels. Chapter/title Chapter is the smallest division and title is the largest division on DVD Video. A chapter is a division of a title and similar to a track for VCD or CD.
Specifications HDD Deck—Video/Audio Video format: MPEG2 (VBR) Audio format: MPEG1 Layer2 Maximum recording time (approx.) (SP): 20 hours (LP): 28 hours (EP): 56 hours (SEP): 80 hours DVD player—Audio Total harmonic distortion:Less than 0.006% Dynamic range: 16 bits: 98 dB 20 bits: 100 dB 24 bits: 100 dB Frequency range CD (fs=44.1 kHz): 2 Hz to 20,000z DVD (fs=48 kHz): 2 Hz to 22,000z DVD (fs=96 kHz): 2 Hz to 44,000z Output level: DVD/HDD AUDIO OUT: 2 Vrms (10 kΩ) DVD DIGITAL OUT: COAXIAL: 0.
Index Numerics & Symbols 3D PHONIC • ACTION 57 • DRAMA 57 • THEATER 57 x1.5 Quick Playback with sound 49 A ACTION 57 AUDIO • ANALOG DOWN MIX 78 • D.
SAFETY INSTRUCTIONS “SOME DOS AND DON’TS ON THE SAFE USE OF EQUIPMENT” This equipment has been designed and manufactured to meet international safety standards but, like any electrical equipment, care must be taken if you are to obtain the best results and safety is to be assured. Do read the operating instructions before you attempt to use the equipment.