6442LP840_UG.qxd 10/10/03 9:22 AM Page 2 LP 840/LP 850 ® ® LP 840/LP 850 ® INSTALLATION & INTEGRATION PROJECTOR. USER’S GUIDE InFocus Corporation 27700B SW Parkway Avenue Wilsonville, Oregon 97070-9215 1-800-294-6400 • 503-685-8888 Fax: 503-685-8887 http://www.infocus.
6442LP840_UG.qxd 10/10/03 9:22 AM Page 2 IF YOU NEED ASSISTANCE… call InFocus Customer Ser vice directly at 1-800-799-9911. WARNING: This product contains chemicals, including lead, known to the State of California to cause birth defects or other reproductive harm. Wash hands after handling. WARNING: This product contains a lamp which contains mercury. Dispose of it as required by local ordinances and regulations.
mêçÇìâíÉêâä‹êáåÖ `~å~Ç~ mêçÇìëÉåíW=fåcçÅìë=`çêéçê~íáçåI=OTTMM_=pt=m~êâï~ó=^îÉK=táäëçåîáääÉI=lêÉÖçå= VTMTM=rp^ hçåíçê=á=bìêçé~W=píê~ïáåëâóä~~å=RURI=NMTT=uu=^ãëíÉêÇ~ãI=kÉÇÉêä~åÇ aÉííÉ=ÇáÖáí~äÉ=~éé~ê~íÉí=á=âä~ëëÉ=^=Éê=á=çîÉêÉåëëíÉããÉäëÉ=ãÉÇ=â~å~ÇáëâÉ=f`bpJMMPK `Éí=~éé~êÉáä=åìã¨êáèìÉ=ÇÉ=ä~=Åä~ëëÉ=^=Éëí=ÅçåÑçêãÉ=¶=ä~=åçêãÉ=kj_JMMP=Çì=`~å~Ç~K ^Çî~êëÉä=Ñçê=ÑàÉêåâçåíêçää i~ëÉêëíê™äáåÖëéêçÇìâí=á=âä~ëëÉ=ffX=Ä›äÖÉäÉåÖÇÉ=SRM=åãX=ã~âëáãìã=ÉÑÑÉâí=NãtK= càÉêåâçåíêçääÉå=ÑìåÖÉêÉê=á=çîÉêÉåëëíÉããÉäëÉ=ãÉÇ=ãÉÇ=ÖàÉäÇÉåÇÉ=âê
Hvis du har erfaring med å installere presentasjonssystemer, kan du følge anvisningene på installasjonsoversikten som fulgte med. Du kan lese mer om tilkobling og bruk av projektoren i denne brukerhåndboken. Elektroniske versjoner av denne brukerhåndboken er tilgjengelig på flere språk på den medfølgende CD-en, samt på vårt web-sted.
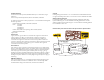
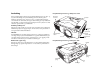
Innledning Projektorkomponenter og -funksjoner: foran Den nye multimediaprojektoren har tre datamaskininnganger, tre video- og to lyd inn-tilkoblinger, én lyd ut-tilkobling, RS-232-kontroll og XGA 1024x768-oppløsning. Kort-, fast kort-, lang- og superlangdistanselinser som brukeren selv kan skifte, kan kjøpes ekstra. Dette gjør at produktet blir mer fleksibelt og velegnet til mange forskjellige formål. Projektoren er enkel å tilkoble og lett å bruke og vedlikeholde.
Tilkoblingspanel Projektoren er utstyrt med tre datamaskininnganger og følgende tre videotilkoblingsalternativer: • én M1-D (DVI med USB) • én VESA-datamaskin • én BNC (RGBHV og Pr, Pb, Y) • én komponent RCA-video (Pr, Pb, Y) • én S-video • én kompositt RCA-video VESA-datamaskin komponentvideo M1-D-datamaskin skjerm RJ-45 RS232 seriell kontroll tilkoblet med ledning fjernkontroll fjernkontroll kontroll mottaker (IR) lås Projektoren er utstyrt med datamaskin- og videotilkoblinger for lyd:
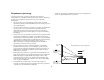
• Projektorens plassering Du finner opplysninger om bildeforskyvninger for forskjellige linser under “Prosjisert bildestørrelse” på side 44. Ta hensyn til størrelsen og formen på skjermen, plasseringen av stikkontaktene og avstanden mellom projektoren og resten av utstyret for å bestemme hvor projektoren skal plasseres. Her er noen generelle retningslinjer: • Plasser projektoren på et flatt underlag i riktig vinkel i forhold til skjermen.
Tilkoble en datamaskin tilkoble datamaskinkabel Nødvendige datamaskintilkoblinger Koble den ene enden av VESA-datamaskinkabelen til Computer 2 tilkoblingen (datamaskin 2) på projektoren. Koble den andre enden til videoporten på datamaskinen. På en skrivebordsmaskin skal du først frakoble skjermkabelen fra videoutgangen på datamaskinen. Koble den svarte strømkabelen til kontakten bak på projektoren og til en elektrisk stikkontakt.
Hvis du bruker en skrivebordsmaskin, og vil se bildet både på datamaskinskjermen og projeksjonsskjermen, kobler du skjermkabelen til Monitor out-tilkoblingen på projektoren. tilkoble skjermkabel Du kan også bruke en BNC-kabel for å koble til datamaskinen. Koble BNCtilkoblingene på BNC-kabelen til de tilsvarende Computer 3 -tilkoblingene (datamaskin 3) på projektoren. Koble den andre enden til videoporten på datamaskinen.
Vise et datamaskinbilde fjerne linsehette Ta av linsehetten. Sett av/på-bryteren på baksiden av projektoren i på-stilling, og trykk deretter på Power-knappen på toppen av projektoren eller fjernkontrollen. 2 I Indikatoren blinker grønt, og viftene startes opp. Når lampen tennes, vises oppstartskjermbildet, og indikatoren lyser grønt. Det kan ta et minutt før bildet oppnår full lysstyrke. trykk på Power-knappen O trykk på Power-bryteren 1 ? Mangler oppstartskjermbildet? Finn hjelp på side 20.
Førstegangs bruk av projektoren med Windows 98 a Den første gangen du tilkobler en datamaskin, som kjøres under Windows 98, til projektoren, registrerer datamaskinen projektoren som “ny maskinvare” og veiviseren for maskininstallasjon vises. Følg disse anvisningene for å bruke veiviseren til å laste den riktige driveren (som ble installert sammen med Windows-operativsystemet). Hvis du kjører Windows 2000, Windows ME eller Window XP, kan du hoppe over disse trinnene og gå til “Justere bildet” på side 14.
Hopp over denne siden hvis du ikke har tilkoblet en USB-musekabel For Windows 98: • Hvis du har tilkoblet USB-kabelen, kommer veiviseren for maskininstallasjon fram igjen. Drivere må være installert for å kunne bruke USB-funksjonen. • Veiviseren startes to ganger. Den første gangen registrerer den en USB-enhet for brukergrensesnitt (for tastatur). Den andre gangen registrerer den en USB-enhet for brukergrensesnitt (for musen).
Bildejustering juster høyden Juster eventuelt høyden til projektoren ved å trykke på utløserknappene på hver side av projektorens forside for å forlenge høydejusteringsføttene. utløserknapp hevefot Plasser projektoren i ønsket avstand fra skjermen i 90 graders vinkel (vinkelrett) i forhold til skjermen. utløserknapp hevefot juster avstanden På side 44 finner du en tabell over skjermstørrelser og -avstander.
qáäâçÄäÉ=Éå=îáÇÉçÉåÜÉí= íáäâçÄäÉ=^LsJâ~ÄÉä pí~åÇ~êÇ=îáÇÉçíáäâçÄäáåÖÉê pÉíí=ÇÉå=ÖìäÉ=éäìÖÖÉå=é™=äóÇJLîáÇÉçâ~ÄÉäÉå=E^LsF=á=îáÇÉçìíÖ~åÖÉå=é™= îáÇÉçÉåÜÉíÉåK=pÉíí=ÇÉå=~åÇêÉ=ÖìäÉ=éäìÖÖÉå=á=ÇÉå=ÖìäÉ=sáÇÉç=PJìíÖ~åÖÉå=é™= éêçàÉâíçêÉåK= pÉíí=Éå=Üîáí=éäìÖÖ=á=ÇÉå=îÉåëíêÉ=äóÇìíÖ~åÖÉå=é™=îáÇÉçÉåÜÉíÉåI=çÖ=Éå=ê›Ç= éäìÖÖ=á=ÇÉå=Ü›óêÉ=äóÇìíÖ~åÖÉå=é™=îáÇÉçÉåÜÉíÉåK=pÉíí=ÇÉå=ÖàÉåî‹êÉåÇÉ= ÜîáíÉ=éäìÖÖÉå=á=ÇÉå=îÉåëíêÉ=~ìÇáç=áåJìíÖ~åÖÉå=é™=éêçàÉâíçêÉå=Eíáä=Ü›óêÉ=Ñçê= ÇÉå=ÖìäÉ=sáÇÉç=PJìíÖ~åÖÉåFI=çÖ=ÇÉå=ê›ÇÉ=éäìÖÖÉå=á=ÇÉå=Ü›óêÉ=~ìÇá
aì=â~å=çÖë™=íáäâçÄäÉ=îáÇÉçÉåÜÉíÉå=ãÉÇ=Éå=_k`Jâ~ÄÉäK=hçÄäÉ=_k`J íáäâçÄäáåÖÉåÉ=é™=_k`Jâ~ÄÉäÉå=íáä=ÇÉ=íáäëî~êÉåÇÉ=`çãéìíÉê=P=JíáäâçÄäáåÖÉåÉ= EÇ~í~ã~ëâáå=PF=é™=éêçàÉâíçêÉåK=hçÄäÉ=ÇÉå=~åÇêÉ=ÉåÇÉå=íáä=îáÇÉçéçêíÉå=é™= îáÇÉçÉåÜÉíÉåK=_êìâ=^LsJâ~ÄÉäÉåë=äóÇéäìÖÖÉê=ëçã=ÄÉëâêÉîÉí=é™=ÑçêÉÖ™ÉåÇÉ= ëáÇÉ=EÇÉ=ÖìäÉ=éäìÖÖÉåÉ=é™=^LsJâ~ÄÉäÉå=ÄêìâÉë=áââÉFK íáäâçÄäÉ=_k`Jâ~ÄäÉê R k™ê=Q=_k`Jâ~ÄäÉê=Éê=íáäâçÄäÉíI=Ü™åÇíÉêÉê=éêçàÉâíçêÉå=Éå= âçãéçëáííëóåâêçåáëÉêáåÖ=é™=eK=k™ê=P=_k`Jâ~ÄäÉê=Éê=íáäâçÄäÉíI=Ü™åíÉêÉê= éêçàÉâíçêÉå=Éå=âçãéçëáííë
Vise et videobilde fjerne linsehette Ta av linsehetten. Sett av/på-bryteren på baksiden av projektoren i på-stilling, og trykk deretter på Power-knappen på toppen av projektoren. I Indikatoren blinker grønt, og viftene startes opp. Når lampen tennes, vises oppstartskjermbildet, og indikatoren lyser grønt. Det kan ta et minutt før bildet oppnår full lysstyrke. trykk på Power-knappen 2 O trykk på Power-bryteren 1 ? Mangler oppstartskjermbildet? Finn hjelp på side 20.
Juster zooming eller fokusering ved å trykke på knappene Zoom eller Focus på tastaturet til du oppnår ønsket bildestørrelse og fokusering. justere zooming og fokusering zoom focus Du kan også justere zooming og fokusering via menyene. Se side 33. justere linseforskyvning Hvis bildet ikke er på skjermen eller i visningsområdet, justerer du dette ved å trykke på knappen for linseforskyvning på tastaturet.
Slå av projektoren Feilsøke oppsettet Projektoren toner automatisk ut skjermbildet etter at det ikke er registrert en aktiv kilde på 30 minutter. Dette uttonede skjermbildet bidrar til å bevare projektorens levetid. Bildet kommer tilbake når det blir registrert en aktiv kilde, eller du trykker på en knapp på tastaturet eller fjernkontrollen. Hvis bildet ser riktig ut på skjermen, kan du gå videre til neste avsnitt. Hvis ikke, må du feilsøke oppsettet.
Feilsøke kilde Problem Løsning Resultat Oppstartskjermbildet mangler Sett i strømkabelen og trykk på av/på-bryteren, trykk på Power-knappen Ta av linsehetten Korrekt bilde star tu scre p en 3 1 2 Trykk på Computer-knappen Aktiver den eksterne porten på den bærbare datamaskinen Bare oppstartskjermbildet vises A startu p scree n Datamaskinbildet vises A eller start den bærbare datamaskinen på nytt 20 A
Datamaskinbildet mangler – bare teksten “For Høy Oppløsning” vises A Juster datamaskinens oppdateringsfrekvens i Kontrollpanel > Skjerm > Innstillinger > Avansert > Adapter (plasseringen er avhengig av hvilket operativsystem du har) Signa l rang out of e Datamaskinbildet vises A Du må kanskje innstille en annen oppløsning på datamaskinen, som vist i det neste problemet, “bildet er uskarpt eller avkuttet” 21 A
Bildet er uskarpt eller avkuttet A AA Innstill datamaskinens skjermoppløsning til den opprinnelige oppløsningen til projektoren (Start > Innstillinger > Kontrollpanel > Skjerm > kategorien Innstillinger, velg 1024x768) Bildet er skarpt og ikke avkuttet A På en bærbar datamaskin deaktiverer du skjermen på skjerm eller aktiverer modusen for to skjermer Navigasjonsknappene på fjernkontrollen fungerer ikke med min datamaskin Tilkoble USB-kabelen (side 9), og last deretter eventuelt USB-drivere (side 12).
Feilsøke projektor Problem Løsning Resultat Bildet er ikke rettvinklet Juster keystone i menyen Bilde Rettvinklet bilde Bildet er uskarpt Juster fokuseringen på tastaturet eller Skarphet i menyen Bilde > Avansert Korrekt bilde AB Bildet passer ikke på en 16:9-skjerm AB Endre skjermformatet til 16:9 i menyen Bilde > Skjerm Format 23 Korrekt bilde
Deaktiver Takmontasje i menyen Innstillinger > System Bildet er opp-ned Korrekt bilde BA Bildet er speilvendt fra venstre mot høyre AB Deaktiver Takmontasje i menyen Innstillinger > System Korrekt bilde A Fargene som vises, samsvarer ikke med fargene til kilden AB Juster innstillingene for farge, sjattering, fargetemperatur, lysstyrke og kontrast i menyene Korrekt bilde COLOR COLOR 24
Lampen kommer ikke på, indikatoren lyser konstant rødt (side 47) ensfarget rødt Kontroller at ingen luftinntak er blokkert.
Bildet er ikke midtstilt på skjermen Flytt projektoren, juster zooming eller linseforskyvning på tastaturet, juster høyden Juster horisontal eller vertikal stilling i Bilde-menyen > Avansert Har du fremdeles problemer? Hvis du trenger hjelp, kan du besøke vårt Web-sted eller ringe til oss Se listen over alle kontaktnumre og relevante Web-adresser på innsiden av omslaget bakerst i boken Dette produktet støttes av en begrenset to-års garanti. En utvidet garantidekning kan kjøpes hos forhandleren.
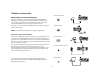
Bruke knappene på tastaturet De fleste knappene er nærmere beskrevet i andre avsnitt, men her er en oversikt over deres funksjoner: power (av/på) — slår projektoren på (side 11) og av (side 17). lens shift (linseforskyvning) — skifter det projiserte bildet opp eller ned. zoom — flytter det projiserte bildet nærmere eller fjernere. focus — justerer bildeklarheten. menu (meny) — åpner menyene på skjermen (side 32). opp-/ned-piler — navigerer til og justerer innstillinger i menyene (side 32).
Bruke fjernkontrollen indikator Fjernkontrollen bruker to (2) AAA-batterier som følger med. De settes lett i ved å skyve av dekselet bak på fjernkontrollen, rette inn + og – endene til batteriene, skyve dem på plass og deretter sette på dekselet igjen. navigeringsknapper laser knapp Fjernkontrollen brukes ved å rette den mot projektorskjermen eller projektoren (ikke mot datamaskinen). Den fungerer optimalt innenfor et område på ca. 9,1 m (30 fot).
Bruke lydfunksjonen tilkoble lydkabel Hvis du vil spille lyd fra projektoren, kobler du kilden til Audio Intilkoblingen på projektoren. Volumet justeres med knappene på tastaturet eller fjernkontrollen. Balansen eller volumet kan justeres via menyen Lyd (se side 36). Lyden dempes ved å trykke på Mute-knappen. Feilsøke lyd juster volumet Kontroller følgende hvis lyden uteblir: • Kontroller at lydkabelen er tilkoblet. • Kontroller at lyden ikke er dempet. • Kontroller at volumet er skrudd nok opp.
Optimalisere datamaskinbilder Presentasjonsfunksjoner Etter at datamaskinen er riktig tilkoblet og datamaskinens bilde vises på skjermen, kan du optimalisere bildet ved hjelp av menyene på skjermen. Du kan lese mer om hvordan du bruker menyene på side 32. Projektoren er utstyrt med flere funksjoner for å forenkle presentasjoner. Nedenfor finner du en oversikt. Nærmere beskrivelser er gitt i avsnittet om menyer på side 32. • Juster Keystone, Kontrast eller Lysstyrke i Bilde-menyen.
Optimalisere videobilder Tilpasse projektoren Etter at videoenheten er riktig tilkoblet og bildet vises på skjermen, kan du optimalisere bildet ved hjelp av menyene på skjermen. Du kan lese mer om hvordan du bruker menyene på side 32. Du kan tilpasse projektoren til egne oppsett og behov. Du kan lese mer om disse funksjonene på side 36 til side 40. • Juster Keystone, Kontrast, Lysstyrke, Farge eller Tint i Bilde-menyen. Se side 33. • Endre skjermformatet.
Bruke menyene Prikk Åpne menyene ved å trykke på menyknappen på tastaturet eller fjernkontrollen. (Menyene lukkes automatisk etter 60 sekunder hvis du ikke trykker på noen knapper.) Hovedmeny vises. Bruk pilknappene til å flytte opp og ned for å utheve ønsket undermeny, og trykk deretter på Selectknappen (velg).
Bilde, meny De følgende seks innstillingene justeres ved å utheve innstillingen, trykke på Select, bruke opp- og ned-piltastene til å justere verdiene og deretter trykke på Select for å bekrefte endringene. Keystone Vertikal øke keystone Zoom: justerer en linse til å zoome inn og ut. Uthev Zoom, og trykk deretter på opp/ned-pilene på tastaturet eller fjernkontrollen. Fokuser: justerer linsefokuseringen for et bilde. Uthev Fokuser, og trykk deretter på opp/ned-pilene på tastaturet eller fjernkontrollen.
Forhåndsinnstillinger: Med menyvalget Presets kan du optimalisere projektoren for visning av presentasjoner fra datamaskinen, fotografier, film- og videobilder. (Innsignaler for film er materiale som opprinnelig ble tatt opp med et filmkamera, for eksempel filmer. Video-inndata er materiale som opprinnelig ble tatt opp med et videokamerea, for eksempel et fjernsynsshow eller en sportsbegivenhet.) Du kan bruke bildeinnstillingene som utgangspunkt, og deretter tilpasse innstillingene for hver kilde.
Avansert-innstillinger Skarphet: (bare videokilder) endrer klarheten til kantene i et videobilde. Velg en skarphetsinnstilling. Skarphet Farge Oppløsning: Dette alternativet kan brukes på datamaskin- og komponentvideokilder. Du kan velge et fargerom som er spesielt tilpasset inngangssignalet. Projektoren avgjør automatisk standarden når du velger Auto.
Strøm Sparer: slår av lampen automatisk etter at det ikke er registrert noen signaler på 20 minutter. Etter ytterligere 10 minutter uten signaler slår projektoren seg av. Hvis det blir mottatt et aktivt signal før projektoren slås av, vil bildet vises. Innstillinger-menyen Lyd: velg dette for å justere balansen og volumet. Med dette alternativet kan du aktivere eller deaktivere de innebygde høyttalerne og oppstartslyden til projektorens oppstartlyd.
Skjermsparer: tømmer automatisk skjermbildet etter at det ikke er registrert noen signaler på fem minutter. Bildet kommer tilbake når det blir registrert en aktiv kilde, eller du trykker på en knapp på tastaturet eller fjernkontrollen. Skjerm Sparer er deaktivert, når Strøm Sparer er aktivert. Skjermsparer Oppstarts Logo: velg dette for å vise et tomt skjermbilde med fargene Svart, Hvit eller Blå istedenfor standardskjermbildet ved oppstart og når det ikke er registrert noen kilde.
PiP: (Bilde i Bilde) for å overlappe med et mindre vindu som viser videokilden, øverst i det store vinduet med datamaskinkilden. Det er bare videokilde 2 og 3 (kompositt- og S-video) som støtter PiP. Både en datamaskin- og en videokilde må da være tilkoblet for å kunne bruke PiP. Du kan ikke vise et datamaskinbilde i det lille PiP-vinduet – bare et videobilde. Velg mellom et lite, middels eller stort vindu.
Nettverk: Projektoren er utstyrt med en RJ45 Ethernet-tilkobling som støtter nettverkstilkoblinger og TCP/IP-protokoller. Dette gjør det mulig å kontrollere og styre projektoren over et intranett i bedriften. Følgende felt er tilgjengelige når DHCP ikke er avmerket, og er tilgjengelige for manuell datainnlegging. Nettverk IP Address: Identifiserer projektoren i nettverket. Subnet mask: Atskiller nettverksadressedelen til IP-adressen. Default gateway: IP-adressen til den lokale ruteren.
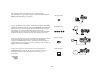
Vedlikehold rens linsen med en myk, tørr klut og ikke-slipende rensemiddel MERK: Når du utfører vedlikehold på projektoren, må du huske på at du bare skal fjerne skruer med ett spor, eller flathodede skruer. Alle andre skruetyper, for eksempel stjerneskruer skal ikke fjernes. Disse skruetypene skal bare fjernes av tekniske serviceeksperter. Rengjøre linsen 1 Bruk en myk, tørr klut og et ikke-slipende rensemiddel for linser. Vær forsiktig med bruk av rensemiddel, og stryk det ikke rett på linsen.
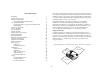
6 En linse fjernes ved å skyve spaken inne i linseholderen og vri linsen mot urviseren til den stopper. Fjern linsen. 7 Den nye linsen settes inn i åpningen fra forsiden av projektoren. Rett inn spak inne i linseholderen den røde prikken (nær linsens base) med den røde prikken på projektoren. Vri den med urviseren til du føler at linsen knepper på plass. 8 Stram de to låseskruene i dekselet som dekker linseholderen.
ADVARSLER: • Unngå forbrenning. Avkjøl projektoren i minst 60 minutter før du bytter lampen. • Mist ikke lampemodulen i gulvet. Glasset kan knuses og forårsake personskade. • Berør ikke lampelinsen. Fingeravtrykk kan redusere bildeskarpheten. • Vær veldig forsiktig når du fjerner lampemodulen. Dersom lampen mot formodning skulle knuses, kan glassbitene bli svært små. Lampemodulen er konstruert for å demme opp for de fleste av disse bitene, men vær likevel forsiktig når du fjerner den.
Skifte støvfilteret 1 Slå av projektoren og trekk ut strømkabelen. slå av og trekk ut strømkabelen til projektoren 2 Vent 60 minutter, slik at projektoren blir helt avkjølt. ADVARSEL! Unngå forbrenning. Avkjøl projektoren i minst 60 minutter før du renser eller skifter støvfilteret. vent 60 minutter 3 Fjern risten foran støvfilteret på siden av projektoren ved å trekke ned de to tappene øverst på risten. 4 Trykk på tappen midt på støvfilteret, og løft det av.
qáääÉÖÖ q~ÄÉää=OW=mêçàÉâëàçåëëí›êêÉäëÉêW=hçêí=Ñ~ëí=äáåëÉ=EMIUWN=â~ëíÉÑçêÜçäÇF _áäÇÉëí›êêÉäëÉ mêçëàáëÉêí=ÄáäÇÉëí›êêÉäëÉ jbohW=_Éë›â=î™êí=ïÉÄJçãê™ÇÉ=Ñçê=™=ÑáååÉ=Éå=áåíÉê~âíáî=â~äâìä~íçê=Ñçê= ÄáäÇÉëí›êêÉäëÉK q~ÄÉää=NW=mêçàÉâëàçåëëí›êêÉäëÉêW=pí~åÇ~êÇäáåëÉ=ENIR=J=OIOWN=â~ëíÉÑçêÜçäÇF jáåáãìã=ÄáäÇÉ j~âëáãìã=ÄáäÇÉ = aá~Öçå~äí= ÄáäÇÉ EãLÑçíF _áäÇÉJ ÄêÉÇÇÉ= EãLÑçíF =aá~Öçå~äí= ÄáäÇÉ EãLÑçíF _áäÇÉJ ÄêÉÇÇÉ= EãLÑçíF jáåáãìã ~îëí~åÇ=MIVLP MIROLNIT MIQOLNIQS MITSLOIR MIRRLNIUO NIRLR MIUTLOIUQ MISVLOIOT NIO
q~ÄÉää=QW=mêçàÉâëàçåëëí›êêÉäëÉêW=i~åÖâ~ëíÉäáåëÉ=EOIO=Ó=QIOWN=â~ëíÉÑçêÜçäÇF q~ÄÉää=PW=mêçàÉâëàçåëëí›êêÉäëÉêW=hçêí=òççãÉäáåëÉ= ENIN=J=NIRWN=â~ëíÉÑçêÜçäÇF jáåáãìã=ÄáäÇÉ =aá~Öçå~äí= ÄáäÇÉ EãLÑçíF _áäÇÉJ ÄêÉÇÇÉ= EãLÑçíF =aá~Öçå~äí= ÄáäÇÉ EãLÑçíF _áäÇÉJ ÄêÉÇÇÉ= EãLÑçíF jáåáãìã ~îëí~åÇ=MISLO MIRNLNIST MIQNLNIPP MISVLOIOT MIRRLNIUO NIRLR NIOTLQINT NIMOLPIPP NITPLRISU NIPVLQIRR PIMLNM OIRQLUIPP OIMPLSIST PIQSLNNIPS OITTLVIMV SINLOM RIMULNSIST QIMSLNPIPP SIVPLOOITP RIRQLNUINU TISLOR SIPRLOMI
q~ÄÉää=RW=mêçàÉâëàçåëëí›êêÉäëÉêW=pìéÉê=ä~åÖâ~ëíÉäáåëÉ=EPKV=ÓTIPWNF jáåáãìã=ÄáäÇÉ j~âëáãìã=ÄáäÇÉ =aá~Öçå~äí= ÄáäÇÉ EãLÑçíF _áäÇÉJ ÄêÉÇÇÉ= EãLÑçíF =aá~Öçå~äí= ÄáäÇÉ EãLÑçíF _áäÇÉJ ÄêÉÇÇÉ= EãLÑçíF jáåáãìã ~îëí~åÇ=OIPLTIR MIPVLNIOU MIPNLNIMP MITPLOIQ MIRVLNIVO TISLOR NIPLQIOU NIMQLPIQO OIQQLUIMN NIVRLSIQN NRIOLRM OISNLUIRS OIMVLSIUR QIUULNSIMP PIVNLNOIUO OOIVLTR PIVNLNOIUQ PINPLNMIOT TIPPLOQIMQ RIUSLNVIOP PMIRLNMM RIOOLNTINO QINULNPITM VIMTLPOIMR TIUOLORISQ PUINLNOR SIROLONIQ RI
Indikatoraktivitet Indikatorfarge/-aktivitet Betydning Power: blinker grønt Temp: Ikke aktuelt Lamp: Ikke aktuelt Power-knappen er i på-stilling og programvaren er initialisert, eller projektoren slår seg av og viftene går for å avkjøle lampen.
En lesekommando returnerer verdiområdet og gjeldende innstilling, for eksempel: RS-232-kommandoer Konfigurasjon for kommunikasjon Besøk vårt web-område for å finne flere RS-232-innstillinger og ytterligere opplysninger.
Eksepmpler på skrivekommandoer Funksjon Kommando Min Maks. Standardinnstilling Auto Power 0: deaktivere 1: aktivere APO ved RW 0 1 0 Skjerm Format 0: Uskalert 1: 16:9 2: 4:3 ARZ ved RW 0 2 2 Det er ikke alle kommandoer som støttes for alle projektorer. Hvis det blir sendt en kommando som ikke støttes, blir den ignorert. Hvis det mottas en kommando som ikke oppfattes, blir “?” returnert, med en angivelse om at kommandoen ikke ble oppfattet.
Funksjon Kommando Min Maks. Standardinnstilling Trinn Funksjon Kommando Min Maks.
Funksjon Kommando Min Maks. Standardinnstilling Funksjon Kommando Min Maks.
Standardinnstilling Funksjon Kommando Min Maks.
Standardinnstilling Trinn Funksjon Kommando Min Maks.
6442LP840_UG.qxd 10/10/03 9:22 AM Page 2 IF YOU NEED ASSISTANCE… call InFocus Customer Ser vice directly at 1-800-799-9911. WARNING: This product contains chemicals, including lead, known to the State of California to cause birth defects or other reproductive harm. Wash hands after handling. WARNING: This product contains a lamp which contains mercury. Dispose of it as required by local ordinances and regulations.
6442LP840_UG.qxd 10/10/03 9:22 AM Page 2 LP 840/LP 850 ® ® LP 840/LP 850 ® INSTALLATION & INTEGRATION PROJECTOR. USER’S GUIDE InFocus Corporation 27700B SW Parkway Avenue Wilsonville, Oregon 97070-9215 1-800-294-6400 • 503-685-8888 Fax: 503-685-8887 http://www.infocus.