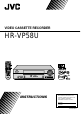
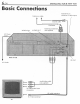
VIDEO CASSETTE RECORDER HR-VP58U CABLE/ DBS TV MBR SET A/B POWER TV/VCR A. MONITOR DISPLAY 1 2 3 2 4 5 6 DBS DAILY(M-F) WEEKLY 7 8 9 C.
EN Dear Customer, Thank you for purchasing the JVC VHS video cassette recorder. Before use, please read the safety information and precautions contained in the following pages to ensure safe use of your new VCR. CAUTIONS CAUTION RISK OF ELECTRIC SHOCK DO NOT OPEN TO REDUCE THE RISK OF ELECTRIC SHOCK. DO NOT REMOVE COVER (OR BACK). NO USER-SERVICEABLE PARTS INSIDE. REFER SERVICING TO QUALIFIED SERVICE PERSONNEL.
EN IMPORTANT PRODUCT SAFETY INSTRUCTIONS Electrical energy can perform many useful functions. But improper use can result in potential electrical shock or fire hazards. This product has been engineered and manufactured to assure your personal safety. In order not to defeat the built-in safeguards, observe the following basic rules for its installation, use and servicing. ATTENTION: 3 5. Ventilation Slots and openings in the cabinet are provided for ventilation.
EN USE SERVICING 1. Accessories 1. Servicing To avoid personal injury: • Do not place this product on an unstable cart, stand, tripod, bracket, or table. It may fall, causing serious injury to a child or adult, and serious damage to the product. • Use only with a cart, stand, tripod, bracket, or table recommended by the manufacturer or sold with the product. • Use a mounting accessory recommended by the manufacturer and follow the manufacturer’s instructions for any mounting of the product.
EN CONTENTS I I NSTALLING YOUR NEW VCR 6 Basic Connections .................................. 6 NITIAL SETTINGS 8 Plug & Play Setting ....................................... 8 Language Setting .......................................... 9 Clock Setting ............................................... 10 Preparations ............................................................. 10 Setting clock semiautomatically — Semiauto Clock Set ..........................................
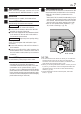
EN 1 Check contents Make sure the package contains all of the accessories listed in “SPECIFICATIONS” (墌 pg. 48). 2 Situate VCR 3 Connect VCR to TV Place the VCR on a stable, horizontal surface. The following connections are required. RF Connection 7 5 Final preparation for use Turn on the VCR and set the CH3-CH4 switch on the rear (shown below) to either CH3 or CH4 correctly. ● The CH3–CH4 switch is preset to the CH3 position. Set to CH4 if CH3 is used for broadcasting in your area.
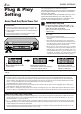
EN INITIAL SETTINGS Plug & Play Setting Auto Clock Set/Auto Tuner Set ATTENTION ● If you use a cable box, Plug & Play will not function; set the clock and tuner channels separately. (墌 pg.10 – 14) ● It takes several minutes for the VCR to complete the Plug & Play setting. ● Do not press any buttons on the front panel or on the Remote while Plug & Play is in progress. SP EP VCR During Initial Auto Clock Set “Auto” blinks.
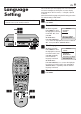
EN Language Setting This VCR offers you the language choice to view menus and some messages (excluding the on-screen display superimposed on the TV screen) — in English, Spanish or French. Select the desired language using the following procedure. The default setting is “ENGLISH”. Turn on the VCR and the TV, and select the VCR channel 3 or 4 (or AV mode) on the TV. 1 Access Main Menu screen 2 Access Initial Set screen Press MENU.
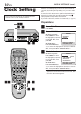
EN INITIAL SETTINGS (cont.) Clock Setting Turn on the VCR and the TV, and select the VCR channel 3 or 4 (or AV mode) on the TV. Perform clock setting only if the clock has not been set correctly by the Plug & Play setting or if you use a cable box. Access the Clock Set screen to perform the Semiauto or Manual Clock Set. Each procedure starts from step 4 after preparation steps below are finished. If you use a cable box, set the clock manually. (墌 pg.
EN Setting clock semiautomatically — Semiauto Clock Set You can change the host channel/D.S.T. /time zone setting manually. First follow steps 1 to 3 on page 10, then go to the following steps. 4 Set Auto Clock to ON On the front panel: Press CH5∞ to move the highlight bar to “AUTO CLOCK”, then press OK so that “ON” is selected. CLOCK SET TIME DATE YEAR 1:00PM 12/24 00 SUN AUTO CLOCK : ON HOST CH : AUTO (CATV) D.S.T.
EN INITIAL SETTINGS (cont.) 5 Set date 8 4–7 On the front panel: Press CH5∞ until the desired date appears, then press OK. On the Remote: Press SHUTTLE PLUS %fi until the desired date appears, then press OK or SHUTTLE PLUS #. ● Holding CH 5∞ or SHUTTLE PLUS %fi changes the date in 15-day intervals. SP EP VCR 4–7 6 Set year On the front panel: Press CH5∞ until the desired year appears, then press OK twice.
EN Tuner Setting Turn on the VCR and the TV, and select the VCR channel 3 or 4 (or AV mode) on the TV. 13 Setting channels automatically — Auto Channel Set Use Auto Channel Set only if channels have not been set correctly by the Plug & Play setting or if you use a cable box. If you want to add or delete channels, use Manual Channel Set (墌 pg. 14). 1 Access Main Menu screen 2 Access Tuner Set screen 14 23 Press MENU.
EN INITIAL SETTINGS (cont.) 2 Access Tuner Set screen 15 2–4 On the front panel: Press CH5∞ to move the highlight bar (arrow) to “TUNER SET”, then press OK. On the Remote: Press SHUTTLE PLUS %fi to move the highlight bar (arrow) to “TUNER SET”, then press OK or SHUTTLE PLUS #. SP EP VCR 2–4 3 Access Manual Channel Set screen On the front panel: Press CH5∞ move the highlight bar (arrow) to “MANUAL CHANNEL SET”, then press OK.
EN BASIC PLAYBACK AND RECORDING Basic Playback 15 1 Load a cassette Make sure the window side is up, the rear label side is facing you and the arrow on the front of the cassette is pointing towards the VCR. Do not apply too much pressure when inserting. Turn on the VCR and the TV, and select the VCR channel 3 or 4 (or AV mode) on the TV. 2 POWER FF ( ¡ ) ● The VCR turns on automatically. ● The counter is automatically reset to “0:00:00”.
EN BASIC PLAYBACK AND RECORDING (cont.) Basic Playback Features A Changing display information Press DISPLAY during playback. Each time you press the button, the front panel display shows the time counter and the clock time alternately. Time Counter STOP/EJECT (7/0) Clock Time ● To display the VCR status including the time counter and the clock time on the TV screen, see “Showing onscreen display” (墌 pg. 21). To reset the time counter, press C. RESET on the Remote.
EN D Adjusting tracking condition — Tracking Adjustments E 17 Selecting monitor sound — Audio Monitor Automatic tracking adjustment You can select the desired monitor sound. This VCR automatically adjusts the tracking condition. Whenever you insert a tape and start playback, automatic tracking starts working and continuously analyzes the signal to enable optimum picture quality during playback. While playing back a tape on which stereo sound or SAP sound is recorded, press A. MONITOR on the Remote.
BASIC PLAYBACK AND RECORDING (cont.) G Index codes are placed on the tape at the beginning of each recording when recording on this VCR. You can find and automatically play back from the beginning of any recording using the Index Search function. H 1 2 3 4 5 6 7 8 9 1 2 0 Locating beginning of recordings — Index Search 2 4 While the tape is not running, press SHUTTLE PLUS 4 or ¢ on the Remote.
EN Basic Recording 1 Load a cassette Make sure the record safety tab is intact. If not, cover the hole with adhesive tape before inserting the cassette. Turn on the VCR and the TV, and select the VCR channel 3 or 4 (or AV mode) on the TV. PLAY ( 3 ) POWER 19 FF ( ¡ ) REW ( 1 ) 2 Select recording channel On the front panel: Press CH5∞. On the Remote: a– Press CH + or –. or b– Press the Number keys.
EN BASIC PLAYBACK AND RECORDING (cont.) Basic Recording Features A Changing display information Press DISPLAY during recording or recording pause. Each time you press the button, the front panel display shows the time counter, channel number and the clock time in sequence. Time Counter Channel No. Clock Time ● To display the VCR status including the time counter, channel number, and the clock time on the TV screen, see “Showing on-screen display” (墌 pg. 21).
EN D Showing on-screen display When “SUPERIMPOSE” is set to “ON” (墌 pg. 33), you can see the current VCR status on the TV screen. ● For more detailed information about the on-screen display, see page 46. 1 Display VCR status on TV screen During recording or CH 125 RECORD THU 12:00 AM PAUSE recording pause, press STEREO ] SP SAP OSD. All indications + + + B E corresponding to the INDEX-1 NORM current VCR status are HI–FI COUNT –1:23:45 displayed for 5 seconds.
EN SPECIAL EFFECT PLAYBACK Special Effect Playback A Locating particular scene rapidly — Picture Search 7 High-Speed Picture Search: PLAY ( 3 ) Possible during normal playback or still picture playback. You can rapidly locate a particular scene on the tape. To do forward picture search, press FF ( ). To do reverse picture search, press REW ( ). ● If you press and hold the button for more than 2 seconds, simply releasing it cancels the picture search, and normal playback resumes.
EN B Viewing still picture — Still Picture Playback Press PAUSE ( 8 ) during normal playback. Playback is freezed and a still picture appears. To resume normal playback, press PLAY ( 3 ). NOTE: To obtain a noiseless still picture, it may be necessary to adjust tracking in slow motion playback before starting still picture playback. C Skipping unwanted portions —Skip Search You can skip over (view at high speed) unwanted portions of the tape. Press SKIP SEARCH once to 4 times during playback.
EN TIMER RECORDING VCR Plus+ Timer Programing Turn on the VCR and the TV, and select the VCR channel 3 or 4 (or AV mode) on the TV. Timer recording allows you to program the VCR to automatically record a broadcast at some future time. Up to 8 timer recording programs can be made using VCR Plus+ timer programing or Express timer programing method (墌 pg. 28) as far as a year in advance.
EN 4 Input receiving channel number The guide channel GUIDE CHANNEL SET number, which is GUIDE CH: 12 assigned to the TV or VCR CH : – – – cable station for the PlusCode number that PRESS NUMBER KEY (0–9) you entered in step 3, OR (5,∞), THEN (OK) PRESS (PROG.) TO END will appear automatically on the Guide Channel Set screen.
EN TIMER RECORDING (cont.) VCR Plus+ Setup IMPORTANT If you have moved to a different area or if a broadcasting station’s channel number has been changed, the wrong VCR CH or CABLE CH number will be displayed on the Program screen (墌 step 5 on page 31). When this happens, perform the following steps to set the correct guide channel number for that station. Turn on the VCR and the TV, and select the VCR channel 3 or 4 (or AV mode) on the TV.
EN 1 Access Main Menu screen 2 Access Initial Set screen 5 Input receiving channel number Press MENU. On the front panel: Press CH5∞ to move the highlight bar (arrow) to “INITIAL SET”, then press OK. MAIN MENU FUNCTION SET TUNER SET = INITIAL SET PRESS (5,∞), THEN (OK) PRESS (MENU) TO END On the Remote: Press SHUTTLE PLUS %fi to move the highlight bar (arrow) to “INITIAL SET”, then press OK or SHUTTLE PLUS #.
EN TIMER RECORDING (cont.) Express Timer Programing Turn on the VCR and the TV, and select the VCR channel 3 or 4 (or AV mode) on the TV. You can directly program the VCR’s timer to record up to 8 broadcasts, as far as a year in advance. Remember, the clock must be set before you can program the timer (墌 pg. 8 or 10). 1 Load a cassette Make sure the record safety tab is intact. If not, cover the hole with adhesive tape, then load it into the VCR.
EN 8 Set tape speed 9 Return to normal screen Press SP/EP to set the tape speed. Press PROG. or OK. “PROGRAM COMPLETED” appears on the screen for about 5 seconds, then normal screen appears. • If “PROGRAM NOT COMPLETED PROGRAM OVERLAP” appears, you have another program overlapping the program you have just made. The Program Check screen appears and conflicting programs will start blinking. You can now correct the conflicting programs. See “When programs overlap each other” on page 21.
EN TIMER RECORDING (cont.) A Checking program settings 1 Disengage timer Turn on the VCR and the TV, and select the VCR channel 3 or 4 (or AV mode) on the TV. Press TIMER, then press POWER. ● When “AUTO TIMER” (墌 pg. 33) is set to “ON”, you do not have to press TIMER. A 1 2 3 4 5 6 7 8 9 2 –1 Access Program Check screen Press PROG. CHECK.
EN C When programs overlap each other If “PROGRAM NOT COMPLETED PROGRAM OVERLAP” appears, you have another program overlapping the program you have just made. The Program Check screen appears and conflicting programs will start blinking. PROGRAM NOT COMPLETED PROGRAM OVERLAP PR START STOP CH DATE 1 8:00P 11:00 12 12/24 2 10:00A 10:45 40 12/25 3 11:30P 1:00 125 12/25 4 9:00P 10:00 10 12/24 5 6 7 8 (5,∞), THEN (>) (PROG.) : END EX.
EN OTHER USEFUL FUNCTIONS Useful Function Settings Turn on the VCR and the TV, and select the VCR channel 3 or 4 (or AV mode) on the TV. You can use the other useful function settings on the Function Set screen by following the procedure described below. ● For the functions you can set on the Function Set screen, see pages 33 to 35. 1 Access Main Menu screen 2 Access Function Set screen Press MENU. On the front panel: Press CH5∞ to move the highlight bar (arrow) to “FUNCTION SET”, then press OK.
EN 33 * The default setting is bold in the table below. 䡵 AUTO PICTURE ON OFF 䡵 PICTURE CONTROL AUTO (NORM): Normally select this. Picture quality is adjusted automatically. When “AUTO PICTURE” is “OFF”, “NORM” will appear instead of “AUTO”. EDIT: Minimizes picture degradation during editing (recording and playback). SOFT: Reduces image coarseness when viewing overplayed tapes containing much noise.
EN OTHER USEFUL FUNCTIONS (cont.) * The default setting is bold in the table below. 䡵 AUTO SP = EP TIMER ON OFF When this function is set to “ON”, the VCR automatically switches to EP mode to allow complete recording if there is not enough tape to record the entire program while timer-recording in SP mode. For Example . . .
EN 35 * The default setting is bold in the table below. 䡵 2ND AUDIO RECORD ON OFF 䡵 AUDIO MONITOR HI-FI: Normally select this. Hi-Fi sound is played back. HI-FI L: Sound on the left Hi-Fi channel is played back. HI-FI R: Sound on the right Hi-Fi channel is played back. NORM: Sound on the normal track is played back. MIX: Both sounds on the Hi-Fi track and normal track are mixed and played back.
EN EDITING Edit To Or From Another VCR Connection Ex. When using this VCR as the playback VCR This VCR (for playback) You can use your VCR as the playback or recording VCR. ● Refer also to the other VCR’s instruction manual for connection and its operations. 1 Make connections Connect an audio/video cable between the playback VCR’s audio/video output connectors and the recording VCR’s audio/video input connectors.
EN MULTI-BRAND REMOTE CONTROL TV Brand Setting This Remote can control some functions of remote controllable TVs listed below. Without setting, you can control a JVC TV. 1 Turn on the TV Turn on the TV using the Power button on the TV or its Remote. 2 –2 2 –1 4 2 Set TV brand code Follow the example shown below. 1 Press and hold TV. 2 Press MBR SET. 3 Press the Number keys to enter your TV’s brand code by referring to the table below. 4 Press OK, and release TV. The TV should turn off.
EN MULTI-BRAND REMOTE CONTROL (cont.) Cable Box Brand Setting This Remote can control some functions of the cable boxes listed below. Some cable box brands have more than one code. If your cable box does not function with a specified code, try other codes. 1 Turn on the cable box Turn on the cable box using the Power button on the cable box or its Remote. POWER 2 –1 4 2 –2 CABLE/DBS 1 2 3 4 5 6 2 –3 7 8 9 Number 2 0 2 Enter cable box brand code Follow the example shown below.
EN DBS Receiver Brand Setting 39 This Remote can control some functions of the DBS (Direct Broadcast Satellite) receivers listed below. 1 Turn on the DBS receiver Turn on the DBS receiver using the Power button on the DBS receiver or its Remote. 2 Enter DBS receiver brand code POWER 2 –1 4 2 –2 CABLE/DBS 1 2 3 4 5 6 2 –3 7 8 9 Number 2 0 4 Follow the example shown below. 1 Press and hold CABLE/DBS. 2 Press MBR SET.
EN MULTI-BRAND REMOTE CONTROL (cont.) Changing Remote Control Code 4 2 –1 1 2 3 2 4 5 6 7 8 9 0 2 –2, 3 4 This Remote is capable of transmitting two control codes; one set to respond to A code control signals and another set to respond to B code control signals. This Remote control is preset to send A code signals because your VCR is initially set to respond to A code signals. You can easily modify your VCR and the Remote to respond to B code signals.
EN TROUBLESHOOTING 41 Before requesting service, use this chart and see if you can repair the trouble yourself. Small problems are often easily corrected, and this can save you the trouble of sending your VCR off for repair. POWER SYMPTOM POSSIBLE CAUSE CORRECTIVE ACTION 1. The power will not come on. ● The AC power cord is disconnected. Connect the AC power cord. 2. The clock works, but the VCR’s power will not come on.
EN TROUBLESHOOTING (cont.) TIMER RECORDING SYMPTOM 1. Timer recording will not work. POSSIBLE CAUSE ● The clock and/or the timer have been set incorrectly. ● The timer is not engaged. ● The VCR has not been set up properly. CORRECTIVE ACTION Set the clock and/or timer correctly. Press TIMER and check to make sure that ‰ appears on the front display panel. Re-perform the set-up procedures. Make sure you have compensated for guide channel and VCR or cable box channel number mismatches (墌 pg. 26). 2.
EN 43 OTHER PROBLEMS CORRECTIVE ACTION SYMPTOM POSSIBLE CAUSE 1. When scanning channels, some of them are skipped over. ● Those channels have been preset to be skipped. If you need the skipped channels, restore them (墌 pg. 14). 2. The channel cannot be changed. ● Recording is in progress. Press PAUSE ( 8 ) to pause the recording, change channels, then press PLAY ( 3 ) to resume recording. 3. The Remote will not operate your TV or cable box or DBS receiver. ● The brand codes are set incorrectly.
EN TROUBLESHOOTING (cont.) Questions and answers PLAYBACK RECORDING Q. What happens if the tape reaches its end during playback or search? A. The VCR automatically rewinds it to the beginning. ............................................ Q. Can the VCR indefinitely remain in still mode? A. No. It stops automatically after 5 minutes to protect the heads. ............................................ Q.
EN INDEX 45 List of terms This guide serves as a quick way to locate frequently used terms and on-screen display names.
EN INDEX (cont.) Front panel 1 2 3 4 5 PLAY POWER REW FF MENU VIDEO SP EP VCR (MONO)L–AUDIO–R CH OK 6 9 7 8 1 POWER button : 墌 pg. 15, 19 2 Cassette loading slot 3 REW ( 1 ) button : 墌 pg. 15, 19 4 PLAY ( # ) button : 墌 pg. 15, 19 5 FF ( ¡ ) button : 墌 pg. 15, 19 6 AUDIO/VIDEO input connectors : 墌 pg. 36 7 OK button 0 ! SP/EP REC STOP/EJECT @ # $ % 8 MENU button 9 Front display panel : 墌 below 0 Remote sensor ! CH 5∞ buttons : 墌 pg. 19 @ SP/EP button : 墌 pg.
EN SPECIFICATIONS GENERAL Power requirement Power consumption Power on Power off Temperature Operating Storage Operating position Dimensions (W x H x D) TIMER : AC 120 V` , 60 Hz : 19 W : 2.5 W : 5°C to 40°C (41°F to 104°F) : –20°C to 60°C (–4°F to140°F) : Horizontal only : 360 x 94 x 278 mm (14-3/16" x 3-3/4" x 10-15/16") : 3.1 kg (6.8 lbs) : VHS NTSC standard Weight Format Maximum recording time SP : 210 min. with ST-210 video cassette EP : 630 min.
EN FOR SERVICING (Only in U.S.A.) HOW TO LOCATE YOUR JVC SERVICE CENTER TOLL FREE: 1-800-252-5722 http://www.jvcservice.com Dear customer: In order to receive the most satisfaction from your purchase, read the instruction booklet before operating the unit. In the event that repair is necessary, or for the address nearest your location, please refer to the factory service center list below or within the Continental United States, call 1-800-252-5722 for your authorized servicer.
EN WARRANTY (Only in U.S.A.) LIMITED WARRANTY 51 CONSUMER VIDEO 1-90 JVC COMPANY OF AMERICA warrants this product and all parts thereof, except as set forth below ONLY TO THE ORIGINAL PURCHASER AT RETAIL to be FREE FROM DEFECTIVE MATERIALS AND WORKMANSHIP from the date of original retail purchase for the period as shown below.
HR-VP68U VICTOR COMPANY OF JAPAN, LIMITED COPYRIGHT © 1999 VICTOR COMPANY OF JAPAN, LTD.