
User manual


English - 10 -
While the search continues a message may appear,
asking whether you want to sort channels according
to the LCN(*). Select Yes and press OK to conrm.
(*) LCN is the Logical Channel Number system that organizes
available broadcasts in accordance with a recognizable
channel number sequence (if available).
Note: Do not turn off the TV while initializing first time
installation. Note that, some options may not be available
depending on the country selection.
Using SatcoDX Feature (**)
You can perform SatcoDX operations using the
Installation>Satelite Settings menu. In the SatcoDX
menu, there are two options regarding to the SatcoDx.
You can download or upload SatcoDX data. In order
to perform these functions a USB device must be
connected to the TV.
You can upload current services and related satellites
& transponders in TV, to a USB device.
Additionally you can download one of the SatcoDx
les stored in USB device, to the TV.
When you select one of these les, all services and
related satellites and transponders in the selected
le will be stored in the TV. If there are any installed
terrestrial, cable and/or analog services, they will be
kept and only satellite services will be removed.
Afterwards, check your antenna settings and make
changes if necessary. An error message stating “No
Signal” may be displayed if the antenna settings are
not congured properly.
(**) If this feature is supported by your TV
E-Manual (if available)
You can nd instructions for your TV’s features in
the E-Manual.
To use E-Manual, press to the Info button while main
menu is displayed on the screen or press Quick Menu
button, select Information Booklet and press OK.
By using the directional buttons select a desired
category. Every category includes different topics.
Select a topic and press OK to read instructions.
To close the E-Manual screen press the Exit or Menu
button.
Note: The contents of the E-Manual may vary according to
the model.
For further information and more detailed instructions,
refer to the complete user manual on our website
www.jvctv.eu.
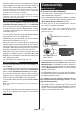
Connectivity
Wired Connectivity
To Connect to a Wired Network
• You must have a modem/router connected to an
active broadband connection.
• Ensure that Nero Media Home software is installed
to your PC (for Audio Video Sharing function). See
“Nero Media Home Installation” section.
• Connect your PC to your modem/router. This can
be a wired or wireless connection.
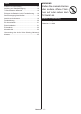
• Connect your TV to your modem/router via an
ethernet cable. There is a LAN port at the rear
(back) of your TV.
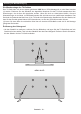
Broadband ISP connection
LAN (ethernet) cable
LAN input on the rear
side of the TV
• To access and play shared les, you must select the
Media Browser. Press the Menu button and select
Media Browser. Press OK to continue. Select the
desired le type and press OK. You must always
use the Media Browser screen to access and play
shared network les.
• PC/HDD/Media Player or any other devices that are
compatible should be used with a wired connection
for higher playback quality.
To configure wired settings please refer to
the Network/Internet Settings section in the
System>Settings Menu.
• You might be able to connect your TV to your LAN
depending on your network’s conguration. In such
a case, use an ethernet cable to connect your TV
directly to the network wall outlet.