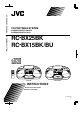
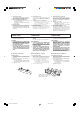
RC-BX25BK/RC-BX15BK/BU CD PORTABLE SYSTEM SISTEMA PORTATIL CON CD SISTEMA PORTATILE A CD CD PORTABLE SYSTEM RC-BX25BK RC-BX15BK/BU PLAY PLAY CD-PORTABLE SYSTEM RC-BX25 CD CD-PORTABLE SYSTEM RC-BX15 TUNER FM/AM CD TUNER FM/AM ONE-TOUCH OPERATION / / STANDBY ON ONE-TOUCH OPERATION / STANDBY/ON STANDBY ON STANDBY/ON REMOTE CONTROL RC-BX25BK RC-BX15BK/BU INSTRUCTIONS MANUAL DE INSTRUCCIONES MANUALE DI ISTRUZIONI LVT0282-002A [E]
ENGLISH ESPAÑOL Thank you for purchasing this JVC product. Please read these instructions carefully before starting operation to be sure to obtain optimum performance and a longer service life from the unit. CONTENTS ITALIANO Enhorabuena por la compra de este producto JVC. Lea detenidamente este manual de instrucciones antes de poner en funcionamiento la unidad a fin de obtener un óptimo rendimiento y una major vida útil. Grazie per avere acquistato questo prodotto JVC.
IMPORTANT FOR LASER PRODUCTS IMPORTANTE PARA PRODUCTOS LÁSER IMPORTANTI PRECAUZIONI PER PRODOTTI LASER PRECAUTIONS PRECAUCIONES PRECAUZIONI 1. CLASS 1 LASER PRODUCT 2. DANGER: Invisible laser radiation when open and interlock failed or defeated. Avoid direct exposure to beam. 3. CAUTION: Do not open the rear cover. There are no user serviceable parts inside the unit; leave all servicing to qualified service personnel. 4.
FEATURES 1. Portable system incorporating CD player • 16-key remote control unit operates the usual CD functions. (RC-BX25 only) • CD player with repeat play function using the remote control unit.(RC-BX25 only) • Digital LCD (Liquid Crystal Display) indicates the playback tune number, repeat play mode (RC-BX25 only) and function modes. • 8-cm ‘‘CD singles’’ capability. 2. One-touch operation (COMPU PLAY) 3. Synchro-record start for CD recording convenience 4. Full auto-stop mechanism 5.
HANDLING PRECAUTIONS PRECAUZIONI PER L’USO PRECAUCIONES DE MANIPULACIÓN Do not use this unit in direct sunlight or leave the unit in closed automobiles (or yachts, etc.) where it would be exposed to high temperatures above 40°C. No utilice esta unidad a la luz directa del sol ni la deje en automóviles cerrados (yates, etc.) donde podría estar expuesta a temperaturas superiores a 40°C. Non utilizzare questa unità alla luce solare diretta e non lasciarla in automobili chiuse (o yacht, ecc.
8. Cleaning the cabinet If the cabinet gets dirty, wipe it with a soft, dry cloth. Never use benzine or thinner as these could damage the surface finish. 9. When listening with headphones • Do not listen at high volumes as it could damage your hearing. • For safety, do not drive while listening to this unit. 10. Carrying handle Do not raise or lower the carrying handle with the telescopic antenna extended, to avoid damaging the antenna. Place the carrying handle so that it does not interfere with operation.
Checking batteries When the tape speed or output sound decreases, or CD playback is intermittent, replace all batteries with fresh ones. When making an important recording, use new batteries (preferably alkaline batteries with a longer service life) to avoid any possible failure. • For better battery usage Continuous operation of the unit causes the battery power to be consumed quicker than noncontinuous operation.
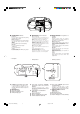
NAMES OF PARTS AND THEIR FUNCTIONS • Front and Top panels NOMBRES DE LAS PARTES Y SUS FUNCIONES NOMI E FUNZIONI DELLE PARTI • • Paneles frontal y superior 12 3 q 1 Pannello anteriore e superiore 4 5 6 7 89 0 3 ALL PLAY 2 CD TUNER FM/AM ONE-TOUCH OPERATION / STANDBY/ON STANDBY ON 4 q 1 BASS BOOST switch _ ON: Set to this position to listen to Bass boost sound. — OFF: Set to this position when Bass boost sound is not required.
PLAY CD TUNER FM/AM ONE-TOUCH OPERATION / STANDBY/ON STANDBY ON y u y Cassette holder u Cassette operation buttons 8 PAUSE: Press to stop the tape temporarily during playback and recording. § STOP/EJECT: Press to stop the tape. Pressing this button after the tape stops opens the cassette holder. 1 FF: Press to wind the tape forward rapidly. ¡REW: Press to rewind the tape rapidly. TAPE (Play): Press to play the tape. ¶ REC: Press this button with TAPE (Play) button to start recording.
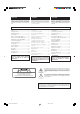
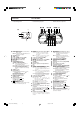
REMOTE CONTROL UNIT (RC-BX25 only) UNIDAD DE CONTROL REMOTO (RC-BX25 exclusivamente) UNITÀ DI TELECOMANDO (solo RC-BX25) Preparation before use Preparación previa Preparativi prima dell’uso • • • Installing batteries in the remote control unit 1. Remove the battery cover from the back of the remote control unit. 2. Insert two ‘‘R6/AA (15F)’’ size batteries. • Insert the batteries with the ª and · terminals matching the indication inside the battery compartment.
The following operations can be performed using the remote control unit. Las siguientes operaciones pueden realizarse utilizando la unidad de control remoto. Le operazioni seguenti possono essere eseguite utilizzando l’unità di telecomando. • • • Check the functions of the operation buttons carefully and operate them correctly. Estudie detenidamente las funciones de los botones de operación y utilícelos correctamente.
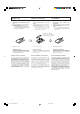
SWITCHING THE POWER ON/STANDBY CONEXIÓN (ON)/PUESTA EN ESPERA (STANDBY) DE LA ALIMENTACIÓN Play/pause (CD ) button Botón de reproducción/pausa (CD Tasto di lettura/pausa (CD ) ) ACCENSIONE (ON)/MODO DI ATTESA (STANDBY) TAPE (Play) button Botón TAPE (Reproducción) TastoTAPE (Riproduzione) Disc holder open button (0) Botón de apertura de la tapa del disco (0) Tasto apertura vano CD (0) PLAY CD TUNER button Botón TUNER Tasto TUNER TUNER FM/AM ONE-TOUCH OPERATION / STANDBY ON STANDBY/ON (STANDBY/ON)
CONCERNING COMPACT DISCS Since dirty, damaged and warped discs may damage the unit, care should be taken of the following: 1. Usable compact discs Use compact discs with the mark shown. 2. Notes on handling discs • Do not touch the reflective recorded surface. • Do not stick anything to or write anything on the label side. • Do not bend compact discs. 3. Storage • After removing a disc from the unit, be sure to put it back in its case.
PLAYING COMPACT DISCS REPRODUCCIÓN DE DISCOS COMPACTOS LETTURA DI CD Playing an entire disc ... The following example assumes a compact disc with 10 tunes and a total playing time of 50 minutes 45 seconds. Reproducción de un disco completo ... El siguiente ejemplo considera un disco compacto con 10 canciones y un tiempo de reproducción total de 50 minutos y 45 segundos. Lettura di un intero CD... L’esempio seguente utilizza un CD con 10 brani ed un tempo di lettura totale di 50 minuti e 45 secondi.
Search playback (to locate the required position on the disc) • The required position can be located using fast-forward or reverse search while playing a disc. Reproducción con búsqueda (para localizar la posición deseada en el disco) • • Hold down the button; search play starts slowly and then gradually increases in speed. Since low-volume sound (at about one quarter of the normal level) can be heard in the search mode, monitor the sound and release the button when the required position is located.
Direct access playback (using the remote control) (RC-BX25 only) • Pressing any of the track number buttons will start play from the beginning of the designated tune, without your having to press the 6 button.
CASSETTE TAPE Cassette tape 1. Loose tape may cause trouble. With a pencil, gently tighten the tape as shown. 2. To prevent recordings from being erased accidentally, remove the tab(s) with a screwdriver. Reseal the slots with adhesive tape to erase and re-record after the tabs have been broken off. Turn the pencil to tighten the tape. Gire el lápiz para ajustar la cinta. Ruotare la matita per stringere il nastro. Cassette loading 1. Press the 7/0 STOP/EJECT button to open the cassette holder. 2.
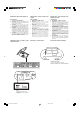
RADIO RECEPTION Operate in the order shown RADIORRECEPCIÓN RICEZIONE CON LA RADIO Proceda en el orden indicado Eseguire le operazioni nell’ordine indicato 2 1 4 3 PLAY CD TUNER FM/AM ONE-TOUCH OPERATION / STANDBY ON 1 2 3 4 Press to set to TUNER mode. Select the band (See page 8). Tune to the required station. Adjust. Using the antennas FM FM FM STANDBY/ON 1 Presione para poner en el modo TUNER. 2 Seleccione la banda (Consulte la página 8). 3 Sintonice la estación deseada. 4 Ajuste.
RECORDING • REGISTRAZIONE GRABACIÓN • In recording, the ALC circuit automatically optimizes the recording level; adjustment of the recording level is unnecessary. Operate in order shown Al efectuar una grabación, el circuito ALC (control automático de nivel) optimiza automáticamente el nivel de grabación; por lo tanto no es necesario ajustar el nivel de grabación.
Synchronized recording with the CD player Grabación sincronizada reproductor de CD • • In this system, the CD player starts playback when deck enters the recording mode. Operate in the order shown con el En este sistema, el reproductor de CD comenzará la reproducción cuando la platina se ponga en el modo de grabación. Registrazione sincronizzata con il lettore CD • In questo sistema, il lettore CD inizia la lettura quando la piastra entra nel modo di registrazione.
Conmutador de corte de batidos (BEAT CUT) Al grabar radioemisiones en AM, se pueden producir batidos que usualmente no ocurren al escuchar una radioemisión. En tal caso, ponga este conmutador en la posición más conveniente para eliminarlos. Normalmente, déjelo en la posición ‘‘NORM 1’’. Interruttore BEAT CUT Quando si registra una trasmissione AM, possono essere prodotti dei battimenti non udibili durante l’ascolto della trasmissione.
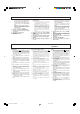
Cleaning the lens If the lens in the CD pickup is dirty, this could degrade sound. Open the disc holder and clean the lens as shown. • Use a blower (available from a camera store) to blow dust off the lens. • If there are fingerprints, etc. on the lens, gently wipe clean with a cotton swab. Limpieza de la lente Si la lente del captor del reproductor de CD está sucia, disminuirá la calidad del sonido. Abra la tapa del disco y limpie la lente como se indica.
Note: When the deck is moved from a cold place of around 0°C to a warm place, it may not operate normally, because moisture has formed inside the deck. Normal operation will be restored after waiting 1 or 2 hours. Nota: Cuando cambia la platina de un lugar frío (aproximadamente 0°C) a otro cálido, es posible que no funcione normalmente por la humedad formada en su interior. El funcionamiento normal se logrará después de 1 ó 2 horas de espera.
A4-3C 98.12.