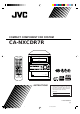
COMPACT COMPONENT CDR SYSTEM CA-NXCDR7R OPEN/CLOSE STANDBY/ON STANDBY/ON CDR SOURCE 1 2 3 DISPLAY 6 CANCEL 4 5 7 8 9 10 AUTO PRESET +10 SET COMPACT ENTER N X - C D R7 R C O M PA C T C O M P O N E N T C D R SYSTEM VOLUME DIGITAL AUDIO Recordable ReWriteble DISC MENU CD CDR FINALIZE PTY SEARCH CD2 REC MUTE CD1 PTY SELECT+ TA/News/Info A.P.
Warnings, Cautions and Others IMPORTANT for the U.K. DO NOT cut off the mains plug from this equipment. If the plug fitted is not suitable for the power points in your home or the cable is too short to reach a power point, then obtain an appropriate safety approved extension lead or consult your dealer. BE SURE to replace the fuse only with an identical approved type, as originally fitted.
CAUTION • Do not block the ventilation openings or holes. (If the ventilation openings or holes are blocked by a newspaper or cloth, etc., the heat may not be able to get out.) • Do not place any naked flame sources, such as lighted candles, on the apparatus. • When discarding batteries, environmental problems must be considered and local rules or laws governing the disposal of these batteries must be followed strictly. • Do not use this apparatus in a bathroom or places with water.
IMPORTANT FOR LASER PRODUCTS REPRODUCTION OF LABELS 1 CLASSIFICATION LABEL, PLACED ON REAR ENCLOSURE CLASS LASER 1 PRODUCT 1. CLASS 1 LASER PRODUCT 2. CAUTION: Invisible laser radiation when open and interlock failed or defeated. Avoid direct exposure to beam. 3. CAUTION: Do not open the top cover. There are no user serviceable parts inside the Unit; leave all servicing to qualified service personnel.
SAFETY INSTRUCTIONS “SOME DOS AND DON’TS ON THE SAFE USE OF EQUIPMENT” This equipment has been designed and manufactured to meet international safety standards but, like any electrical equipment, care must be taken if you are to obtain the best results and safety is to be assured. ✮✮✮✮✮✮✮✮✮✮✮✮✮✮✮✮✮✮✮✮✮✮✮✮✮✮✮✮✮✮✮✮✮✮✮✮✮✮✮✮✮✮✮✮✮✮✮ Do read the operating instructions before you attempt to use the equipment.
Contents Introduction .................................................... 2 Playing Back a Disc on CD Recorder ......... 29 About This Manual ................................................ 2 Precautions ............................................................. 2 Precautions on Disc Playback and Recording ....... 3 Playing Back a Disc—Normal Play ..................... 30 Basic Disc Operations .......................................... 30 Repeating Tracks—Repeat Play ..........................
Introduction Continued We would like to thank you for purchasing one of our JVC products. Before operating this unit, read this manual carefully and thoroughly to obtain the best possible performance from your unit, and retain this manual for future reference.
Precautions on Disc Playback and Recording Recording Playback This unit has been designed to record on the discs bearing the following logos: This unit has been designed to play back discs bearing the following logos: CD ReWritable (CD-RW) CD ReWritable (CD-RW) CD Recordable (CD-R) CD Recordable (CD-R) Audio CD CD Text (Text information can be shown only when playing on 3-CD Changer.) In addition to the above discs, this unit can play back audio data recorded on CD-G (CD Graphics) and CD-Extra.
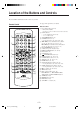
Location of the Buttons and Controls Become familiar with the buttons and controls on your unit. Remote Control See pages in the parentheses for details. Remote Control STANDBY/ON 1 q 1 4 2 2 5 3 DISPLAY 6 CANCEL 9 SET w e 7 10 8 AUTO PRESET +10 r ENTER t y 3 4 5 MENU 6 7 8 9 EON PTY SELECT– PTY SEARCH PTY SELECT+ TA/News/Info A.P.
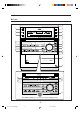
Main Unit w OPEN/CLOSE 1 e STANDBY/ON 2 CD 1 2 3 UNFINALIZE DISC SOURCE TEXT PITCH AUTO TRACK DIGITAL CDR BASS SOUND NORMAL DAILY PROGRAM RANDOM HIGH SPEED ANALOG 1CD ALL SKIP ON CD-RW REC OVER REC [ ] UNFINALIZE DISC SLEEP RDS EON TA News Info REC LEVEL dB A.P.
y u i o ; Main Unit 1 (Standby/On) button (14) 2 STANDBY/ON lamp (14) 3 SOURCE button (14, 18) • Pressing this button also turns on the unit. 4 FINALIZE button (34, 41) 5 CDR 3 / 8 (play/pause) button (14, 30, 34) • Pressing this button also turns on the unit. 6 CD 3 / 8 (play/pause) button (14, 24) • Pressing this button also turns on the unit.
Display Window 1 2 CD 1 2 3 UNFINALIZE DISC TEXT PITCH 3 4 A.P.off 5 6 BASS SOUND 7 8 AUTO TRACK DIGITAL CDR NORMAL DAILY PROGRAM RANDOM HIGH SPEED ANALOG 1CD ALL SKIP ON CD-RW REC OVER REC UNFINALIZE DISC SLEEP RDS EON [ TA News Info ] REC LEVEL dB MONO STEREO 9 p ! Recording source (input) indicator – DIGITAL lights while digital recording is performed. – ANALOG lights while analog recording is performed.
Getting Started Unpacking To connect an outdoor FM antenna Before connecting it, disconnect the supplied FM antenna. After unpacking, check to be sure that you have all the following items. The numbers in the parentheses indicate the quantity of the pieces supplied. • • • • AM (MW/LW) loop antenna (1) FM antenna (1) Remote control (1) Batteries (2) Outdoor FM antenna (not supplied) If any item is missing, consult your dealer immediately.
Connecting Speakers AM (MW/LW) antenna You can connect the speakers using the speaker cords. AM (MW/LW) loop antenna (supplied) 1 3 2 4 3 Red Red Black Black 1 2 Speaker cord Vinyl-covered wire (not supplied) 1 If cords are covered with insulation, twist the core of the cord at the end of each cord, then remove the insulation. 2 Connect the AM (MW/LW) loop antenna to the AM LOOP terminals as illustrated. 3 Turn the AM (MW/LW) loop antenna until you have the best reception.
Connecting Other Components To connect digital components When you connect and use other components, refer also to the manuals supplied with them. • DO NOT connect other components while the power is on. • DO NOT plug in any component until all connections are complete.
• When connecting a digital component equipped with an optical digital input terminal You can record playback sounds of 3-CD Changer onto the other component—digital-to-digital recording.
Putting the Batteries into the Remote Control When using the remote control, point it at the remote sensor on the front panel. Insert the batteries—R6(UM-3)/AA(15F)—into the remote control, by matching the polarity (+ and –) on the batteries with the + and – markings on the battery compartment. When the remote control can no longer operate the unit, replace both batteries at the same time. Remote sensor OPEN/CLOSE STANDBY/ON CDR SOURCE • DO NOT use an old battery together with a new one.
Basic and Common Operations The buttons and controls enlarged in the illustration below are used and explained in this section (pages 14 to 16). Remote control STANDBY/ON STANDBY/ON 10 1 2 3 DISPLAY 4 5 6 CANCEL 7 8 9 SET 10 AUTO PRESET +10 PTY SELECT– PTY SEARCH A.P.
Continued Selecting the Sources and Starting Play Before operating the unit any further, first set the clock built in this unit (see page 48). Turning On the Power To turn on the unit without playing, press so that the STANDBY/ON lamp on the unit lights green, and the CDR lamps light. UNFINALIZE DISC PITCH S S O [ e s o] dB U SC again so that To turn off the unit (on standby), press the STANDBY/ON lamp lights red, and the CDR lamps go off.
Adjusting the Volume Changing the Display Information You can adjust the volume level only while the unit is turned on. You can change the information in the main display. • For display information while recording, see “To change the display information while recording” on page 35. When using the remote control, press VOLUME + to increase the volume or press VOLUME – to decrease it. When using the unit, turn VOLUME clockwise to increase the volume or counterclockwise to decrease it.
Selecting the Sound Modes Creating Your Own Sound Modes —MANUAL Modes You can select one of the 5 preset sound modes and 2 manual modes. • You can use this effect only for playback, but not for recording. On the remote control ONLY: Press SOUND repeatedly until the sound mode you want appears in the main display. The SOUND indicator also lights on the display. • Each time you press the button, the sound modes change as follows: CD 1 2 BASS You can create and store your own sound modes.
Listening to FM and AM (MW/LW) Broadcasts The buttons and controls enlarged in the illustration below are used and explained in this section (pages 18 to 22). Remote control 1 2 3 4 5 6 7 8 9 10 AUTO PRESET +10 STANDBY/ON 1 2 3 DISPLAY 4 5 6 CANCEL 7 8 9 SET 10 AUTO PRESET +10 ENTER SET MENU PTY SELECT– PTY SEARCH PTY SELECT+ EON PTY SELECT– PTY SEARCH A.P.
Continued Tuning into a Station Presetting Stations 1 Press SOURCE repeatedly until FM or AM (MW/ You can preset 30 FM and 15 AM (MW/LW) stations— using either automatic presetting method or manual presetting method. • You cannot store FM reception mode separately for each preset station. LW) is selected. The unit automatically turns on and tunes into the previously received station (either FM or AM—MW/ LW).
Tuning into a Preset Station To preset stations manually—Manual Presetting On the remote control ONLY: • There is a time limit in doing the following steps. If the setting is canceled before you finish, start from step 2 again. On the remote control ONLY: 1 Press SOURCE repeatedly until FM or AM (MW/ LW) is selected. SLEEP UNFINALIZE DISC PITCH 1 Tune into a station you want to preset. PITCH SLEEP RDS EON [ TA News Info ] REC LEVEL UNFINALIZE DISC dB UNFINALIZE DISC Ex.
Continued 2 Press PTY SELECT + or – to select a PTY code Changing the RDS Information while “PTY SELECT” is still in the main display. You can see RDS information in the main display while listening to an FM station. 1 PS PTY 3 1CD ALL SKIP ON TEXT RDS OVER CD RW STEREO On the remote control ONLY: Press RDS DISPLAY while listening to an FM station.
Switching to a Program of Your Choice Automatically The EON function allows the unit to switch temporarily to a broadcast program of your choice (TA, News, and/or Info) from a different station except when you are listening to a non-RDS stations—some FM stations and AM (MW/ LW) stations. • This function only works while receiving a preset RDS station sending the EON data (the RDS and EON indicators light while receiving such a station). • This function is applicable only to the preset stations.
Alarm function If an “Alarm!” (Emergency) signal is received from a station while listening to an RDS station sending the EON data, the unit automatically switches to the station broadcasting the “Alarm!” signal. More about the EON function • EON data sent from some stations may not be compatible with this unit. • While listening to a program tuned in by the EON function, the station does not change even if another network station starts broadcasting a program of the same type.
Playing Back Discs on 3-CD Changer The buttons and controls enlarged in the illustration below are used and explained in this section (pages 24 to 28). Remote control STANDBY/ON 1 2 3 4 5 6 7 8 9 10 1 2 3 DISPLAY 4 5 6 CANCEL 7 8 9 SET 10 AUTO PRESET +10 PTY SELECT– PTY SEARCH A.P.
Continued The built-in 3-CD Changer can play back both finalized and unfinalized CD-Rs/CD-RWs. However, some unfinalized discs cannot be played back because of their disc characteristics. Playing Back the Entire Discs—Continuous Play You can play discs continuously. 1 Load discs into 3-CD Changer. 2 Select a disc, and start playback. Loading Discs On the unit ONLY: On the unit: 1 Press DISC repeatedly to select the disc you want. 2 Press CD 3 / 8.
Basic Disc Operations To exchange a disc during playback of another disc On the unit ONLY: Press the open/close buttons (0 CD1, 0 CD2, or 0 CD3) to eject a disc not currently playing. If discs are exchanged during playback, playback will stop after playing all newly inserted discs. Programing the Playing Order of the Tracks —Program Play You can arrange the order in which the tracks play before you start playing. You can program up to 32 tracks. On the remote control ONLY: 1 Load discs into 3-CD Changer.
Continued 5 Program other tracks you want. Playing at Random—Random Play • To program tracks from the same disc, repeat step 4. • To program tracks from a different disc, repeat steps 3 and 4. 6 Press CD 3 / 8. The tracks of all loaded discs will play at random. On the remote control ONLY: 1 Load discs into 3-CD Changer. The tracks are played in the order you have programed. Program Play stops when all the programed tracks are played (unless Repeat Play is activated—see page 27).
Repeating Tracks or Discs—Repeat Play Other Convenient Functions You can have all the discs, the program or the individual track currently playing repeat as many times as you like. • If an unfinalized CD-R or CD-RW is loaded, it will be skipped and not be played back. The following functions can be used only for 3-CD Changer. On the remote control ONLY: Press REPEAT repeatedly during or before playing.
To show the text information recorded on a CD Text On a CD Text, some information about the disc (its disc title, performer, composer, arranger, etc.—shaded portion in the illustration below) is recorded. While the currently selected disc in 3 CD Changer is a CD Text, the TEXT indicator lights on the display, and you can show this text information in the main display. On the remote control ONLY: Press DISPLAY repeatedly.
Playing Back a Disc on CD Recorder The buttons and controls enlarged in the illustration below are used and explained in this section (page 30). Remote control 1 2 3 4 5 6 STANDBY/ON 7 8 10 9 +10 1 2 3 DISPLAY 4 5 6 CANCEL 7 8 9 SET 10 AUTO PRESET +10 PTY SELECT– PTY SEARCH A.P.
Basic Disc Operations Notice you cannot use Program Play and Random Play while playing a disc on CD Recorder. To locate a particular point in a track during play Playing Back a Disc—Normal Play You can play back both finalized and unfinalized discs on CD Recorder. On the remote control: Press and hold ¡ / ¢ or 4 / 1. On the unit: Press and hold ¢ or 4. On the remote control ONLY: • ¡ / ¢ (¢): Fast-forwards the tracks. • 4 / 1 (4): Fast-reverses the tracks. 1 Press 0 CDR.
Recording on a CD-R/CD-RW The buttons and controls enlarged in the illustration below are used and explained in this section (pages 32 to 41). For recording operations, you mainly use the buttons and controls on the unit.
Continued Before You Start Recording • When you record onto a partially recorded unfinalized CD-R or CD-RW, its contents are not erased or overwritten. The recording starts from the point following the last recorded track of the disc. For CD-RW only: If you want to record on such a CD-RW from the beginning, you have to erase its contents first (see “Erasing All Tracks (Only for CD-RW)” on page 46). (You cannot erase the contents recorded on a CD-R.
Available recording modes—REC MODE High-Speed Recording CD Recorder provides a variety of the recording methods—called “Recording Modes.” Available recording modes vary according to the playback source and its playback status. When using some of the Recording Modes mentioned on the left column, this unit allows you to change the recording speed—normal speed and high speed. For CD-R, high speed means 4 times normal speed and for CD-RW, 2 times normal speed.
Continued 4 Adjust the recording input level if necessary. Recording Any Sound Source —Standard Recording See “To adjust the recording input level” on page 35. 5 Press CDR 3 / 8. The following recording method can be applied to any sound source. Recording starts. On the unit ONLY: AUTO TRACK ANALOG 1 Select the source to record from. 1 2 3 OVER REC LEVEL • When recording from 3-CD Changer: – Press CD 3 / 8, then 7. To select a disc, press DISC repeatedly, then 7.
To adjust the recording input level To make a silent portion in your recording You can adjust the recording input level. You can record a 4-second silence when using Standard Recording. This is convenient when recording tracks from many discs. • This function can be used both for digital and analog recording. Once adjustment is made, it is memorized, and will be recalled when you record any source on CD Recorder, using any recording method (except when high speed recording is selected).
Continued 4 Press DIRECT REC. Recording from 3-CD Changer —CD Synchronized Recording AUTO TRACK NORMAL SPEED CD 1 You have three methods to record from 3-CD Changer to CD Recorder. Using these synchronized recording methods, you can start and playback and recording at the same time. CD Direct Recording allows you to easily record a disc in 3-CD Changer onto a CD-R or CD-RW in CD Recorder. ■ Using the DIRECT REC button On the unit ONLY: 1 Prepare discs in 3-CD Changer.
■ Using the REC MODE button 5 Press REC START (inside the sliding panel). On the unit ONLY: AUTO TRACK NORMAL SPEED CD 1 Prepare discs in 3-CD Changer. 1 2 3 REC LEVEL • If the current playing source is not 3-CD changer, press CD 3 / 8, then 7. To select a disc, press DISC repeatedly, then 7. You can also use the remote control. When using it, press CD1, CD2, or CD3, then 7.
Continued 5 Press REC START (inside the sliding panel) . First Track Recording First Track Recording allows you to record the first track of each loaded disc in 3-CD Changer. You can, for example, make a directory of all your best CDs. • If OPC (see page 32) is being performed, “UPDATE OPC” flashes first in the main display, then recording starts.
Listening Edit Recording Listening Edit Recording allows you to make a program while listening and checking each track of the loaded discs (up to 3 discs) in 3-CD Changer, then to start recording the program. • You can program up to 32 tracks. 5 Press SET (inside the sliding panel). 3-CD Changer starts playing. • Playback starts from the currently selected disc if two or three discs are loaded.
Continued 5 Press REC START (inside the sliding panel). Recording the External Components —Sound Synchronized Recording The REC indicator flashes on the display for a while. AUTO TRACK With this recording method, you can start recording automatically when the source sound comes into this unit through the LINE IN jacks or the LINE DIGITAL IN terminal. ANALOG 1 2 3 REC LEVEL Recording starts automatically when the sound signals come in.
Recording a Single Track during Play Finalizing a Disc—CD-R/CD-RW You can record the current track while playing back a disc on 3-CD changer. • If a recordable disc is not loaded, “CDR NO DISC” appears in the main display. Insert a recordable CD-R or CD-RW. Finalization is the final process in recording on a CD-R or CD-RW. “Finalizing a disc” means writing the TOC (Table of Contents) on the recorded disc.
Other Convenient CDR Functions Continued The buttons and controls enlarged in the illustration below are used and explained in this section (pages 43 to 46). Remote control STANDBY/ON 1 2 3 DISPLAY 4 5 6 CANCEL 7 8 9 SET 10 AUTO PRESET +10 PTY SELECT– PTY SEARCH A.P.
By pressing MENU, you can use (or cancel) the following convenient CD Recorder functions: Recording Track Marks Manually —Manual Track-Marking AUTO TRACK: Selects either auto-track marking or manual track marking (see the right column.) When auto track-marking is activated (initial setting at the factory), track marks are recorded automatically (see “Auto track-marking” on page 32 for more details).
Continued Separating Recorded Tracks Automatically—Auto-Track Space Turning On or Off Sampling Frequency Rate Converter While recording from the 3-CD Changer onto CD Recorder using Standard Recording method (see page 34), CD Recorder automatically places a 2-second blank space at the beginning of each track in the recording. When shipped from the factory, this function is turned “ON.” • This function works when “AUTO TRACK” is set to “ON.” (See page 43.
Recording Skip Marks onto a CD-R/CD-RW Erasing Tracks (Only for CD-RW) Before finalizing a disc, you can record a skip mark to an unwanted track so that it will be skipped (ignored as if it does not exist) during play. Before finalizing a disc, you can erase recorded tracks— from a selected track up to the last track—on a CD-RW at a time. • To erase recorded tracks on a finalized CD-RW, unfinalize the disc first (see page 46).
Erasing All Tracks (Only for CD-RW) Unfinalizing a Disc (Only for CD-RW) You can erase all the recorded tracks on a CD-RW at a time. By erasing the TOC (Table of Contents) of a finalized CDRW, you will be able to record on the CD-RW again. This erasing process of the TOC is called “Unfinalization.” • Unfinalization is just to erase the TOC only, but not the recorded music signals on the disc. Before you start.... • Once erasure is performed, erased data cannot be restored.
Using the Timers The buttons and controls enlarged in the illustration below are used and explained in this section (pages 48 to 52). Remote control STANDBY/ON 1 2 3 DISPLAY 4 5 6 CANCEL 7 8 9 SET 10 AUTO PRESET +10 PTY SELECT– PTY SEARCH A.P.off CLOCK /TIMER BASS FM/PLAY MODE STANDBY/ON CANCEL MENU CLOCK /TIMER A.P.
Continued There are three timers available—Recording Timer, Daily Timer, and Sleep Timer. Before using these timers, you need to set the clock built in the unit. • In addition to these three timers, you can also use Auto Power Off to shut off the power automatically. Setting the Clock You can set the clock whether the unit is turned on or off (on standby). • If you have activated the power consumption saving mode (“DISPLAY OFF”), you cannot adjust the clock while the unit is turned off (on standby).
2 Press ¡ / ¢ or 4 / 1 to set the hour of the 8 Press to turn off the unit (on standby) if you have set the timer with the unit turned on. on-time, then press SET. 3 Press ¡ / ¢ or 4 / 1 to set the minute of the IMPORTANT: If you turn off the unit within 4 minutes before the timer on-time, timer recording will not start. on-time, then press SET. 4 Press ¡ / ¢ or 4 / 1 to set the hour of the off-time, then press SET. 5 Press ¡ / ¢ or 4 / 1 to set the minute of the off-time, then press SET.
Continued 4 Press ¡ / ¢ or 4 / 1 to set the hour of the Using Daily Timer off-time, then press SET. With Daily Timer, you can wake up to your favorite music or radio program. • You can set Daily Timer whether the unit is turned on or off (on standby). • To correct a misentry any time during the process, press CANCEL. • To cancel the setting any time during the process, press CLOCK/TIMER. 5 Press ¡ / ¢ or 4 / 1 to set the minute of the off-time, then press SET.
7 If you have selected “CD” as the source in the above step, select a disc number. Press ¡ / ¢ or 4 / 1 to select the disc number (CD 1, CD 2, or CD 3), then press SET. To turn on or off Daily Timer after its setting is done 1 Press CLOCK/TIMER repeatedly until “DAILY” appears in the main display. CD DAILY IMPORTANT: When selecting a disc number, make sure that a disc is already loaded on the selected disc number tray. If there is no disc on the tray, playback will not start.
Using Sleep Timer To sleep with the Sleep Timer and wake up with the Daily Timer With Sleep Timer, you can fall asleep to your favorite music or radio program. • You can set Sleep Timer when the unit is turned on. The unit turns off when the shut-off time comes (set by Sleep Timer), and turns on when the timer on-time (set by Daily Timer) comes. 1 Set the Daily Timer (see pages 50 and 51). How Sleep Timer actually works The unit automatically turns off after the specified time length passes.
Maintenance To get the best performance of the unit, keep your discs and mechanism clean. General Notes To play new discs In general, you will have the best performance by keeping your discs and the mechanism clean. • Store discs in their cases, and keep them in cabinets or on shelves. • Keep the disc trays closed when not in use. New discs may have some rough spots around the inner and outer edges. If such a disc is used, this unit may reject the disc.
Glossary OPC (Optimum Power Control) OPC is a function that checks the loaded disc and automatically adjusts the laser for optimum recording setting before recording through the Digital Optical Input terminal. PCA (Power Calibration Area) A space reserved at the beginning of a CD-R/CD-RW for calibrating the laser output power required to record on that disc.
Messages Message ALL SKIP TR ALREADY FINAL Signification Solution Skip marks are recorded to all the tracks. Replace the disc. You are trying to erase a track or add a skip mark on a finalized disc. ALREADY UNFIN. You are trying to unfinalize an unfinalized disc. BLANK DISC CANNOT ERASE CANNOT FIN. CANNOT LISTEN Loaded disc is blank. Loaded disc is damaged. Erasure on this disc is impossible. Replace the disc. Loaded disc is damaged. Finalization on this disc is impossible. Replace the disc.
Troubleshooting If you are having a problem with your unit, check this list for a possible solution before calling for service. If you cannot solve the problem from the hints given here, or the unit has been physically damaged, call a qualified person, such as your dealer, for service. Symptom Possible Cause No sound is heard. Unable to record on a CD-R or CDRW. • Connections are incorrect, or loose. • • CD-ROM is loaded. • CD-R or CD-RW has been loaded • upside down.
Specifications Amplifier Output Power (IEC 268-3/DIN): 19 W per channel, min. RMS, both channels driven into 6 Ω at 1 kHz, with no more than 0.9% total harmonic distortion Audio input sensitivity/Impedance (at 1 kHz) Analog input: LINE IN: 125 mV/47 kΩ (at “LEVEL 2”) 500 mV/47 kΩ (at “LEVEL 1”) 1.3 V/47 kΩ (at “LEVEL 3”) Digital input: LINE DIGITAL IN: OPTICAL Signal wave length: 660 nm Input level: –23 dBm to –15 dBm (With the built-in sampling rate converter, corresponding to 32 kHz/ 44.
CD player CD Capacity: 3 CDs Dynamic range: 88 dB Signal-to-noise ratio: 95 dB Wow and flutter: Immeasurable CD Recorder System: Compact disc digital audio recording system Sampling frequency: 44.1 kHz Dynamic range: 91 dB Signal-to-noise ratio: 94 dB Frequency response: 20 Hz to 20 kHz Wow and flutter: Immeasurable General Power requirement: AC 230 V , 50 Hz Power consumption: 70 W (at operation) 1 W (on standby: with Display Off) 3.
VICTOR COMPANY OF JAPAN, LIMITED V J EN CA-NXCDR7R[B]_COVER_f 6 01.7.