MICRO COMPONENT MD SYSTEM UX-Z7MDR —Consists of CA-UXZ7MDR and SP-UXZ7MD TA/News/Info INSTRUCTIONS For Customer Use: Enter below the Model No. and Serial No. which are located either on the rear, bottom or side of the cabinet. Retain this information for future reference. Model No. Serial No. LVT0900-003A [B] UX-Z7MDR[B]Cover_f 1 02.6.
Warnings, Cautions and Others IMPORTANT for the U.K. DO NOT cut off the mains plug from this equipment. If the plug fitted is not suitable for the power points in your home or the cable is too short to reach a power point, then obtain an appropriate safety approved extension lead or consult your dealer. BE SURE to replace the fuse only with an identical approved type, as originally fitted.
CAUTION • Do not block the ventilation openings or holes. (If the ventilation openings or holes are blocked by a newspaper or cloth, etc., the heat may not be able to get out.) • Do not place any naked flame sources, such as lighted candles, on the apparatus. • When discarding batteries, environmental problems must be considered and local rules or laws governing the disposal of these batteries must be followed strictly.
IMPORTANT FOR LASER PRODUCTS REPRODUCTION OF LABELS 1 CLASSIFICATION LABEL ON EXTERIOR SURFACE 2 WARNING LABEL INSIDE THE UNIT CAUTION: Invisible laser radiation when open and interlock failed or defeated. AVOID DIRECT EXPOSURE TO BEAM. (e) ADVARSEL: Usynlig laserstråling ved åbning, når sikkerhedsafbrydere er ude af funktion. Undgå udsættelse for stråling (d) VARNING: Osynlig laserstrålning när denna del är öppnad och spärren är urkopplad. Betrakta ej strålen.
SAFETY INSTRUCTIONS “SOME DOS AND DON’TS ON THE SAFE USE OF EQUIPMENT” This equipment has been designed and manufactured to meet international safety standards but, like any electrical equipment, care must be taken if you are to obtain the best results and safety is to be assured. ✮✮✮✮✮✮✮✮✮✮✮✮✮✮✮✮✮✮✮✮✮✮✮✮✮✮✮✮✮✮✮✮✮✮✮✮✮✮✮✮✮✮✮✮✮✮✮ Do read the operating instructions before you attempt to use the equipment.
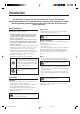
Introduction We would like to thank you for purchasing one of our JVC products. Before operating this unit, read this manual carefully and thoroughly to obtain the best possible performance from your unit, and retain this manual for future reference. About This Manual Power sources This manual is organized as follows: • When unplugging the unit from the wall outlet, always pull the plug, not the AC power cord.
Contents Location of the Buttons .................................. 3 Listening to External Equipment ................ 34 Main Unit ............................................................... 3 Remote Control ...................................................... 5 Listening to External Equipment ......................... 35 Adjusting the Audio Input Level .......................... 35 Getting Started ................................................ 6 Recording .....................................
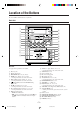
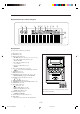
Location of the Buttons Become familiar with the buttons on your unit. Main Unit 1 2 e 3 4 5 6 r t y u 7 p i o ; a q s w d 8 9 f g Main unit See pages in the parentheses for details. 1 2 3 4 5 6 7 8 9 Disc tray (23) Display window (4) REV.MODE button (28, 33, 42, 43) MD 0 (eject) button (11, 27, 29, 60) • Pressing this button also turns on the unit. MD #¥8 (play/pause) button (11, 13, 27) • Pressing this button also turns on the unit.
Display window on the electronic swing panel 1 2 3 45 6 7 8 9 0 - = ~ ! Display window See pages in the parentheses for details.
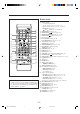
Remote Control t y 1 u i 2 o 3 ; 4 a 5 6 7 s d f g h j TA/News/Info 8 9 p q w e r k l * When using the remote control: For RDS operations, press and hold RDS CONTROL (f) on the remote control while using the buttons—PTY SEARCH (7), TA/News/Info (8), DISPLAY (g), PTY SELECT + (j) and PTY SELECT – (p) buttons.
Getting Started Continued Unpacking To connect an outdoor FM antenna Before connecting it, disconnect the supplied FM antenna. After unpacking, check to be sure that you have all the following items. The number in the parentheses indicates the quantity of the pieces supplied. • • • • Outdoor FM antenna (not supplied) FM antenna (1) AM (MW/LW) loop antenna (1) Remote control (1) Batteries (2) If any is missing, consult your dealer immediately.
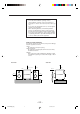
Connecting Speakers AM (MW/LW) antenna To connect speakers 1 You can connect the speakers using the speaker cords. 1 2 2 Vinyl-covered wire (not supplied) 3,4 Speaker terminals Black 3 SPEAKERS Red CAUTION: Black AM (MW/LW) loop antenna (supplied) 1 If cords are covered with insulation, twist the core of the cord at the end of each cord, then remove the insulation. 2 Connect the AM (MW/LW) loop antenna to the AM LOOP terminals as illustrated.
Connecting External Equipment To remove the speaker grilles The speaker grilles are removable as illustrated below: You can connect another equipment which can be used as a playback device. Holes Projections When you connect and use the equipment, refer also to its manual supplied. • DO NOT connect other equipment while the power is on. • DO NOT plug in any equipment until all connections are complete.
Putting the Batteries into the Remote Control NOW, you can plug in the unit and other connected equipment FINALLY! Insert the batteries—R6P(SUM-3)/AA(15F)—into the remote control, by matching the polarity (+ and –) on the batteries with the + and – marking on the battery compartment. When the remote control can no longer operate the unit, replace both batteries at the same time.
Basic and Common Operations The buttons emphasized in the illustration below are used and explained in this section (pages 11 to 15). Remote control TA/News/Info Main unit – 10 – EN10-15UX-Z7MDR[B]f 10 02.6.
Turning On the Power Setting the Auto Power Off When you press one of the source selecting buttons, the unit automatically turns on (and starts playback if the source is ready). Using Auto Power Off function, the unit automatically turns itself off if no sound comes in for more than 3 minutes except when FM or AM (MW/LW) is selected as the source. If any operation is done during this 3-minute period, Auto Power Off is canceled temporarily even though no sound comes in.
Setting the Clock When you unplug the AC power cord or if a power failure occurs The clock loses the setting and is reset to “0:00.” If this happens, set the clock again. You can set the clock whether the unit is turned on or in standby mode. On the remote control ONLY: 1 Press CLOCK/TIMER. To turn off the clock indication (power save mode) “0:00” appears in the main display with the hour digit flashing. Press DISP/CHARA while the unit is in standby mode. “DISPLAY OFF” appears in the main display.
Selecting the Sources and Starting Play Adjusting the Volume To select the tuner or external equipment as the source On the remote control: Press FM/AM/AUX. You can adjust the volume level only while the unit is turned on. • The volume level has no effect on recording. The unit automatically turns on (when the unit is in standby), and the last selected source appears in the main display.
Reinforcing the Bass Sound Selecting the Sound Modes The richness and fullness of the bass sound is clearly maintained regardless of how low you set the volume —Active Hyper Bass Pro. • This effect does not affect recording. You can use this effect only for playback. • This function also effects the sound from headphones. You can select one of the 4 preset sound modes. • This effect does not affect recording. You can use this effect only for playback.
Setting the Display Illumination To create your favorite colors To select the illumination color You can create two favorite colors and store them in memory as “MANUAL1” and “MANUAL2.” • There is a time limit in doing the following steps. If the unit exits from the color adjusting mode before you finish, start from step 1 again. You can select the illumination color by your preference.
Listening to FM and AM (MW/LW) Broadcasts The buttons emphasized in the illustration below are used and explained in this section (pages 17 to 21). Remote control TA/News/Info TA/News/Info You cannot use the buttons on the main unit to operate the RDS functions. Use only buttons on the remote control. Main unit – 16 – EN16-21UX-Z7MDR[B]f 16 02.6.
Tuning in to a Station To change the information shown in the main display 1 Press FM/AM/AUX (or FM/AM on the main unit) to select either “FM” or “AM.” When you press the button for the first time, the unit automatically turns on with the last selected source.
4 Press SET again. Receiving FM Stations with RDS “STORED” appears in the main display for a while. RDS allows FM stations to send an additional signal along with their regular program signals. For example, the stations send their station names, as well as information about what type of program they broadcast, such as sports or music, etc. The tuned station in step 1 is stored in the preset number selected in step 3. • Storing a new station on a used number erases the previously stored one.
2 Press PTY SEARCH. Changing the RDS Information “PTY SELECT” appears in the main display. You can see RDS information on the display while listening to an FM station. 3 Press PTY SELECT + or – to select a PTY code. The PTY code previously selected starts flashing in the main display. On the remote control ONLY: 1 While listening to an FM station, press and hold RDS CONTROL until you finish the following procedure. 2 Press DISPLAY. Ex.: When “News” is selected.
To continue searching after the first stop, press PTY SEARCH again (while holding RDS CONTROL) when the selected PTY code in the main display is flashing. To stop searching any time during the process, press PTY SEARCH (while holding RDS CONTROL) when searching. 4 Press TA/News/Info again. The indication disappears. Now, this function is activated. See “How the Enhanced Other Networks function actually works” below.
Alarm function If an “Alarm!” (Emergency) signal is received from a station while listening to the radio, the unit automatically switches to the station broadcasting the “Alarm!” signal, except when you are listening to non-RDS stations (all AM—MW/LW and some FM stations). Test function The TEST signal is used for testing the “Alarm!” signal. Therefore, it makes the unit work in the same way as the “Alarm!” signal does.
Playing Back CDs (CD-R/CD-RW) The buttons emphasized in the illustration below are used and explained in this section (pages 23 to 25). Remote control TA/News/Info TA/News/Info Main unit – 22 – EN22-25UX-Z7MDR[B]f 22 02.6.
Precautions on CD Playback Playing Back the Entire CD—Normal Play This unit has been designed to play back discs bearing the following logos: 1 Press CD 0 on the main unit. The unit automatically turns on, the electronic swing panel slides downward, then the disc tray comes out. Audio CD CD Recordable (CD-R) Disc tray CD ReWritable (CD-RW) Electronic swing panel In addition to the above discs, this unit can play back audio data recorded on CD Text, CD-G (CD Graphics), and CD-Extra.
Continued Basic CD Operations While playing a disc, you can do the following operations. To stop playback for a moment Press CD 3/8. The CD indicator and the elapsed playing time start flashing on the display. • When the key-touch tone is activated (see page 11), the unit keeps beeping while pausing. To resume playback, press CD 3/8 again. Programing the Playing Order of the Tracks —Program Play You can arrange the order in which the tracks play before you start playing. You can program up to 32 tracks.
4 Press CD 3/8. To check the program contents The tracks are played at random. Random play ends when all the tracks are played once. Before playing, you can check the program contents by pressing ¢ or 4 . • ¢: Shows the programed tracks in the programed order. • 4: Shows them in the reverse order. To skip the current track, press ¢. • You cannot go back to the previous tracks by pressing 4.
Playing Back MDs The buttons emphasized in the illustration below are used and explained in this section (pages 27 to 31). Remote control TA/News/Info TA/News/Info Main unit – 26 – EN26-31UX-Z7MDR[B]f 26 02.6.
Playing Back the Entire MD—Normal Play While the unit is pulling in the MD: • DO NOT press MD 0. • DO NOT close the electronic swing panel by force. 1 Press MD 0 on the main unit. The unit automatically turns on, the electronic swing panel slides upward, then the MD loading slot appears. • If an MD is already in the MD loading slot, it will be ejected. 2 Insert an MD into the MD loading slot. The MD is pulled in, then the electronic swing panel slides downward automatically.
Continued To go to another track About MD indicator Press ¢ or 4 repeatedly. • ¢: Skips to the beginning of the next or succeeding tracks. • 4: Goes back to the beginning of the current or previous tracks. An MD is loaded To go to another track directly using the number buttons During playback During pause To prohibit disc ejection—Disc Lock You can prohibit disc and MD ejection from the unit and can lock the discs.
4 Press the number buttons to select the tracks. • For how to use the number buttons, see “To go to another track directly using the number buttons” on the previous page. PRGM indicator Step No. If you try to program a 33rd step “MEMORY FULL” will appear in the main display. If the total playing time is 150 minutes or more The total playing time will not be shown. (“– – : – –” will appear.) Playing at Random—Random Play The last programed track No.
Playing Tracks in a Group—Group Play To go to another group, press GROUP SKIP or GROUP SKIP repeatedly during Group play. • GROUP SKIP : Skips to the first track in the next or succeeding groups. • GROUP SKIP : Goes back to the first track in the current or previous groups. You can play back tracks in a group. • To make or edit groups, see pages 45 to 53. On the remote control ONLY: 1 Load an MD including a group(s). 2 Press MD 3/8, then 7. To stop during play, press 7. The source is changed to “MD.
Searching for Tracks to Play —MD Title Search 2) Press the character entry button for a character you want to enter. Ex.: • To enter an “A” or “a,” press ABC once. To enter a “B” or “b,” press ABC twice. To enter a “C” or “c,” press ABC three times. • To enter a symbol, press MARK repeatedly until the mark you want appears. • To enter a numeral, press 0 – 9. • To enter a space while entering a title, press twice. • To move the character entry position while entering a title, press or .
Playing Back Tapes The buttons emphasized in the illustration below are used and explained in this section (page 33). Remote control TA/News/Info Main unit – 32 – EN32-35UX-Z7MDR[B]f 32 02.6.
To stop during play, press 7. Playing Back a Tape To fast-wind to the left, press 4. You can play back type I tapes. To fast-wind to the right, press ¢. 1 Push ) (PUSH OPEN). To remove the cassette, push ) (PUSH OPEN). The cassette holder opens. DO NOT push ) (PUSH OPEN) during tape play. ) (PUSH OPEN) To play both sides—Reverse mode You can set the deck to play just one side or both sides of a tape once, or both sides continuously. Press REV.MODE.
Listening to External Equipment The buttons emphasized in the illustration below are used and explained in this section (page 35). Remote control TA/News/Info Main unit – 34 – EN32-35UX-Z7MDR[B]f 34 02.6.
4 Adjust the volume level of the unit to your desired Listening to External Equipment listening level. You can listen to external equipment connected to the AUX/DVD jacks on the rear of the unit. • First make sure that the external equipment is properly connected as follows: DO NOT connect other equipment while the power is on. 5 Apply sound effects, if you wish. • For how to apply sound effects, see page 14.
Recording The buttons emphasized in the illustration below are used and explained in this section (pages 37 to 43). For recording operations, you mainly use the buttons on the main unit. Main unit Remote control TA/News/Info – 36 – EN36-43UX-Z7MDR[B]f 36 02.6.
Before You Start Recording on an MD • It should be noted that it may be unlawful to re-record pre-recorded tapes, records, or discs without the consent of the owner of copyright in the sound or video recording, broadcast or cable programme and in any literary, dramatic, musical, or artistic embodied therein. • When you record onto partially recorded MD, its contents are not erased or overwritten. The recording starts from the point following the last recorded track of the MD.
Stereo Long-Hour Recording (MDLP) On conventional MD recorders, 2 times long-hour recording on MDs has been possible only in monaural sound, but this unit allows for 2 times or 4 times longhour recording without losing stereo sound. With this feature, songs (tracks) can be recorded on a single MD using different recording length modes—SP: Standard Play, LP2: 2 Times Long Play, LP4: 4 Times Long Play. SP: Signifies standard-hour stereo recording.
Setting MD Recording Modes Before recording on MDs, set the recording length mode (SP/LP2/LP4), “LP:”-prefix addition mode, and the group recording mode. On the remote control ONLY: Recording CD onto an MD—CD Synchronized Recording Using the CD synchronized recording method, you can start and stop CD play and MD recording at the same time. 1 Prepare a disc. To set the recording length mode After placing a disc, press CD 3/8, then 7 before going to the next step.
2 Insert a recordable MD into the MD loading slot. To record a single track during play or pause • Set the MD recording length mode, “LP:”-prefix addition mode, and Group recording mode (see “Setting MD Recording Modes” on page 39). On the main unit ONLY: While playing back or pausing a track you want to record, press ONE TOUCH MD REC. The playback of the track is stopped, and the same track starts playing from the beginning again. This time, the MD recorder starts recording the track.
Before You Start Recording on a Tape • It should be noted that it may be unlawful to re-record pre-recorded tapes, records, or discs without the consent of the owner of copyright in the sound or video recording, broadcast or cable programme and in any literary, dramatic, musical, or artistic embodied therein. • The recording level is automatically set correctly, so it is not affected by the volume level.
4 Press ONE TOUCH TAPE REC on the main unit. Recording onto a Tape The recording starts and the REC indicator starts flashing on the display. • When you select a track by pressing ¢ or 4 before pressing ONE TOUCH TAPE REC, recording starts from the selected track (except when Program play mode is selected). • When recording an external equipment, start playback after “AUX = TAPE” appears in the main display. You can use only type I tapes for recording. 1 Prepare the source to record.
Recording CD onto an MD and a Tape —CD Synchronized Recording To record a single track during play or pause On the main unit ONLY: 1 Prepare a disc . While playing back or pausing a track you want to record, press MD&TAPE REC. The playback of the track is stopped, and the same track starts playing from the beginning again. This time, the MD recorder and cassette deck start recording the track. • After the track is recorded, both playback and recording stop automatically.
Editing MDs The buttons emphasized in the illustration below are used and explained in this section (pages 45 to 60). Remote control TA/News/Info Main unit – 44 – EN44-53UX-Z7MDR[B]f 44 02.6.
Guidance—MD Group Functions To add to the conventional MD Editing functions (called the track editing functions in this manual), MD Group functions help you to classify the tracks by making groups on your MD. Classifying the tracks on an MD MDLP enables you to record more tracks on a single MD than usual. So, there are many tracks which have been recorded from the various sources—CDs, FM, and so on—on your MD. Track No.
Introducing Group Editing Functions The groups and tracks can be edited in many ways (Group editing functions and Track editing functions). From this page to page 53, the group editing functions are explained. For details on the track editing functions, see pages 54 to 58. Forming a group (FORM GR): Page 47 This function forms a series of tracks or a single track into a new group. Moving a group (MOVE GR): Page 51 This function moves the selected group by reordering the group and track numbers.
5 Press SET. Forming a Group—FORM GR This function allows you to form a group from a series of tracks which do not belong to the other groups. You can form a group from a single track. Once a new group is formed, the other groups are renumbered. • You can form up to 99 groups on a single MD. • To stop any time during the editing process before step 8, press GROUP TITLE/EDIT. • If the selected first track belongs to another group, “GROUP TRACK” appears in the main display.
5 Press SET. Adding a Track to a Group—ENTRY GR This function allows you to enter a track into a group. The track will be added as the last track in the selected group. The track numbers will be renumbered. • To stop any time during the editing process before step 8, press GROUP TITLE/EDIT. • If the loaded MD has no group, you cannot go to the following steps. • When the selected track belongs to a group, its group number appears in the main display.
5 Press ¢ or 4 to select the track as the dividing Dividing a Group—DIVIDE GR point. The track selected in this step will be the first track in the divided group. • You can select the track using the number buttons. In this case, the selected track starts playback repeatedly. This function allows you to divide one group into two separate groups. You cannot divide the group containing only a single track.
5 Press SET. Joining Two Groups—JOIN GR This function allows you to join two adjacent groups into a single group. When the groups have their own titles, the title of the preceding group is reassigned to the joined group. Once two groups are joined, the other groups are renumbered. • To stop any time during the editing process before step 6, press GROUP TITLE/EDIT. • To cancel the setting, press CANCEL, then repeat from step 4. 6 Press ENTER.
5 Press SET. Moving a Group—MOVE GR This function allows you to move a group. Once a group is moved, the tracks and the other groups are renumbered. • To stop any time during the editing process before step 8, press GROUP TITLE/EDIT. • To cancel the setting, press CANCEL, then repeat from step 4. 6 Press GROUP SKIP On the remote control ONLY: or GROUP SKIP to select the position where you want to move the group.
5 Press SET. Ungrouping Tracks—UNGROUP This function allows you to dissolve a group. You cannot erase the tracks using this function. Once tracks are ungrouped, the other groups are renumbered. • To stop any time during the editing process before step 6, press GROUP TITLE/EDIT. On the remote control ONLY: • To cancel the setting, press CANCEL, then repeat from step 4. 6 Press ENTER.
4 Press GROUP SKIP Erasing Tracks in a Group—ERASE GR or GROUP SKIP select the group you want to erase. This function allows you to erase a group together with tracks in the group. You cannot resume the tracks in the erased group. Once a group is erased, the other tracks and groups are renumbered. • To stop any time during the editing process before step 6, press GROUP TITLE/EDIT. On the remote control ONLY: to Ex.: When group 6 is selected. 5 Press SET.
Introducing Track Editing Functions The groups and tracks can be edited in many ways (Group editing functions and Track editing functions). From this page to page 58, the track editing functions are explained. For details on the group editing functions, see pages 46 to 53. Dividing a track (DIVIDE): Page 55 This function divides a track by adding a track mark(s) in the desired point(s) in the middle or where you want to search for later.
5 Press SET when you find the point where you want Dividing a Track—DIVIDE to divide the track. “POSIT. (position) 0” appears in the main display, and the unit repeats the selected point—a 3-second period following the dividing point. This function allows you to divide one track into two separate tracks. It is useful, for example, when you want to add track marks at a certain point within a track or if you want to separate a recording.
5 Press SET. Joining Two Tracks—JOIN This function allows you to join two adjacent tracks into one track. When the tracks have their own titles, the title of the preceding track is reassigned to the joined track. Once two tracks are joined, the other tracks and/or the groups are renumbered. • To stop any time during the editing process before step 6, press TITLE/EDIT. • To cancel the setting, press CANCEL, then repeat from step 4. 6 Press ENTER.
5 Press SET. Moving a Track—MOVE This function allows you to move a track to the position you prefer. It is useful to change the order of the tracks as you like. Once a track is moved, the tracks and/or the groups are renumbered. • To stop any time during the editing process before step 8, press TITLE/EDIT. On the remote control ONLY: • To cancel the setting, press CANCEL, then repeat from step 4. 6 Press ¢ or 4 to select the position where you want to move the track.
6 Repeat steps 4 and 5 to select all the tracks you want Erasing Tracks—ERASE This function allows you to erase unwanted tracks. You cannot resume the erased tracks. Once tracks are erased, the other tracks and/or groups are renumbered. You can erase up to 15 tracks at a time. • To stop any time during the editing process before step 8, press TITLE/EDIT. On the remote control ONLY: In the following example, the process is explained from the very first—that is, inserting a disc.
3 Press Assigning Titles to an MD or to change the title entry mode. • Each time you press the button, the title entry mode changes as follows: For the disc and track title: You can assign a name to each MD, to each group and to each track using alphabetic characters (uppercase and lowercase), symbols and numerals. Once a title is assigned, it is displayed for your confirmation. • You cannot edit titles composed of more than 64 characters.
3) Repeat steps 5 – 1) and 5 – 2) to enter other characters. • If the character you want to enter next is assigned to the same button you have just pressed in step 5 – 2), press once to move the character entry position to the right. • The main display can only show 6 characters at a time. If you enter the 7th character, the first character disappears, and so on. • During CD Synchronized Recording (see page 39): You can assign the disc title, and 16 track titles one after another as recording goes on.
Using the Timers The buttons emphasized in the illustration below are used and explained in this section (pages 62 to 65). Remote control TA/News/Info Main unit – 61 – EN61-65UX-Z7MDR[B]f 61 02.6.
Continued There are three timers available—Recording Timer, Daily Timer and Sleep Timer. 3 Select the source to record. 1) Press ¢ or 4 repeatedly to select the source. • Each time you press the button, the source changes as follows: • Before using these timers, make sure the built-in clock is set correctly (see page 12). • When using the tuner as the source, preset stations in advance (see page 17). AUX • When you select “FM” or “AM,” press SET, then select a preset number by pressing ¢ or 4.
6 Set the timer-off time. Using Daily Timer 1) Press ¢ or 4 repeatedly to adjust the hour. You can adjust the hour using the number buttons. 2) Press SET. The minute digit starts flashing. 3) Press ¢ or 4 repeatedly to adjust the minute. You can adjust the minute using the number buttons. With Daily Timer, you can wake up to your favorite music or radio program. • You can set Daily Timer whether the unit is turned on or in standby mode.
3 Select the source to play back. 6 Adjust the volume level. 1) Press ¢ or 4 repeatedly to select the source. • Each time you press the button, the source changes as follows: FM AM AUX TAPE 1) Press ¢ or 4 repeatedly to adjust the volume level. • You can adjust the volume level to “– –” or within the range of 0 (silent) to 40 (maximum). • When you select “VOLUME – –,” the volume is set to the current volume level. CD MD • You can also use the source selecting buttons.
Using Sleep Timer To sleep with the Sleep Timer and wake up with the Daily Timer With Sleep Timer, you can fall asleep to your favorite music. • You can set Sleep Timer when the unit is turned on. The unit turns off when the shut-off time comes (set by the Sleep Timer), and turns on when the timer-on time (set by the Daily Timer) comes. How Sleep Timer actually works 1 2 The unit automatically turns off after the specified time length passes. Set the Daily Timer as explained on pages 63 and 64.
Maintenance To get the best performance of the unit, keep your discs, tapes and mechanism clean. Handling MDs General Notes • Do not open the shutter. - The shutter is locked so that it will not open. Trying to force it open will break the MD. If the shutter opens accidentally, close it again quickly without touching the MD inside. In general, you will have the best performance by keeping your CDs, MDs and the mechanism clean. • Store CDs and MDs in their cases, and keep them in cabinets or on shelves.
Additional Information MD Disc Types There are two types of MDs: Premastered (prerecorded) and Recordable (blank). Premastered MDs Premastered MDs, which have been recorded at music studio, can be played back like regular CDs. On an MD of this type, data is recorded as the presence or absence of tiny pits. A laser beam focuses on the pits on the surface of the MD and reflects the detection back to the lens in the MD recorder. The MD recorder then decodes the signals and plays them back as music.
SCMS (Serial Copy Management System) The MD recorder integrated to this unit uses the Serial Copy Management System which allows only first-generation digital copies to be made of premastered software (like CDs or prerecorded MDs). 1st Generation ABCDEFG 2nd Generation ABCDEFG CD CD-R/RW HCMS (High-speed Copy Management System) Now onto recordable MDs (minidiscs), you can record (copy) sound at a recording speed exceeding the normal speed.
CD/MD Messages For CD: Message Signification Solution You are trying to play back a CD which Change the CD. cannot be played or there is a problem with the CD. • No disc is on the disc tray. • Place a disc on the disc tray. • You are trying to play back a • This is not a malfunction. You can CD-R/RW which has not been play back “finalized” CD-R/RWs. “finalized.” CANNOT PLAY CD NO DISC You are trying to record a CD onto an MD and a tape at the same time using x2 or x4 speed recording.
Message EMERGENCY STOP Signification A malfunction has occurred during recording. Solution Stop playback, and eject the MD and re-insert it. You are trying to form over 99 groups. This is not a malfunction. There can be up to 99 groups on an MD. GROUP TRACK You are trying to make a group by including a track which belongs to another group. This is not a malfunction. (See “Forming a Group—FORM GR” on page 47.
Troubleshooting If you are having a problem with your unit, check this list for a possible solution before calling for service. If you cannot solve the problem from the hints given here, or the unit has been physically damaged, call a qualified person, such as your dealer, for service. Symptom No sound is heard from the speakers. Unable to record on an MD. Poor radio reception. Possible Cause • Connections are incorrect or loose. • • A pair of headphones is connected.
Specifications Amplifier Section—CA-UXZ7MDR Design and specifications are subject to change without notice. 46 W (23 W + 23 W) at 4 Ω (MAX.) 40 W (20 W + 20 W) at 4 Ω (10 % THD) Audio input sensitivity/Impedance (at 1 kHz) AUX/DVD: 400 mV/47 kΩ (at “LEVEL 1”) 200 mV/47 kΩ (at “LEVEL 2”) Output Power (IEC 268-3/DIN): Speaker Terminals: 4 Ω – 16 Ω Tuner FM tuning range: AM (MW/LW) tuning range: 87.50 MHz—108.
VICTOR COMPANY OF JAPAN, LIMITED V EN UX-Z7MDR[B]Cover_f J 2 02.6.