Cover.
warning.fm Page 1 Monday, February 28, 2005 11:38 AM Warnings, Cautions and Others IMPORTANT for the U.K. DO NOT cut off the mains plug from this equipment. If the plug fitted is not suitable for the power points in your home or the cable is too short to reach a power point, then obtain an appropriate safety approved extension lead or consult your dealer. BE SURE to replace the fuse only with an identical approved type, as originally fitted.
warning.fm Page 2 Monday, February 28, 2005 11:38 AM SAFETY INSTRUCTIONS “SOME DOS AND DON’TS ON THE SAFE USE OF EQUIPMENT” This equipment has been disigned and manufactured to meet international safety standards but, like any electrical equipment, care must be taken if you are to obtain the best results and safety is to be assured. ✮✮✮✮✮✮✮✮✮✮✮✮✮✮✮✮✮✮✮✮✮✮✮✮✮✮✮✮✮✮✮✮✮✮✮✮✮✮✮✮✮✮✮✮✮✮✮ Do read the operating instructions before you attempt to use the equipment.
LVT1346-001A_E.book Page 1 Friday, April 8, 2005 9:41 AM English Introduction Thank you for purchasing the JVC Compact Component System. We hope it will be a valued addition to your home, giving you years of enjoyment. Be sure to read this instruction manual carefully before operating your new stereo system. In it you will find all the information you need to set up and use the system. If you have a query that is not answered by the manual, please contact your dealer.
LVT1346-001A_E.book Page 2 Friday, April 8, 2005 9:41 AM English Table of Contents Introduction ...................................................................................................................1 Features.................................................................................................................................................... 1 How This Manual Is Organized..............................................................................................................
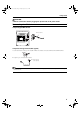
LVT1346-001A_E.book Page 3 Friday, April 8, 2005 9:41 AM English Getting Started Accessories Make sure that you have all of the following items, which are supplied with the System. AM (MW) Loop Antenna (1) FM Wire Antenna (1) Remote Control (1) Batteries (2) If any of these items are missing, contact your dealer immediately. How To Put Batteries In the Remote Control Match the polarity (+ and –) on the batteries with the + and – markings in the battery compartment.
LVT1346-001A_E.book Page 4 Friday, April 8, 2005 9:41 AM English Getting Started CAUTION: • Make all connections before plugging the System into an AC power outlet. Connecting the FM Antenna Using the Supplied Wire Antenna FM wire antenna Using the Coaxial Type Connector (Not supplied) A 75-ohm antenna with coaxial type connector (IEC or DIN45 325) should be connected to the FM 75-ohm COAXIAL terminal. If reception is poor, connect the outdoor antenna.
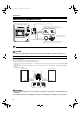
LVT1346-001A_E.book Page 5 Friday, April 8, 2005 9:41 AM English Getting Started Connecting the AM (MW) Antenna Rear Panel of the Unit AM (MW) antenna wire (not supplied) If reception is poor, connect the outside antenna. Turn the loop until you have the best reception. AM (MW) loop antenna (Supplied) Attach the AM (MW) loop to its base by snapping the tabs on the loop into the slot in the base. • Even when connecting an outside AM (MW) antenna, keep the indoor AM (MW) loop connected.
LVT1346-001A_E.book Page 6 Friday, April 8, 2005 9:41 AM Connecting External Equipment Connect a signal cord with stereo mini plugs (not supplied) between the System’s AUX IN jack on the front panel and the audio output jack or output terminals of the external portable CD, MD player, STB, etc. You can then listen to the external source through the System. White Signal cord (not supplied) Lch To audio output of external equipment.
LVT1346-001A_E.book Page 7 Friday, April 8, 2005 9:41 AM English Basic Operations ) STANDBY/ON Numeric keys ACTIVE BASS EX. SOUND MODE Display (STANDBY/ON) ECO VOLUME STANDBY indicator PHONES FADE MUTING ACTIVE BASS EX. VOLUME +, – SOUND MODE Various information Sound Mode indicator ACTIVE BASS EX. indicator Level bar Status bar (Indicates various statuses.) * When the System is in use, the display shows other items as well.
LVT1346-001A_E.book Page 8 Friday, April 8, 2005 9:41 AM For private listening Connect a pair of headphones to the PHONES jack. No sound comes out of the speakers. Be sure to turn down the volume before connecting or putting on headphones. Fade-out Muting (FADE MUTING) Entering the Number with the Remote Control (Numeric Keys) You will use the number keys on the Remote Control to enter numbers for presetting stations, recalling the preset stations, or programming the playing tracks on CDs.
LVT1346-001A_E.book Page 9 Friday, April 8, 2005 9:41 AM English Using the Tuner Numeric keys FM/AM FM MODE 4 ¢ 22 Á FM/AM SET/DISPLAY RDS MODE RDS DISPLAY SELECT Band display, Frequency display, Preset number FM mode indicators * When the System is in use, the display shows other items as well. For simplicity, we show here only the items described in this section. You can listen to FM and AM (MW) stations. Stations can be tuned in manually, automatically, or from preset memory storage.
LVT1346-001A_E.book Page 10 Friday, April 8, 2005 9:41 AM CAUTION: • In AM (MW) broadcast, reception sensitivity will be changed by turning the AM (MW) loop antenna. Turn the AM (MW) loop antenna for best reception. • Even if the System is unplugged or if the power failure occurs, the preset stations will be stored for a few days. However, in case the preset stations are erased, you will need to preset the stations again.
LVT1346-001A_E.book Page 11 Friday, April 8, 2005 9:41 AM English Using the Tuner Receiving FM Stations with RDS You can use the RDS (Radio Data System) by using the buttons on the Remote Control. RDS allows FM stations to send additional signals with their regular program signals. For example, the stations send their station names, and information about what type of program they broadcast, such as sports or music, etc.
LVT1346-001A_E.book Page 12 Friday, April 8, 2005 9:41 AM PHONE IN: Programs where people can express their views either by phone or in a public form TRAVEL: Programs about travel destinations, package tours, and travel ideas and opportunities LEISURE: Programs concerned with recreational activities such as gardening, cooking, fishing, etc.
LVT1346-001A_E.book Page 13 Friday, April 8, 2005 9:41 AM English Using the CD Player Numeric keys CD Open/ Close 0 DISC SKIP CD1-CD3 MP3 7 4/1 ¢/Á CD1-CD3 CD 6 ¢ 4 Á 22 CD 6 CANCEL/DEMO SET/DISPLAY 7 REPEAT PROGRAM /RANDOM Track number, Playing time, Program number, etc. Program indicator Disc indicators Repeat indicator Random indicator MP3 indicator * When the System is in use, the display shows other items as well. For simplicity, we show here only the items described in this section.
LVT1346-001A_E.book Page 14 Friday, April 8, 2005 9:41 AM About Disc Indicator: English Using the CD Player To Unload CDs Selected Disc indicator Disc Number indicator Take out the CD as shown below. 1 While the CD Player is stopped, press the CD Open/Close 0 button on the Unit to open the tray. 2 Remove the CD, then press the DISC SKIP button on the Unit. Disc Rotation indicator The Disc indicator consists of the following three kinds of indicators: Disc Number indicator: Lights all the time.
LVT1346-001A_E.book Page 15 Friday, April 8, 2005 9:41 AM English Using the CD Player Basics of Using the CD PlayerNormal Play For MP3 disc Total track number To Play CDs 1 2 Load CDs. Press CD 6 button to play. The currently selected disc number (e.g. “CD DISC 1”) appears on the display. The first track of the selected CD begins playing. When the first CD finishes playing, the next and the third CDs are continuously played back.
LVT1346-001A_E.book Page 16 Friday, April 8, 2005 9:41 AM Programming the Playing Order of the Tracks You can program the playing order of the tracks on all the CDs. Note that you can only make a program when the CD Player is stopped. ❏ You can program up to 32 tracks in any desired order including the same tracks. For MP3 discs • If you try to select a MP3 disc that has once been read or played, “MP3 DISC” appears on the display and it can not be programmed.
LVT1346-001A_E.book Page 17 Friday, April 8, 2005 9:41 AM English Using the CD Player Random Play Tray Lock Function The tracks of the selected CD will play in no special order when you use this mode. In order to safely keep the CD in the CD Player, the tray can be electronically locked. 1 In Stop mode, set the CD Player in Random Play mode. On the Remote Control ONLY Press the PROGRAM/RANDOM button until the “RANDOM” indicator lights up.
LVT1346-001A_E.book Page 18 Friday, April 8, 2005 9:41 AM English Using the Cassette Deck (Listening to a Tape) Á 22 TAPE A 3 4/1 7 TAPE B 3 0 PUSH OPEN (Deck B) ¢/Á 7 0 PUSH OPEN (Deck A) TAPE B 3 TAPE A 3 3: Tape indicator Deck indicators * When the System is in use, the display shows other items as well. For simplicity, we show here only the items described in this section. The Cassette Deck allows you to play, record, and dub audio tapes.
LVT1346-001A_E.book Page 19 Friday, April 8, 2005 9:41 AM English Using the Cassette Deck (Recording) TAPE A 3 7 TAPE B 3 7 PROGRAM /RANDOM REC START/STOP 0 PUSH OPEN (Deck A) CD REC START TAPE B 3 TAPE A 3 0 PUSH OPEN (Deck B) DUBBING Deck indicators REC indicator 3: Tape indicator * When the System is in use, the display shows other items as well. For simplicity, we show here only the items described in this section. Recording onto a cassette from any of the sound sources is simple.
LVT1346-001A_E.book Page 20 Friday, April 8, 2005 9:41 AM Standard Recording CD Synchro Recording This is the basic method for recording any source. The System also has special ways for recording CD to tape, and tape to tape, which save you time and effort, as well as give you some special effects.
LVT1346-001A_E.book Page 21 Friday, April 8, 2005 9:41 AM English Using an External Equipment AUX AUX IN AUX Listening to the External Equipment You can listen to the external equipment such as MD recorder, cassette deck, or other auxiliary. ❏ First, make sure that the external equipment is properly connected to the System. (See page 6.) 1 Set the volume level to the minimum position. 2 Press the AUX button. “AUX IN” appears on the display. 3 4 Start playing the external equipment.
LVT1346-001A_E.book Page 22 Friday, April 8, 2005 9:41 AM English Using the Timers SLEEP 4 ¢ SET/DISPLAY CLOCK TIMER SLEEP indicator Timer indicator DAILY Timer indicator REC (Recording) Timer indicator * When the System is in use, the display shows other items as well. For simplicity, we show here only the items described in this section. Three types of timers are available: DAILY Timer Use this timer to set wake up everyday to music from any source, instead of an alarm clock.
LVT1346-001A_E.book Page 23 Friday, April 8, 2005 9:41 AM English Using the Timers 2. Press the ¢ or 4 button to set the minute, then press the SET/DISPLAY button. Setting the Daily Timer Once you have set the Daily Timer, the timer will be activated at the same time every day. The Timer indicator ( ) and “DAILY” indicator on the display shows that the Daily Timer you have set is in effect. You can set the Daily Timer whether the System is turned on or off.
LVT1346-001A_E.book Page 24 Friday, April 8, 2005 9:41 AM Preparation for each music source: Perform the following operation according to the music source you have selected. Then, the System enters Volume Setting mode. When selecting TUNER FM or TUNER AM: Press the ¢ or 4 button to select the preset station number, then press the SET/DISPLAY button. When selecting CD : Press the ¢ or 4 button to select the disc number, then press the SET/DISPLAY button.
LVT1346-001A_E.book Page 25 Friday, April 8, 2005 9:41 AM English Using the Timers Using the Unit You can set the time in the same way as for setting the Daily Timer. 8 Press the STANDBY/ON button to turn off the System, if necessary. 1 Insert a blank or erasable tape into the Deck B and wind past the tape leader. The Timer indicator ( ) and “REC” indicator are lit on the display, showing that the REC Timer is set to on.
LVT1346-001A_E.book Page 26 Friday, April 8, 2005 9:41 AM Setting the SLEEP Timer Timer Priority Use the Sleep Timer to turn the System off after a certain number of minutes when it is playing. By setting the Sleep Timer, you can fall asleep to music and know that your System will turn off by itself rather than play all night. • You can only set the Sleep Timer when the System is on. Since REC Timer and DAILY Timer can be set independently, you may wonder what happens if the settings overlap.
LVT1346-001A_E.book Page 27 Friday, April 8, 2005 9:41 AM English Care And Maintenance Handle your CDs and tapes carefully, and they will last a long time. Cassette Tapes • If the tape is loose in its cassette, take up the slack by inserting a pencil in one of the reels and rotating. • If the tape is loose, it may get stretched, cut, or caught in the cassette. Compact Discs • Remove the CD from its case by holding it at the edges while pressing the case’s center hole lightly.
LVT1346-001A_E.book Page 28 Friday, April 8, 2005 9:41 AM • If you are having a problem with your System, check this list for a possible solution before calling for service. • If you cannot solve the problem from the hints given here, or the System has been physically damaged, call a qualified person, such as your dealer, for service. Symptom Possible Cause Action No sound is heard. • Connections are incorrect, or loose. • Headphones are connected. • Check all connections and make corrections.
Back cover.
INSTRUCTIONS SPEAKER SYSTEM SP-MXKC2 BEDIENUNGSANLEITUNG: LAUTSPRECHERSYSTEM MANUEL D’INSTRUCTIONS: SYSTEME DES ENCEINTES GEBRUIKSAANWIJZING: LUIDSPREKERSYSTEEM MANUAL DE INSTRUCCIONES: SISTEMA DE ALTAVOCES ISTRUZIONI: SISTEMA DI ALTOPARLANTI BRUKSANVISNING: HÖGTALARSYSTEM VEJLEDNING: HØJTTALERSYSTEM KÄYTTÖOHJE: KAIUTINJÄRJESTELMÄ Thank you for purchasing JVC speakers. Before you begin using them, please read the instructions carefully to be sure you get the best possible performance.
Precautions Connection/Anschluß/Raccordement/Aansluiting Conexión/Collegamento/Ansluiting/Tilslutning/Liitäntä Right speaker Rechter Lautsprecher Enceinte de droite Rechter spreker Altavoz derecho Altoparlante destro Höger högtalare Højre højttaler Oikea kaiutin Before connecting: • Make sure to match the polarity (ª and ·) when connecting the speaker cords. • Turn off the power to the amplifier before connecting the speaker system; otherwise, the speakers may be damaged.
Vorsichtsmaßnahmen Précautions Vor dem Anschließen: • Beim Anschließen der Lautsprecherkabel sicherstellen, dass die Polung (ª und ·) stimmt. • Schalten Sie die Stromversorgung des Verstärkers ab, bevor Sie das Lautsprechersystem anschließen, da die Lautsprecher sonst beschädigt werden können. • Jeder Lautsprecher hat eine Impedanz von 6 Ω. Wenn dies nicht mit dem auf dem Verstärker angegebenen Impedanzbereich der Lautsprecher übereinstimmt, können Sie dieses System an diesen Verstärker nicht anschließen.
Voorzorgen Precauciones Alvorens aan te sluiten: • Sluit de luidsprekersnoeren met de juiste polariteit (ª en ·) aan. • Schakel de stroom van de versterker geheel uit alvorens het luidsprekersysteem aan te sluiten; de luidsprekers worden anders mogelijk beschadigd. • De impedantie van iedere luidspreker is 6 Ω. U kunt dit systeem niet met de versterker verbinden indien deze impedantie niet overeenkomt met de op de versterker gespecificeerde impedantie. • Het maximale vermogen van de SP-MXKC2 is 50 W.
Precauzioni Försiktighetsåtgärder Prima del collegamento: • Verificare che i simboli di polarità (ª e ·) corrispondano. • Per evitare di danneggiare i diffusori, prima di collegare il sistema di diffusori spegnere l’amplificatore. • Ciascun diffusore ha un’impedenza di 6 Ω. Se non corrisponde alla gamma di impedenza del diffusore indicata sull’amplificatore, non è possibile collegare il sistema all’amplificatore. • La capacità massima di gestione di energia di SP-MXKC2 è di 50 W.
Forholdsregler Varotoimia Før tilslutning: • Sørg for at matche polariteten (ª og ·), når højttalerledningerne tilsluttes. • Sluk for strømmen til forstærkeren før højttalersystemet tilsluttes, ellers kan højttalerne blive beskadiget. • Hver højttalers impedans er på 6 Ω. Hvis denne impedans ikke passer til højttalerens impedansområde som angivet på forstærkeren, kan dette system ikke sættes til forstærkeren. • SP-MXKC2 kan maksimalt håndtere 50 W.